SpringBoot2.x入门:使用CommandLineRunner钩子接口
前提
这篇文章是《SpringBoot2.x入门》专辑的第6篇文章,使用的SpringBoot版本为2.3.1.RELEASE,JDK版本为1.8。
这篇文章主要简单聊聊钩子接口CommandLineRunner和ApplicationRunner,下文有时候统称两者为Runner。
Runner的回调时机
参考org.springframework.boot.SpringApplication#run()方法的源码,可以知道CommandLineRunner和ApplicationRunner的回调时机:
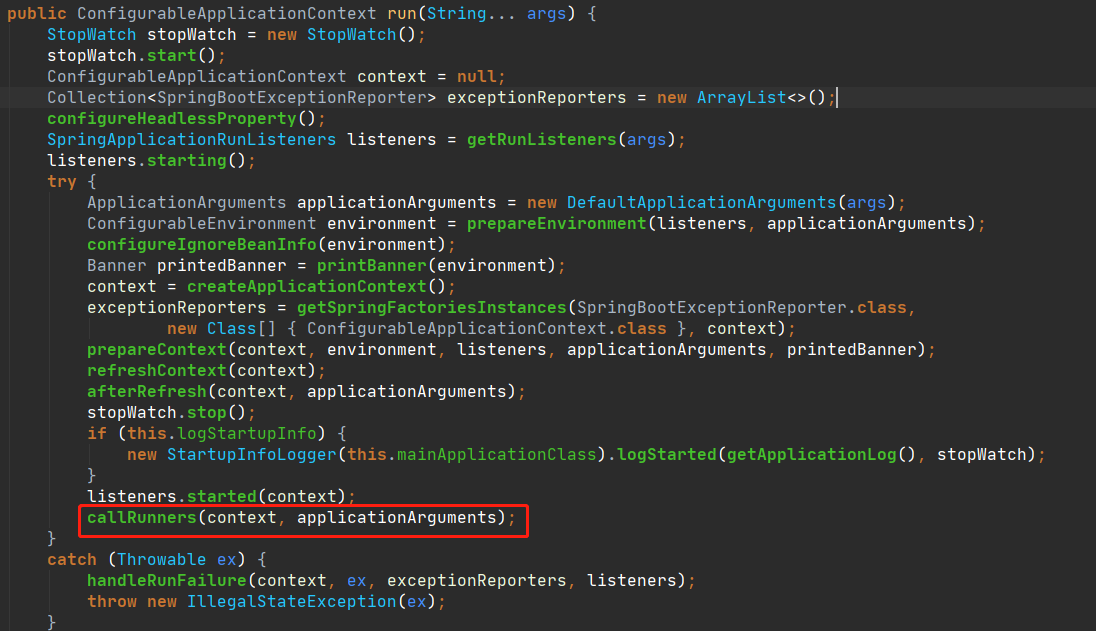
在所有的CommandLineRunner和ApplicationRunner回调之前,下面的步骤已经确保执行完毕:
Environment内置变量的创建和属性填充已经完成。Banner已经打印完毕。ApplicationContext和BeanFactory创建完成,并且完成了上下文刷新(refreshContext),意味着所有单例的Bean完成了初始化以及属性装配。Servlet容器启动成功,如内置的Tomcat、Jetty容器已经正常启动,可以正常接收请求和处理。- 启动信息完成打印,一般会看到日志输出类似
Started OrderExportApplication in XXX seconds (JVM running for YYY)。
也就是CommandLineRunner或者ApplicationRunner回调的时候,可以使用所有上下文中存在的单例Bean和Environment内置变量中已经存在的属性值,所以很多时候demo项目都会在CommandLineRunner或者ApplicationRunner中进行操作。
Runner的简单使用
CommandLineRunner和ApplicationRunner没有本质区别,唯一的区别在:CommandLineRunner#run()接收来自于main方法的参数,类型是字符串数组(不定字符串数组),而ApplicationRunner#run()接收ApplicationArguments类型的参数,对应的实现类是DefaultApplicationArguments。
可以直接把注解@Component应用在CommandLineRunner或者ApplicationRunner的实现类上,相对于把对应的实现单例添加到Spring上下文中。例如:
@Slf4j
@Component
public class CustomCommandLineRunner implements CommandLineRunner {

    @Override
    public void run(String... args) throws Exception {
        log.info("CustomCommandLineRunner runs...");
    }
}
也可以通过@Bean注解,直接作用于CommandLineRunner的匿名类对应的方法上,例如:
@Slf4j
@Configuration
public class CommandLineRunners {

    @Bean
    public CommandLineRunner commandLineRunner(){
        return args -> log.info("CommandLineRunners commandLineRunner");
    }
}
或者直接在启动类实现CommandLineRunner接口(这种方式不推荐使用):
@Slf4j
@SpringBootApplication
public class Ch5Application implements CommandLineRunner {

    public static void main(String[] args) {
        SpringApplication.run(Ch5Application.class, args);
    }

    @Override
    public void run(String... args) throws Exception {
        log.info("Ch5Application CommandLineRunner runs...");
    }
}
此外,可以通过实现org.springframework.core.Ordered接口或者@Order注解定义Runner回调的顺序,指定的顺序数越小,优先级越高。
Runner的使用场景
这一小节是根据个人的编程习惯提出的建议。Runner钩子接口回调的时候如果抛出异常,会直接导致应用进程退出,所以如果在Runner回调方法中一定要注意异常的捕获和处理。基于这个特性,结合前面分析Runner接口的回调时机,它适用的主要场景有:
- 打印日志用于标识服务启动成功或者标识某些属性加载成功。
- 设置属性值或者启动组件,例如开启某些组件的开关、一些应用级别缓存的加载、启动定时任务等等。
- 预加载数据(更常见于一些测试场景中,可以结合
@Profile注解使用,指定特定的profile才生效)。 - 需要使用
main方法的入参。
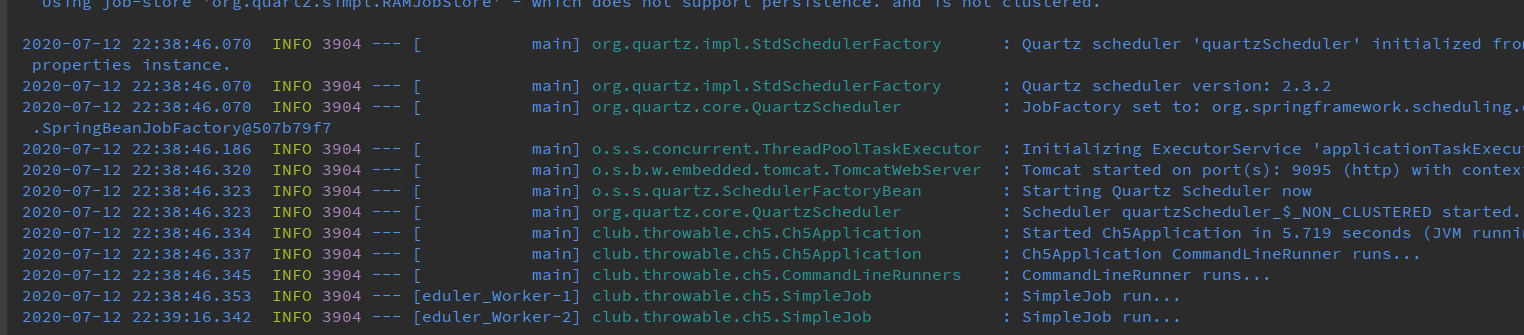
下面使用CommandLineRunner启动所有Quartz中的Job(记得先引入依赖spring-boot-starter-quartz以及quartz),为了简单起见调度器使用内存态:
@Slf4j
@DisallowConcurrentExecution
public class SimpleJob extends QuartzJobBean {

    @Override
    protected void executeInternal(JobExecutionContext context) throws JobExecutionException {
        log.info("SimpleJob run...");
    }
}

@Component
public class QuartzCommandLineRunner implements CommandLineRunner {

    @Autowired
    private Scheduler scheduler;

    @Override
    public void run(String... args) throws Exception {
        JobDetail job = JobBuilder.newJob(SimpleJob.class).storeDurably().withIdentity(JobKey.jobKey("SimpleJob")).build();
        // 30秒执行一次
        Trigger trigger = TriggerBuilder.newTrigger()
                .withSchedule(SimpleScheduleBuilder.simpleSchedule().repeatForever().withIntervalInSeconds(30))
                .forJob(job).build();
        scheduler.scheduleJob(job, trigger);
    }
}
启动应用后,日志如下:
小结
本文demo项目仓库:
(本文完 c-2-d e-a-20200712)
技术公众号《Throwable文摘》(id:throwable-doge),不定期推送笔者原创技术文章(绝不抄袭或者转载):
![]()

 浙公网安备 33010602011771号