将 XMind 测试用例转换为 CSV 文件导入测试管理平台
在日常的软件测试工作中,我们常常使用 XMind 来整理测试用例。XMind 的可视化结构让用例层次清晰、逻辑直观,但当我们需要将这些用例导入到测试管理平台(如 TestRail、禅道、Jira 等)时,就需要把它们转换成 CSV 文件。本文就分享一个简单易行的方法。
为什么需要转换
- 批量导入:测试管理平台通常支持 CSV 批量导入,避免重复手动录入。
- 结构清晰:XMind 中的测试用例按模块、功能、子功能组织,转换成 CSV 后便于统一管理。
- 提高效率:特别是面对上百条用例时,自动化转换节省大量时间。
说明
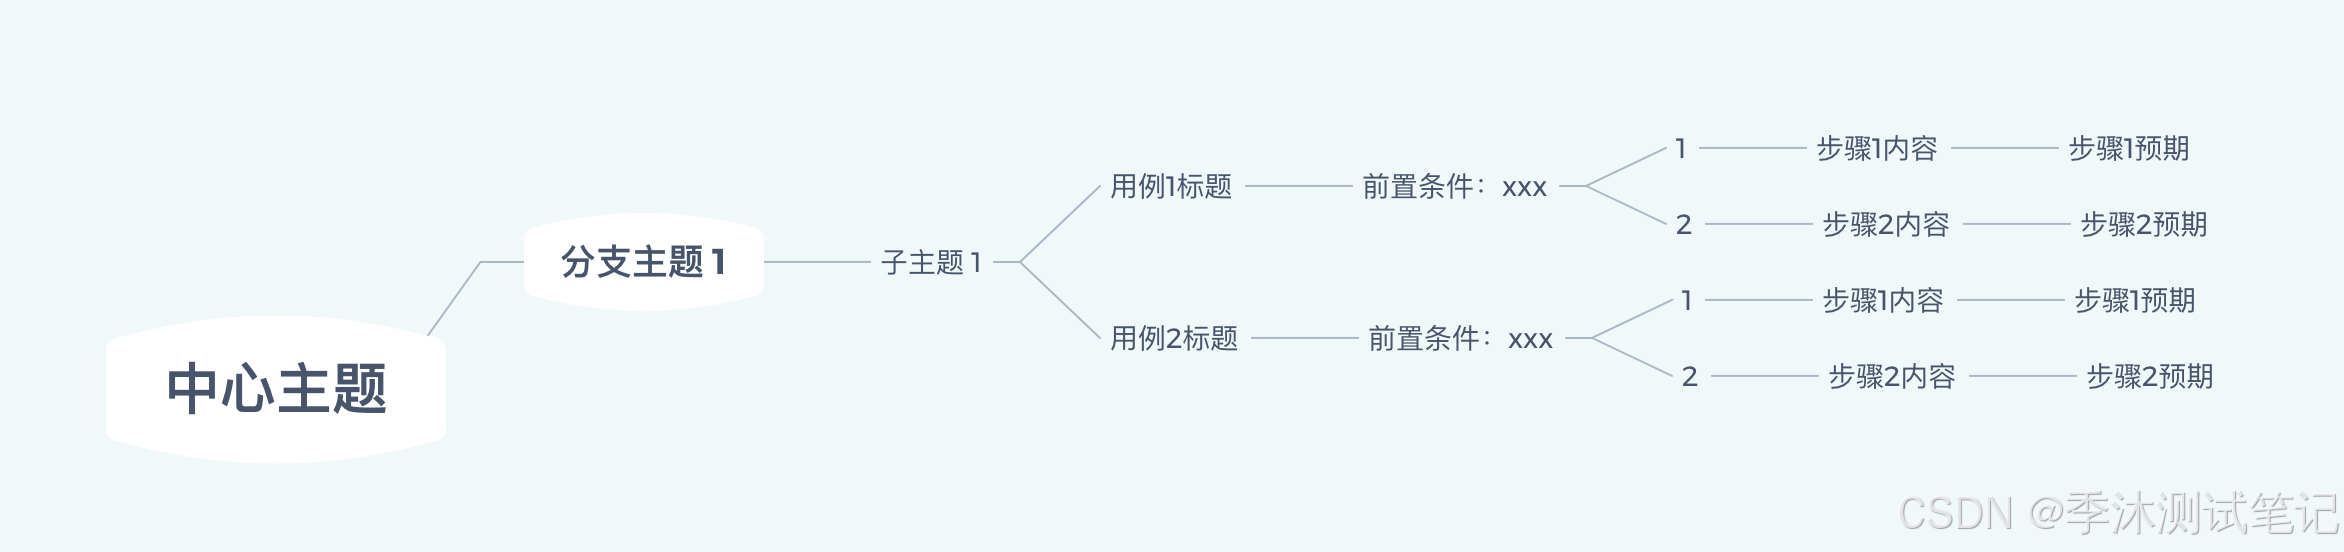
这里我用到的xminf版本是图中这个,其他版本自测

准备工作
- XMind 文件:确保你的测试用例已经整理好,最好按照模块-功能-用例步骤的层级结构。
操作步骤
1. XMind文件格式
目前脚本按这个格式处理的,可以根据自己的需求部分代码
2. 编写转换脚本
用 Java 可以快速把文本解析成 CSV,例如:
import com.fasterxml.jackson.databind.JsonNode;
import com.fasterxml.jackson.databind.ObjectMapper;
import com.opencsv.CSVWriter;
import java.io.FileNotFoundException;
import java.io.FileWriter;
import java.io.IOException;
import java.io.InputStream;
import java.nio.file.Path;
import java.nio.file.Paths;
import java.util.ArrayList;
import java.util.Enumeration;
import java.util.List;
import java.util.Scanner;
import java.util.concurrent.atomic.AtomicReference;
import java.util.zip.ZipEntry;
import java.util.zip.ZipFile;


public class XmindToCsvConverter {
    public static void main(String[] args) throws Exception {
        // XMind 文件路径
        String xmindFile = "/Users/xx.xmind";
        convertXmindToCsv(xmindFile);
    }

    public static void convertXmindToCsv(String xmindFile) throws Exception {
        // 1. 解压 XMind 并读取 content.json
        String jsonContent = extractJsonFromXmind(xmindFile);
        ObjectMapper objectMapper = new ObjectMapper();
        JsonNode rootNode = objectMapper.readTree(jsonContent);

        // 获取根节点的名称,作为 CSV 文件名
        String rootTitle = rootNode.get(0).get("rootTopic").get("title").asText();

        // 确定 CSV 文件路径(与 XMind 文件同目录)
        Path xmindPath = Paths.get(xmindFile);
        // 获取 XMind 所在目录
        String outputDir = xmindPath.getParent().toString();
        // 生成 CSV 文件路径
        String outputCsv = outputDir + "/用例csv/" + rootTitle + ".csv";

        System.out.println("CSV文件名: " + outputCsv);

        // 2. 解析 JSON 生成测试用例
        List<String[]> testCases = new ArrayList<>();
        // CSV 表头
        testCases.add(new String[]{"模块", "用例标题", "前置条件", "步骤ID", "步骤", "预期结果"});

        // 变量存储上一个节点信息
        AtomicReference<String> lastModule = new AtomicReference<>("");
        AtomicReference<String> lastCaseTitle = new AtomicReference<>("");
        AtomicReference<String> lastPrecondition = new AtomicReference<>("");
        AtomicReference<Boolean> isFirstStep = new AtomicReference<>(true);

        // 遍历 XMind 结构
        for (JsonNode sheet : rootNode) {
            traverseNode(sheet.get("rootTopic"), new ArrayList<>(), testCases, lastModule, lastCaseTitle, lastPrecondition, isFirstStep);
        }

        // 3. 保存到 CSV 文件
        try (CSVWriter writer = new CSVWriter(new FileWriter(outputCsv))) {
            writer.writeAll(testCases);
        }

        System.out.println("转换完成: " + outputCsv);
    }

    private static String extractJsonFromXmind(String xmindFile) throws IOException {
        try (ZipFile zipFile = new ZipFile(xmindFile)) {
            for (Enumeration<? extends ZipEntry> entries = zipFile.entries(); entries.hasMoreElements(); ) {
                ZipEntry entry = entries.nextElement();
                if (entry.getName().endsWith("content.json")) {
                    try (InputStream is = zipFile.getInputStream(entry);
                         Scanner scanner = new Scanner(is, "UTF-8")) {
                        return scanner.useDelimiter("\\A").next();
                    }
                }
            }
        }
        throw new FileNotFoundException("content.json not found in XMind file");
    }

    private static void traverseNode(JsonNode node, List<String> path, List<String[]> testCases, AtomicReference<String> lastModule, AtomicReference<String> lastCaseTitle, AtomicReference<String> lastPrecondition, AtomicReference<Boolean> isFirstStep) {
        if (node == null || !node.has("title")) return;
        List<String> newPath = new ArrayList<>(path);
        newPath.add(node.get("title").asText());
        if (node.has("children")) {
            for (JsonNode child : node.get("children").get("attached")) {
                traverseNode(child, newPath, testCases, lastModule, lastCaseTitle, lastPrecondition, isFirstStep);
            }
        } else {
            int size = newPath.size();
            String module = size >= 3 ? String.join("-", newPath.subList(0, 3)) : "";
            String caseTitle = size >= 4 ? newPath.get(3) : "";
            boolean hasPrecondition = (size == 8);
            String precondition = hasPrecondition ? newPath.get(4) : "";
            String stepId = hasPrecondition ? newPath.get(5) : (size >= 5 ? newPath.get(4) : "");
            String step = hasPrecondition ? newPath.get(6) : (size >= 6 ? newPath.get(5) : "");
            String expectedResult = hasPrecondition ? newPath.get(7) : (size >= 7 ? newPath.get(6) : "");

            // 用例的第一步保留模块名称
            if (caseTitle.equals(lastCaseTitle.get())) {
                caseTitle = "";
                precondition = "";
                if (!isFirstStep.get()) {
                    module = "";
                }
            } else {
                lastCaseTitle.set(caseTitle);
                lastPrecondition.set(precondition);
                // 新用例的第一步
                isFirstStep.set(true);
            }

            testCases.add(new String[]{module, caseTitle, precondition, stepId, step, expectedResult});
            // 之后的步骤不再显示模块
            isFirstStep.set(false);
        }
    }
}
提示:根据实际导出的文本格式,可能需要调整解析逻辑。
3. 导入到测试管理平台
- 打开平台的导入功能 → 选择 CSV 文件 → 映射字段 → 批量导入。
- 导入完成后,检查用例层级和步骤是否正确。
总结
将 XMind 测试用例转换为 CSV 文件并导入测试平台,虽然看似多了一步,但合理利用脚本工具和平台导入功能,可以极大提升效率,减少重复劳动。对于日常测试工作来说,这是一项值得掌握的小技巧。

 浙公网安备 33010602011771号