使用LoadRunner 11针对Web Services协议脚本的应用
13.13 Web Services协议脚本应用-选自<<精通软件性能测试与LoadRunner最佳实战>>
13.13.1 Web Services简介
Web Service是基于网络的、分布式的模块化组件,它执行特定的任务,遵守具体的技术规范,这些规范使得Web Service能与其他兼容的组件进行互操作。Internet Inter-Orb Protocol(IIOP)都已经发布了很长时间了,但是这些模型都依赖于特殊对象模型协议,而Web Services利用SOAP和XML对这些模型在通信方面作了进一步的扩展以消除特殊对象模型的障碍。Web Services主要利用HTTP和SOAP协议使商业数据在Web上传输,SOAP通过HTTP调用商业对象执行远程功能调用,Web用户能够使用SOAP和HTTP通过Web调用的方法来调用远程对象。
客户根据WSDL描述文档,会生成一个SOAP请求消息,请求会被嵌入在一个HTTP POST请求中,发送到Web服务器来。Web Services部署于Web服务器端,Web服务器把这些请求转发给Web Services请求处理器。请求处理器解析收到的请求,调用Web Services,然后再生成相应的SOAP应答。Web服务器得到SOAP应答后,会再通过HTTP应答的方式把信息送回到客户端。
下面针对Web Services中的一些重要名词进行讲解。
(1)UDDI,英文为“Universal Description, Discovery and Integration”,可译为“通用描述、发现与集成服务”。UDDI是一个独立于平台的框架,用于通过使用Internet来描述服务,发现企业,并对企业服务进行集成。任何规模的行业或企业都能得益于UDDI,UDDI使用W3C和IETF*的因特网标准,比如XML、HTTP和DNS协议。在UDDI之前,还不存在一种Internet标准,可以供企业为它们的企业和伙伴提供有关其产品和服务的信息。也不存在一种方法,来集成到彼此的系统和进程中。那么UDDI有什么样的用途呢?举个例子来讲,假如航空行业发布了一个用于航班预订的UDDI标准,航空公司就可以把它们的服务注册到一个UDDI目录中。然后旅行社就能够搜索这个UDDI目录以找到航空公司预订界面。当此界面被找到后,旅行社就能够立即与此服务进行通信,这是由于它使用了一套定义良好的预订界面。
(2)WSDL英文为“Web Services Description Language”,可译为网络服务描述语言。它是一种使用XML编写的文档,可描述某个Web Service。它可规定服务的位置,以及此服务提供的操作(或方法)。WSDL文档仅仅是一个简单的XML文档,它包含一系列描述某个Web Service的定义。
以下WSDL文档的简化的片段是后续将会讲到的,这里我们先拿出来分析一下:
<message name="getTermRequest">
<part name="term" type="xs:string"/>
</message>
<message name="getTermResponse">
<part name="value" type="xs:string"/>
</message>
<portType name="glossaryTerms">
<operation name="getTerm">
<input message="getTermRequest"/>
<output message="getTermResponse"/>
</operation>
</portType>
<?xml version="1.0" encoding="utf-8"?>
<definitions xmlns="http://schemas.xmlsoap.org/wsdl/"
xmlns:xs="http://www.w3.org/2001/XMLSchema" name="IMyHelloservice"
targetNamespace="http://tempuri.org/" xmlns:tns="http://tempuri.org/"
xmlns:soap="http://schemas.xmlsoap.org/wsdl/soap/"
xmlns:soapenc="http://schemas.xmlsoap.org/soap/encoding/"
xmlns:mime="http://schemas.xmlsoap.org/wsdl/mime/">
<message name="Welcome0Request">
<part name="name" type="xs:string" />
</message>
<message name="Welcome0Response">
<part name="return" type="xs:string" />
</message>
<portType name="IMyHello">
<operation name="Welcome">
<input message="tns:Welcome0Request" />
<output message="tns:Welcome0Response" />
</operation>
</portType>
<binding name="IMyHellobinding" type="tns:IMyHello">
<soap:binding style="rpc" transport="http://schemas.xmlsoap.org/soap/http" />
<operation name="Welcome">
<soap:operation soapAction="urn:MyHelloIntf-IMyHello#Welcome" style="rpc" />
<input message="tns:Welcome0Request">
<soap:body use="encoded" encodingStyle=http://schemas.xmlsoap.org/soap/encoding/
namespace="urn:MyHelloIntf-IMyHello" />
</input>
<output message="tns:Welcome0Response">
<soap:body use="encoded" encodingStyle=http://schemas.xmlsoap.org/soap/encoding/
namespace="urn:MyHelloIntf-IMyHello" />
</output>
</operation>
</binding>
<service name="IMyHelloservice">
<port name="IMyHelloPort" binding="tns:IMyHellobinding">
<soap:address location="http://localhost:5678/soap/IMyHello" />
</port>
</service>
</definitions>
我们可以将该WSDL 文档分成三部分。
第一部分:声明部分内容
<?xml version="1.0" encoding="utf-8"?>
<definitions xmlns="http://schemas.xmlsoap.org/wsdl/"
xmlns:xs="http://www.w3.org/2001/XMLSchema" name="IMyHelloservice"
targetNamespace="http://tempuri.org/" xmlns:tns="http://tempuri.org/"
xmlns:soap="http://schemas.xmlsoap.org/wsdl/soap/"
xmlns:soapenc="http://schemas.xmlsoap.org/soap/encoding/"
xmlns:mime="http://schemas.xmlsoap.org/wsdl/mime/">
第二部分:
<message name="Welcome0Request">
<part name="name" type="xs:string" />
</message>
<message name="Welcome0Response">
<part name="return" type="xs:string" />
</message>
<portType name="IMyHello">
<operation name="Welcome">
<input message="tns:Welcome0Request" />
<output message="tns:Welcome0Response" />
</operation>
</portType>
<binding name="IMyHellobinding" type="tns:IMyHello">
<soap:binding style="rpc" transport="http://schemas.xmlsoap.org/soap/http" />
<operation name="Welcome">
<soap:operation soapAction="urn:MyHelloIntf-IMyHello#Welcome" style="rpc" />
<input message="tns:Welcome0Request">
<soap:body use="encoded" encodingStyle=http://schemas.xmlsoap.org/soap/encoding/
namespace="urn:MyHelloIntf-IMyHello" />
</input>
<output message="tns:Welcome0Response">
<soap:body use="encoded" encodingStyle=http://schemas.xmlsoap.org/soap/encoding/
namespace="urn:MyHelloIntf-IMyHello" />
</output>
</operation>
</binding>
在这部分内容中,<portType> 元素把 " IMyHello" 定义为某个端口的名称,把 " Welcome " 定义为某个操作的名称。操作 " Welcome " 拥有一个名为 " Welcome0Request " 的输入消息,以及一个名为 " Welcome0Response " 的输出消息。<message> 元素可定义每个消息的部件,以及相关联的数据类型。从上面的文档您不难发现,其主要有以下元素的元素来描述某个web service ,参见表13-5。
表13-5 WSDL 文档结构表
|
元 素 |
定 义 |
|
<portType> |
Web Service 执行的操作 |
|
<message> |
Web Service 使用的消息 |
|
<types> |
Web Service 使用的数据类型 |
|
<binding> |
Web Service 使用的通信协议 |
<portType> 元素是最重要的WSDL元素。它可描述一个 Web Service、可被执行的操作,以及相关的消息。可以把<portType>元素比作传统编程语言中的一个函数库(或一个模块、或一个类)、<message>元素定义一个操作的数据元素。每个消息均由一个或多个部件组成。可以把这些部件比作传统编程语言中一个函数调用的参数、<types>元素定义Web Service使用的数据类型。为了最大程度的平台中立性,WSDL使用XML Schema语法来定义数据类型、<binding>元素为每个端口定义消息格式和协议细节。binding元素的name属性定义binding的名称,而type属性指向用于binding的端口,在这个例子中是“ImyHello”端口。
soap:binding元素的style属性可取值“rpc”或“document”。在这个例子中我们使用rpc、transport属性定义了要使用的SOAP协议,在这个例子中我们使用HTTP。operation元素定义了每个端口提供的操作符,对于每个操作,相应的SOAP行为都需要被定义。同时您必须对输入和输出进行编码。在这个例子中我们使用了“encoded”。
第三部分:
<service name="IMyHelloservice">
<port name="IMyHelloPort" binding="tns:IMyHellobinding">
<soap:address location="http://localhost:5678/soap/IMyHello" />
</port>
</service>
service是一套<port>元素。在一一对应形式下,每个<port>元素都和一个location关联。如果同一个<binding>有多个<port>元素与之关联,可以使用额外的URL地址作为替换。
一个WSDL文档中可以有多个<service>元素,而且多个<service>元素十分有用,其中之一就是可以根据目标URL来组织端口。这样,我就可以方便地使用另一个<service>来重定向我的股市查询申请。我的客户端程序仍然工作,因为这种根据协议归类的服务不随服务而变化。多个<service>元素的另一个作用是根据特定的协议划分端口。例如,我可以把所有的HTTP端口放在同一个<service>中,所有的SMTP端口放在另一个<service>里。
13.13.2 Delphi Web Services样例程序
1.服务端
为了使读者朋友对Web Services程序的开发过程有一个较清晰的认识,这里作者用Delphi给大家做一个简单样例程序。服务端用来提供对外服务接口,只有服务端运行后,其提供的服务接口才能被其他应用所调用,这里我们把调用其服务接口的程序统一叫客户端。
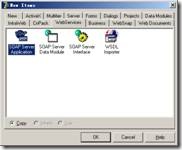
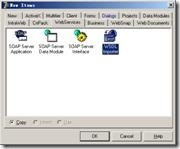
首先,选择“SOAP Server Application”选项,如图13-110所示。
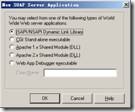
单击【OK】按钮,则弹出图13-111所示对话框信息,我们选择 “ISAPI/NSAPI Dynamic Link Library”,单击【OK】按钮,弹出确认对话框,如图13-112所示,单击【Yes】按钮。
图13-110 New Items对话框 图13-111 New SOAP Server Application对话框 图13-112 Confirm对话框
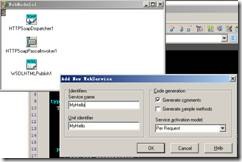
将出现图13-113所示界面信息,您可以在对话框中输入服务名称,这里我们将该服务接口定义为“MyHello”,单击【OK】按钮,将产生相关的单元(Unit)文件,下面将附上相关文件的源代码供大家参考。
图13-113 Confirm对话框 图13-114 WebModule1对话框(对应单元文件为main.pas)
main.pas源代码:
{ SOAP WebModule }
unit main;
interface
uses
SysUtils, Classes, HTTPApp, InvokeRegistry, WSDLIntf, TypInfo,
WebServExp, WSDLBind, XMLSchema, WSDLPub, SOAPPasInv, SOAPHTTPPasInv,
SOAPHTTPDisp, WebBrokerSOAP;
type
TWebModule1 = class(TWebModule)
HTTPSoapDispatcher1: THTTPSoapDispatcher;
HTTPSoapPascalInvoker1: THTTPSoapPascalInvoker;
WSDLHTMLPublish1: TWSDLHTMLPublish;
procedure WebModule1DefaultHandlerAction(Sender: TObject;
Request: TWebRequest; Response: TWebResponse; var Handled: Boolean);
private
{ Private declarations }
public
{ Public declarations }
end;
var
WebModule1: TWebModule1;
implementation
{$R *.dfm}
procedure TWebModule1.WebModule1DefaultHandlerAction(Sender: TObject;
Request: TWebRequest; Response: TWebResponse; var Handled: Boolean);
begin
WSDLHTMLPublish1.ServiceInfo(Sender, Request, Response, Handled);
end;
end.
MyHelloImpl.pas源代码:
unit MyHelloImpl;
interface
uses InvokeRegistry, Types, XSBuiltIns, MyHelloIntf;
type
{ TMyHello }
TMyHello = class(TInvokableClass, IMyHello)
public
function Welcome(name: string): string; stdcall;
end;
implementation
function TMyHello.Welcome(name: string): string;
begin
result := '欢迎' + name + '同学!' ;
end;
initialization
{ Invokable classes must be registered }
InvRegistry.RegisterInvokableClass(TMyHello);
end.
MyHelloIntf.pas源代码:
unit MyHelloIntf;
interface
uses InvokeRegistry, Types, XSBuiltIns;
type
TEnumTest = (etNone, etAFew, etSome, etAlot);
TDoubleArray = array of Double;
TMyEmployee = class(TRemotable)
private
FLastName: AnsiString;
FFirstName: AnsiString;
FSalary: Double;
published
property LastName: AnsiString read FLastName write FLastName;
property FirstName: AnsiString read FFirstName write FFirstName;
property Salary: Double read FSalary write FSalary;
end;
{ Invokable interfaces must derive from IInvokable }
IMyHello = interface(IInvokable)
['{F80D3129-3B13-49A7-8CCF-3DC3B120BA15}']
{ Methods of Invokable interface must not use the default }
{ calling convention; stdcall is recommended }
function Welcome(name: string): string; stdcall;
end;
implementation
initialization
{ Invokable interfaces must be registered }
InvRegistry.RegisterInterface(TypeInfo(IMyHello));
end.
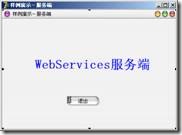
接下来,您需要创建一个标准的“Application”,界面信息如图13-115所示。
图13-115 样例演示-服务端(对应单元文件为u_main.pas)
u_main.pas源代码:
unit u_main;
interface
uses
Windows, Messages, SysUtils, Variants, Classes, Graphics, Controls, Forms,
Dialogs, SUIButton, StdCtrls, ExtCtrls, SUIForm, IdHTTPWebBrokerBridge;
type
TForm1 = class(TForm)
sfrm1: TsuiForm;
lbl1: TLabel;
btn1: TsuiButton;
procedure btn1Click(Sender: TObject);
procedure FormCreate(Sender: TObject);
procedure sfrm1Click(Sender: TObject);
private
{ Private declarations }
ser: TIdHTTPWebBrokerBridge;
public
{ Public declarations }
end;
var
Form1: TForm1;
implementation
uses main, MyHelloImpl, MyHelloIntf;
{$R *.dfm}
procedure TForm1.btn1Click(Sender: TObject);
begin
close;
end;
procedure TForm1.FormCreate(Sender: TObject);
begin
ser:=TIdHTTPWebBrokerBridge.Create(self);
ser.DefaultPort:=5678;
ser.Active:=true;
ser.RegisterWebModuleClass(TWebModule1);
end;
end.
Server.dpr源代码:
program Server;
uses
Forms,
u_main in 'u_main.pas' {Form1},
main in 'main.pas' {WebModule1: TWebModule},
MyHelloImpl in 'MyHelloImpl.pas',
MyHelloIntf in 'MyHelloIntf.pas';
{$R *.res}
begin
Application.Initialize;
Application.CreateForm(TForm1, Form1);
Application.CreateForm(TWebModule1, WebModule1);
Application.Run;
end.
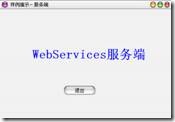
所有源代码编写完成后,单击“F9”运行程序,将弹出图13-116所示界面。
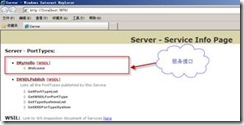
如图13-116所示,“样例演示-服务端”小程序运行后,您可以打开IE,输入“http://localhost:5678/”来检验先前完成的服务是否可以成功展示,如图13-117所示。
图13-116 “样例演示-服务端”小程序 图13-117 服务接口相关信息
 2.客户端
2.客户端
最后,让我们来制作一个客户端小程序来调用先前完成的接口。
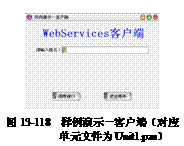
创建一个标准的Delphi应用,其界面设计如图13-118所示。
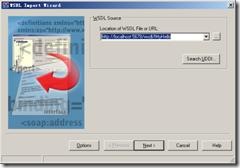
应用“WSDL Import Wizard”工具引入接口,如图13-119和图13-120所示。
图13-119 “New Items-WSDL Importer”对话框 图13-120 “WSDL Import Wizard”对话框
引入服务接口后,将生成“IMyHello1.pas”单元文件,其源代码如下:
// ************************************************************************ //
// The types declared in this file were generated from data read from the
// WSDL File described below:
// WSDL : http://localhost:5678/wsdl/IMyHello
// Encoding : utf-8
// Version : 1.0
// (2012-11-11 下午 02:02:42 - 1.33.2.5)
// ************************************************************************ //
unit IMyHello1;
interface
uses InvokeRegistry, SOAPHTTPClient, Types, XSBuiltIns;
type
// ************************************************************************ //
// The following types, referred to in the WSDL document are not being represented
// in this file. They are either aliases[@] of other types represented or were referred
// to but never[!] declared in the document. The types from the latter category
// typically map to predefined/known XML or Borland types; however, they could also
// indicate incorrect WSDL documents that failed to declare or import a schema type.
// ************************************************************************ //
// !:string - "http://www.w3.org/2001/XMLSchema"
// ************************************************************************ //
// Namespace : urn:MyHelloIntf-IMyHello
// soapAction: urn:MyHelloIntf-IMyHello#Welcome
// transport : http://schemas.xmlsoap.org/soap/http
// style : rpc
// binding : IMyHellobinding
// service : IMyHelloservice
// port : IMyHelloPort
// URL : http://localhost:5678/soap/IMyHello
// ************************************************************************ //
IMyHello = interface(IInvokable)
['{FEDC3D83-ACE9-0403-6D1D-C1B54AA0B54C}']
function Welcome(const name: WideString): WideString; stdcall;
end;
function GetIMyHello(UseWSDL: Boolean = System.False; Addr: string = ''; HTTPRIO: THTTPRIO
= nil): IMyHello;
implementation
function GetIMyHello(UseWSDL: Boolean; Addr: string; HTTPRIO: THTTPRIO): IMyHello;
const
defWSDL = 'http://localhost:5678/wsdl/IMyHello';
defURL = 'http://localhost:5678/soap/IMyHello';
defSvc = 'IMyHelloservice';
defPrt = 'IMyHelloPort';
var
RIO: THTTPRIO;
begin
Result := nil;
if (Addr = '') then
begin
if UseWSDL then
Addr := defWSDL
else
Addr := defURL;
end;
if HTTPRIO = nil then
RIO := THTTPRIO.Create(nil)
else
RIO := HTTPRIO;
try
Result := (RIO as IMyHello);
if UseWSDL then
begin
RIO.WSDLLocation := Addr;
RIO.Service := defSvc;
RIO.Port := defPrt;
end else
RIO.URL := Addr;
finally
if (Result = nil) and (HTTPRIO = nil) then
RIO.Free;
end;
end;
initialization
InvRegistry.RegisterInterface(TypeInfo(IMyHello), 'urn:MyHelloIntf-IMyHello', 'utf-8');
InvRegistry.RegisterDefaultSOAPAction(TypeInfo(IMyHello),
'urn:MyHelloIntf-IMyHello#Welcome');
end.
.Unit1.pas源代码:
unit Unit1;
interface
uses
Windows, Messages, SysUtils, Variants, Classes, Graphics, Controls, Forms,
Dialogs, SUIButton, ExtCtrls, SUIForm, StdCtrls, SUIEdit;
type
TForm1 = class(TForm)
sfrm1: TsuiForm;
btn1: TsuiButton;
lbl1: TLabel;
edt1: TsuiEdit;
btn2: TsuiButton;
lbl2: TLabel;
lbl3: TLabel;
procedure btn1Click(Sender: TObject);
procedure btn2Click(Sender: TObject);
private
{ Private declarations }
public
{ Public declarations }
end;
var
Form1: TForm1;
implementation
uses IMyHello1;
{$R *.dfm}
procedure TForm1.btn1Click(Sender: TObject);
var
I: IMyHello;
begin
I := GetIMyHello;
if Trim(edt1.Text) <> '' then begin
lbl2.Caption := I.Welcome(edt1.Text);
I := nil;
end
else begin
Application.MessageBox('请输入姓名!', '系统信息', 0);
Exit;
end;
end;
procedure TForm1.btn2Click(Sender: TObject);
begin
Close;
end;
end.
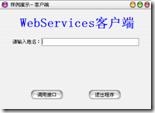
在Delphi IDE环境,单击“F9”运行客户端程序,将弹出图13-121所示对话框。
13.13.3 Web Services脚本
完成Web Services服务端和客户端两个小程序的编写、编译、执行后,您需要确保服务端程序是开启的,关闭已运行的客户端小程序。
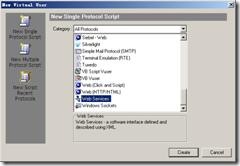
接下来,您启动LoadRunner 11.0,选择“Web Services”协议,如图13-122所示。
图13-121 “样例演示-客户端”对话框 图13-122 “New Virtual User”对话框
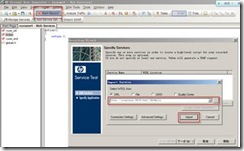
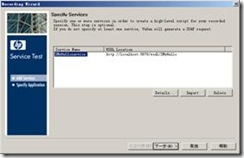
单击【Create】按钮,创建“Web Services”协议,在LoadRunner 脚本编辑环境单击录制红色按钮,在弹出的“Recording Wizard”对话框中单击【Import】按钮,在弹出的“Import Service”对话框中选择“URL”选项,在文本框中输入“http://localhost:5678/wsdl/IMyHello”,单击【Import】按钮,如图13-123所示。
图13-123 “Recording Wizard-Add Services页”对话框
稍等片刻,将出现图13-124所示界面信息,单击【下一步(N)>】按钮。
图13-124 “Recording Wizard”对话框
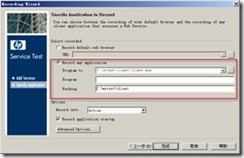
在图13-125所示对话框中输入客户端路径相关信息“C:\mytest\client\Client.exe”,工作目录为“C:\mytest\client”,(如果您的应用是基于B/S的,则选择“Record default web browser”选项并输入相应URL)单击【完成】按钮。
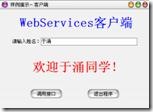
将弹出客户端程序,在客户端程序的文本输入框,输入“于涌”,单击【调用接口】按钮,此时将会在输入框下方出现“欢迎于涌同学!”字符串,如图13-126所示。
图13-125 “Recording Wizard-Specify Application页”对话框 图13-126 “样例演示-客户端”对话框
此时将会产生如下代码:
Action()
{
web_add_header("Content-Type", "text/xml");
web_add_header("SOAPAction", "\"urn:MyHelloIntf-IMyHello#Welcome\"");
web_add_header("User-Agent", "Borland SOAP 1.2");
soap_request("StepName=Welcome",
"URL=http://localhost:5678/soap/IMyHello",
"SOAPEnvelope=<?xml version=\"1.0\" encoding=\"GBK\" standalone=\"no\"?"
"><SOAP-ENV:Envelope xmlns:SOAP-ENC=\"http://schemas.xmlsoap.org/soap/"
"encoding/\" xmlns:xsi=\"http://www.w3.org/2001/XMLSchema-instance\" "
"xmlns:xsd=\"http://www.w3.org/2001/XMLSchema\" xmlns:SOAP-ENV=\"http:/"
"/schemas.xmlsoap.org/soap/envelope/\"><SOAP-ENV:Body SOAP-ENV"
":encodingStyle=\"http://schemas.xmlsoap.org/soap/encoding/\"><NS1"
":Welcome xmlns:NS1=\"urn:MyHelloIntf-IMyHello\"><name xsi:type=\"xsd"
":string\">于涌</name></NS1:Welcome></SOAP-ENV:Body></SOAP-ENV:Envelope>",
"Snapshot=t1.inf",
"ResponseParam=response",
LAST);
return 0;
}
我们最关心的内容应该是Web Services服务接口返回的内容,所以需要对脚本进行完善,脚本信息如下,黑色字体为新添加内容。
Action()
{
web_add_header("Content-Type", "text/xml");
web_add_header("SOAPAction", "\"urn:MyHelloIntf-IMyHello#Welcome\"");
web_add_header("User-Agent", "Borland SOAP 1.2");
soap_request("StepName=Welcome",
"URL=http://localhost:5678/soap/IMyHello",
"SOAPEnvelope=<?xml version=\"1.0\" encoding=\"GBK\" standalone=\"no\"?"
"><SOAP-ENV:Envelope xmlns:SOAP-ENC=\"http://schemas.xmlsoap.org/soap/"
"encoding/\" xmlns:xsi=\"http://www.w3.org/2001/XMLSchema-instance\" "
"xmlns:xsd=\"http://www.w3.org/2001/XMLSchema\" xmlns:SOAP-ENV=\"http:/"
"/schemas.xmlsoap.org/soap/envelope/\"><SOAP-ENV:Body SOAP-ENV"
":encodingStyle=\"http://schemas.xmlsoap.org/soap/encoding/\"><NS1"
":Welcome xmlns:NS1=\"urn:MyHelloIntf-IMyHello\"><name xsi:type=\"xsd"
":string\">于涌</name></NS1:Welcome></SOAP-ENV:Body></SOAP-ENV:Envelope>",
"Snapshot=t1.inf",
"ResponseParam=response",
LAST);
lr_save_string(lr_eval_string("{response}"), "XML_Input_Param");
lr_xml_get_values("XML={XML_Input_Param}",
"ValueParam=OutputParam",
"Query=/*/*/*/return",
LAST );
lr_output_message(lr_eval_string("返回结果 = {OutputParam}"));
return 0;
}
脚本的执行信息如下:
Virtual User Script started at : 2012-11-11 14:56:30
Starting action vuser_init.
Ending action vuser_init.
Running Vuser...
Starting iteration 1.
Starting action Action.
Action.c(4): Warning -26593: The header being added may cause unpredictable results when
applied to all ensuing URLs. It is added anyway [MsgId: MWAR-26593]
Action.c(4): web_add_header("Content-Type") highest severity level was "warning" [MsgId: MMSG-26391]
Action.c(6): web_add_header("SOAPAction") was successful [MsgId: MMSG-26392]
Action.c(8): web_add_header("User-Agent") was successful [MsgId: MMSG-26392]
Action.c(10): SOAP request "Welcome" started
Action.c(10): SOAP request "Welcome" was successful
Action.c(26): "lr_xml_get_values" succeeded, 1 match processed
Action.c(31): 返回结果 = 欢迎于涌同学!
Ending action Action.
Ending iteration 1.
Ending Vuser...
Starting action vuser_end.
Ending action vuser_end.
Vuser Terminated.
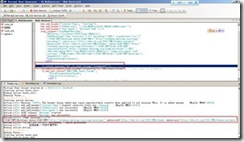
也许有的读者会说:“我想先看看服务端返回的信息,这可不可以呢?”。“当然没问题”,您只需要在脚本中加入“lr_output_message("%s",lr_eval_string("{response}")); ”(lr_xml_get_values()函数在前面已经介绍过,其在进行该协议类型脚本关联时非常重要,请读者朋友务必掌握),执行脚本时就会打印出响应的相关数据信息,如图13-127所示。
图13-127 WebServices相关脚本及执行结果
为了让大家对返回的内容看得更加清楚,这里我将其拷贝出来,放置到my.xml文件中,其内容如图13-128所示。
图13-128 服务返回的XML相关信息
从图13-128您会看到有一串乱码,凭直觉这应该是“欢迎于涌同学!”,那么直觉对不对呢?您可以在脚本中加入以下两行代码,如图13-129所示。
图13-129 转码及输出函数
其输出结果果真为“欢迎于涌同学!”。图13-129 中使用“lr_convert_string_encoding()”的函数就是将UTF8编码转码为系统语言编码的函数,经过转码后信息显示正确了。也许有的读者会问:“系统返回的xml响应信息有些显得十分混乱,有没有什么方法直接能看出其层次关系呢?”您可以借助树视图,单击“Tree”按钮,将出现图13-130所示界面信息,是不是一目了然了呢!这也方便了您应用lr_xml_get_values()函数时填写“Query”部分内容。
图13-130 WebServices响应结果树视图
【重要提示】
(1)从上面Web Services程序编写和脚本应用中,相信大家对该协议的应用已经有了非常清晰的认识,我们给大家演示的是基于C/S的小程序,在实际工作中您测试的应用可能是基于B/S的,它们在实际应用上并没有大的区别,所以请读者朋友们举一反三。
(2)也许您也会像我一样,在机器上安装有杀毒软件,如果您应用本书此客户端和服务器端小程序时,有可能您的杀毒软件会对其产生干扰,如:将小程序自动删除、运行小程序没反应等情况,此时应暂时关闭杀毒软件,确保小应用可以正常运行。





 浙公网安备 33010602011771号