SpringBoot---基于Mybatis的数据持久层技术(包括注解和xml文件格式实现添删查改、懒加载配置、一对一,一对多查询、模糊查询、动态查询)
整合SpringBoot与Mybatis
1、创建一个Spring Boot项目。pom配置文件中添加依赖,这里我们采用了阿里巴巴的Druid连接池
<!-- 阿里巴巴的Druid数据源依赖启动器 -->
<dependency>
   <groupId>com.alibaba</groupId>
   <artifactId>druid-spring-boot-starter</artifactId>
   <version>1.1.14</version>
</dependency>

<!-- Mybatis启动器 -->
<dependency>
   <groupId>org.mybatis.spring.boot</groupId>
   <artifactId>mybatis-spring-boot-starter</artifactId>
   <version>2.1.2</version>
</dependency>

<!-- MySQL数据库连接驱动 -->
<dependency>
   <groupId>mysql</groupId>
   <artifactId>mysql-connector-java</artifactId>
   <scope>runtime</scope>
</dependency>
2、在application.yml 配置文件中添加相关的数据库连接配置
# Mysql 数据库连接配置
spring:
  datasource:
    url: jdbc:mysql://localhost:3306/mybatis?useUnicode=true&characterEncoding=utf8&serverTimezone=UTC&useSSL=false&serverTimezone=Asia/Shanghai  # 数据库端口号/数据库名?各种参数
    username: root
    password: 123456

# 添加并配置第三方数据源druid
    type: com.alibaba.druid.pool.DruidDataSource
    initialSize: 20
    minIdle: 10
    maxActive: 100
# 配置MyBatisi的xml配置文件路径
mybatis:
  mapper-locations: classpath:mapper/*.xml
  type-aliases-package: com.zsc.mybatisi.demo1.domain #配置XML映射文件中指定的实体类别名路径
  configuration:
    log-impl: org.apache.ibatis.logging.stdout.StdOutImpl #输出执行的SQL语句
    map-underscore-to-camel-case: true #开启驼峰命名匹配映射
注意:在配置数据库的url的时候要在后面加上参数以防乱码(?useUnicode=true&characterEncoding=utf8&serverTimezone=UTC&useSSL=false)
# serverTimezone=Asia/Shanghai使用上海时区 之前是使用UTC时区,但是插入数据库会和电脑时间不一样,少8个小时
3、在数据库中创建 t_article和t_comment两张表,并添加一些数据
CREATE TABLE `t_article` (
  `id` int(20) NOT NULL AUTO_INCREMENT COMMENT '文章id',
  `title` varchar(200) DEFAULT NULL COMMENT '文章标题',
  `content` longtext COMMENT '文章内容',
  PRIMARY KEY (`id`)
) ENGINE=InnoDB AUTO_INCREMENT=2 DEFAULT CHARSET=utf8;

INSERT INTO `t_article` VALUES ('1', 'Spring Boot基础入门', '从入门到精通讲解...');
INSERT INTO `t_article` VALUES ('2', 'Spring Cloud基础入门', '从入门到精通讲解...');

CREATE TABLE `t_comment` (
  `id` int(20) NOT NULL AUTO_INCREMENT COMMENT '评论id',
  `content` longtext COMMENT '评论内容',
  `author` varchar(200) DEFAULT NULL COMMENT '评论作者',
  `a_id` int(20) DEFAULT NULL COMMENT '关联的文章id',
  PRIMARY KEY (`id`)
) ENGINE=InnoDB AUTO_INCREMENT=3 DEFAULT CHARSET=utf8;

INSERT INTO `t_comment` VALUES ('1', '很全、很详细', '狂奔的蜗牛', '1');
INSERT INTO `t_comment` VALUES ('2', '赞一个', 'tom', '1');
INSERT INTO `t_comment` VALUES ('3', '很详细', 'kitty', '1');
INSERT INTO `t_comment` VALUES ('4', '很好,非常详细', '张三', '1');
INSERT INTO `t_comment` VALUES ('5', '很不错', '张杨', '2');
4、创建表对应的实体类

/**评论实体类*/
@Data
@TableName("t_comment") // 数据库表名
public class Comment implements Serializable{

  @TableId("id") // 数据库主键字段
    private Integer id;

  @TableField("content") // 数据库非主键字段
    private String content;
    private String author;
    private Integer aId;

  //@TableField("expire_date") // 数据库非主键字段
   //@JsonFormat(pattern = "yyyy-MM-dd HH:mm:ss") // 日期格式自动化
  //private Date expireDate;

}
/** 文章实体类 */
@Data
@TableName("t_article") // 数据库表名
public class Article implements Serializable{

  @TableId("id") // 数据库主键字段
    private Integer id;

  @TableField("title") // 数据库非主键字段
    private String title;
    private String content;
    private List<Comment> commentList;
}
5、基于注解方式实现对评论的增删改查,在mapper文件夹中编写评论的Mapper接口文件。
@Mapper
public interface CommentMapper {
    //插入评论数据
    @Insert("insert into t_comment(content,author,a_id) "+"values (#{content},#{author},#{aId})")
    int insertComment(Comment comment);

    //删除
    @Delete("delete from t_comment where id=#{id}")
    int deleteComment(Integer id);

    //查询
    @Select("select * from t_comment where id=#{id}")
    Comment findById(Integer id);

    //更新
    @Update("update t_comment set content=#{content} shere id=#{id}")
    int updateComment(Comment comment);
}
6、编写测试方法进行接口方法测试。
@SpringBootTest
@RunWith(SpringRunner.class)
public class CommentMapperTest {
    @Autowired
    CommentMapper commentMapper;

    @org.junit.Test
    public void findById() {
        Comment comment=commentMapper.findById(1);
        System.out.println(comment.toString());
    }
}
7、基于配置文件方式实现对文章的增删改查,与注解方式不同的是我们除了要编写Mapper接口还要编写Mapper.xml映射文件
ArticleMapper接口
@Mapper
public interface ArticleMapper {
    //根据id查询文章
    Article selectArticle( Integer id);

    //更新文章数据
    int updateArticle(Article article);
}
ArticleMapper.xml
<?xml version="1.0" encoding="UTF-8"?>
<!DOCTYPE mapper PUBLIC "-//mybatis.org//DTD Mapper 3.0//EN"
        "http://mybatis.org/dtd/mybatis-3-mapper.dtd">
<mapper namespace="com.zsc.mybatisi.demo1.mapper.ArticleMapper">
    <resultMap id="articleWithComment" type="Article">
        <id property="id" column="id"/>
        <result property="title" column="title"/>
        <result property="content" column="content"/>
        <collection property="commentList" ofType="Comment">
            <id property="id" column="c_id"/>
            <result property="content" column="c_content"/>
            <result property="author" column="author"/>
        </collection>
    </resultMap>

    <select id="selectArticle" resultMap="articleWithComment">
        select a.*,c.id c_id,c.content c_content,c.author
        from t_article a,t_comment c
        where a.id=c.a_id and a.id=#{id}
    </select>

    <update id="updateArticle" parameterType="Article">
        update t_article
        <set>
            <if test="title !=null and title !=''">title=#{title},</if>
            <if test="content !=null and content !=''">content=#{content}</if>
        </set>
        where id=#{id}
    </update>
</mapper>
8、编写单元测试方法进行接口方法测试。
@SpringBootTest
@RunWith(SpringRunner.class)
public class ArticleMapperTest {
    @Autowired
    ArticleMapper articleMapper;

    @Test
    public void TestArticle() {
        Article article=articleMapper.selectArticle(1);
        System.out.println(article);
        article.setContent("修改文字内容");
        articleMapper.updateArticle(article);
        Article updateArticle=articleMapper.selectArticle(1);
        System.out.println(updateArticle);
    }
}
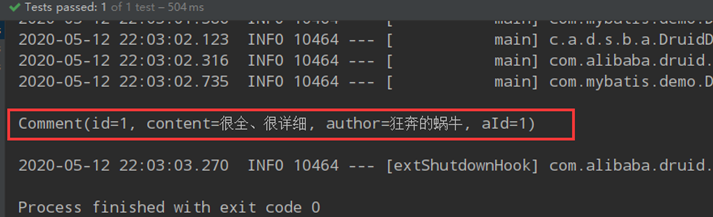
测试结果

使用ResutlMap实现一对多、多对多的对象关联
(1)1对1 关联 ,使用assosication,一个票据只能对应一个User,因此使用assosication与用户对象进行关联。Property为Ticket对象中关联的user属性,而Column表示关联到User表的外键。JavaType表示关联对象类型为User,select表示调用对应的接口get查询User对象。
(2)1对n 关联 ,使用collection,一个票据对应多个AttachFile,因此使用collection与附件对象进行关联。Property为Ticket对象中关联的AttachFile属性,而Column表示关联到attachfile表的外键。ofType表示关联对象类型为AttachFile,select表示调用接口listByTicketId查询attachFile对象。
1、实体类 AttachFile(附件实体类)、Ticket(票据实体类)、User(用户实体类)
@Data
public class AttachFile {
    Long id;                     //主键
    String fileUUID;             //文件的UUID
    String filename;             //保存后的文件名
    String originalFilename;     //源文件名
    String fileSize;             //文件大小
    Date create;                 //上传时间
    String fileType;             //文件类型
    Long ticketId;               //票据Id(外键)

}
@Data
public class Ticket {
  //票据用户
    Long id;                        //票据Id(主键)
    String companyName;             //客户名称
    double money;                   //票据金额
    String subject;                 //票据主题
    String body;                    //票据主要内容
    String ticketType;              //票据类型
    Long userId;                    //提交者名字
    Date createTime;                //提交时间
    Date updateTime;                //审核时间
    Date approvedTime;              //审核时间
    int status;                     //状态
    List<AttachFile>attachFiles;    //票据附件
    User user;                      //票据用户
}
@Data
public class User{
        //用户角色、role=0表示管理员、role=1表示普通用户
    Long id;             //id
    String username;     //用户名
    String password;     //密码
    String email;        //电子邮件
    Date createTime;     //注册时间
    Date updateTime;     //更新时间
    String registerIp;   //注册id
    Integer status;      //状态 0:用户停用  1:用户激活
    Integer role;        //用户角色 0:管理者 1:普通用户
}
2、Mapper接口
@SuppressWarnings("ALL")
@Mapper
public interface TicketMapper {
//查询票据及其附件
    public Ticket getTicketDetails(Long id);
}
@SuppressWarnings("ALL")
@Mapper
public interface AttachFileMapper {
 //根据ticketId查找附件
   @Select("select * from attachfile where id=#{id}")
   public List<AttachFile> listByTicketId(Long id);
}
@SuppressWarnings("ALL")
@Mapper
public interface UserMapper {
//根据id获取用户对象,如果不存在返回null
    @Select("select * from user where id=#{id}")
    public User get(@Param("id") Long id);
}
3、mapper.xml
注意:
(1)<select id="getTicketDetails" parameterType="Long" resultMap="Ticket_User_AttachFile">
id对应的值是mapper接口里的方法名,parameterType对应的是方法内的参数类型,resultMap对应的是返回值类型 ,一般是实体类路径和resultMap的id值(这里对应的是resultMap的id值)。
(2)<association property="user" column="user_id" javaType="User" select="com.zsc.ticketsys.mapper.UserMapper.get"/>
property对应的是Ticket实体类的属性,column是查询出来的表的列名,同时对应的是要传的值,javaType对应的是返回类型 ,select对应的是查询方法

(3)<collection property="attachFiles" column="id" ofType="AttachFile" select="com.zsc.ticketsys.mapper.AttachFileMapper.listByTicketId"/>
同(2),其中,ofType是返回的类型。
<?xml version="1.0" encoding="UTF-8" ?>
<!DOCTYPE mapper
        PUBLIC "-//mybatis.org//DTD Mapper 3.0//EN"
        "http://mybatis.org/dtd/mybatis-3-mapper.dtd">
<!-- namespace表示命名空间 -->
<mapper namespace="com.zsc.ticketsys.mapper.TicketMapper">
<select id="getTicketDetails" parameterType="Long" resultMap="Ticket_User_AttachFile">
        select * from ticket where id=#{id}
    </select>
<!--    定义一个ResultMap 封装查询结果-->
    <resultMap id="Ticket_User_AttachFile" type="Ticket">
        <id property="id" column="id"/>
<!--        用户对象1对1关联-->
        <association property="user" column="user_id" javaType="User"
                     select="com.zsc.ticketsys.mapper.UserMapper.get"/>
<!--        附件对象1对多关联-->
        <collection property="attachFiles" column="id" ofType="AttachFile"
                    select="com.zsc.ticketsys.mapper.AttachFileMapper.listByTicketId"/>
    </resultMap>
</mapper>
4、测试
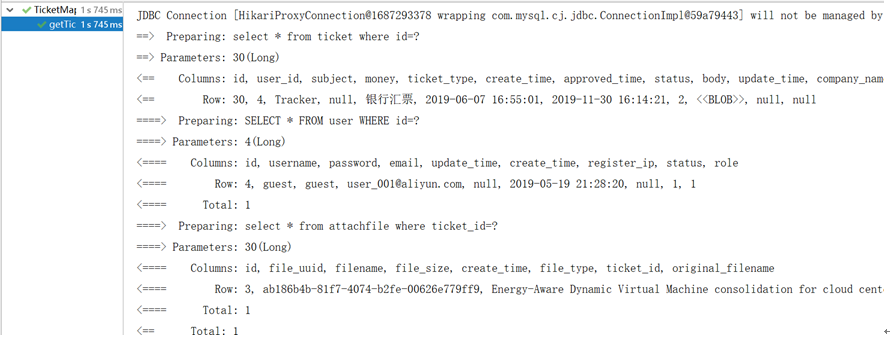
@SpringBootTest
@RunWith(SpringRunner.class)
public class TicketMapperTest {

    @Autowired
    TicketMapper ticketMapper;


    @Test
    public void getTicketDetails() {
        Ticket ticket=ticketMapper.getTicketDetails(30L);
        System.out.println(ticket.getCompanyName());
    }
}
懒加载
注意:为了避免关联对象立即加载问题,可以在配置文件中使用懒加载的方式。懒加载只在加载对象时不会立即加载该对象的关联对象,而只有在调用如get()等方法才会进行加载。懒加载时性能优化的一种方式。
启动懒加载
#配置Mybatis的相关属性
mybatis:
    #指定mapper XML文件的位置
  mapper-locations: classpath:com.zsc.ticketsys.mapper/*.xml
     #指定实体类的别名的映射路径
  type-aliases-package: com.zsc.ticketsys.domain
  configuration:
       #打印输出SQL语句
    log-impl: org.apache.ibatis.logging.stdout.StdOutImpl
     # 启动驼峰式转换
    map-underscore-to-camel-case: true
        #开启自增组件
    use-generated-keys: true
        #启动懒加载
    lazy-loading-enabled: true
        #禁用立即加载
    aggressive-lazy-loading: false
实现模糊查询和动态查询
1、实现票据主题的模糊查询。在mapper接口类中定义方法
@Mapper
public interface TicketMapper {
    //根据主题进行迷糊查询
    public List<Ticket> listLikeSubject(String subject);
}
2、在ticketMpper.xml文件中编写对应的实现内容
<!--进行模糊查询-->
    <select id="listLikeSubject" parameterType="String" resultType="Ticket">
       select * from ticket where Subject like concat('%' ,#{subject},'%')
    </select>
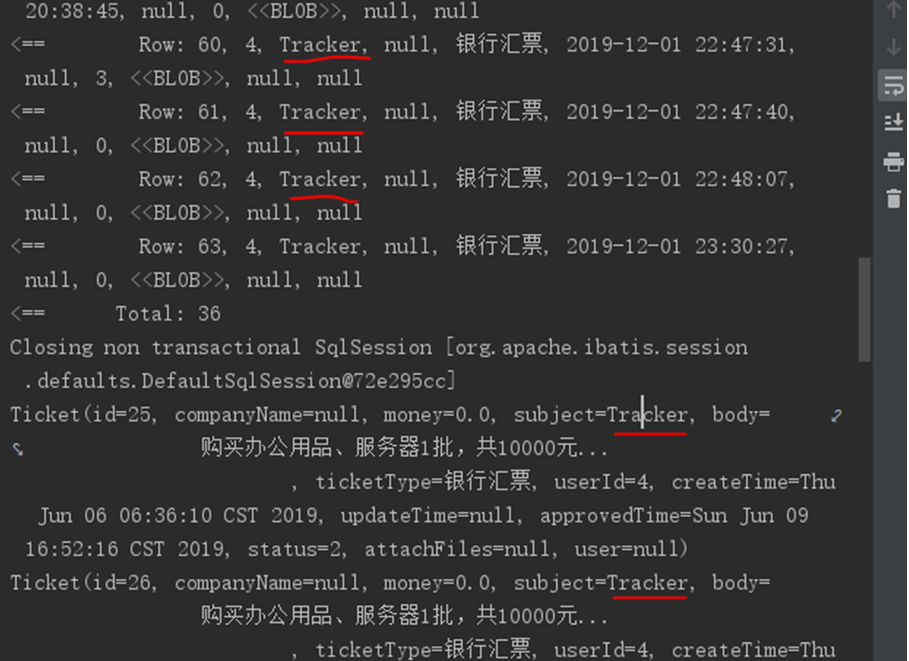
3、结果测试,用tra查询出来的结果
4、实现动态查询,动态拼接SQL查询语句。在mapper接口类中定义方法和XML的内容如下:
//根据主题和类型进行查询
    public List<Ticket> listLikeSubjectAndType(String subject,String type);
 <!--动态查询-->
    <select id="listLikeSubjectAndType" parameterType="String"
            resultType="Ticket">
        select * from ticket where 1=1
        <if test="subject !=null and type!=''">and subject like concat('%',#{subject},'%')</if>
        <if test="type !=null and type !=''">and ticket_type =#{type}</if>
    </select>
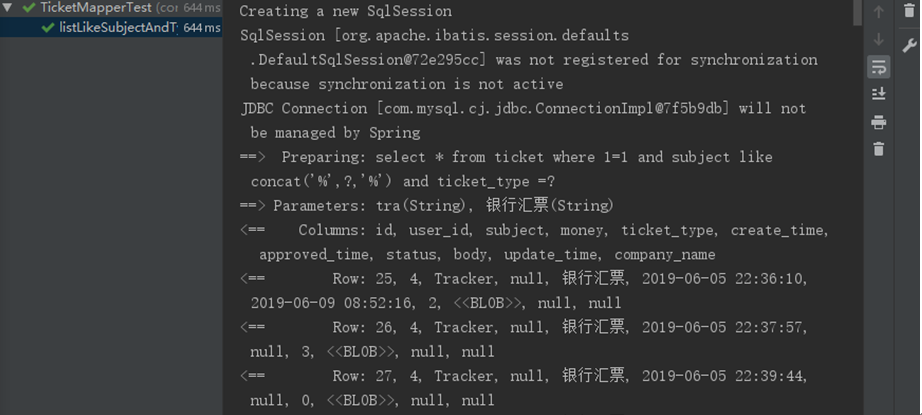
5、测试。测试用例:票据主题:tra(模糊词汇)、票据类型:银行汇票
源码:
链接:https://pan.baidu.com/s/1k_vsOqfqb-7q7h5C5EnKFg
提取码:ox1s

 浙公网安备 33010602011771号