

乘风破浪,遇见最佳跨平台跨终端框架.Net Core/.Net生态 - 浅析ASP.NET Core远程过程调用,HttpClientFactory和gRPC最佳实践
什么是远程调用
在分布式计算中,远程过程调用(Remote Procedure Call, RPC)是指计算机程序导致一个过程(子程序)在不同的地址空间(通常是在共享网络上的另一台计算机上)执行,其编码就像普通的(本地)过程调用一样,而程序员没有明确编码远程交互的细节。在分布式计算中,远程过程调用(Remote Procedure Call, RPC)是指计算机程序导致一个过程(子程序)在不同的地址空间(通常是在共享网络上的另一台计算机上)执行,其编码就像普通的(本地)过程调用一样,而程序员没有明确编码远程交互的细节。
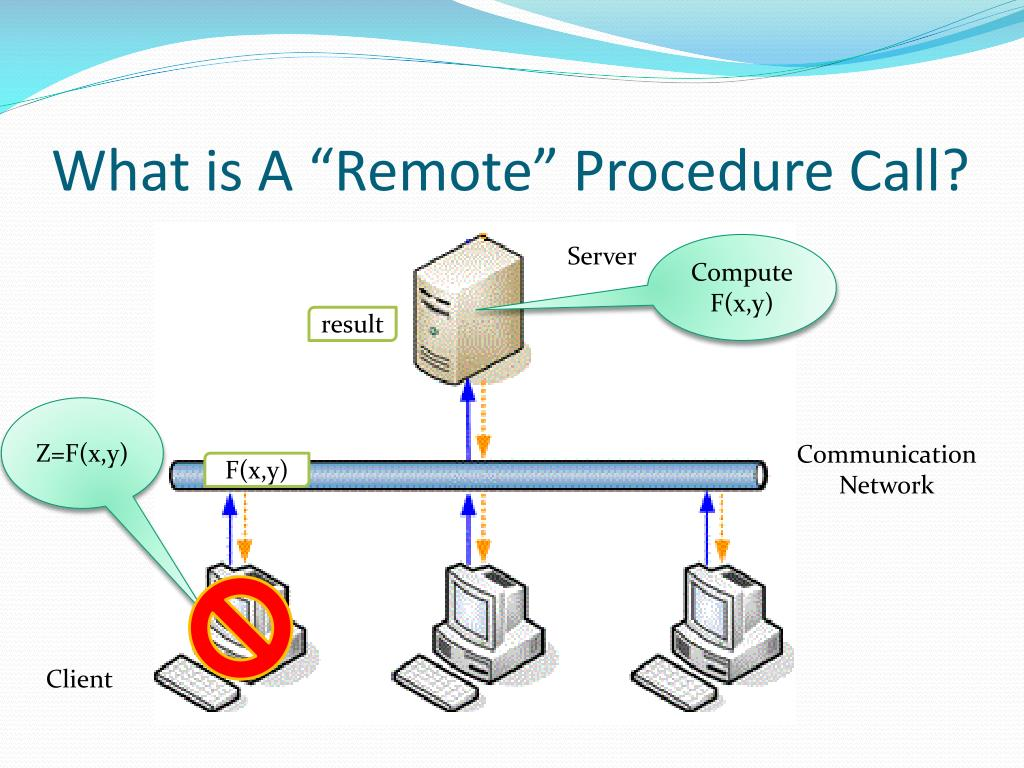
也就是说,无论子程序是在执行程序的本地,还是在远程,程序员写的代码基本上都是一样的。这是一种客户-服务器交互的形式(调用者是客户,执行者是服务器),通常通过请求-响应的消息传递系统实现。在面向对象的编程范式中,RPC由远程方法调用(RMI)表示。RPC模型意味着一定程度的位置透明,即无论本地还是远程,调用程序基本相同,但通常,它们并不完全相同,所以本地调用可以与远程调用区分开来。远程调用通常比本地调用慢几个数量级,而且不那么可靠,所以区分它们很重要。
RPC是进程间通信(Inter-Process Communication, IPC)的一种形式,即不同的进程有不同的地址空间:如果在同一主机上,它们有不同的虚拟地址空间,即使物理地址空间是相同的;而如果它们在不同的主机上,物理地址空间是不同的。许多不同的(通常是不兼容的)技术被用来实现这一概念。
函数接口调用方式分为:
- 本地调用(Local Procedure Call, LPC),通常,在我们的代码中调用一个函数,这个函数要么是系统API,要么是我们自己实现的本地代码,一起编译,一起发布,也在同一个进程中一起执行,这就是本地调用!
- 远程调用(Remote Procedure Call, RPC) 被调用方法的具体实现不在同一个进程,而是在别进程,甚至别的电脑上。RPC一个重要思想就是,使远程调用看起来像本地调用一样,调用者无需知道被调用接口具体在哪台机器上执行。
Socket是RPC经常采用的通信手段之一,除了Socket,RPC还有其他的通信方法,比如:http、操作系统自带的管道等
历史和渊源
请求-响应协议可以追溯到20世纪60年代末的早期分布式计算,将远程过程调用作为网络操作模型的理论建议可以追溯到20世纪70年代,而实际实现可以追溯到20世纪80年代初。布鲁斯-杰-尼尔森一般被认为是在1981年创造了"远程过程调用"这个术语。
现代操作系统中使用的远程过程调用可以追溯到RC4000多编程系统,它使用请求-响应通信协议进行进程同步。将网络操作视为远程过程调用的想法至少可以追溯到1970年代的早期ARPANET文件中。1978年,Per Brinch Hansen提出了分布式进程,一种基于"外部请求"的分布式计算语言,由进程间的过程调用构成。
最早的实际实现之一是在1982年由BrianRandell及其同事为他们的UNIX机器之间的Newcastle Connection所做的。随后不久,Andrew Birrell和Bruce Nelson在XeroxPARC的Cedar环境中提出了"Lupine"。Lupine自动生成存根,提供类型安全的绑定,并使用高效协议进行通信。RPC的首批商业用途之一是由Xerox在1981年以"Courier"的名义进行的。RPC在Unix上的第一个流行实现是Sun的RPC(现在称为ONC RPC),被用作网络文件系统(NFS)的基础。
在20世纪90年代,随着面向对象编程的普及,远程方法调用(RMI)的另一种模式被广泛实现,例如在通用对象请求代理架构(CORBA,1991)和Java远程方法调用中。而RMI又随着互联网的兴起而衰落,特别是在2000年代。
消息传递
RPC是一个请求-回应协议。RPC由客户端发起,它向已知的远程服务器发送请求消息,以执行一个指定的程序和提供的参数。远程服务器向客户端发送一个响应,然后应用程序继续其进程。当服务器处理调用时,客户端被阻塞(它等待服务器完成处理后再恢复执行),除非客户端向服务器发送异步请求,如XMLHttpRequest。在各种实现中存在许多变化和微妙之处,导致各种不同的(不兼容的)RPC协议。
远程过程调用和本地调用的一个重要区别是,远程调用可能因为不可预测的网络问题而失败。而且,调用者通常必须在不知道远程过程是否真的被调用的情况下处理这种失败。无效程序(那些如果被多次调用就不会有额外效果的程序)很容易处理,但仍有足够的困难,所以调用远程程序的代码往往被限制在精心编写的低级子系统中。
事件的顺序
- 客户端调用客户端存根。该调用是一个本地过程调用,参数以正常方式推送到堆栈中。
- 客户端存根将参数打包成一个消息,并进行系统调用来发送该消息。包装参数被称为marshalling。
- 客户机的本地操作系统将消息从客户机发送至服务器机。
- 服务器机器上的本地操作系统将传入的数据包传递给服务器存根。
- 服务器存根从消息中解包参数。解除参数的包装被称为解包。
- 最后,服务器存根调用服务器程序。回复以相反的方向追踪同样的步骤。
管理向外请求的最佳实践(HttpClientFactory)
前世今生
HttpClient类型是在2012年发布的.NET Framework4.5中引入的。换句话说,它已经存在一段时间了。HttpClient用于从由Uri标识的网络资源发出HTTP请求和处理HTTP响应。
HTTP协议占所有Internet流量的绝大部分。
根据推动最佳做法的新式应用程序开发原则,IHttpClientFactory充当工厂抽象,可以使用自定义配置创建HttpClient实例。.NET Core 2.1中引入了IHttpClientFactory。常见的基于HTTP的.NET工作负载可以轻松利用可复原和瞬态故障处理第三方中间件。
组件包
https://www.nuget.org/packages/Microsoft.Extensions.Http.Polly
- Microsoft.Extensions.Http
- Microsoft.Extensions.Http.Polly
在Net Core中微软为我们提供了HttpClientFactory这个类,基于这个类我们可以更好的HttpClient管理。
HttpClientFactory存在于Microsoft.Extensions.Http包中。
核心能力
- 管理内部HttpMessgaeHandler的生命周期,灵活应对资源问题和DNS刷新问题
- 支持命名化、类型化配置,集中管理配置,避免冲突
- 灵活的出站请求管道配置,轻松管理请求生命周期
- 内置管道最外层和最内层的日志记录器,有Information和Trace输出
核心对象
- HttpClient
- HttpMessageHandler
- SocketsHttpHandler
- DelegatingHandler
- IHttpClientFactory
- IHttpClientBuilder
管道模型

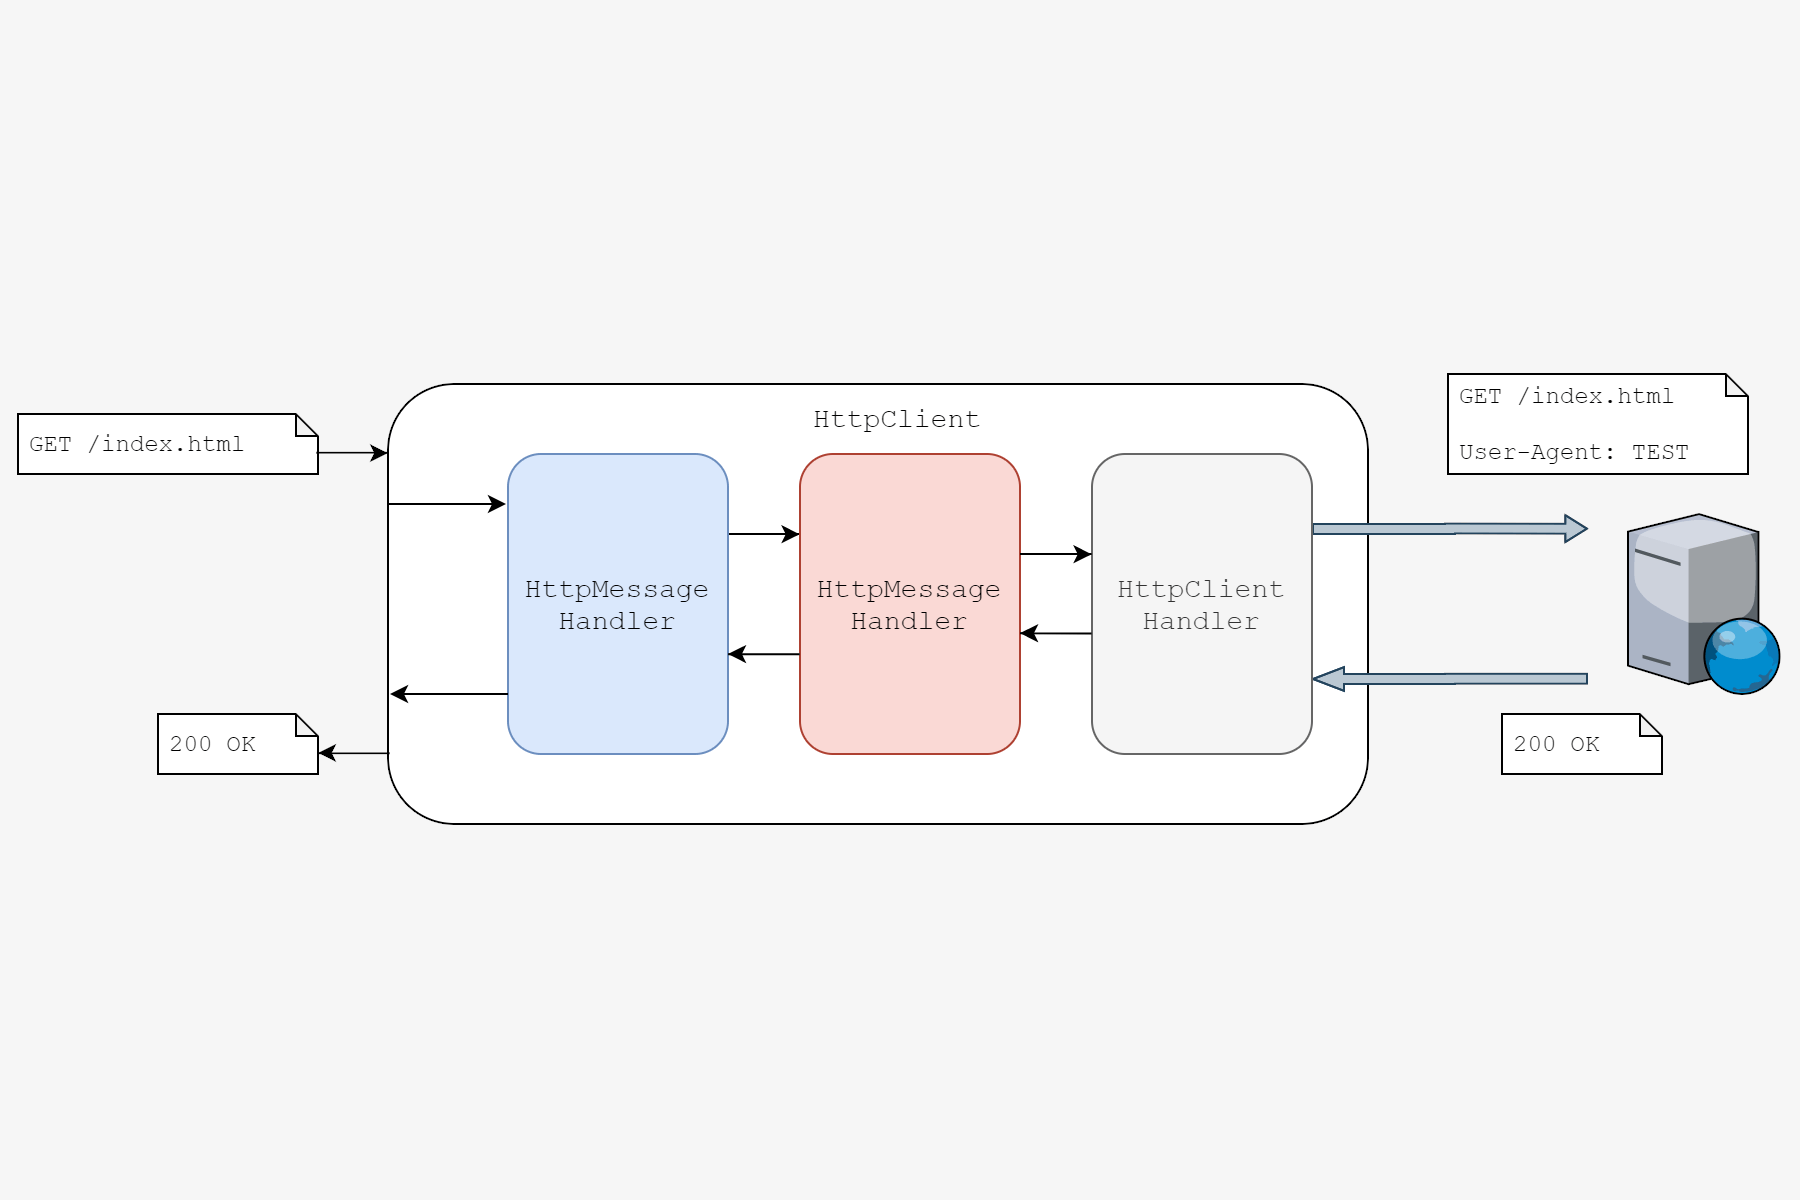
它和我们之前讲到的中间件的管道模型很像,由HttpClient负责去调用DelegatingHandler,最后端是由SocketsHttpHandler来处理真正的HTTP请求。
中间的DelegatingHandler就是我们的管道处理器,也就是中间件部分,内置了最外层的LoggingScoped HttpMessageHandler用来记录管道最外层的日志。
还有一个Logging HttpMessageHandler这个用来记录最内层的HTTP请求日志,它可以记录SocketsHttpHandler发起请求前的日志和响应的日志。
我们的扩展点就是在Custom MessageHandler,我们可以把自己的Handler注册到管道模型里面,就类似我们注册中间件一样,它会按照我们的注册顺序去执行。
它的整个请求过程:HttpClient发起请求 -> 最外层的日志记录器记录日志 -> 自定义的Handler去处理一些自定义的逻辑 -> 最内层的SockerHttpHandler(我们真正去发起远程调用的处理程序,它会去向远程站点发起HTTP请求并接受响应) -> Http最内层日志记录器会记录我们的响应信息 -> 把响应结果交还给自定义的MessageHandler(接收响应后再处理接收响应后的逻辑) -> 最外层日志记录器会输出响应日志 -> 最终HttpClient拿到响应结果输出给应用程序。
创建模式
HttpClientFactory提供了三种创建HttpClient的模式
- 工程模式
- 命名客户端模式
- 类型化客户端模式
准备响应项目
将项目模板中的WeatherForecast改成Order
[ApiController]
[Route("[controller]")]
public class OrderController : ControllerBase
{
    private static readonly string[] Summaries = new[]
    {
        "Freezing", "Bracing", "Chilly", "Cool", "Mild", "Warm", "Balmy", "Hot", "Sweltering", "Scorching"
    };

    private readonly ILogger<OrderController> _logger;

    public OrderController(ILogger<OrderController> logger)
    {
        _logger = logger;
    }

    [HttpGet]
    public IEnumerable<WeatherForecast> Get()
    {
        var rng = new Random();
        return Enumerable.Range(1, 5).Select(index => new WeatherForecast
        {
            Date = DateTime.Now.AddDays(index),
            TemperatureC = rng.Next(-20, 55),
            Summary = Summaries[rng.Next(Summaries.Length)]
        })
        .ToArray();
    }
}
将启动配置文件launchSettings.json中的applicationUrl的端口号错开下,改成5003和5002
{
    "demoForRemoteSite31": {
        "commandName": "Project",
        "launchBrowser": true,
        "launchUrl": "order",
        "environmentVariables": {
            "ASPNETCORE_ENVIRONMENT": "Development"
        },
        "applicationUrl": "https://localhost:5003;http://localhost:5002"
    }
}
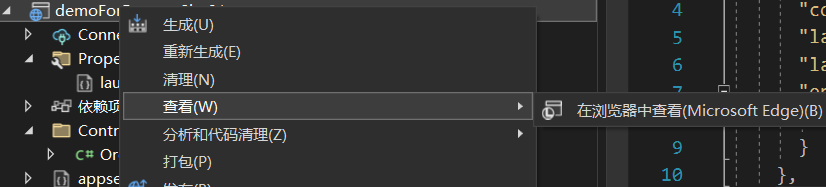
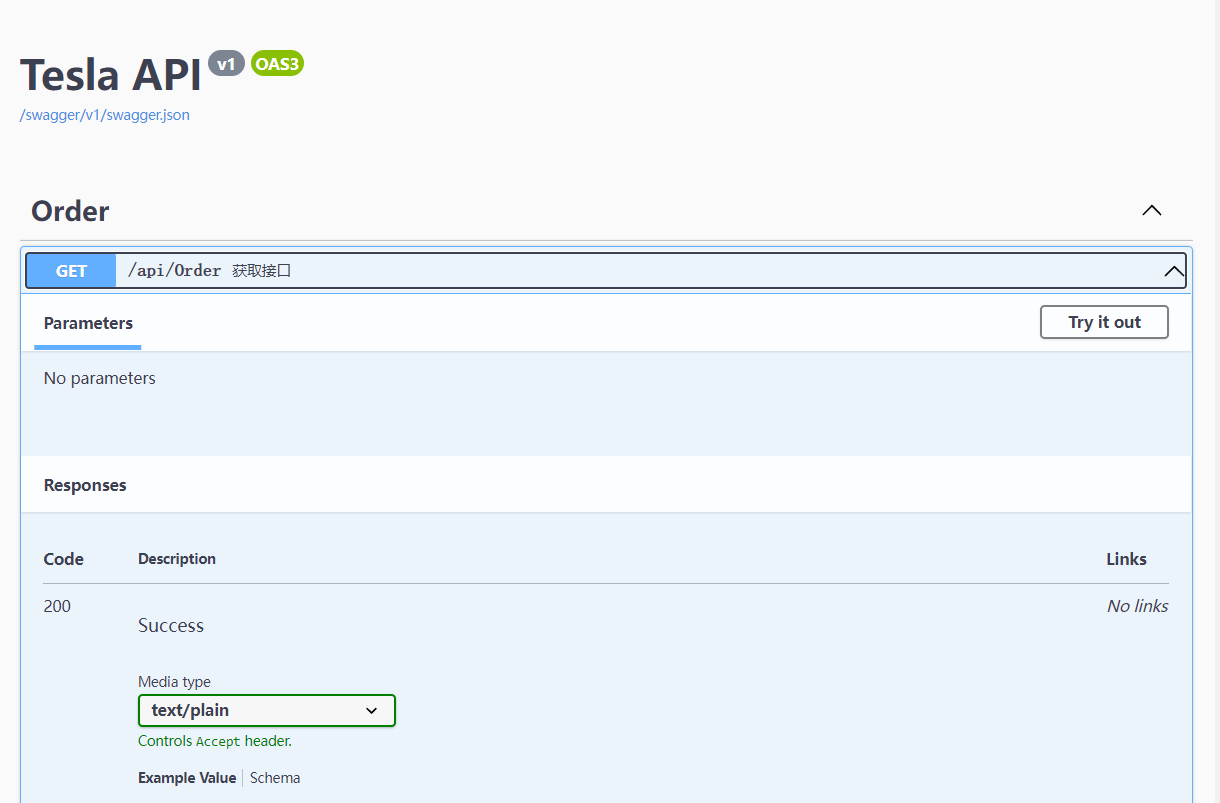
在项目上右键,查看-在浏览器中查看,启动它
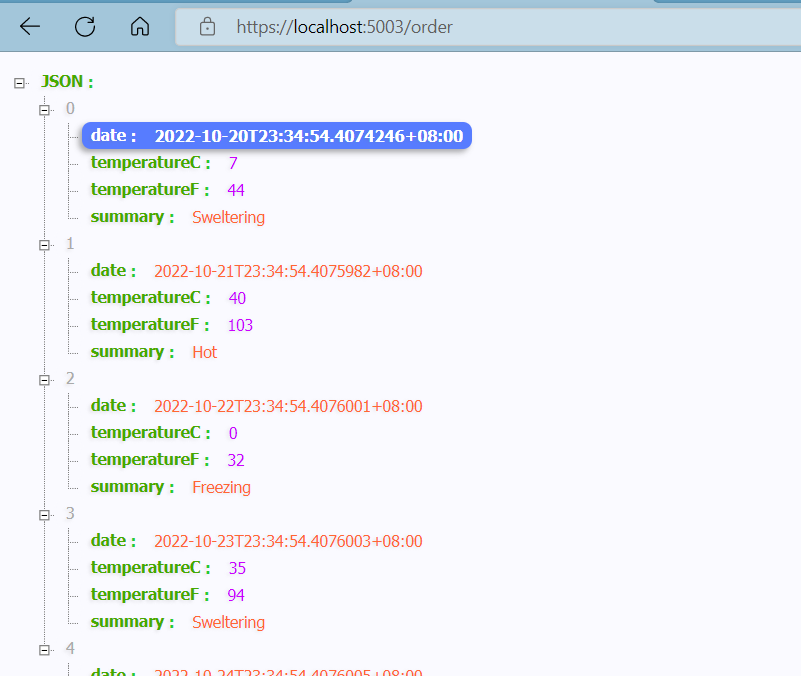
得到可供调用的接口:https://localhost:5003/order
通过工厂模式请求接口
在另外一个请求示例项目中,我们准备基于工厂模式的订单请求代码OrderServiceClient
/// <summary>
/// 订单服务请求(工厂构造模式)
/// </summary>
public class OrderServiceClient
{
    readonly IHttpClientFactory _httpClientFactory;

    /// <summary>
    /// 构造函数
    /// </summary>
    /// <param name="httpClientFactory"></param>
    public OrderServiceClient(IHttpClientFactory httpClientFactory)
    {
        this._httpClientFactory = httpClientFactory;
    }

    public async Task<string> GetAsync()
    {
        var client = _httpClientFactory.CreateClient();

        // 使用Client发起Http请求
        return await client.GetStringAsync("https://localhost:5003/order");
    }
}
在Startup.cs的ConfigureServices添加对HttpClient的支持,并且添加OrderServiceClient
public void ConfigureServices(IServiceCollection services)
{
    services.AddControllers();
    services.AddHttpClient();
    services.AddScoped<OrderServiceClient>();
}
接着我们改造下Controller,让它提供一个Action以便我们可以触发调用。
/// <summary>
/// 订单服务
/// </summary>
[ApiController]
[Route("api/[controller]")]
public class OrderController : ControllerBase
{
    private readonly ILogger<OrderController> _logger;
    private readonly OrderServiceClient _orderServiceClient;

    /// <summary>
    /// 构造函数
    /// </summary>
    /// <param name="logger"></param>
    /// <param name="orderServiceClient"></param>
    public OrderController(ILogger<OrderController> logger, OrderServiceClient orderServiceClient)
    {
        _logger = logger;
        _orderServiceClient = orderServiceClient;
    }

    /// <summary>
    /// 获取接口
    /// </summary>
    /// <returns></returns>
    [HttpGet]
    public async Task<string> Get()
    {
        return await _orderServiceClient.GetAsync();
    }
}
启动项目运行下
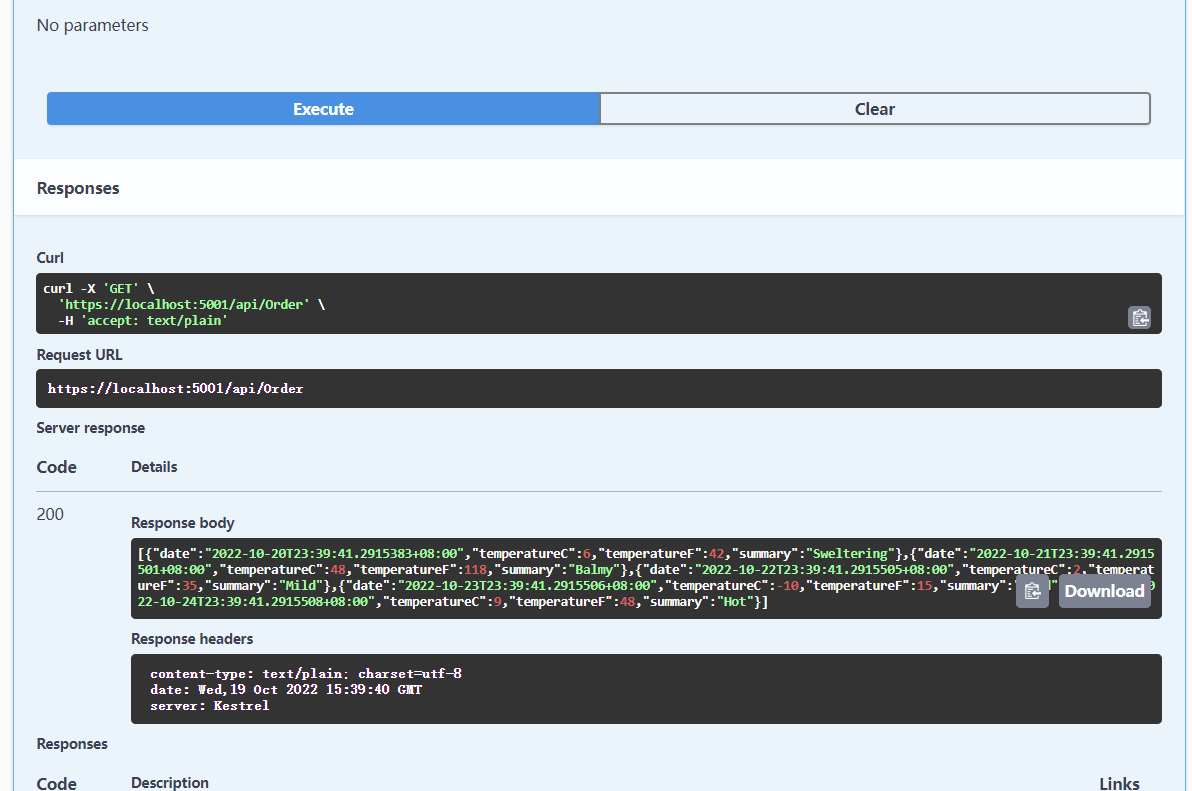
顺利完成请求。
这里我们使用了IHttpClientFactory的CreateClient方式来获取请求客户端。
使用命名客户端方式发起请求
我们可以通过AddHttpClient的参数来命名一个新的客户端,并且给它设置一些策略
public void ConfigureServices(IServiceCollection services)
{
    services.AddControllers();
    services.AddHttpClient("TeslaOrderHttpClient", configureClient =>
    {
        configureClient.DefaultRequestHeaders.Add("tesla-header", "TeslaOrder");
        configureClient.BaseAddress = new Uri("https://localhost:5003");
    });
    services.AddScoped<TeslaOrderHttpClient>();
这里我们就把它取名为TeslaOrderHttpClient,并且携带了定制Header以及指定它的BaseAddress。
接下来我们看看关于TeslaOrderHttpClient类的定义,基于之前的,我们稍作改造。
/// <summary>
/// 特斯拉订单网络请求
/// </summary>
public class TeslaOrderHttpClient
{
readonly IHttpClientFactory _httpClientFactory;
/// <summary>
/// 客户端名称
/// </summary>
readonly string _clientName = "TeslaOrderHttpClient";
/// <summary>
/// 构造函数
/// </summary>
/// <param name="httpClientFactory"></param>
public TeslaOrderHttpClient(IHttpClientFactory httpClientFactory)
{
this._httpClientFactory = httpClientFactory;
}
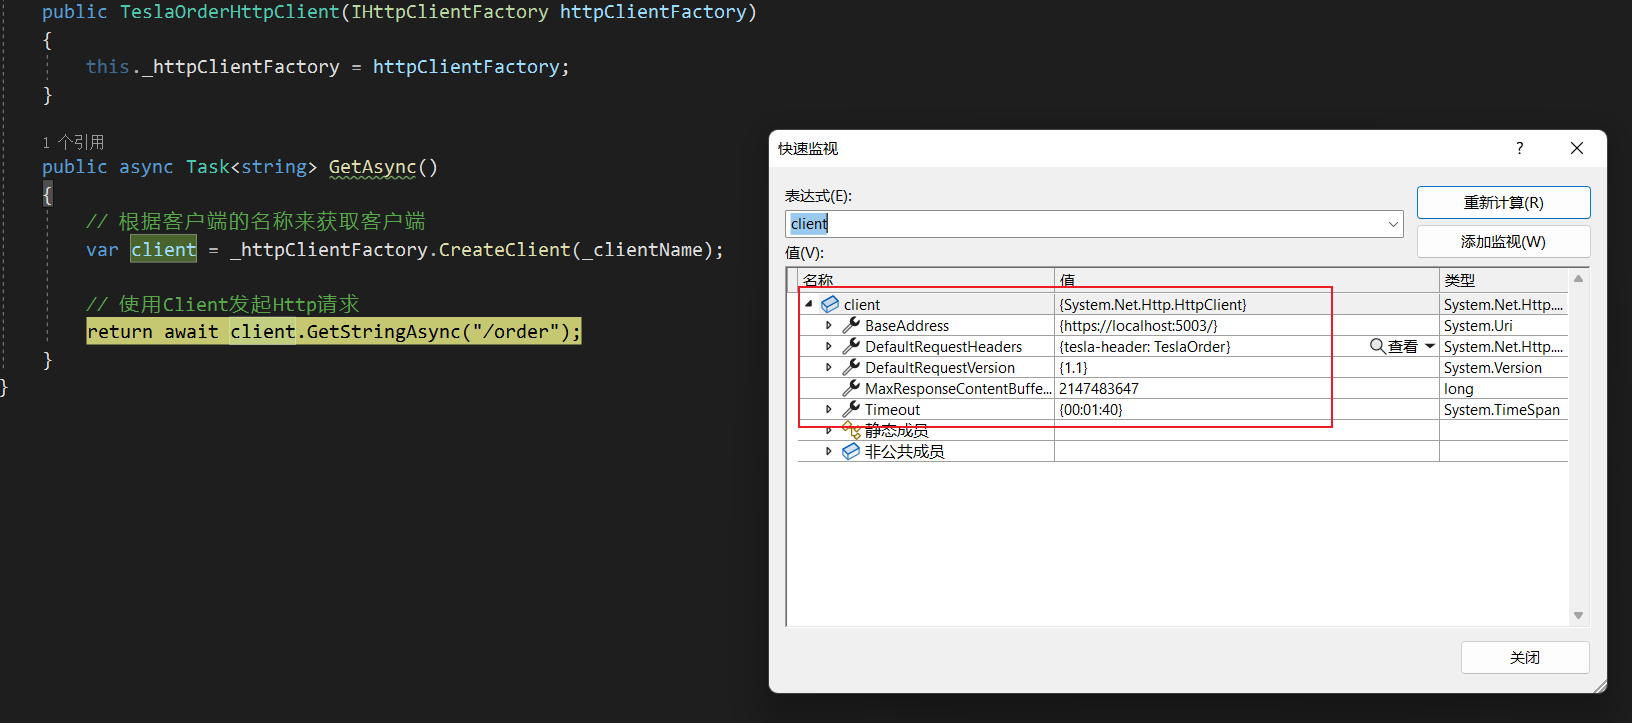
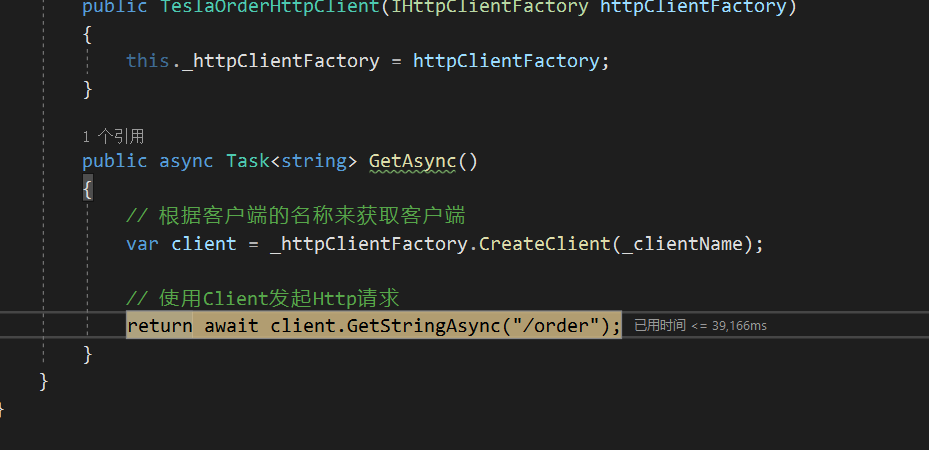
public async Task<string> GetAsync()
{
// 根据客户端的名称来获取客户端
var client = _httpClientFactory.CreateClient(_clientName);
// 使用Client发起Http请求
return await client.GetStringAsync("/order");
}
}
可以看从我们这次根据名称来获取HttpClient,并且这个名称就是前面约定的。
在Controller中添加新的Action来支持对它的调用
/// <summary>
/// 订单服务
/// </summary>
[ApiController]
[Route("api/[controller]")]
public class OrderController : ControllerBase
{
private readonly ILogger<OrderController> _logger;
private readonly TeslaOrderHttpClient _teslaOrderHttpClient;
/// <summary>
/// 构造函数
/// </summary>
/// <param name="logger"></param>
/// <param name="orderServiceClient"></param>
public OrderController(ILogger<OrderController> logger, TeslaOrderHttpClient teslaOrderHttpClient)
{
_logger = logger;
_teslaOrderHttpClient = teslaOrderHttpClient;
}
/// <summary>
/// 获取接口
/// </summary>
/// <returns></returns>
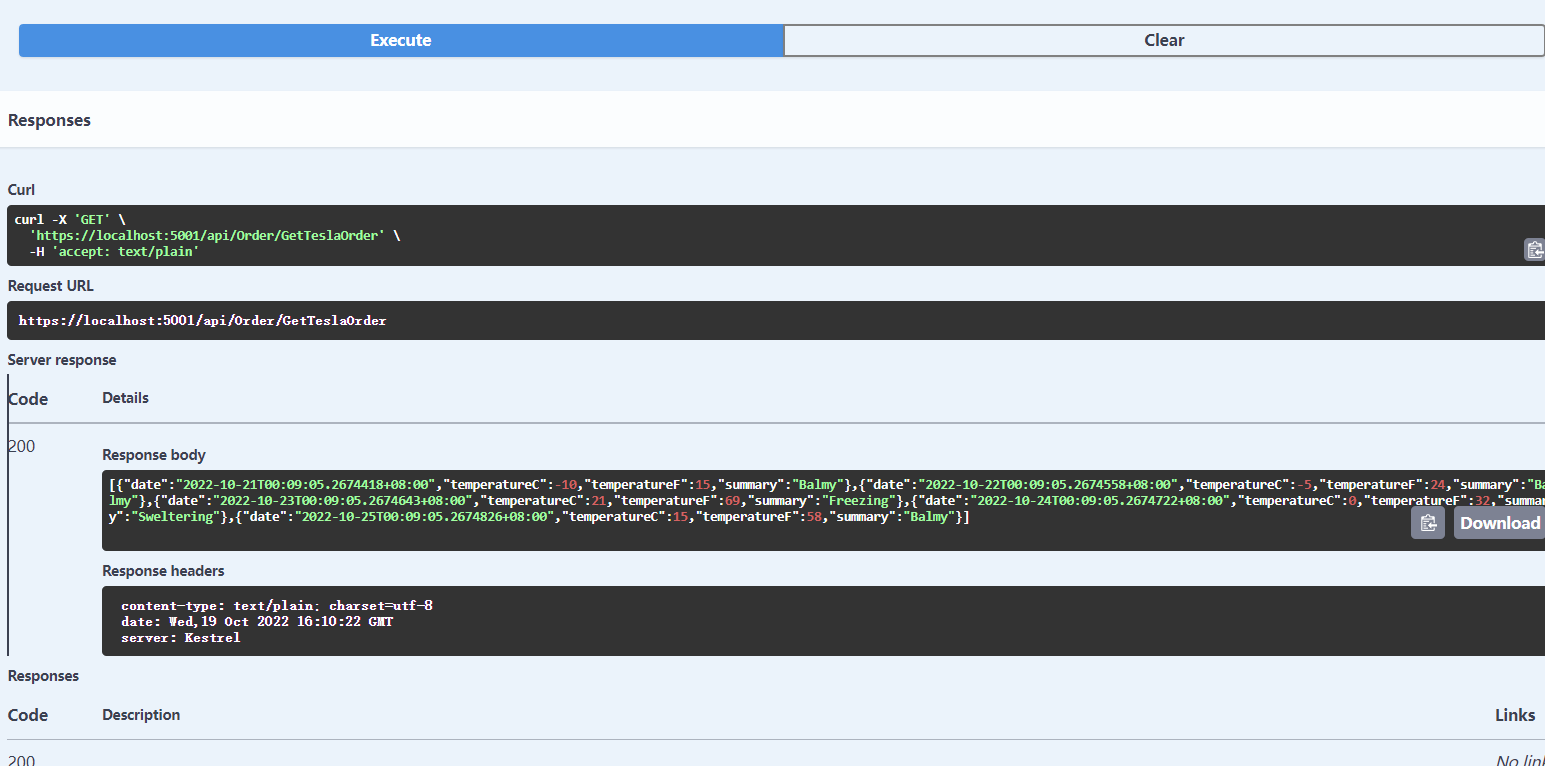
[HttpGet("GetTeslaOrder")]
public async Task<string> GetTeslaOrder()
{
return await _teslaOrderHttpClient.GetAsync();
}
}
运行试试
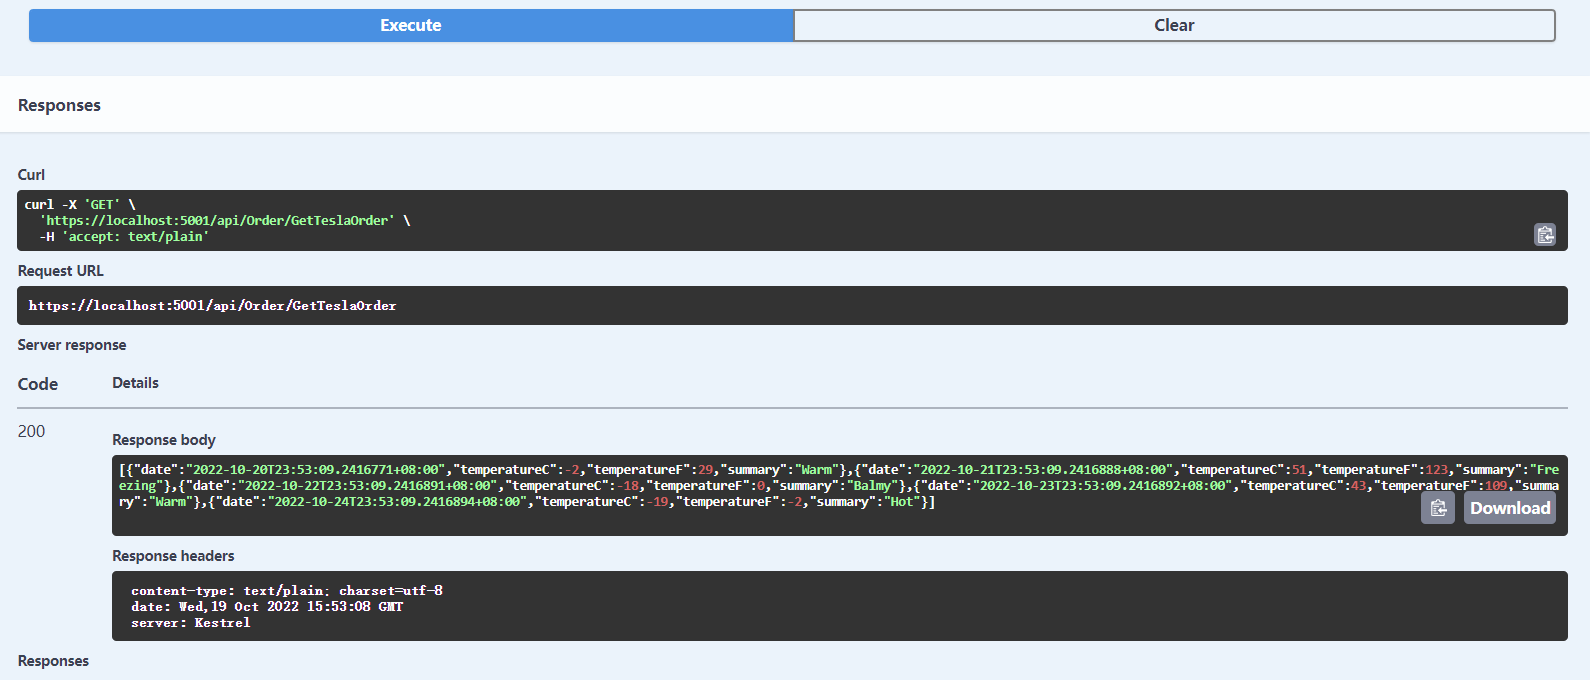
从断点可以看出,这里已经正确获取到我们配置的HttpClient了
另外还可以给这个HttpClient设置生命周期SetHandlerLifetime
services.AddHttpClient("TeslaOrderHttpClient", configureClient =>
{
    configureClient.DefaultRequestHeaders.Add("tesla-header", "TeslaOrder");
    configureClient.BaseAddress = new Uri("https://localhost:5003");
}).SetHandlerLifetime(TimeSpan.FromMinutes(4));
通过管道模式来设置客户端
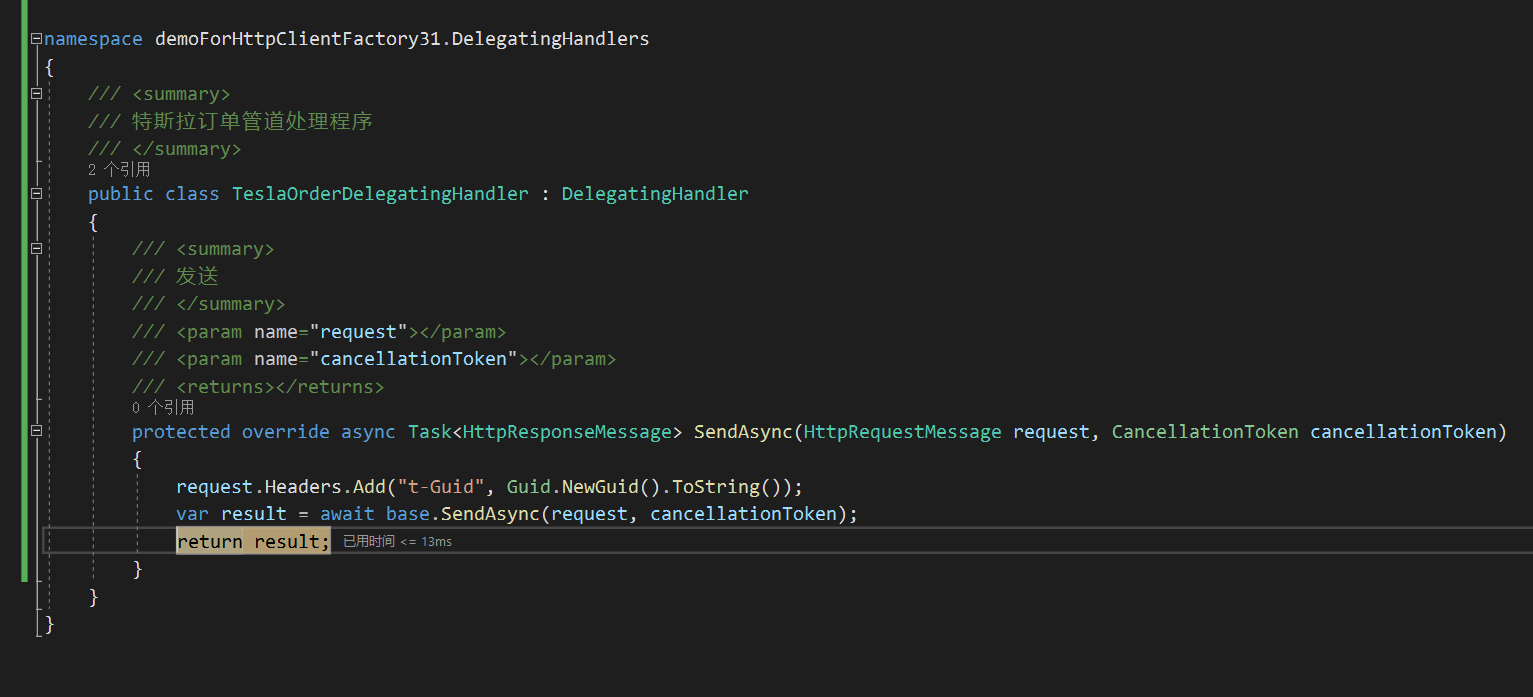
继承自DelegatingHandler的TeslaOrderDelegatingHandler
/// <summary>
/// 特斯拉订单管道处理程序
/// </summary>
public class TeslaOrderDelegatingHandler : DelegatingHandler
{
    /// <summary>
    /// 发送
    /// </summary>
    /// <param name="request"></param>
    /// <param name="cancellationToken"></param>
    /// <returns></returns>
    protected override async Task<HttpResponseMessage> SendAsync(HttpRequestMessage request, CancellationToken cancellationToken)
    {
        request.Headers.Add("t-Guid", Guid.NewGuid().ToString());
        var result = await base.SendAsync(request, cancellationToken);
        return result;
    }
}
我们重写其SendAsync方法,并且和前面一样,添加我们自定义的Header进来。
然后我们把它注册进去AddHttpMessageHandler。
services.AddScoped<TeslaOrderDelegatingHandler>();
services.AddHttpClient("TeslaOrderHttpClient", configureClient =>
{
    configureClient.DefaultRequestHeaders.Add("tesla-header", "TeslaOrder");
    configureClient.BaseAddress = new Uri("https://localhost:5003");
})
.SetHandlerLifetime(TimeSpan.FromMinutes(4))
.AddHttpMessageHandler(serviceProvider => serviceProvider.GetService<TeslaOrderDelegatingHandler>());
运行下
看到,它会作用于真正请求之前。
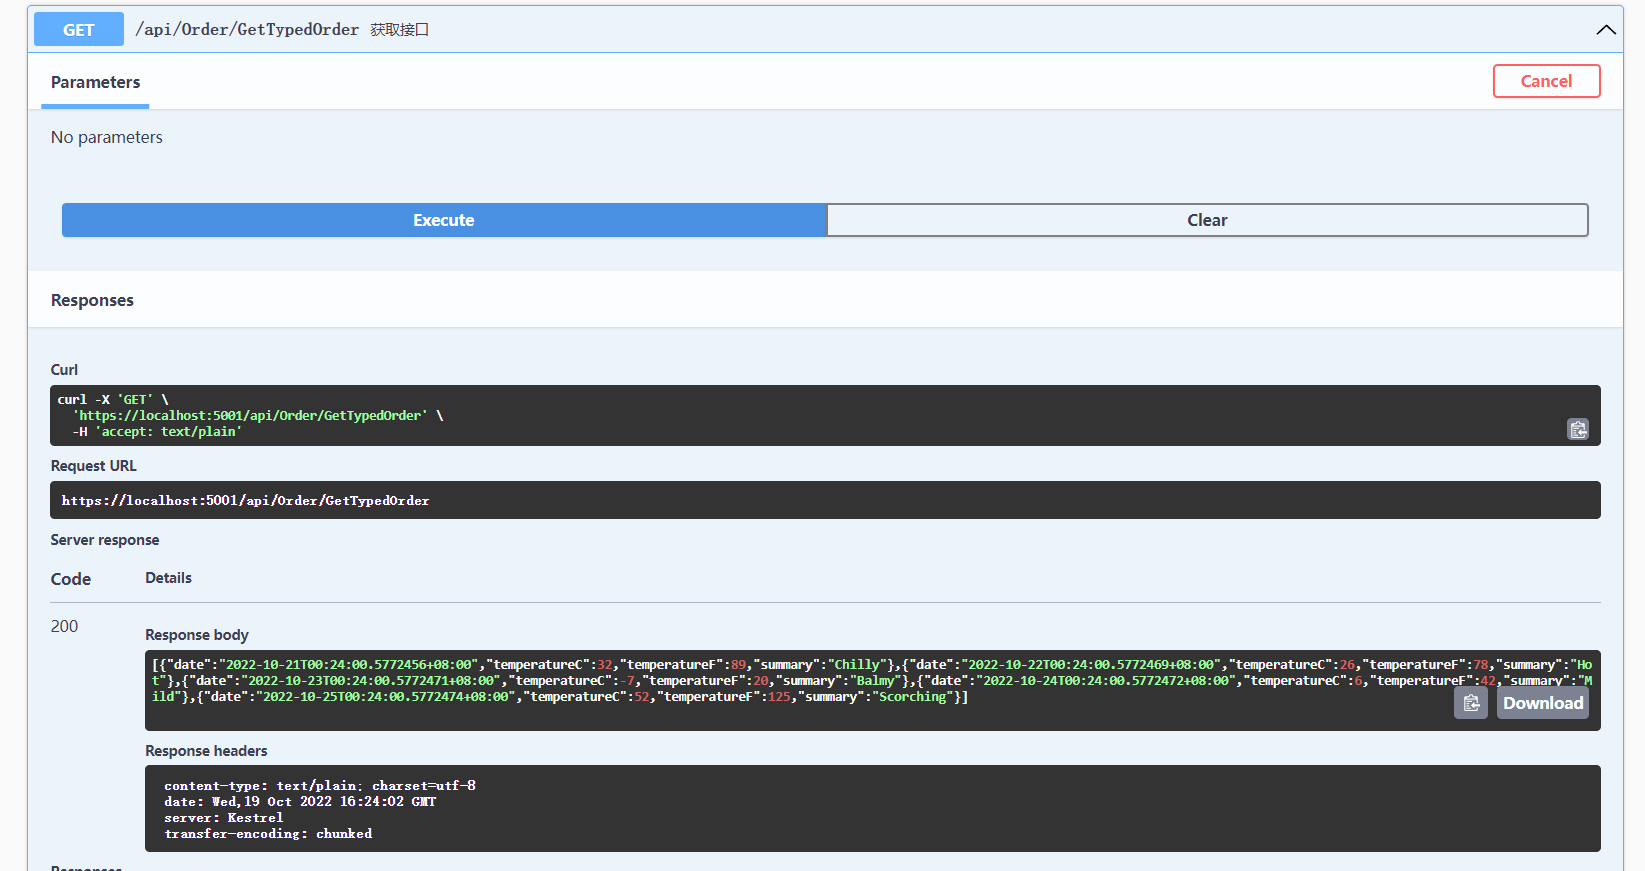
使用类型客户端方式发起请求
类型客户端的本质也是命名客户端,只是它的本质是使用客户端的类型名称来作为HttpClient的配置名称的。
/// <summary>
/// 类型订单客户端
/// </summary>
public class TypedOrderHttpClient
{
    readonly HttpClient _httpClient;

    /// <summary>
    /// 构造函数
    /// </summary>
    /// <param name="httpClient"></param>
    public TypedOrderHttpClient(HttpClient httpClient)
    {
        this._httpClient = httpClient;
    }

    public async Task<string> GetAsync()
    {
        // 使用Client发起Http请求
        return await _httpClient.GetStringAsync("/order");
    }
}
这里可以不使用HttpClientFactory了
在注册的时候直接services.AddHttpClient<TypedOrderHttpClient>即可
services.AddHttpClient<TypedOrderHttpClient>(configureClient =>
{
    configureClient.DefaultRequestHeaders.Add("tesla-header", "TeslaOrder");
    configureClient.BaseAddress = new Uri("https://localhost:5003");
})
.SetHandlerLifetime(TimeSpan.FromMinutes(4))
.AddHttpMessageHandler(serviceProvider => serviceProvider.GetService<TeslaOrderDelegatingHandler>());
运行
启用日志输出
{
  "Logging": {
    "LogLevel": {
      "Default": "Information",
      "Microsoft": "Warning",
      "Microsoft.Hosting.Lifetime": "Information",
      "System.Net.Http.HttpClient.TypedOrderHttpClient": "Trace"
    }
  },
  "AllowedHosts": "*"
}
注意这里TypedOrderHttpClient和你要输出的HttpClient配置名称保持一致。
info: System.Net.Http.HttpClient.TypedOrderHttpClient.LogicalHandler[100]
      Start processing HTTP request GET https://localhost:5003/order
trce: System.Net.Http.HttpClient.TypedOrderHttpClient.LogicalHandler[102]
      Request Headers:
      tesla-header: TeslaOrder

info: System.Net.Http.HttpClient.TypedOrderHttpClient.ClientHandler[100]
      Sending HTTP request GET https://localhost:5003/order
trce: System.Net.Http.HttpClient.TypedOrderHttpClient.ClientHandler[102]
      Request Headers:
      tesla-header: TeslaOrder
      t-Guid: 92f85542-3db7-4b95-966d-71c8dc15f022

info: System.Net.Http.HttpClient.TypedOrderHttpClient.ClientHandler[101]
      Received HTTP response after 192.8728ms - OK
trce: System.Net.Http.HttpClient.TypedOrderHttpClient.ClientHandler[103]
      Response Headers:
      Date: Wed, 19 Oct 2022 16:28:20 GMT
      Server: Kestrel
      Transfer-Encoding: chunked
      Content-Type: application/json; charset=utf-8

info: System.Net.Http.HttpClient.TypedOrderHttpClient.LogicalHandler[101]
      End processing HTTP request after 213.5573ms - OK
trce: System.Net.Http.HttpClient.TypedOrderHttpClient.LogicalHandler[103]
      Response Headers:
      Date: Wed, 19 Oct 2022 16:28:20 GMT
      Server: Kestrel
      Transfer-Encoding: chunked
      Content-Type: application/json; charset=utf-8
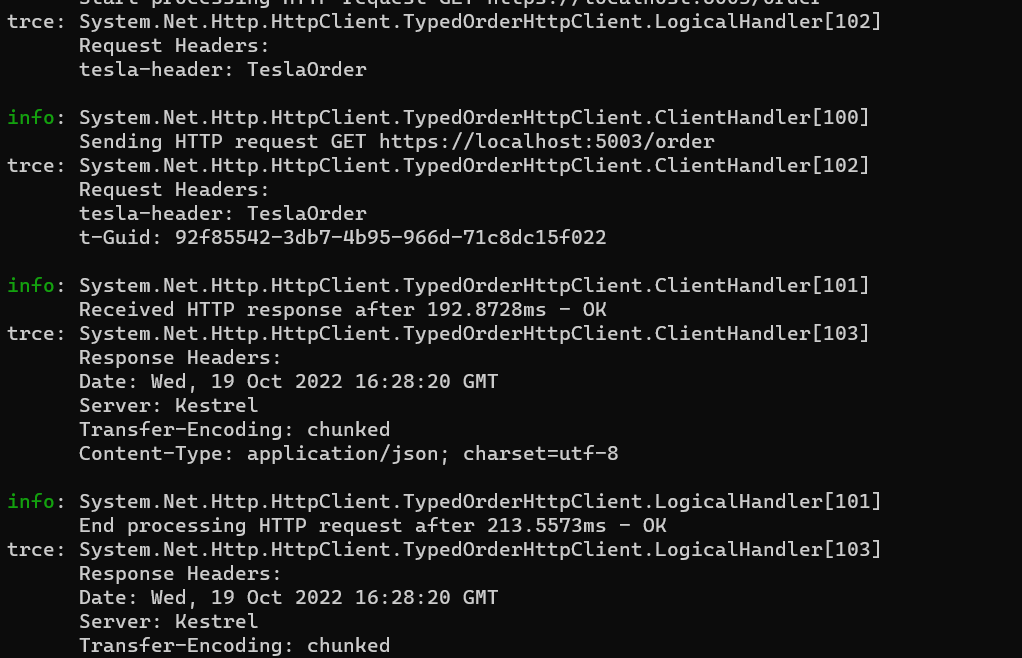
可以看到整个管道的日志。
总结
实战中,建议优先采用类型客户端方式,可以为不同服务客户端设置不同生命周期和管道模型。
内部服务间通讯利器(gRPC)
什么是gRPC

gRPC是一个现代开源的高性能远程过程调用(RPC)框架,可以在任何环境下运行。它可以通过对负载平衡、跟踪、健康检查和认证的可插拔支持,有效地连接数据中心内和跨数据中心的服务。它也适用于分布式计算的最后一英里,将设备、移动应用和浏览器连接到后端服务。
gRPC是一个现代的、高性能的框架,发展了古老的远程过程调用(RPC)协议。在应用层面,gRPC简化了客户端和后端服务之间的信息传递。gRPC起源于谷歌,是开源的,是云原生计算基金会(CNCF)云原生产品生态系统的一部分。CNCF认为gRPC是一个孵化项目。孵化意味着终端用户正在生产应用中使用该技术,而且该项目有大量的贡献者。
一个典型的gRPC客户端应用程序将暴露一个本地的、进程中的函数,实现一个业务操作。掩盖之下,该本地函数调用了远程机器上的另一个函数。看上去是一个本地调用,实际上是对远程服务的一个透明的进程外调用。RPC管道抽象了计算机之间的点对点网络通信、序列化和执行。
在云原生应用中,开发人员经常跨编程语言、框架和技术工作。这种互操作性使消息契约和跨平台通信所需的管道变得复杂。gRPC提供了一个"统一的水平层",抽象了这些问题。开发人员在他们的原生平台上编码,专注于业务功能,而gRPC处理通信管道。
gRPC为大多数流行的开发堆栈提供全面支持,包括Java、JavaScript、C#、Go、Swift和NodeJS。
在gRPC中,客户端应用程序可以直接调用不同机器上的服务器应用程序的方法,就像它是一个本地对象一样,使你更容易创建分布式应用程序和服务。就像许多RPC系统一样,gRPC是围绕着定义服务的想法,指定可以远程调用的方法及其参数和返回类型。在服务器端,服务器实现这个接口并运行gRPC服务器来处理客户端的调用。在客户端,客户端有一个存根(在某些语言中被称为只是一个客户端),提供与服务器相同的方法。
gRPC客户端和服务器可以在各种环境中运行并相互交谈--从谷歌内部的服务器到你自己的桌面--并且可以用任何gRPC支持的语言编写。因此,举例来说,你可以很容易地用Java创建一个gRPC服务器,客户端用Go、Python或Ruby。此外,最新的谷歌API将有gRPC版本的接口,让你轻松地在你的应用程序中建立谷歌功能。

gRPC的好处
gRPC使用HTTP/2作为其传输协议。虽然与HTTP 1.1兼容,但HTTP/2具有许多高级功能。
- 用于数据传输的二进制框架协议--与HTTP 1.1不同,它是基于文本的。
- 支持多路复用,可在同一连接上发送多个并行请求--HTTP 1.1限制每次处理一个请求/响应信息。
- 双向全双工通信,可同时发送客户端请求和服务器响应。
- 内置的流媒体,使请求和响应能够异步地流传大数据集。
- 头部压缩,减少网络使用。
gRPC是轻量级和高性能的。它可以比JSON序列化快8倍,信息量小60-80%。用微软Windows通信基金会(WCF)的话说,gRPC的性能超过了高度优化的NetTCP绑定的速度和效率。与NetTCP不同的是,gRPC是跨平台的,因为NetTCP偏向于微软的协议栈。
协议缓冲区(Protocol Buffers)
https://developers.google.com/protocol-buffers/docs/overview
gRPC采用了一种叫做协议缓冲区(Protocol Buffers)的开源技术。它们提供了一种高效的、平台中立的序列化格式,用于序列化服务之间相互发送的结构化消息。使用跨平台的接口定义语言(IDL),开发者为每个微服务定义一个服务合同。该合同以基于文本的.proto文件实现,描述了每个服务的方法、输入和输出。同样的合同文件可以用于gRPC客户端和建立在不同开发平台上的服务。
使用proto文件,Protobuf编译器protoc可以为你的目标平台生成客户端和服务代码。这些代码包括以下部分。
- 强类型的对象,由客户和服务共享,表示服务操作和消息的数据元素。
- 一个强类型的基类,具有所需的网络管道,远程gRPC服务可以继承和扩展。
- 一个客户端存根,包含调用远程gRPC服务所需的管道。
在运行时,每个消息都被序列化为标准的Protobuf表示,并在客户端和远程服务之间进行交换。与JSON或XML不同,Protobuf消息被序列化为编译的二进制字节。
这本书《gRPC for WCF Developers》(可从微软架构网站获得)对gRPC和协议缓冲区进行了深入介绍。
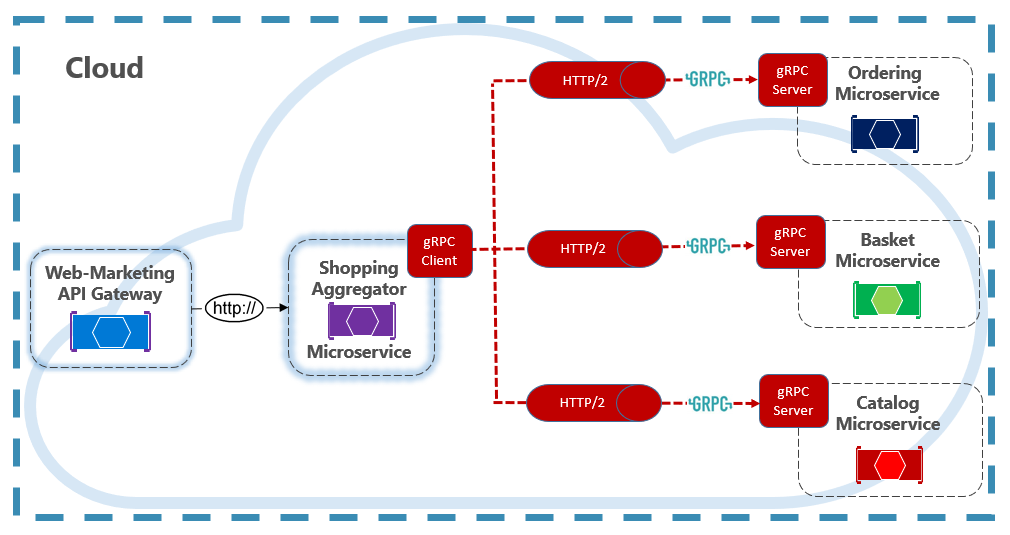
容器上的eShop中的gRPC
gRPC的特点
- 提供几乎所有主流语言的实现,打破语言隔阂
- 基于HTTP/2,开放协议,受到广泛的支持,易于实现和集成
- 默认使用Protocol Buffers序列化,性能相较于Restful Json好很多
- 工具链成熟,代码生成便捷,开箱即用
- 支持双向流式的请求和响应,对批量处理、低延时场景友好
.Net生态对gRPC的支持情况
- 提供基于HttpClient的原生框架实现
- 提供原生的ASP.NET Core集成库
- 提供完整的代码生成工具
- Visual Studio和Visual Studio Code提供proto文件的智能提示
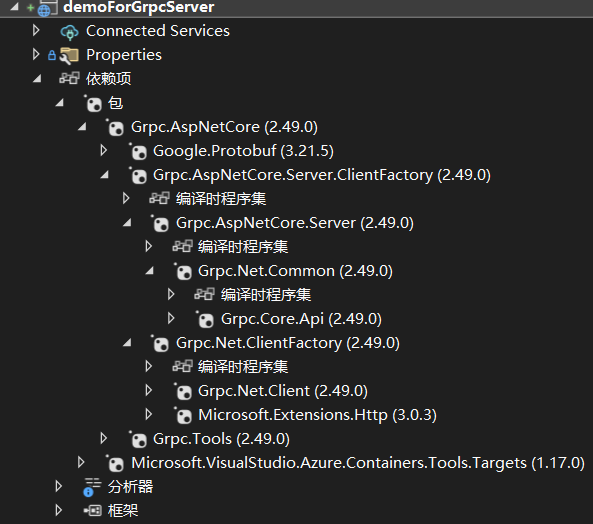
客户端核心包
- Google.Protobuf
- Grpc.Net.Client
- Grpc.Net.ClientFactory
- Grpc.Tools
.proto文件
- 定义包、库名
- 定义服务
Service - 定义输入输出模型
Message
proto文件主要是负责定义包名和库名,定义我们的服务,定义服务的输入输出类型,基于这些定义可以通过Grpc.Tools生成我们的服务端代码和客户端的代码。
gRPC异常处理
- 使用Grpc.Core.RpcException
- 使用Grpc.Core.Interceptors.Interceptor
gRPC发生异常时,我们会使用到Grpc的RpcException这个异常,我们捕获到这个异常就可以捕捉到gRPC相关的异常,它也提供了拦截器的机制,可以通过注入拦截器来处理我们的异常。
gRPC与HTTP证书
- 使用自制证书
- 使用非加密的HTTP2
gRPC基于HTTP2,默认情况下HTTP2使用了HTTP的加密协议,在发布我们的gRPC服务时会需要用到证书,同时它也提供了不使用证书的解决方案。
引入Grpc并且定义proto
依赖包
dotnet add package Grpc.AspNetCore
这里我们新建一个Proto文件夹来存放约定的.proto文件
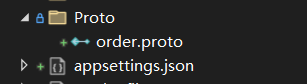
这里新建一个order.proto文件
syntax = "proto3";

option csharp_namespace = "GrpcServices";

service OrderGrpc
{
	rpc CreateOrder(CreateOrderCommand) returns (CreateOrderResult);
}

message CreateOrderCommand
{
	string buyerId = 1;
	int32 productId = 2;
	double unitPrice = 3;
	double discount = 4;
	int32 units = 5;
}

message CreateOrderResult
{
	int32 orderId = 1;
}
第一行表示了使用proto3协议,第二行、第三行表示了命名空间是GrpcServices
接下来定义了一个服务叫OrderGrpc,这个服务有一个方法叫CreateOrder,入参是CreateOrderCommand,响应是CreateOrderResult
在gRPC的proto文件里面定义输入输出响应的时候,都是message,这里定义了两个message叫CreateOrderCommand、CreateOrderResult。
需要为每一个字段定义它的顺序,这个顺序决定了序列化时的顺序,它不像Json,我们需要定义Key、Value,在序列化的时候,它实际上是根据数据类型和顺序来识别我们的字段的值,所以这也是Protocol Buffers比HTTP Json快的原因。
基于proto生成编译前代码
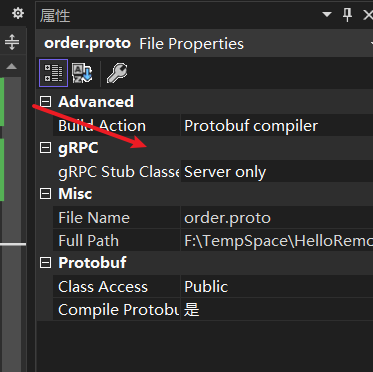
同时,我们需要修改下order.proto的属性,将它的Build Action设置为Protobuf compiler类型。
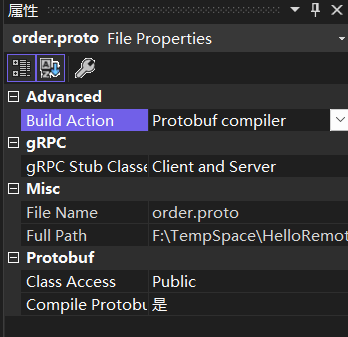
我们还可以根据它实际作用设定它的工作场景:Client and Server、Client Only、Server Only
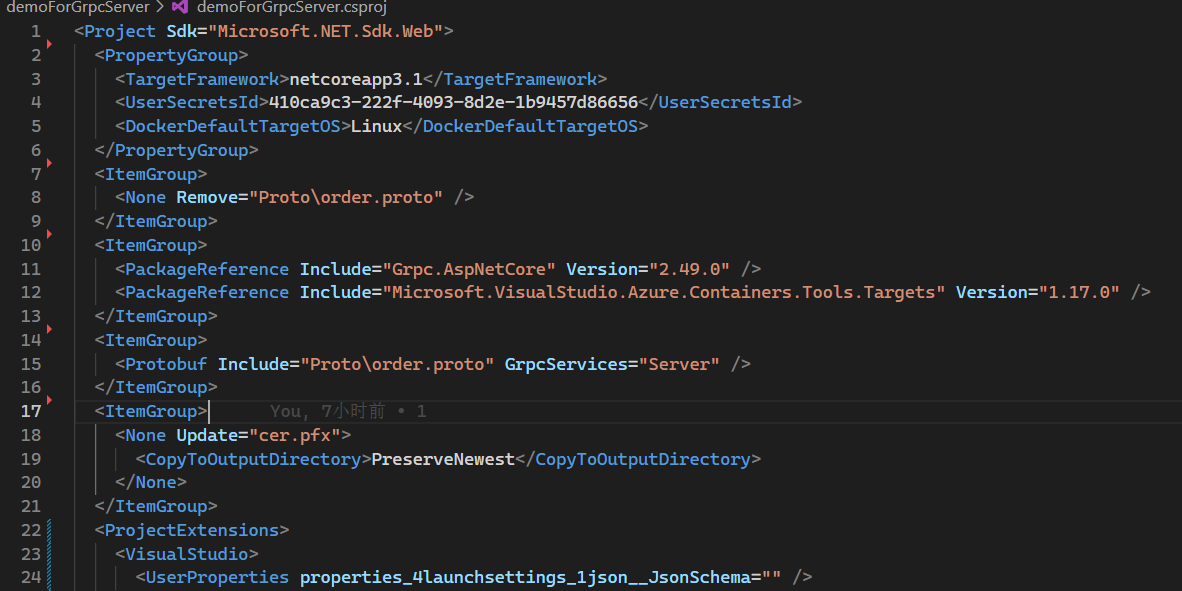
这时候,它在项目文件中描述是同步变更的
<Project Sdk="Microsoft.NET.Sdk.Web">

  <PropertyGroup>
    <TargetFramework>netcoreapp3.1</TargetFramework>
    <UserSecretsId>410ca9c3-222f-4093-8d2e-1b9457d86656</UserSecretsId>
    <DockerDefaultTargetOS>Linux</DockerDefaultTargetOS>
  </PropertyGroup>

  <ItemGroup>
    <None Remove="Proto\order.proto" />
  </ItemGroup>

  <ItemGroup>
    <PackageReference Include="Grpc.AspNetCore" Version="2.49.0" />
    <PackageReference Include="Microsoft.VisualStudio.Azure.Containers.Tools.Targets" Version="1.17.0" />
  </ItemGroup>

  <ItemGroup>
    <Protobuf Include="Proto\order.proto" GrpcServices="Server" />
  </ItemGroup>

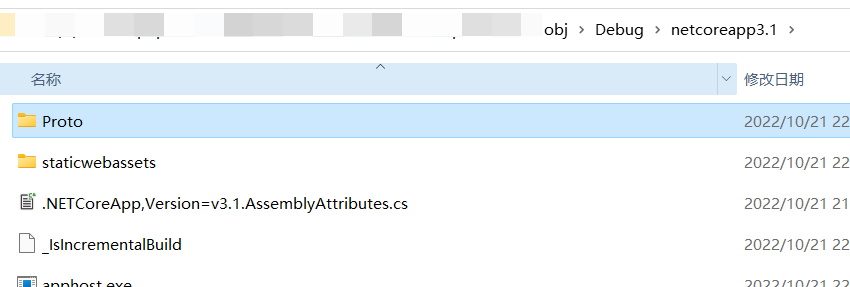
这时候重新生成一次项目,我们就可以发现,在obj目录下,会生成对应的cs文件。

看下Order.cs的定义
// <auto-generated>
//     Generated by the protocol buffer compiler.  DO NOT EDIT!
//     source: Proto/order.proto
// </auto-generated>
#pragma warning disable 1591, 0612, 3021, 8981
#region Designer generated code

using pb = global::Google.Protobuf;
using pbc = global::Google.Protobuf.Collections;
using pbr = global::Google.Protobuf.Reflection;
using scg = global::System.Collections.Generic;
namespace GrpcServices {

  /// <summary>Holder for reflection information generated from Proto/order.proto</summary>
  public static partial class OrderReflection {

    #region Descriptor
    /// <summary>File descriptor for Proto/order.proto</summary>
    public static pbr::FileDescriptor Descriptor {
      get { return descriptor; }
    }
    private static pbr::FileDescriptor descriptor;

    static OrderReflection() {
      byte[] descriptorData = global::System.Convert.FromBase64String(
          string.Concat(
            "ChFQcm90by9vcmRlci5wcm90byJsChJDcmVhdGVPcmRlckNvbW1hbmQSDwoH",
            "YnV5ZXJJZBgBIAEoCRIRCglwcm9kdWN0SWQYAiABKAUSEQoJdW5pdFByaWNl",
            "GAMgASgBEhAKCGRpc2NvdW50GAQgASgBEg0KBXVuaXRzGAUgASgFIiQKEUNy",
            "ZWF0ZU9yZGVyUmVzdWx0Eg8KB29yZGVySWQYASABKAUyQwoJT3JkZXJHcnBj",
            "EjYKC0NyZWF0ZU9yZGVyEhMuQ3JlYXRlT3JkZXJDb21tYW5kGhIuQ3JlYXRl",
            "T3JkZXJSZXN1bHRCD6oCDEdycGNTZXJ2aWNlc2IGcHJvdG8z"));
      descriptor = pbr::FileDescriptor.FromGeneratedCode(descriptorData,
          new pbr::FileDescriptor[] { },
          new pbr::GeneratedClrTypeInfo(null, null, new pbr::GeneratedClrTypeInfo[] {
            new pbr::GeneratedClrTypeInfo(typeof(global::GrpcServices.CreateOrderCommand), global::GrpcServices.CreateOrderCommand.Parser, new[]{ "BuyerId", "ProductId", "UnitPrice", "Discount", "Units" }, null, null, null, null),
            new pbr::GeneratedClrTypeInfo(typeof(global::GrpcServices.CreateOrderResult), global::GrpcServices.CreateOrderResult.Parser, new[]{ "OrderId" }, null, null, null, null)
          }));
    }
    #endregion

  }
有点长。。。
看下OrderGrpc.cs的定义
// <auto-generated>
//     Generated by the protocol buffer compiler.  DO NOT EDIT!
//     source: Proto/order.proto
// </auto-generated>
#pragma warning disable 0414, 1591, 8981
#region Designer generated code

using grpc = global::Grpc.Core;

namespace GrpcServices {
  public static partial class OrderGrpc
  {
    static readonly string __ServiceName = "OrderGrpc";

    [global::System.CodeDom.Compiler.GeneratedCode("grpc_csharp_plugin", null)]
    static void __Helper_SerializeMessage(global::Google.Protobuf.IMessage message, grpc::SerializationContext context)
    {
      #if !GRPC_DISABLE_PROTOBUF_BUFFER_SERIALIZATION
      if (message is global::Google.Protobuf.IBufferMessage)
      {
        context.SetPayloadLength(message.CalculateSize());
        global::Google.Protobuf.MessageExtensions.WriteTo(message, context.GetBufferWriter());
        context.Complete();
        return;
      }
      #endif
      context.Complete(global::Google.Protobuf.MessageExtensions.ToByteArray(message));
    }

    [global::System.CodeDom.Compiler.GeneratedCode("grpc_csharp_plugin", null)]
    static class __Helper_MessageCache<T>
    {
      public static readonly bool IsBufferMessage = global::System.Reflection.IntrospectionExtensions.GetTypeInfo(typeof(global::Google.Protobuf.IBufferMessage)).IsAssignableFrom(typeof(T));
    }
使用自动生成的代码
首先,我们要把服务端那个proto文件共享过来,我们编辑客户端项目的项目文件demoForGrpcClient.csproj
<Project Sdk="Microsoft.NET.Sdk.Web">

  <PropertyGroup>
    <TargetFramework>netcoreapp3.1</TargetFramework>
    <UserSecretsId>4a768401-255f-4d25-804e-ab6643ba275d</UserSecretsId>
    <DockerDefaultTargetOS>Linux</DockerDefaultTargetOS>
  </PropertyGroup>

  <ItemGroup>
    <PackageReference Include="Grpc.AspNetCore" Version="2.49.0" />
    <PackageReference Include="Microsoft.VisualStudio.Azure.Containers.Tools.Targets" Version="1.17.0" />
  </ItemGroup>

  <ItemGroup>
    <Protobuf Include="..\demoForGrpcServer\Proto\order.proto" GrpcServices="Client" />
  </ItemGroup>
这里根据相对路径,把位于demoForGrpcServer的order.proto引入进来,并且标识其场景为Client。
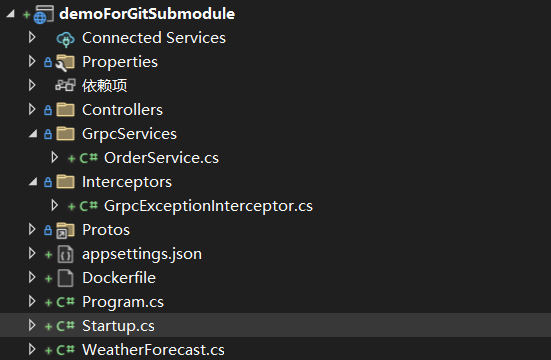
接下来,创建名为GrpcServices的文件夹,新建订单服务类OrderService,继承自OrderGrpc.OrderGrpcBase
如果前面一步成功生成,那么这里就可以继承到,如果前面一步没有生成,那这里会找不到定义
/// <summary>
/// 订单服务(基于Grpc)
/// </summary>
public class OrderService : OrderGrpc.OrderGrpcBase
{
    /// <summary>
    /// 重写创建订单
    /// </summary>
    /// <param name="request"></param>
    /// <param name="context"></param>
    /// <returns></returns>
    public override Task<CreateOrderResult> CreateOrder(CreateOrderCommand request, ServerCallContext context)
    {
        return base.CreateOrder(request, context);
    }
}
这里在OrderGrpc.OrderGrpcBase就会存在我们前面在proto定义的那个CreateOrder方法,我们可以在这里重写它,以便插入我们想自定义的逻辑。
其中request是入参,context是当前请求的上下文,ServerCallContext是Grpc的一个内置类。
/// <summary>
/// Context for a server-side call.
/// </summary>
public abstract class ServerCallContext
{
    private Dictionary<object, object>? userState;

    /// <summary>
    /// Creates a new instance of <c>ServerCallContext</c>.
    /// </summary>
    protected ServerCallContext()
    {
    }

    /// <summary>
    /// Asynchronously sends response headers for the current call to the client. This method may only be invoked once for each call and needs to be invoked
    /// before any response messages are written. Writing the first response message implicitly sends empty response headers if <c>WriteResponseHeadersAsync</c> haven't
    /// been called yet.
    /// </summary>
    /// <param name="responseHeaders">The response headers to send.</param>
    /// <returns>The task that finished once response headers have been written.</returns>
    public Task WriteResponseHeadersAsync(Metadata responseHeaders)
    {
        return WriteResponseHeadersAsyncCore(responseHeaders);
    }

    /// <summary>
    /// Creates a propagation token to be used to propagate call context to a child call.
    /// </summary>
    public ContextPropagationToken CreatePropagationToken(ContextPropagationOptions? options = null)
    {
        return CreatePropagationTokenCore(options);
    }

    /// <summary>Name of method called in this RPC.</summary>
    public string Method => MethodCore;

    /// <summary>Name of host called in this RPC.</summary>
    public string Host => HostCore;

    /// <summary>Address of the remote endpoint in URI format.</summary>
    public string Peer => PeerCore;

    /// <summary>Deadline for this RPC. The call will be automatically cancelled once the deadline is exceeded.</summary>
    public DateTime Deadline => DeadlineCore;

    /// <summary>Initial metadata sent by client.</summary>
    public Metadata RequestHeaders => RequestHeadersCore;
最终我们可以根据实际业务需要来改造这个服务代码
/// <summary>
/// 订单服务(基于Grpc)
/// </summary>
public class OrderService : OrderGrpc.OrderGrpcBase
{
    /// <summary>
    /// 重写创建订单
    /// </summary>
    /// <param name="request"></param>
    /// <param name="context"></param>
    /// <returns></returns>
    public override Task<CreateOrderResult> CreateOrder(CreateOrderCommand request, ServerCallContext context)
    {
        // 可替换成真实的创建订单服务的业务代码
        return Task.FromResult(new CreateOrderResult { OrderId = 11 });
    }
}
我们在Startup.cs的Configure方法直接设计一次gRPC调用
public void Configure(IApplicationBuilder app, IWebHostEnvironment env)
{
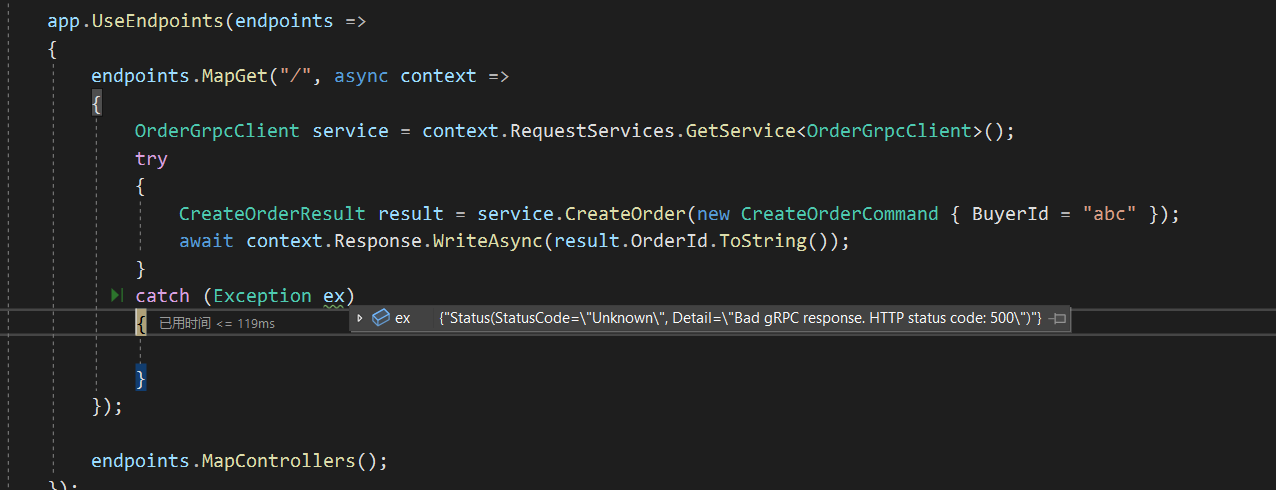
app.UseEndpoints(endpoints =>
{
endpoints.MapGet("/", async context =>
{
OrderGrpcClient service = context.RequestServices.GetService<OrderGrpcClient>();
try
{
CreateOrderResult result = service.CreateOrder(new CreateOrderCommand { BuyerId = "abc" });
await context.Response.WriteAsync(result.OrderId.ToString());
}
catch (Exception ex)
{
}
});
endpoints.MapControllers();
});
}
当访问根路径/的时候,我们获取OrderGrpcClient实例并且调用一次CreateOrder方法,并且我们将拿到的结果值放到输出结果中。
运行之后,我们发现报错了
fail: Grpc.Net.Client.Internal.GrpcCall[6]
      Error starting gRPC call.
System.Net.Http.HttpRequestException: 由于目标计算机积极拒绝,无法连接。
 ---> System.Net.Sockets.SocketException (10061): 由于目标计算机积极拒绝,无法连接。
   at System.Net.Http.ConnectHelper.ConnectAsync(String host, Int32 port, CancellationToken cancellationToken)
   --- End of inner exception stack trace ---
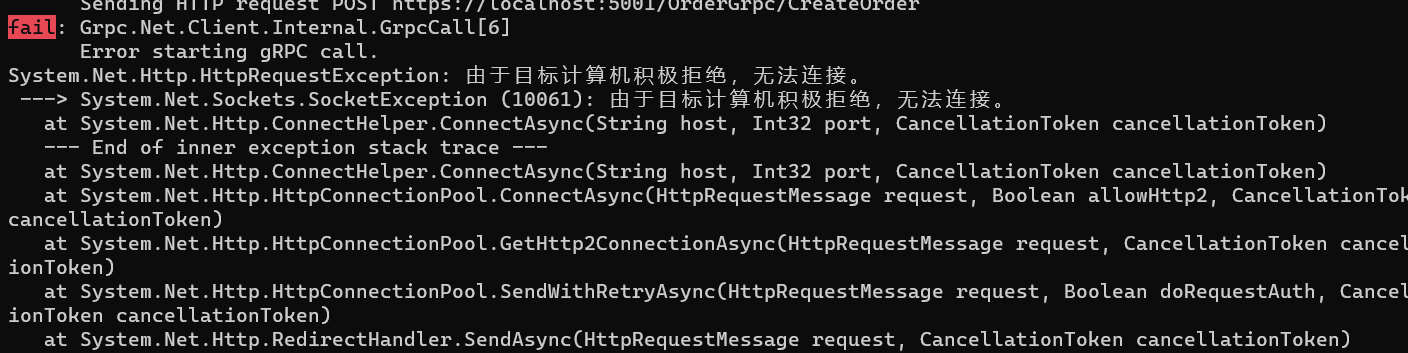
服务端侧没响应,因为服务侧还没起来,我们将服务端弄起来,发现继续报错,这次是报SSL证书问题。
接下来,我们将服务端内置的HTTP服务器Kestrel的配置稍作修改appsettings.json。
{
  "Kestrel": {
    "Endpoints": {
      "Http": {
        "Url": "http://+:5000"
      },
      "Https": {
        "Url": "https://+:5001"
      },
      "Http2": {
        "Url": "http://+:5002",
        "Protocols": "Http2"
      }
    }
  },
  "Logging": {
    "LogLevel": {
      "Default": "Information",
      "Microsoft": "Warning",
      "Microsoft.Hosting.Lifetime": "Information"
    }
  },
  "AllowedHosts": "*"
}
这里设置HTTP协议端口是5000,HTTPS协议端口是5001,还另外监听一个端口5002,它是HTTP协议,但是把它标记为HTTP2,这样它就是不加密的HTTP2协议,gRPC通信的时候,走的是HTTP2协议,但是会使用HTTP的证书,所以接下来,我们就改用5001给客户端用。
这时候,把服务端项目设置为启动项目,右键查看模式启动它
那么接下来,我们在客户端项目中,切换到5001
public void ConfigureServices(IServiceCollection services)
{
    services.AddGrpcClient<OrderGrpc.OrderGrpcClient>(grpcClientFactoryOptions =>
    {
        grpcClientFactoryOptions.Address = new Uri("https://localhost:5001");
    });
}
运行客户端项目,这时候我们看到成功收到了来自服务端的响应,这次gRPC调用成功了
info: System.Net.Http.HttpClient.OrderGrpcClient.LogicalHandler[100]
      Start processing HTTP request POST https://localhost:5001/OrderGrpc/CreateOrder
info: System.Net.Http.HttpClient.OrderGrpcClient.ClientHandler[100]
      Sending HTTP request POST https://localhost:5001/OrderGrpc/CreateOrder
info: System.Net.Http.HttpClient.OrderGrpcClient.ClientHandler[101]
      Received HTTP response after 364.8463ms - OK
info: System.Net.Http.HttpClient.OrderGrpcClient.LogicalHandler[101]
      End processing HTTP request after 378.509ms - OK
不配置证书使用gRPC
如果想不配置证书就使用gRPC,我们也可以直接请求http协议的5002端口。
public void ConfigureServices(IServiceCollection services)
{
    services.AddGrpcClient<OrderGrpc.OrderGrpcClient>(grpcClientFactoryOptions =>
    {
        //grpcClientFactoryOptions.Address = new Uri("https://localhost:5001");
        grpcClientFactoryOptions.Address = new Uri("http://localhost:5002");
    });
}
但是这样会报个错
fail: Grpc.Net.Client.Internal.GrpcCall[6]
      Error starting gRPC call.
System.Net.Http.HttpRequestException: An error occurred while sending the request.
 ---> System.IO.IOException: The response ended prematurely.
   at System.Net.Http.HttpConnection.FillAsync()
   at System.Net.Http.HttpConnection.ReadNextResponseHeaderLineAsync(Boolean foldedHeadersAllowed)
   at System.Net.Http.HttpConnection.SendAsyncCore(HttpRequestMessage request, CancellationToken cancellationToken)
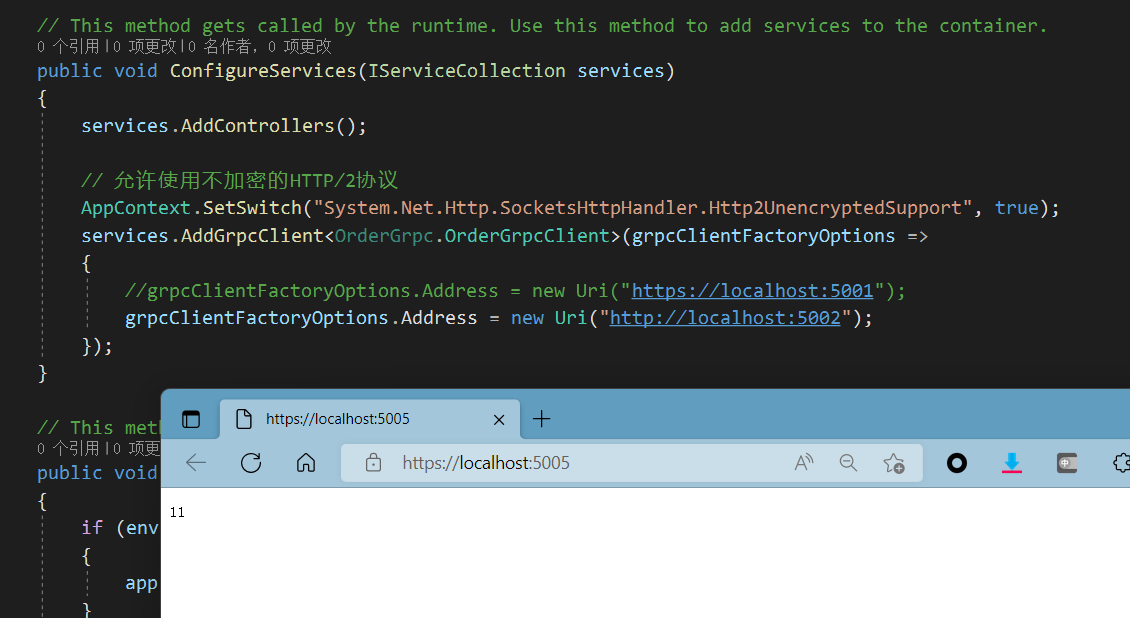
我们可以给客户端一个特殊配置,允许使用不加密的HTTP/2协议
public void ConfigureServices(IServiceCollection services)
{
    // 允许使用不加密的HTTP/2协议
    AppContext.SetSwitch("System.Net.Http.SocketsHttpHandler.Http2UnencryptedSupport", true);
    services.AddGrpcClient<OrderGrpc.OrderGrpcClient>(grpcClientFactoryOptions =>
    {
        // 使用不加密的HTTP/2协议地址
        grpcClientFactoryOptions.Address = new Uri("http://localhost:5002");
    });
这样就可以正常使用了。
在Kubernetes内网环境下我们可以考虑不使用证书的用法来去使用gRPC。
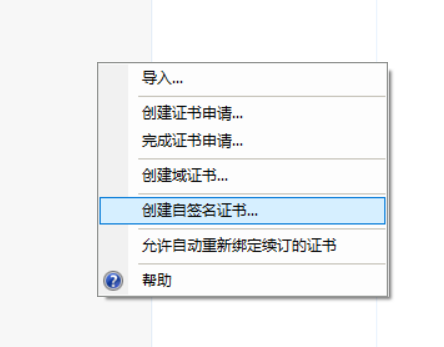
使用自签名证书
我们使用了HTTPS证书,但是如果这个证书是自签名的证书,那就意味着在操作系统层面,它不认为这个证书是有效的,我们可以通过配置HttpClient让它绕过证书的检测。
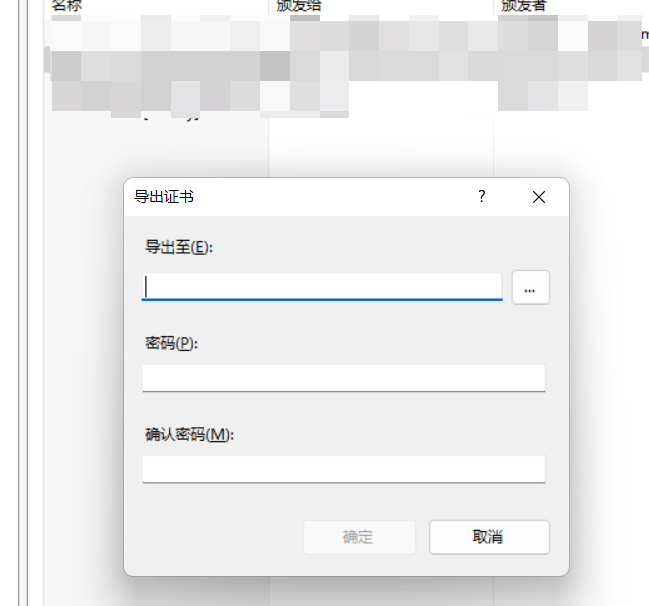
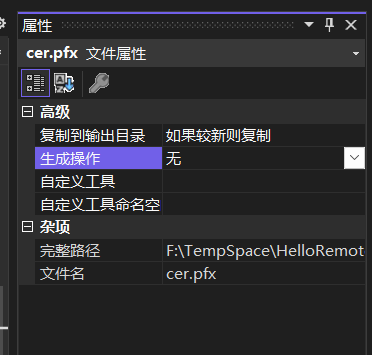
通过IIS生成一个自签名证书并且将它导出成.pfx。
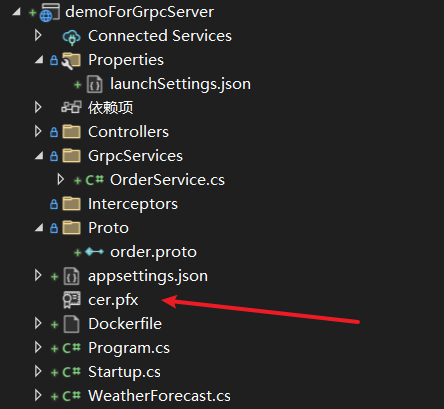
将它添加进来,并且设置"如果较新则复制"
在appsettings.json中把自签名证书配置进来。
{
    "Kestrel": {
        "Endpoints": {
            "Http": {
                "Url": "http://+:5000"
            },
            "Https": {
                "Url": "https://+:5001"
            },
            "Http2": {
                "Url": "http://+:5002",
                "Protocols": "Http2"
            }
        },
        "Certificates": {
            "Default": {
                "Path": "cer.pfx",
                "Password": "xxxxxxxxxxxxx"
            }
        }
    }
}
这时候,我们重新启动并查看服务端项目。
接着我们去客户端项目,将请求地址改回Https的5001
public void ConfigureServices(IServiceCollection services)
{
    services.AddGrpcClient<OrderGrpc.OrderGrpcClient>(grpcClientFactoryOptions =>
    {
        grpcClientFactoryOptions.Address = new Uri("https://localhost:5001");
    });
}
运行看看
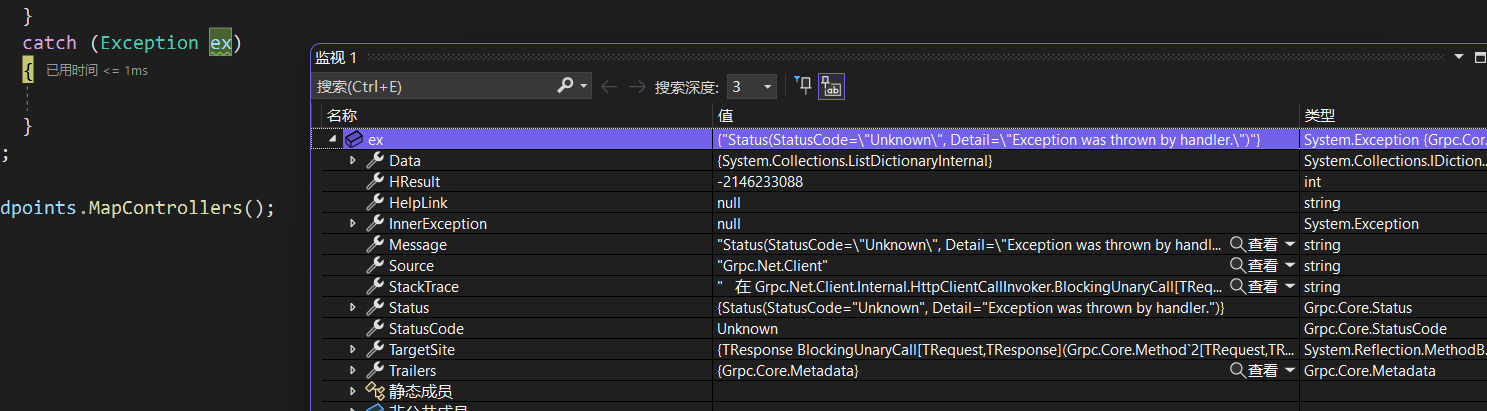
fail: Grpc.Net.Client.Internal.GrpcCall[6]
      Error starting gRPC call.
System.Net.Http.HttpRequestException: The SSL connection could not be established, see inner exception.
确实报错了,因为SSL连接问题,肯定了,我们采用了一个不受信任的证书。
不用担心,这个局当然可以破。
我们添加一些设置即可ConfigurePrimaryHttpMessageHandler。
public void ConfigureServices(IServiceCollection services)
{
    services.AddGrpcClient<OrderGrpc.OrderGrpcClient>(grpcClientFactoryOptions =>
    {
        grpcClientFactoryOptions.Address = new Uri("https://localhost:5001");
    }).ConfigurePrimaryHttpMessageHandler(serviceProvider =>
    {
        var handler = new SocketsHttpHandler();
        // 允许无效或自签名证书
        handler.SslOptions.RemoteCertificateValidationCallback = (a, b, c, d) => true;
        return handler;
    });
}
它的工作原理是在配置HttpMessageHandler的时候,最内部的那个HttpHandler是SocketsHttpHandler,同样我们可以设置构造自己的SocketsHttpHandler注入进去,这里将一个忽略证书错误的SocketsHttpHandler注入进去。
SslOptions.RemoteCertificateValidationCallback = (a, b, c, d) => true代表验证证书时永远返回true,不管证书有效没效都认为它是有效的。
这样设置后,我们就可以使用自签名证书来访问gRPC了,这时候一切就正常了。

gRPC异常处理
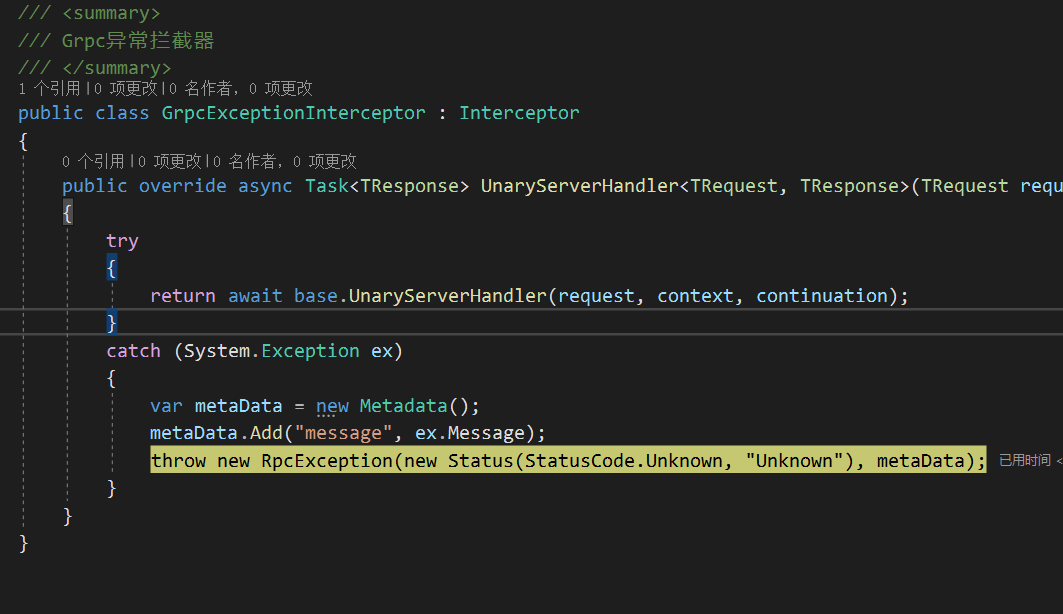
在服务端项目中,我们可以增加一个异常拦截器GrpcExceptionInterceptor
/// <summary>
/// Grpc异常拦截器
/// </summary>
public class GrpcExceptionInterceptor : Interceptor
{
    public override async Task<TResponse> UnaryServerHandler<TRequest, TResponse>(TRequest request, ServerCallContext context, UnaryServerMethod<TRequest, TResponse> continuation)
    {
        try
        {
            return await base.UnaryServerHandler(request, context, continuation);
        }
        catch (System.Exception ex)
        {
            var metaData = new Metadata();
            metaData.Add("message", ex.Message);
            throw new RpcException(new Status(StatusCode.Unknown, "Unknown"), metaData);
        }
    }
}
怎么使用它呢?
在Startup.cs的ConfigureServices方法中AddGrpc是添加进来。
public void ConfigureServices(IServiceCollection services)
{
    services.AddGrpc(grpcServiceOptions =>
    {
        // 生产环境需要将内部错误信息输出关闭掉
        grpcServiceOptions.EnableDetailedErrors = false;
        // 添加一个异常拦截器
        grpcServiceOptions.Interceptors.Add<GrpcExceptionInterceptor>();
    });
}
在OrderService模拟触发一个异常
/// <summary>
/// 订单服务(基于Grpc)
/// </summary>
public class OrderService : OrderGrpc.OrderGrpcBase
{
    /// <summary>
    /// 重写创建订单
    /// </summary>
    /// <param name="request"></param>
    /// <param name="context"></param>
    /// <returns></returns>
    public override Task<CreateOrderResult> CreateOrder(CreateOrderCommand request, ServerCallContext context)
    {
        throw new System.Exception("我是一个gRPC异常");

        // 可替换成真实的创建订单服务的业务代码
        return Task.FromResult(new CreateOrderResult { OrderId = 11 });
    }
}
先注释掉异常拦截器,看看原始的异常是怎么样。
info: Grpc.Net.Client.Internal.GrpcCall[3]
      Call failed with gRPC error status. Status code: 'Unknown', Message: 'Exception was thrown by handler.'.
如果启用异常拦截器之后呢?
推荐的做法是在服务端注入拦截器,将服务端的错误信息进行一定的封装然后传输给客户端。

info: Grpc.Net.Client.Internal.GrpcCall[3]
      Call failed with gRPC error status. Status code: 'Unknown', Message: 'Bad gRPC response. HTTP status code: 500'.
.Net上gRPC
gRPC是一种与语言无关的高性能远程过程调用(RPC)框架。
gRPC的主要优点是:
- 现代高性能轻量级RPC框架。
- 协定优先API开发,默认使用协议缓冲区,允许与语言无关的实现。
- 可用于多种语言的工具,以生成强类型服务器和客户端。
- 支持客户端、服务器和双向流式处理调用。
- 使用Protobuf二进制序列化减少对网络的使用。
这些优点使gRPC适用于:
- 效率至关重要的轻量级微服务。
- 需要多种语言用于开发的Polyglot系统。
- 需要处理流式处理请求或响应的点对点实时服务。
.NET gRPC客户端要求
Grpc.Net.Client包支持在.NET Core 3以及.NET 5或更高版本上通过HTTP/2进行gRPC调用。
.NET Framework上对gRPC over HTTP/2的支持有限。其他.NET版本(例如UWP、Xamarin和Unity)不具备所需的HTTP/2支持,必须改为使用gRPC-Web。
| .NET 实现 | gRPC over HTTP/2 | gRPC-Web |
|---|---|---|
| .NET 5 或更高版本 | ✔️ | ✔️ |
| .NET Core 3 | ✔️ | ✔️ |
| .NET Core 2.1 | ❌ | ✔️ |
| .NET Framework 4.6.1 | ⚠️† | ✔️ |
| Blazor WebAssembly | ❌ | ✔️ |
| Mono 5.4 | ❌ | ✔️ |
| Xamarin.iOS 10.14 | ❌ | ✔️ |
| Xamarin.Android 8.0 | ❌ | ✔️ |
| 通用 Windows 平台 10.0.16299 | ❌ | ✔️ |
| Unity 2018.1 | ❌ | ✔️ |
Grpc核心工具包
- Grpc.Tools,工程需要引入的Nuget包
- dotnet-grpc,命令行插件工具
dotnet-grpc命令行工具
dotnet-grpc是一种.NET Core全局工具,用于在.NET gRPC项目中管理Protobuf(.proto)引用。该工具可以用于添加、刷新、删除和列出Protobuf引用。
安装它
dotnet tool install dotnet-grpc -g

常见命令
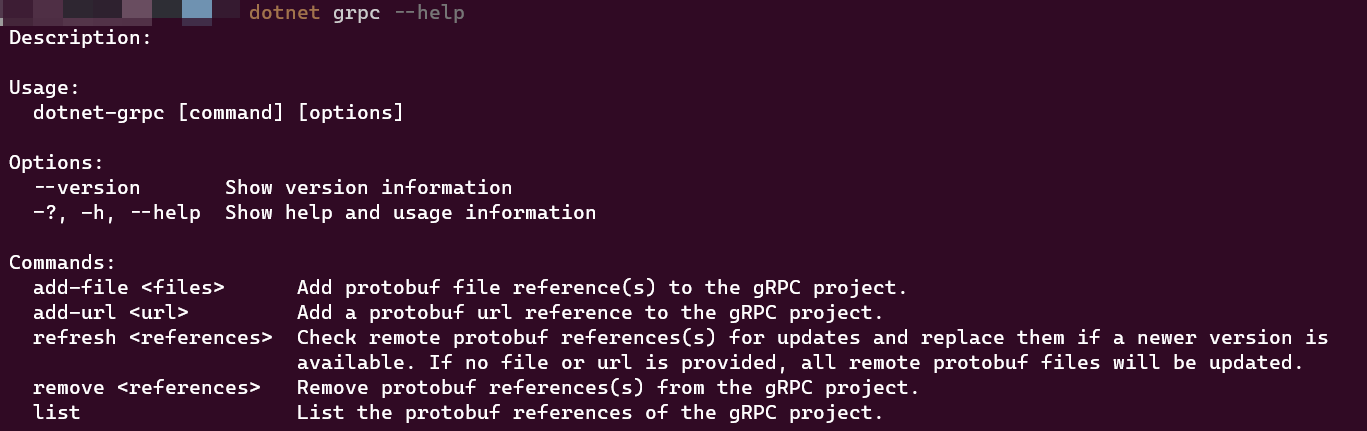
dotnet grpc add-file,将指定目录下proto文件添加到工程里面dotnet grpc add-url,将一个Http的URL地址指定的proto文件添加到工程里面dotnet grpc remove,将添加的proto文件的引用移除,从工程中移除dotnet grpc refresh,更新我们的proto文件,如果是远程url引用的proto文件,那就意味着可以通过它来更新这个文件
proto文件最佳实践
- 使用单独的Git仓库管理Proto文件
- 使用submodule将proto文件集成到工程目录中
- 使用dotnet-grpc命令行添加proto文件及相关依赖包引用
由proto生成的代码文件位于
obj目录中,不会被git签入到仓库中。
使用dotnet-grpc命令行添加proto文件
我们先移除之前对客户端项目的proto的引用。

在终端里面,切换到客户端项目目录
cd F:\TempSpace\HelloRemoteCall\demoForGrpcClient\
通过命令行来讲之前服务端项目的proto文件添加进来。
dotnet grpc add-file ..\demoForGrpcServer\Proto\order.proto
注意,笔者在这一步竟然折腾了半天,报错了,好像是net 7预览版有干扰,建议如果装了预览版的可以卸载试试。

这时候demoForGrpcClient.csproj
<Project Sdk="Microsoft.NET.Sdk.Web">
  <PropertyGroup>
    <TargetFramework>netcoreapp3.1</TargetFramework>
    <UserSecretsId>4a768401-255f-4d25-804e-ab6643ba275d</UserSecretsId>
    <DockerDefaultTargetOS>Linux</DockerDefaultTargetOS>
  </PropertyGroup>
  <ItemGroup>
    <PackageReference Include="Grpc.AspNetCore" Version="2.49.0" />
    <PackageReference Include="Microsoft.VisualStudio.Azure.Containers.Tools.Targets" Version="1.17.0" />
  </ItemGroup>
  <ItemGroup>
    <Protobuf Include="..\demoForGrpcServer\Proto\order.proto" Link="Protos\order.proto" />
  </ItemGroup>
</Project>
这里会看到它会主动添加Grpc.AspNetCore的包,并且添加order.proto文件。
使用dotnet-grpc命令行添加proto地址
这里从github官方库里面选取一个地址,通过命令行方式来添加它
dotnet grpc add-url 'https://raw.githubusercontent.com/grpc/grpc/master/examples/protos/helloworld.proto' -o Protos\helloworld.proto

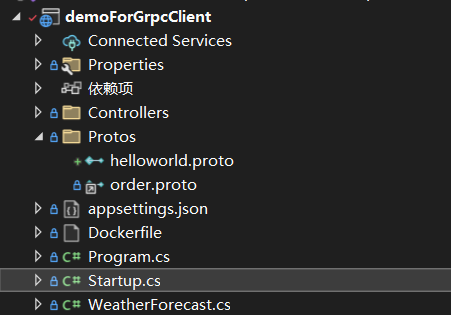
它就真的按我们指定的输出位置放置进来了哈。
<Project Sdk="Microsoft.NET.Sdk.Web">
  <PropertyGroup>
    <TargetFramework>netcoreapp3.1</TargetFramework>
    <UserSecretsId>4a768401-255f-4d25-804e-ab6643ba275d</UserSecretsId>
    <DockerDefaultTargetOS>Linux</DockerDefaultTargetOS>
  </PropertyGroup>
  <ItemGroup>
    <PackageReference Include="Grpc.AspNetCore" Version="2.49.0" />
    <PackageReference Include="Microsoft.VisualStudio.Azure.Containers.Tools.Targets" Version="1.17.0" />
  </ItemGroup>
  <ItemGroup>
    <Protobuf Include="..\demoForGrpcServer\Proto\order.proto" Link="Protos\order.proto" />
    <Protobuf Include="Protos\helloworld.proto">
      <SourceUrl>https://raw.githubusercontent.com/grpc/grpc/master/examples/protos/helloworld.proto</SourceUrl>
    </Protobuf>
  </ItemGroup>
</Project>
我们看下helloworld.proto的定义
syntax = "proto3";

option java_multiple_files = true;
option java_package = "io.grpc.examples.helloworld";
option java_outer_classname = "HelloWorldProto";
option objc_class_prefix = "HLW";

package helloworld;

// The greeting service definition.
service Greeter {
  // Sends a greeting
  rpc SayHello (HelloRequest) returns (HelloReply) {}
}

// The request message containing the user's name.
message HelloRequest {
  string name = 1;
}

// The response message containing the greetings
message HelloReply {
  string message = 1;
}
从定义看,这里定义了一个Greeter服务,里面有一个SayHello方法。
public void ConfigureServices(IServiceCollection services)
{
    services.AddGrpcClient<Greeter.GreeterClient>(grpcClientFactoryOptions =>
    {
        grpcClientFactoryOptions.Address = new Uri("https://localhost:5001");
    }).ConfigurePrimaryHttpMessageHandler(serviceProvider =>
    {
        var handler = new SocketsHttpHandler();
        // 允许无效或自签名证书
        handler.SslOptions.RemoteCertificateValidationCallback = (a, b, c, d) => true;
        return handler;
    });
}
public void Configure(IApplicationBuilder app, IWebHostEnvironment env)
{
    app.UseEndpoints(endpoints =>
    {
        endpoints.MapGet("/", async context =>
        {
            GreeterClient service = context.RequestServices.GetService<GreeterClient>();
            try
            {
                HelloReply result = service.SayHello(new HelloRequest { Name = "abc" });
                await context.Response.WriteAsync(result.Message.ToString());
            }
            catch (Exception ex)
            {

            }
        }
    });
}
我们也在服务端进行引入。
dotnet grpc add-url 'https://raw.githubusercontent.com/grpc/grpc/master/examples/protos/helloworld.proto' -o Protos\helloworld.proto

public class GreeterService : Greeter.GreeterBase
{
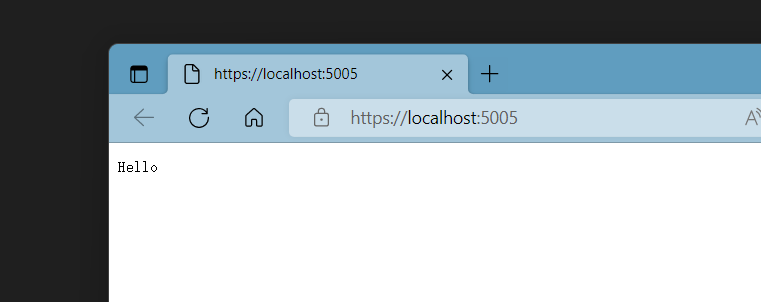
public override Task<HelloReply> SayHello(HelloRequest request, ServerCallContext context)
{
return Task.FromResult(new HelloReply()
{
Message = "Hello"
});
}
}
public void Configure(IApplicationBuilder app, IWebHostEnvironment env)
{
    app.UseEndpoints(endpoints =>
    {
        endpoints.MapGrpcService<GreeterService>();
        endpoints.MapControllers();
    });
}
两边运行后,哈哈,顺利拿到值
使用dotnet-grpc命令行更新和移除proto地址
这种通过URL方式引入进来的,我们还可以通过命令dotnet grpc refresh来更新它
dotnet grpc refresh 'https://raw.githubusercontent.com/grpc/grpc/master/examples/protos/helloworld.proto'

如果要移除这个文件,可以使用dotnet grpc remove
dotnet grpc remove 'https://raw.githubusercontent.com/grpc/grpc/master/examples/protos/helloworld.proto'

但是这里注意的是,remove只是移除了工程文件对这个proto的映射关系,并没有移除本地这个proto文件,这个文件本身的移除,还是需要我们手工操作。
总结
有了dotnet-grpc命令行工具我们就可以很方便的向工程中添加proto文件,添加不同的服务的proto文件来生成我们的客户端代码,同样我们也可以将它定义到我们的Server端。
将gRPC纳入Swagger展示
依赖包
https://www.nuget.org/packages/Microsoft.AspNetCore.Grpc.Swagger
https://www.nuget.org/packages/Microsoft.AspNetCore.Grpc.JsonTranscoding
dotnet add package Microsoft.AspNetCore.Grpc.Swagger --prerelease
这个包暂时还处于预发布状态,需要添加--prerelease才能装成功。
很遗憾,需要.Net 7才可以。
public void ConfigureServices(IServiceCollection services)
{
    services.AddControllers();
    services.AddGrpc(grpcServiceOptions =>
    {
        // 生产环境需要将内部错误信息输出关闭掉
        grpcServiceOptions.EnableDetailedErrors = false;
        // 添加一个异常拦截器
        grpcServiceOptions.Interceptors.Add<GrpcExceptionInterceptor>();
    }).AddJsonTranscoding();
    services.AddGrpcSwagger();
    services.AddApiVersions();
    services.AddSwaggers();
}
这里需要在AddGrpc后面使用AddJsonTranscoding启用gRPC的Json转码。
然后添加AddGrpcSwagger方法,注册用于Grpc的Swagger相关服务。
使用Git Submodule方式管理proto文件
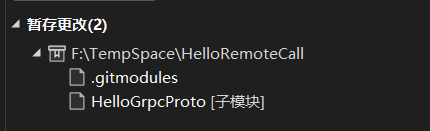
我们可以单独把proto文件建立一个独立的项目,这里我们建立一个示例项目HelloGrpcProto
这里面只存储纯的proto文件。
我们在当前项目的git中,将它以Submodule的方式加进来。
git submodule add https://github.com/TaylorShi/HelloGrpcProto

这时候,我们会看到根目录就多了一个HelloGrpcProto,它包括了这个子项目的所有内容。
我们可以通过前面的dotnet grcp命令行工具来添加proto文件。
dotnet grpc add-file ..\HelloGrpcProto\Protos\order.proto

这样我们就可以愉快的使用它了。
我们看到,这样其实目录里面新增了一个.gitmodules文件,这里面记录了子模块的地址
[submodule "HelloGrpcProto"]
	path = HelloGrpcProto
	url = https://github.com/TaylorShi/HelloGrpcProto
这样有个好处,就是可以分开管理proto文件。
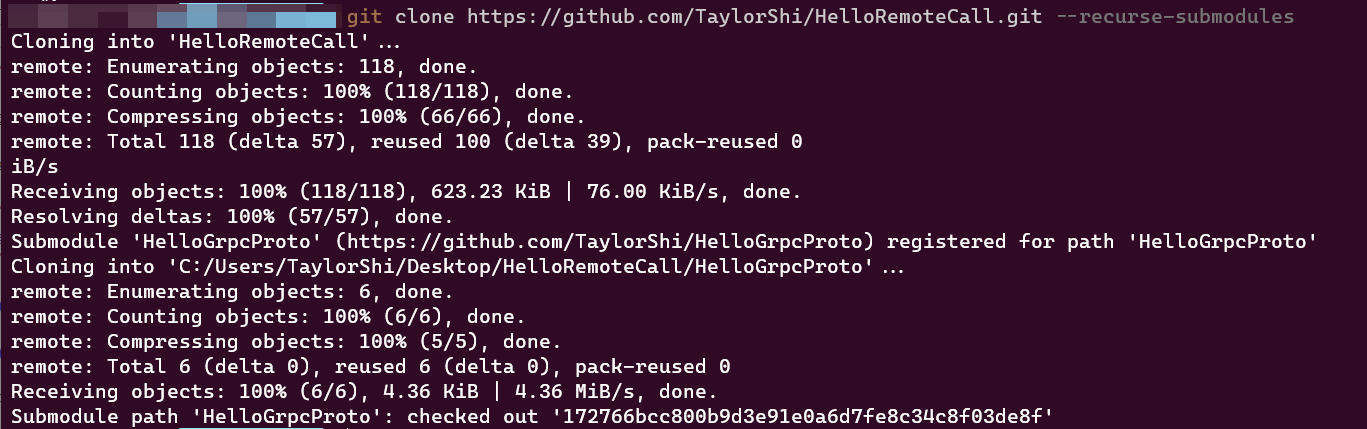
如果初次拉取项目的时候,也可以设置一起拉取,带上--recurse-submodules参数就行。
git clone https://sssssssssssssssss.git --recurse-submodules
gRPC相关Nuget包
| 名称 | 备注 |
|---|---|
| Grpc.AspNetCore | >= .NET 5.0; >= .NET Core 3.0; |
| Grpc.AspNetCore.HealthChecks | >= .NET 5.0; >= .NET Core 3.0; |
| Grpc.AspNetCore.Web | >= .NET 5.0; >= .NET Core 3.0; |
| Grpc.AspNetCore.Server.Reflection | >= .NET 5.0; >= .NET Core 3.0; |
| Grpc.AspNetCore.Server | >= .NET 5.0; >= .NET Core 3.0; |
| Grpc.Tools | |
| Grpc.Net.ClientFactory | >= .NET 5.0; >= .NET Standard 2.0; |
| Grpc.Net.Client | >= .NET 5.0; >= .NET Standard 2.0; |
| Grpc.Net.Common | >= .NET 5.0; >= .NET Standard 2.0; |
| Grpc.Net.Client.Web | >= .NET 5.0; >= .NET Standard 2.0; |
| Grpc.Core | >= .NET Standard 1.5; >= .NET Framework 4.5; |
| Grpc.Core.Api | >= .NET Standard 1.5; >= .NET Framework 4.6.2; |
| Grpc.Core.Xamarin | >= .NET Standard 1.5; >= .NET Framework 4.5; |
| Grpc.Core.NativeDebug | |
| Grpc.HealthCheck | >= .NET Standard 1.5; >= .NET Framework 4.6.2; |
| Grpc.Auth | >= .NET Standard 1.5; >= .NET Framework 4.6.2; |
| Grpc.Reflection | >= .NET Standard 1.5; >= .NET Framework 4.6.2; |
| dotnet-grpc | >= .NET Core 3.0; |
通过BloomRPC调试gRPC接口

BloomRPC是可用于调试gRPC接口的GUI客户端,和我们经常使用的Postman类似。
BloomRPC旨在为探索和查询你的GRPC服务提供最简单、最有效的开发者体验。
受Postman和GraphQL Playground的启发。
获取BloomRPC并安装
安装之后,找到它。

点击Import Protos按钮来选中服务端项目用到的.proto,可以多选,然后左侧就会加载出来我们定义的gRPC通讯结构了。
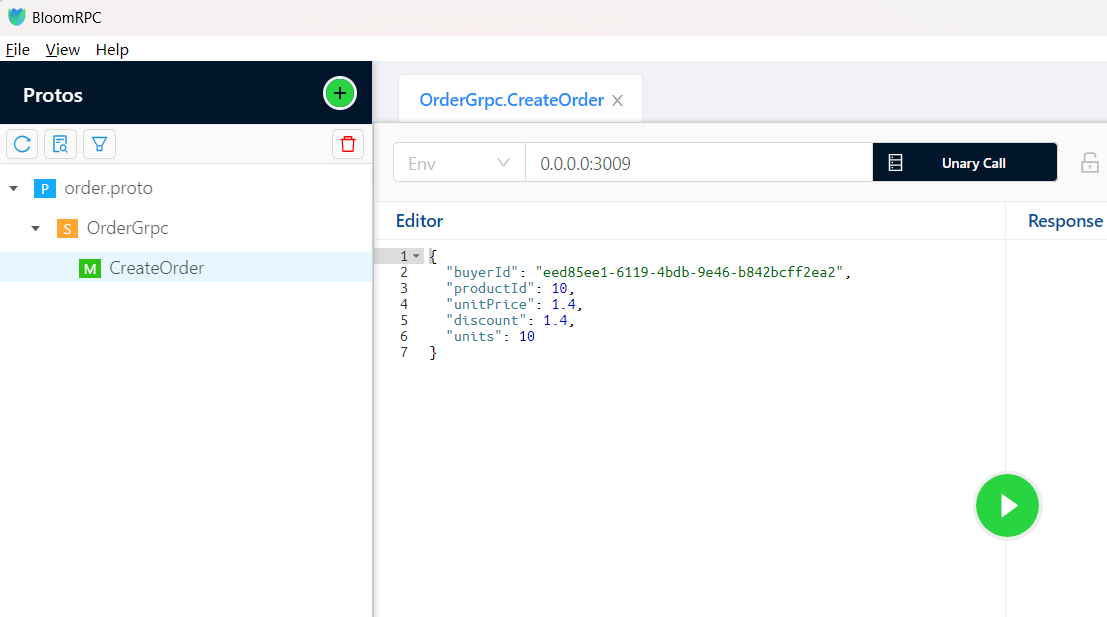
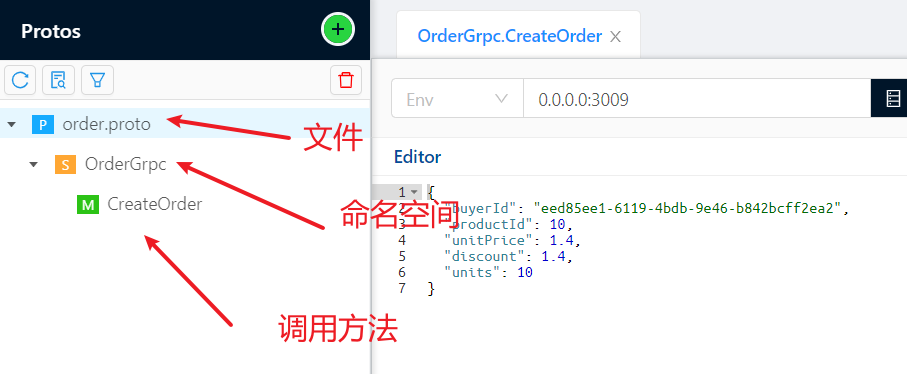
配置测试环境,点击右侧区域的Env,有个下拉,可以添加环境。

HTTP状态代码
信息状态代码
信息状态代码反映临时响应。客户端应继续使用同一请求并放弃响应
| HTTP状态代码 | HttpStatusCode |
|---|---|
| 100 | HttpStatusCode.Continue |
| 101 | HttpStatusCode.SwitchingProtocols |
| 102 | HttpStatusCode.Processing |
| 103 | HttpStatusCode.EarlyHints |
成功状态代码
成功的状态代码指示客户端的请求已被成功接收、理解和接受。
| HTTP状态代码 | HttpStatusCode |
|---|---|
| 200 | HttpStatusCode.OK |
| 201 | HttpStatusCode.Created |
| 202 | HttpStatusCode.Accepted |
| 203 | HttpStatusCode.NonAuthoritativeInformation |
| 204 | HttpStatusCode.NoContent |
| 205 | HttpStatusCode.ResetContent |
| 206 | HttpStatusCode.PartialContent |
| 207 | HttpStatusCode.MultiStatus |
| 208 | HttpStatusCode.AlreadyReported |
| 226 | HttpStatusCode.IMUsed |
重定向状态代码
重定向状态代码要求用户代理采取措施以完成请求。使用适当的标头时,可以自动重定向
| HTTP状态代码 | HttpStatusCode |
|---|---|
| 300 | HttpStatusCode.MultipleChoices或HttpStatusCode.Ambiguous |
| 301 | HttpStatusCode.MovedPermanently或HttpStatusCode.Moved |
| 302 | HttpStatusCode.Found或HttpStatusCode.Redirect |
| 303 | HttpStatusCode.SeeOther或HttpStatusCode.RedirectMethod |
| 304 | HttpStatusCode.NotModified |
| 305 | HttpStatusCode.UseProxy |
| 306 | HttpStatusCode.Unused |
| 307 | HttpStatusCode.TemporaryRedirect或HttpStatusCode.RedirectKeepVerb |
| 308 | HttpStatusCode.PermanentRedirect |
客户端错误状态代码
客户端错误状态代码指示客户端的请求无效。
| HTTP状态代码 | HttpStatusCode |
|---|---|
| 400 | HttpStatusCode.BadRequest |
| 401 | HttpStatusCode.Unauthorized |
| 402 | HttpStatusCode.PaymentRequired |
| 403 | HttpStatusCode.Forbidden |
| 404 | HttpStatusCode.NotFound |
| 405 | HttpStatusCode.MethodNotAllowed |
| 406 | HttpStatusCode.NotAcceptable |
| 407 | HttpStatusCode.ProxyAuthenticationRequired |
| 408 | HttpStatusCode.RequestTimeout |
| 409 | HttpStatusCode.Conflict |
| 410 | HttpStatusCode.Gone |
| 411 | HttpStatusCode.LengthRequired |
| 412 | HttpStatusCode.PreconditionFailed |
| 413 | HttpStatusCode.RequestEntityTooLarge |
| 414 | HttpStatusCode.RequestUriTooLong |
| 415 | HttpStatusCode.UnsupportedMediaType |
| 416 | HttpStatusCode.RequestedRangeNotSatisfiable |
| 417 | HttpStatusCode.ExpectationFailed |
| 418 | 我是茶壶🫖 |
| 421 | HttpStatusCode.MisdirectedRequest |
| 422 | HttpStatusCode.UnprocessableEntity |
| 423 | HttpStatusCode.Locked |
| 424 | HttpStatusCode.FailedDependency |
| 426 | HttpStatusCode.UpgradeRequired |
| 428 | HttpStatusCode.PreconditionRequired |
| 429 | HttpStatusCode.TooManyRequests |
| 431 | HttpStatusCode.RequestHeaderFieldsTooLarge |
| 451 | HttpStatusCode.UnavailableForLegalReasons |
服务器错误状态代码
服务器错误状态代码指示服务器遇到了阻止其完成请求的意外条件。
| HTTP状态代码 | HttpStatusCode |
|---|---|
| 500 | HttpStatusCode.InternalServerError |
| 501 | HttpStatusCode.NotImplemented |
| 502 | HttpStatusCode.BadGateway |
| 503 | HttpStatusCode.ServiceUnavailable |
| 504 | HttpStatusCode.GatewayTimeout |
| 505 | HttpStatusCode.HttpVersionNotSupported |
| 506 | HttpStatusCode.VariantAlsoNegotiates |
| 507 | HttpStatusCode.InsufficientStorage |
| 508 | HttpStatusCode.LoopDetected |
| 510 | HttpStatusCode.NotExtended |
| 511 | HttpStatusCode.NetworkAuthenticationRequired |
参考
- .NET中的HTTP支持
- 使用.NET的IHttpClientFactory
- HttpClient的使用准则
- .NETCore远程调用
- 【ASP.NET Core学习】远程过程调用 - gRPC使用
- 什么是远程调用?图文简要介绍
- Remote procedure call
- gRPC
- Protocol buffers
- This guide gets you started with gRPC in C# with a simple working example
- Introduction to gRPC
- Markdown Supported Languages
- ASP.NET Core 3.0 gRPC配置使用HTTP
- IIS发布自签名证书https
- 通过dotnet-grpc管理Protobuf参考
- DotNet Core中使用 gRPC
- ASP.NET Core gRPC应用中的gRPC JSON转码
- gRPC JSON转码文档与Swagger/OpenAPI
- 关于.Net 7.0 RC gRPC JSON转码为Swagger/OpenAPI文档的注意事项
- .NET 中的gRPC客户端工厂集成
- GRPC接口测试工具BloomRPC的使用及下载,对标postman
- Weird error calling my grpc server "Stream removed" #138
- How to call a .NET Core 3.0 gRPC Server application with bloomRPC?
- Rebuild with Newer Root Certificates - Unable to Connect to All Addresses Error
- BloomRpc Missed Gprc GUI Client

 浙公网安备 33010602011771号