nagios,cacti不报警;短信报警
http://bbs.51cto.com/tag-Nagios.html
===============
nagios nrpe 不报警
https://www.google.com.hk/#newwindow=1&q=nagios++nrpe++%E4%B8%8D%E6%8A%A5%E8%AD%A6&safe=strict
nagios 论坛
https://www.google.com.hk/#newwindow=1&q=nagios++%E8%AE%BA%E5%9D%9B&safe=strict
nagios 短信
https://www.google.com.hk/#newwindow=1&q=nagios+%E7%9F%AD%E4%BF%A1&safe=strict
cacti不报警
https://www.google.com.hk/#newwindow=1&q=cacti%E4%B8%8D%E6%8A%A5%E8%AD%A6&safe=strict
#################################################
http://bbs.chinaunix.net/thread-3778342-1-1.html
| 本帖最后由 barrn 于 2012-11-01 14:07 编辑 出现问题之前,我所管理的cacti监控程序一直运行正常,包括thold报警也都很稳定。 问题出现在昨天,cacti所在的服务器(Cent os 5.5,64位)意外重启,重启后cacti监控页面均可正常显示,唯独thold插件下配置的所有监控信息全部丢失; 在Management下的Thresholds中重新配置最新的监控后,也无法显示,请帮忙分析下原因,告诉下我应该如何解决。十分感谢! |
| 这个之前遇到过,貌似是数据库损坏导致的,用mysqlcheck修复一下看看。 |
看看是不是thold_data数据表损坏
##################################################
Thold的应用和声音报警
Thold的应用
添加Turn Bytes into MBits 公式 源数据*8/1024/1024
然后如下设置,设置警告和报警的阀值
效果
Thold 声音报警
在cacti目录下,更新thold插件代码,实现thold声音报警
/cacti/plugins/thold/thold_graph.php
在463行的 if ( $row['thold_fail_count'] >= $row['thold_fail_trigger'] )把以下代码添加入{}内
print ‘<EMBED src=”/cacti/plugins/monitor/sounds/attn-noc.wav” autostart=true loop=true volume=100 hidden=true>’;
http://shubao.blog.51cto.com/401810/537184
Nagios为了方便我们的管理工作,提供了至少3种表现手段:
1、web方式,即通过浏览器观看被监控的对象;如正常状态下,其状态(status)是以蓝色填充并显示一个OK。
2、邮件通知,发生故障时,到达设定重试次数和探测间隔时间后发送邮件给管理员或相关人员,报告问题的大致情况。
3、手机短信,这是非常有用和及时的功能了;晚上熟睡中,再也没可能看web页面或查阅邮件,可以一旦发生故障,手机短信却能把你随时唤醒。
一般情况下,这3者是同时进行的:上班时间开个浏览器看页面显示、打开邮件程序定时收取邮件、手机24小时在线。
使用Cacti的threshold插件进行端口流量报警
由于cacti的threshld报警时默认流量以字节显示,不是很直观,需要 作以下修改CDEF,可以很好的显示流量。
Create a Console->Graph Management->CDEF->add
“Byte to Mbits”—这个事名称
Item Item Value
Item #1 Special Data Source: CURRENT_DATA_SOURCE
Item #2 Custom String: 8
Item #3 Operator: *
Item #4 Custom String: 1024
Item #5 Operator: /
Item #6 Custom String: 1024
Item #7 Operator: /
就是:cdef=CURRENT_DATA_SOURCE,8,*,1024,/,1024,/
数据源 * 8 / 1024 / 1024 (Mbits)
如下图:
现在我们就可以在Threshold 添加需要监控流量的端口了
Cacti中为每主机定义不同的Down机报警邮件接收地址

(主机=Host=Device)
背景:默认情况下Cacti的Down机邮件报警功能只能设置一个统一的接受地址,不够人性化。特是对于集团性质的企业,通常不同的主机是由不同的人员来负责的,因此,为每主机定义不同的邮件接收地址就很有必要。
环境:Cacti 0.8.7g Monitor1.2.1 Thold 0.4.1
Setp1: 给cacti.host表增加一个字段alertMail
ALTER TABLE host ADD laertmail varchar(200) default '' not null AFTER monitor_text;
Setp2: 修改脚本/plugins/monitor/setup.php, 设置Host管理表单项,找到monitor_config_form()方法,在$fields_host_edit3['monitor_text']数组变量下加入$fields_host_edit3['alertMail']数组,如下
    $fields_host_edit3['alertMail'] = array(

    "method" => "textbox",

    "friendly_name" => "Alert Email",

    "description" => "This is the email address that will be sent when this host is reported as down.",

    "value" => "|arg1:alertMail|",

    "max_length" => "250",

);
找到monitor_api_device_save()方法,在return $save;一行的上面,增加如下代码
if (isset($_POST['alertMail']))

    $save['alertMail'] = form_input_validate($_POST['alertMail'], 'alertMail', '', true, 3);

else

                $save['alertMail'] = form_input_validate('', 'alertMail', '', true, 3);
Setp3: 修改脚本/plugins/thold/includes/polling.php, 将thold_update_host_status()方法替换为如下:
function thold_update_host_status () {

        global $config;

        // Return if we aren't set to notify

        $deadnotify = (read_config_option('alert_deadnotify') == 'on');

        if (!$deadnotify) return 0;

        include_once($config['base_path'] . '/plugins/thold/thold_functions.php');
    $alert_email = read_config_option('alert_email');
    $ping_failure_count = read_config_option('ping_failure_count');
    // Lets find hosts that were down, but are now back up
    $failed = read_config_option('thold_failed_hosts', true);
    $failed = explode(',', $failed);
    if (!empty($failed)) {
            foreach($failed as $id) {
                    if ($id != '') {
                            $host = db_fetch_row('SELECT id, status, description, hostname, alertMail FROM host WHERE id = ' . $id);
                            if ($host['status'] == HOST_UP) {
                                    $subject = 'Host Notice : ' . $host['description'] . ' (' . $host['hostname'] . ') returned from DOWN state';
                                    $msg = $subject;
                                    if($host['alertMail']){
                                            $alert_email .= ','.$host['alertMail'];
                                    }
                                    if ($alert_email == '') {
                                            cacti_log('THOLD: Can not send Host Recovering email since the \'Alert e-mail\' setting is not set!', true, 'POLLER');
                                    } else {
                                            thold_mail($alert_email, '', $subject, $msg, '');
                                    }
                            }
                    }
            }
    }

    // Lets find hosts that are down
    $hosts = db_fetch_assoc('SELECT id, description, hostname, status_last_error, alertMail FROM host WHERE disabled="" AND status=' . HOST_DOWN . ' AND status_event_count=' . $ping_failure_count);
    $total_hosts = sizeof($hosts);
    if (count($hosts)) {
            foreach($hosts as $host) {
                    $subject = 'Host Error : ' . $host['description'] . ' (' . $host['hostname'] . ') is DOWN';
                    $msg = 'Host Error : ' . $host['description'] . ' (' . $host['hostname'] . ') is DOWN<br>Message : ' . $host['status_last_error'];
                    if($host['alertMail']){
                            $alert_email .= ','.$host['alertMail'];
                    }
                    if ($alert_email == '') {
                            cacti_log('THOLD: Can not send Host Down email since the \'Alert e-mail\' setting is not set!', true, 'POLLER');
                    } else {
                            thold_mail($alert_email, '', $subject, $msg, '');
                    }
            }
    }

    // Now lets record all failed hosts
    $hosts = db_fetch_assoc('SELECT id FROM host WHERE status != ' . HOST_UP);
    $failed = array();
    if (!empty($hosts)) {
            foreach ($hosts as $host) {
                    $failed[] = $host['id'];
            }
    }
    $failed = implode(',', $failed);
    db_execute("REPLACE INTO settings (name, value) VALUES ('thold_failed_hosts', '$failed')");

    return $total_hosts;
}
至此,修改完成。
Cacti实现短信报警
一、 软件环境:cacti(需Threshold插件),飞信机器人(fetion)
二、 安装过程:
Cacti的Threshold插件下载及安装配置参见:Cacti配置e-mail报警
飞信机器人(fetion)下载及安装配置参见:系统监控:linux命令行-飞信客户端发送免费报警短信
三、 配置过程:
1.按照Cacti配置e-mail报警配置并启用thold
2.编辑cacti/plugins/thold/thold-functions.php
在thold–functions.php查找thold_mail($global_alert_address, ”, $subject, $msg, $file_array);行在此行下面加入:
exec("/var/www/html/cacti/plugins/thold/sendsms.sh");
查找 thold_mail($item["notify_extra"], ”, $subject,
$msg, $file_array);行在此行下面加入:
exec("/var/www/html/cacti/plugins/thold/sendsms.sh"); #执行sendsms.sh
备注:本人的thold安装在/var/www/html/cacti/plugins/thold/目录中,如果注释掉thold_mail,只通过短信发送报警。不注释掉thold_mail,会通过email和短信同时发送报警
thold-functions.php生成的alter.log范例如下:
编写脚本sendsms.sh自动调用飞信机器人发送报警
#send sms by fetion
#Write by John.Lv
if [ ! -e "/var/www/html/cacti/plugins/thold/alert.log" ];then #判断alter.log是否存在
echo "Usage:alert.log does not exist"
exit
fi
if [ -n "`cat /var/www/html/cacti/plugins/thold/alert.log`" ]; then #判断alter.log是否有报警信息
admin="135xxxxxxxx" #短信接收人,需在你飞信的好友列表中
echo "sms $admin "`cat /var/www/html/cacti/plugins/thold/alert.log` >>/var/www/html/cacti/plugins/thold/sms.txt #发送alter.log中的报警信息给admin
echo "exit" >> /var/www/html/cacti/plugins/thold/sms.txt #退出飞信
else
echo "Usage:no alert"
exit
fi
if [ -n "`cat /var/www/html/cacti/plugins/thold/sms.txt`" ] ; then
/var/www/html/cacti/plugins/thold/install/fetion -u 13512345678 -p "123456" -b /var/www/html/cacti/plugins/thold/sms.txt -EN
#调用fetion发送短信,命令格式和参数说明参见:系统监控:linux命令行-飞信客户端发送免费报警短信
rm -f /var/www/html/cacti/plugins/thold/sms.txt 1>/dev/null 2>&1
rm -f /var/www/html/cacti/plugins/thold/alert.log 1>/dev/null 2>&1
else
echo "Usgae:no message to send"
exit
fi
ok,配置完成了,现在就可以通过短信接收报警信息了
===================================================================================
【系统环境】
RHEL-5.4
===================================================================================
【支持库】
需要 Glibc2.4 以上的版本;centos5 默认安装的 Glibc2.5,所不需要额外升级;
目前网上的安装文档只有 ubuntu 的,至于redhat、fedora、centos都没有相关安装文档,我在安装的过程中遇到很多库的问题,所以在这里一并给大家进行介绍;
===================================================================================
【”飞信机器人“安装过程】
飞信机器人官网地址:http://www.it-adv.net/
飞信机器人支持 linux、命令行下的飞信、完全免费(目前为止)
2009版说明及下载:http://bbs.it-adv.net/viewthread.php?tid=155&extra=page%3D1
linux: http://www.it-adv.net/fetion/downng/fetion20090406003-linux.tar.gz
win32: http://www.it-adv.net/fetion/downng/fetion20090406003-win32.rar
# wget http://www.it-adv.net/fetion/downng/fetion20090406003-linux.tar.gz
# tar zxvf fetion20090406003-linux.tar.gz
./install/
./install/cron.sh
./install/fetion
./install/fxdemo.sql
./install/plugins/
./install/plugins/inc/
./install/plugins/inc/config.inc.php
./install/plugins/inc/db.inc.php
./install/plugins/inc/session.inc.php
./install/plugins/inc/utils.inc.php
./install/plugins/plugin_buddy_data.php
./install/plugins/plugin_buddy_data.sh
./install/plugins/plugin_buddy_invite.php
./install/plugins/plugin_buddy_invite.sh
./install/plugins/plugin_handle_contact_request.php
./install/plugins/plugin_handle_contact_request.sh
./install/plugins/plugin_message.php
./install/plugins/plugin_message.sh
./install/plugins/plugin_notify.php
./install/plugins/plugin_notify.sh
./install/plugins/plugin_result.php
./install/plugins/plugin_result.sh
./install/plugins/plugin_timer.php
./install/plugins/plugin_timer.sh
./install/plugins/provider/
./install/plugins/provider/ArticleView.class.php
./install/plugins/provider/CaiLing.class.php
./install/plugins/provider/CommonPlugin.class.php
./install/plugins/provider/DiscussionCollect.class.php
./install/plugins/provider/DiscussionPost.class.php
./install/plugins/provider/DiscussionShow.class.php
./install/plugins/provider/Game24Point.class.php
./install/plugins/provider/GameKaiXinCiDian.class.php
./install/plugins/provider/GuestBook.class.php
./install/plugins/provider/HelloRobot.class.php
./install/plugins/provider/Help.class.php
./install/plugins/provider/MindTest.class.php
./install/plugins/provider/Participate.class.php
./install/plugins/provider/Vote.class.php
./install/plugins/provider/Weather.Class.php
./install/Readme.txt
./install/robots.dat
./install/sample.conf
# ll install
total 972
-rwxr-xr-x 1 root root 1570 Apr 6 11:29 cron.sh 机器人监控程序(LINUX)
-rwxr-xr-x 1 root root 405265 Apr 6 11:29 fetion linux下主运行程序
-rwxr-xr-x 1 root root 560192 Apr 6 11:29 fxdemo.sql 机器人框架数据库(请导入到数据库)
d-w--wx-w- 4 root root 4096 Apr 6 11:29 plugins 机器人框架程序
-rwxr-xr-x 1 root root 2837 Apr 6 11:29 Readme.txt 说明文件
-rwxr-xr-x 1 root root 19 Apr 6 11:29 robots.dat 机器人账号密码(配合cron.sh)
-rwxr-xr-x 1 root root 167 Apr 6 11:29 sample.conf 演示配置文件
注:本程序需要 libACE 的支持,库请到 http://www.it-adv.net/ 中下载 linux 下需要的四个文件:
# wget http://www.it-adv.net/fetion/downng/library_linux.tar.gz
# tar zxvf library_linux.tar.gz
libACE-5.6.8.so
libACE_SSL-5.6.8.so
libcrypto.so.0.9.8
libssl.so.0.9.8
把依赖的库文件和执行程序放到相同的目录
本程序的 linux 版本 基于 UBUNTU 7.10(gutsy) 开发,libc6。
一些老的发行版,如 RH9, RHES4 等可能无法正常运行,
请参照 http://bbs.it-adv.net/viewthread.php?tid=154 如何在不同版本 Linux 上运行 Binary-Only 应用包 解决。
把支持库复制到 /usr/lib/ 目录下:
查看
# ll /usr/lib | grep libcrypto*
-rw-r--r-- 1 root root 1735192 Mar 3 2009 libcrypto.a
lrwxrwxrwx 1 root root 29 Jul 18 16:58 libcrypto.so -> ../../lib/libcrypto.so.0.9.7a
-rwxr-xr-x 1 root root 1350660 Sep 17 22:42 libcrypto.so.0.9.8
# ll /usr/lib | grep libssl*
-r--r--r-- 1 root root 112944 Jun 1 12:09 libss.a
-rw-r--r-- 1 root root 304144 Mar 3 2009 libssl.a
lrwxrwxrwx 1 root root 26 Jul 18 16:58 libssl.so -> ../../lib/libssl.so.0.9.7a
-rwxr-xr-x 1 root root 261612 Sep 17 22:42 libssl.so.0.9.8
lrwxrwxrwx 1 root root 15 Aug 22 21:42 libss.so -> /lib/libss.so.2
# cp lib*so* /usr/lib/
# ln -s /usr/lib/libcrypto.so.0.9.7a /usr/lib/libcrypto.so.4
# ln -s /usr/lib/libssl.so.0.9.7a /usr/lib/libssl.so.4
------------------------------------------------------------------------------------------------------------------------------------
【飞信2009依赖的其他库】
ld-2.5.so libcom_err.so.2 libpam_misc.so.0
ld-linux.so.2 libcom_err.so.2.1 libpam_misc.so.0.81.2
ld-lsb.so.3 libcrypt-2.5.so libpam.so.0
ld.so.conf libcrypto.so.0.9.8 libpam.so.0.81.5
libACE-5.6.8.so libcrypto.so.0.9.8b libpcre.so.0
libACE_SSL-5.6.8.so libcrypto.so.6 libpcre.so.0.0.1
libc-2.5.so libcrypt.so.1 libproc-3.2.7.so
libcap.so libc.so.6 libpthread-2.5.so
libcap.so.1 libnss_ldap-2.5.so libpthread.so.0
libcap.so.1.10 libnss_ldap.so.2 libssl.so.0.9.8
libcidn-2.5.so libpamc.so.0 libstdc++.so.6
libcidn.so.1 libpamc.so.0.81.0 libstdc++.so.6.0.8
------------------------------------------------------------------------------------------------------------------------------------
设定 lib 库配置文件
# vi /etc/ld.so.conf
# 增加一条
/usr/lib/
# 保存退出后,执行
# ldconfig
------------------------------------------------------------------------------------------------------------------------------------
【实际测试】
linux 下,请使用如下命令:
# ./fetion -h
Usage:
fetion -h
-h: help
fetion -u mobile -p pwd [-b batchfile] [-EN] [-d]
-u: Fetion user account(only supports mobile phone No.)
-p: Account password
-b: Batch file name
-d: Debug on and write logs to [mobile]-debug.log
-EN: English
登录飞信默认是中文 utf8 的,如果 linux 系统不支持 utf8 会出现乱码:我使用 english 的方式来登录。
测试帐号:15800000000
密码:qu6zhi (如果密码中含有特殊字符,请使用单引号)
# ./fetion --mobile=15800000000 --pwd=qu6zhi --to=136XXXXXXXX --msg-utf8=test4qu6zhi
SIP-C/2.0 280 Send SMS OK
T: sip:759614688@fetion.com.cn;p=2511
I: 4
Q: 1 M
已经成功收到测试短信息。
LD_LIBRARY_PATH=. ./fetion --sid=6630321 --pwd=mypwd --to=137xxxxxxxx --msg-utf8=测试
LD_LIBRARY_PATH=. ./fetion --config=sample.conf --index=1 --to=137xxxxxxxx --msg-utf8=测试
===================================================================================
-bash: Permission denied
===================================================================================
fetion 的目录结构:
.\Readme.txt: 本说明文件
.\fetion:主程序
.\sound\*.wav:各种音效文件,您可以用自己喜欢的文件替换
.\plugins\plugin_*: 插件程序,您可以修改插件以达到自己的各性化需求
登录后输入?获得帮助
****************************************************************
指令 指令说明
list 好友列表: list
sms 发送短信: sms 飞信号/手机号/编号 短信内容(换行请用\n代替)
chat 在线消息: chat 飞信号/手机号/编号 短信内容(换行请用\n代替)
status 在线状态: status online/busy/away/hidden [个性化信息]
add 添加好友: add 飞信号/手机号 申请信息 本地呢称
del 删除好友: del 飞信号/手机号/编号
invite 邀请好友: invite 手机号 您的姓名(邀请好友开通飞信)
autoaccept 自动接受: autoaccept on/off/status 自动接受加为好友申请
myinfo 修改资料: myinfo nickname/impresa 内容(呢称/心情)
help 帮助菜单: help/?
exit 退出系统: quit/exit
***************************************************************
脚本测试:
可以使用 fetion 的 -b 参数来实现批处理;
举例如下:
# vi p.sh
sms 13712312311 “msyqlserver is down”
sms 13712312312 “db1 is not running”
sms 13712312313 “warning db2 disk3 is full”
保存后执行:
./fetion -u 13713718888 -p 123456 -b p.sh
就是一次给3个 admin 发出报警信息。
还有许多插件的功能,我会在下次实际应用中写出日志和大家一起研究;
在初步接触中,发现可以实现一些交互信息的查询,比如直接向短信机器人发指令得到某台服务器的运行状态等。
【安装过程】
Cacti 的 Threshold 插件下载及安装配置
【配置过程】
1.按照 Cacti 配置 e-mail 报警配置并启用 thold
2.编辑 cacti/plugins/thold/thold-functions.php
在 thold–functions.php 查找 thold_mail($global_alert_address, ”, $subject, $msg, $file_array);行在此行下面加入:
exec("echo $subject >>/var/www/html/cacti/plugins/thold/alter.log");
exec("/var/www/html/cacti/plugins/thold/sendsms.sh");
查找 thold_mail($item["notify_extra"], ”, $subject,
$msg, $file_array);行在此行下面加入:
exec("echo $subject >>/var/www/html/cacti/plugins/thold/alter.log"); #将报警信息记录到alter.log
exec("/var/www/html/cacti/plugins/thold/sendsms.sh"); #执行sendsms.sh
备注:本人的thold安装在/var/www/html/cacti/plugins/thold/目录中,如果注释掉thold_mail,只通过短信发送报警。不注释掉thold_mail,会通过email和短信同时发送报警
thold-functions.php 生成的 alter.log 范例如下:
192.168.1.207 - Used Space - G: Label: [hdd_percent] is still above threshold of 85 with 99
编写脚本 sendsms.sh 自动调用飞信机器人发送报警
#!/bin/sh
#send sms by fetion
#Write by John.Lv
if [ ! -e "/var/www/html/cacti/plugins/thold/alert.log" ];then #判断 alter.log 是否存在
echo "Usage:alert.log does not exist"
exit
fi
if [ -n "`cat /var/www/html/cacti/plugins/thold/alert.log`" ]; then #判断 alter.log 是否有报警信息
admin="135xxxxxxxx" #短信接收人,需在你飞信的好友列表中
echo "sms $admin "`cat /var/www/html/cacti/plugins/thold/alert.log` >>/var/www/html/cacti/plugins/thold/sms.txt #发送alter.log 中的报警信息给 admin
echo "exit" >> /var/www/html/cacti/plugins/thold/sms.txt #退出飞信
else
echo "Usage:no alert"
exit
fi
if [ -n "`cat /var/www/html/cacti/plugins/thold/sms.txt`" ] ; then
/var/www/html/cacti/plugins/thold/install/fetion -u 13512345678 -p "123456" -b /var/www/html/cacti/plugins/thold/sms.txt -EN
#调用 fetion 发送短信,命令格式和参数说明参见:系统监控:linux命令行-飞信客户端发送免费报警短信
rm -f /var/www/html/cacti/plugins/thold/sms.txt 1>/dev/null 2>&1
rm -f /var/www/html/cacti/plugins/thold/alert.log 1>/dev/null 2>&1
else
echo "Usgae:no message to send"
exit
fi
===================================================================================
飞信机器人实现命令式互动(以Linux版本为例)
原文地址:http://www.hiadmin.com/%E9%A3%9E%E4%BF%A1%E6%9C%BA%E5%99%A8%E4%BA%BA%E5%AE%9E%E7%8E%B0%E5%91%BD%E4%BB%A4%E5%BC%8F%E4%BA%92%E5%8A%A8%EF%BC%88%E4%BB%A5linux%E7%89%88%E6%9C%AC%E4%B8%BA%E4%BE%8B%EF%BC%89/
修改 fetion 安装目录下plugins中的plugin_message
#!/bin/bash
# $1: fetion_account
# $2: message
# Plus Description:
# When a new message arrival, the system will call this plug-in:
buddy=$1
message=$2
admin="135xxxxxxxx" #Only accept instructions sent admin
# message A Show disk space
if [[ "$message" = "A" && "$buddy" = "$admin" ]] ;then
df -h
sendback="you send command A"
# message B show network connections
elif [[ "$message" = "B" && "$buddy" = "$admin" ]];then
netstat -an | wc -l
sendback="you send command B"
# message C run shell script
elif [[ "$message" = "C" && "$buddy" = "$admin" ]];then
/root/sendMsg/1.sh
sendback="you send command C"
# message D only send message
elif [[ "$message" = "D" && "$buddy" = "$admin" ]];then
sendback="you send command D"
# other send not accept
elif [ "$buddy" = "$admin" ];then
sendbac="you send command $message。command does not accept"
else
sendback="you can not send comman"
fi
#send message $sendback
cmd="sms $buddy $sendback"
echo $cmd
保存退出
下面进行测试
测试帐号:13713718888
密码:123456 (如果密码中含有特殊字符,请使用单引号)
./fetion -u 13713718888 -p 123456 -EN
发送信息给135xxxxxxxx
sms 135xxxxxxxx “show me the command”
如果135xxxxxxxx回复短信,将自动调用插件plugin_message
如果135xxxxxxxx 回复 A 执行查看磁盘空间的命令并回复message
如果135xxxxxxxx 回复 B 执行统计网络连接数并回复message
如果135xxxxxxxx 回复 C 执行一个shell脚本并回复message
如果135xxxxxxxx 回复 D 只回复message
如果135xxxxxxxx 回复 其它 回复错误指令的信息
如果不是135xxxxxxxx 回复的信息即使是正确指令也不予执行
其中A,B,C,D可以任意指定激活执行命令或者脚本的条件,通过短信回复可以使机器人执行命令,脚本,程序,回复信息等任意操作。
===================================================================================
参考:
飞信机器人官方网站:http://www.it-adv.net/
http://www.hiadmin.com/%E7%B3%BB%E7%BB%9F%E7%9B%91%E6%8E%A7%EF%BC%9Alinux%E5%91%BD%E4%BB%A4%E8%A1%8C-%E9%A3%9E%E4%BF%A1%E5%AE%A2%E6%88%B7%E7%AB%AF%E5%8F%91%E9%80%81%E5%85%8D%E8%B4%B9%E6%8A%A5%E8%AD%A6%E7%9F%AD%E4%BF%A1/
http://www.hiadmin.com/cacti%E5%AE%9E%E7%8E%B0%E7%9F%AD%E4%BF%A1%E6%8A%A5%E8%AD%A6/
给 cacti 插件 thold 加上飞信和msn报警功能:http://www.hiadmin.com/category/workshop/sms/
谨慎使用:成功将飞信2009(fetion20090318001-linux)移植到rhel4:http://xok.la/2009/03/fetion_2009_to_rhel4_linux4.html
Net-SMS-PChome:http://people.debian.org.tw/~chihchun/2008/02/29/net-sms-pchome-updated/
【系统环境】
RHEL-5.4
================================================== =================================
【撑持库】
需要 Glibc2.4 以上的版本;centos5 默认安装的 Glibc2.5,所不需要分外升级;
目前网上的安装文档只有 ubuntu 的,至于redhat、fedora、centos都没有相关安装文档,我在安装的过程中遇到很多库的问题,所以在这里一并给大家进行介绍;
================================================== =================================
【”飞信机器人“安装过程】
飞信机器人官网地址:http://www.it-adv.net/
飞信机器人撑持 linux、命令行下的飞信、完全免费(目前为止)
2009版说明及下载:http://bbs.it-adv.net/viewthread.php?tid=155&extra =page%3D1
linux: http://www.it-adv.net/fetion/downng/fetion 003-linux.tar.gz
win32: http://www.it-adv.net/fetion/downng/fetion 003-win32.rar
# wget http://www.it-adv.net/fetion/downng/fetion 003-linux.tar.gz
# tar zxvf fetion-linux.tar.gz
./install/
./install/cron.sh
./install/fetion
./install/fxdemo.sql
./install/plugins/
./install/plugins/inc/
./install/plugins/inc/config.inc.php
./install/plugins/inc/db.inc.php
./install/plugins/inc/session.inc.php
./install/plugins/inc/utils.inc.php
./install/plugins/plugin_buddy_data.php
./install/plugins/plugin_buddy_data.sh
./install/plugins/plugin_buddy_invite.php
./install/plugins/plugin_buddy_invite.sh
./install/plugins/plugin_handle_contact_request.ph p
./install/plugins/plugin_handle_contact_request.sh
./install/plugins/plugin_message.php
./install/plugins/plugin_message.sh
./install/plugins/plugin_notify.php
./install/plugins/plugin_notify.sh
./install/plugins/plugin_result.php
./install/plugins/plugin_result.sh
./install/plugins/plugin_timer.php
./install/plugins/plugin_timer.sh
./install/plugins/provider/
./install/plugins/provider/ArticleView.class.php
./install/plugins/provider/CaiLing.class.php
./install/plugins/provider/CommonPlugin.class.php
./install/plugins/provider/DiscussionCollect.class .php
./install/plugins/provider/DiscussionPost.class.ph p
./install/plugins/provider/DiscussionShow.class.ph p
./install/plugins/provider/Game24Point.class.php
./install/plugins/provider/GameKaiXinCiDian.class. php
./install/plugins/provider/GuestBook.class.php
./install/plugins/provider/HelloRobot.class.php
./install/plugins/provider/Help.class.php
./install/plugins/provider/MindTest.class.php
./install/plugins/provider/Participate.class.php
./install/plugins/provider/Vote.class.php
./install/plugins/provider/Weather.Class.php
./install/Readme.txt
./install/robots.dat
./install/sample.conf
# ll install
total 972
-rwxr-xr-x 1 root root 1570 Apr 6 11:29 cron.sh 机器人监控程序(LINUX)
-rwxr-xr-x 1 root root Apr 6 11:29 fetion linux下主运行程序
-rwxr-xr-x 1 root root Apr 6 11:29 fxdemo.sql 机器人框架数据库(请导入到数据库)
d-w--wx-w- 4 root root 4096 Apr 6 11:29 plugins 机器人框架程序
-rwxr-xr-x 1 root root 2837 Apr 6 11:29 Readme.txt 说明文件
-rwxr-xr-x 1 root root 19 Apr 6 11:29 robots.dat 机器人账号密码(配合cron.sh)
-rwxr-xr-x 1 root root 167 Apr 6 11:29 sample.conf 演示配置文件
注:本程序需要 libACE 的撑持,库请到 http://www.it-adv.net/ 中下载 linux 下需要的四个文件:
# wget http://www.it-adv.net/fetion/downng/library_linux. tar.gz
# tar zxvf library_linux.tar.gz
libACE-5.6.8.so
libACE_SSL-5.6.8.so
libcrypto.so.0.9.8
libssl.so.0.9.8
把依赖的库文件和执行程序放到相同的目录
本程序的 linux 版本 基于 UBUNTU 7.10(gutsy) 开发,libc6。
一些老的发行版,如 RH9, RHES4 等可能无法正常运行,
请参照 http://bbs.it-adv.net/viewthread.php?tid=154 如何在不同版本 Linux 上运行 Binary-Only 应用包 解决。
把撑持库复制到 /usr/lib/ 目录下:
查看
# ll /usr/lib | grep libcrypto*
-rw-r--r-- 1 root root Mar 3 2009 libcrypto.a
lrwxrwxrwx 1 root root 29 Jul 18 16:58 libcrypto.so -> ../../lib/libcrypto.so.0.9.7a
-rwxr-xr-x 1 root root Sep 17 22:42 libcrypto.so.0.9.8
# ll /usr/lib | grep libssl*
-r--r--r-- 1 root root Jun 1 12:09 libss.a
-rw-r--r-- 1 root root Mar 3 2009 libssl.a
lrwxrwxrwx 1 root root 26 Jul 18 16:58 libssl.so -> ../../lib/libssl.so.0.9.7a
-rwxr-xr-x 1 root root Sep 17 22:42 libssl.so.0.9.8
lrwxrwxrwx 1 root root 15 Aug 22 21:42 libss.so -> /lib/libss.so.2
# cp lib*so* /usr/lib/
# ln -s /usr/lib/libcrypto.so.0.9.7a /usr/lib/libcrypto.so.4
# ln -s /usr/lib/libssl.so.0.9.7a /usr/lib/libssl.so.4
-------------------------------------------------- --------------------------------------------------- -------------------------------
【飞信2009依赖的其他库】
ld-2.5.so libcom_err.so.2 libpam_misc.so.0
ld-linux.so.2 libcom_err.so.2.1 libpam_misc.so.0.81.2
ld-lsb.so.3 libcrypt-2.5.so libpam.so.0
ld.so.conf libcrypto.so.0.9.8 libpam.so.0.81.5
libACE-5.6.8.so libcrypto.so.0.9.8b libpcre.so.0
libACE_SSL-5.6.8.so libcrypto.so.6 libpcre.so.0.0.1
libc-2.5.so libcrypt.so.1 libproc-3.2.7.so
libcap.so libc.so.6 libpthread-2.5.so
libcap.so.1 libnss_ldap-2.5.so libpthread.so.0
libcap.so.1.10 libnss_ldap.so.2 libssl.so.0.9.8
libcidn-2.5.so libpamc.so.0 libstdc++.so.6
libcidn.so.1 libpamc.so.0.81.0 libstdc++.so.6.0.8
-------------------------------------------------- --------------------------------------------------- -------------------------------
设定 lib 库配置文件
# vi /etc/ld.so.conf
# 增加一条
/usr/lib/
# 保存退出后,执行
# ldconfig
-------------------------------------------------- --------------------------------------------------- -------------------------------
【实际测试】
linux 下,请使用如下命令:
# ./fetion -h
Usage:
fetion -h
-h: help
fetion -u mobile -p pwd [-b batchfile] [-EN] [-d]
-u: Fetion user account(only supports mobile phone No.)
-p: Account password
-b: Batch file name
-d: Debug on and write logs to [mobile]-debug.log
-EN: English
登录飞信默认是中文 utf8 的,如果 linux 系统不撑持 utf8 会出现乱码:我使用 english 的方式来登录。
测试帐号:
密码:qu6zhi (如果密码中含有特殊字符,请使用单引号)
# ./fetion --mobile= --pwd=qu6zhi --to=136XXXXXXXX --msg-utf8=test4qu6zhi
SIP-C/2.0 280 Send SMS OK
T: sip:;p=2511
I: 4
Q: 1 M
已经成功收到测试短信息。
LD_LIBRARY_PATH=. ./fetion --sid= --pwd=mypwd --to=137xxxxxxxx --msg-utf8=测试
LD_LIBRARY_PATH=. ./fetion --config=sample.conf --index=1 --to=137xxxxxxxx --msg-utf8=测试
================================================== =================================
-bash: Permission denied
================================================== =================================
fetion 的目录结构:
.\Readme.txt: 本说明文件
.\fetion:主程序
.\sound\*.wav:各种音效文件,您能够用本身喜欢的文件替换
.\plugins\plugin_*: 插件程序,您能够修改插件以达到本身的各性化需求
登录后输入?获得资助
************************************************** **************
指令 指令说明
list 好友列表: list
sms 发送短信: sms 飞信号/手机UC浏览器号/编号 短信内容(换行请用\n代替)
chat 在线消息: chat 飞信号/手机号/编号 短信内容(换行请用\n代替)
status 在线状态: status online/busy/away/hidden [个性化信息]
add 添加好友: add 飞信号/手机号 申请信息 本地呢称
del 删除好友: del 飞信号/手机号/编号
invite 邀请好友: invite 手机号 您的姓名(邀请好友开通飞信)
autoaccept 自动接受: autoaccept on/off/status 自动接受加为好友申请
myinfo 修改资料: myinfo nickname/impresa 内容(呢称/心情)
help 资助菜单: help/?
exit 退出系统: quit/exit
************************************************** *************
脚本测试:
能够使用 fetion 的 -b 参数来实现批处理;
举例如下:
# vi p.sh
sms “msyqlserver is down”
sms “db1 is not running”
sms “warning db2 disk3 is full”
保存后执行:
./fetion -u -p -b p.sh
就是一次给3个 admin 发出报警信息。
还有许多插件的功能,我会在下次实际应用中写出日志和大家一起研究;
在初步接触中,发现能够实现一些交互信息的查询,比如直接向短信机器人发指令得到某台服务器的运行状态等。
【安装过程】
Cacti 的 Threshold 插件下载及安装配置
【配置过程】
1.按照 Cacti 配置 e-mail 报警配置并启用 thold
2.编辑 cacti/plugins/thold/thold-functions.php
在 thold–functions.php 查找 thold_mail($global_alert_address, ”, $subject, $msg, $file_array);行在此行下面加入:
exec("echo $subject >>/var/www/html/cacti/plugins/thold/alter.log");
exec("/var/www/html/cacti/plugins/thold/sendsms.sh ");
查找 thold_mail($item["notify_extra"], ”, $subject,
$msg, $file_array);行在此行下面加入:
exec("echo $subject >>/var/www/html/cacti/plugins/thold/alter.log"); #将报警信息记录到alter.log
exec("/var/www/html/cacti/plugins/thold/sendsms.sh "); #执行sendsms.sh
备注:本人的thold安装在/var/www/html/cacti/plugins/thold/目录中,如果注释掉thold_mail,只通过短信发送报警。不注释掉thold_mail,会通过email和短信同时发送报警
thold-functions.php 生成的 alter.log 范例如下:
192.168.1.207 - Used Space - G: Label: [hdd_percent] is still above threshold of 85 with 99
编写脚本 sendsms.sh 自动调用飞信机器人发送报警
#!/bin/sh
#send sms by fetion
#Write by John.Lv
if [ ! -e "/var/www/html/cacti/plugins/thold/alert.log" ];then #判断 alter.log 是否存在
echo "Usage:alert.log does not exist"
exit
fi
if [ -n "`cat /var/www/html/cacti/plugins/thold/alert.log`" ]; then #判断 alter.log 是否有报警信息
admin="135xxxxxxxx" #短信接收人,需在你飞信的好友列表中
echo "sms $admin "`cat /var/www/html/cacti/plugins/thold/alert.log` >>/var/www/html/cacti/plugins/thold/sms.txt #发送alter.log 中的报警信息给 admin
echo "exit" >> /var/www/html/cacti/plugins/thold/sms.txt #退出飞信
else
echo "Usage:no alert"
exit
fi
if [ -n "`cat /var/www/html/cacti/plugins/thold/sms.txt`" ] ; then
/var/www/html/cacti/plugins/thold/install/fetion -u -p "" -b /var/www/html/cacti/plugins/thold/sms.txt -EN
#调用 fetion 发送短信,命令花式和参数说明参见:系统监控:linux命令行-飞信客户端发送免费报警短信
rm -f /var/www/html/cacti/plugins/thold/sms.txt 1>/dev/null 2>&1
rm -f /var/www/html/cacti/plugins/thold/alert.log 1>/dev/null 2>&1
else
echo "Usgae:no message to send"
exit
fi
================================================== =================================
飞信机器人实现命令式互动(以Linux版本为例)
原文地址:http://www.hiadmin.com/%E9%A3%9E%E4%BF%A1%E6%9C%BA %E5%99%A8%E4%BA%BA%E5%AE%9E%E7%8E%B0%E5%91%BD%E4%BB %A4%E5%BC%8F%E4%BA%92%E5%8A%A8%EF%BC%88%E4%BB%A5lin ux%E7%89%88%E6%9C%AC%E4%B8%BA%E4%BE%8B%EF%BC%89/
修改 fetion 安装目录下plugins中的plugin_message
?
#!/bin/bash
?? # $1:? fetion_account
?? # $2:? message
?? # Plus Description:
?? # When a new message arrival, the system will call this plug-in:
?? buddy=$1
?? message=$2
?? admin="135xxxxxxxx"? #Only accept instructions sent admin
?? # message A Show disk space
?? if [[ "$message" = "A" && "$buddy" = "$admin" ]] ;then
??????? df -h
??????? sendback="you send command A"
?? # message B show network connections
?? elif [[ "$message" = "B" && "$buddy" = "$admin" ]];then
??????? netstat -an | wc -l
??????? sendback="you send command B"
?? # message C run shell script
?? elif [[ "$message" = "C" && "$buddy" = "$admin" ]];then
??????? /root/sendMsg/1.sh
??????? sendback="you send command C"
?? # message D only send message
?? elif [[ "$message" = "D" && "$buddy" = "$admin" ]];then
??????? sendback="you send command D"
?? # other send not accept
?? elif [ "$buddy" = "$admin" ];then
??????? sendbac="you send command $message。command does not accept"
?? else
??????? sendback="you can not send comman"
?? fi
?? #send message $sendback
?? cmd="sms $buddy $sendback"
?? echo $cmd
?保存退出
下面进行测试
测试帐号:
密码: (如果密码中含有特殊字符,请使用单引号)
./fetion -u -p -EN
发送信息给135xxxxxxxx
sms 135xxxxxxxx “show me the command”
如果135xxxxxxxx回复短信,将自动调用插件plugin_message
如果135xxxxxxxx 回复 A 执行查看磁盘空间的命令并回复message
如果135xxxxxxxx 回复 B 执行统计网络连接数并回复message
如果135xxxxxxxx 回复 C 执行一个shell脚本并回复message
如果135xxxxxxxx 回复 D 只回复message
如果135xxxxxxxx 回复 其它 回复错误指令的信息
如果不是135xxxxxxxx 回复的信息即使是正确指令也不予执行
其中A,B,C,D可以任意指定激活执行命令或者脚本的条件,通过短信回复可以使机器人执行命令,脚本,程序,回复信息等任意操做。
================================================== =================================
参考:
飞信机器人官方网站:http://www.it-adv.net/
http://www.hiadmin.com/%E7%B3%BB%E7%BB%9F%E7%9B%91 %E6%8E%A7%EF%BC%9Alinux%E5%91%BD%E4%BB%A4%E8%A1%8C- %E9%A3%9E%E4%BF%A1%E5%AE%A2%E6%88%B7%E7%AB%AF%E5%8F %91%E9%80%81%E5%85%8D%E8%B4%B9%E6%8A%A5%E8%AD%A6%E7 %9F%AD%E4%BF%A1/
http://www.hiadmin.com/cacti%E5%AE%9E%E7%8E%B0%E7% 9F%AD%E4%BF%A1%E6%8A%A5%E8%AD%A6/
给 cacti 插件 thold 加上飞信和msn报警功能:http://www.hiadmin.com/category/workshop/sms/
谨慎使用:成功将飞信2009(fetion-linux)移植到rhel4:http://xok.la/2009/03/fetion_2009_to_rhel4_linux4. html
Net-SMS-PChome:http://people.debian.org.tw/~chihch un/2008/02/29/net-sms-pchome-updated/
yum install patch
wget http://mirror.cactiusers.org/downloads/plugins/cacti-plugin-0.8.7g-PA-v2.8.tar.gz
wget http://docs.cacti.net/_media/plugin:thold-v0.4.9-3.tgz
wget http://docs.cacti.net/_media/plugin:settings-v0.71-1.tgz
tar zxf cacti-plugin-0.8.7g-PA-v2.8.tar.gz
cd cacti-plugin-arch/
mysql -u root -p cacti < pa.sql
cd /var/www/html/cacti
patch -p1 -N < cacti-plugin-arch/cacti-plugin-0.8.7g-PA-v2.8.diff
tar zxf thold-v0.4.9-3.tgz
tar zxf settings-v0.71-1.tgz
mv settings /var/www/html/cacti/plugins/
mv thold /var/www/html/cacti/plugins/
vim /var/www/html/cacti/include/global.php
要修改的地方有两处
100行修改为
$config['url_path']='/cacti/';
$plugins[]='settings';
$plugins[]='thold';
1、登录系统 > 修改用户权限User Management > 勾选Plugin Management > 进入插件管理Plugin Management > 点击图标添加
2、进入settings > Mail/DNS收发信测试
> Thresholds报警设置
3、进入Thresholds > Add添加
设置短信报警
基本思路是修改邮件报警,将内容追加到一个脚本里,然后通过脚本调用短信接口进行发信。
目前初期阶段报警内容比较简单
vim /var/www/html/cacti/plugins/thold/thold_functions.php
添加部分代码
function thold_mail($to, $from, $subject, $message, $filename, $headers =''){vim /var/www/html/cacti/plugins/thold/alert.d/shijie.sh (curl在调URL变量的时候有些问题)
global $config;
thold_debug('Preparing to send email');
include_once($config['base_path'].'/plugins/settings/include/mailer.php');
include_once($config['base_path'].'/plugins/thold/setup.php');
//add by september
exec("echo $subject >>/var/www/html/cacti/plugins/thold/alert.log");
exec("date +%T >> /var/www/html/cacti/plugins/thold/alert.log");
exec("/var/www/html/cacti/plugins/thold/alert.d/shijie.php");
exec("cat /dev/null > /var/www/html/cacti/plugins/thold/alert.log");
//add end
#!/bin/sh
if[!-e "/var/www/html/cacti/plugins/thold/alert.log"];then
echo "Usage:alter.log does not exist"
elif[-n "`cat /var/www/html/cacti/plugins/thold/alert.log`"];then
date=`date +%Y%m%d`
curl 'http://XXXXXX/Page/SendAPI.aspx?num=XXXXXXX&msg=XX总出口流量过高:'.$date
echo >/var/www/html/cacti/plugins/thold/alert.log
#!/usr/bin/php
<?php
$curl=curl_init();
$body=`cat /var/www/html/cacti/plugins/thold/alert.log`;
$body=urlencode($body);
curl_setopt($curl,CURLOPT_URL,'http://xxxxx/Page/SendAPI.aspx?num=xxxx&msg=xx:'.$body);
curl_exec($curl);
curl_close($curl);
?>
#################################################################################################
另一种方法:(测试中)
vim plugins/settings/setup.php
改成(个人喜好)
$tabs['mail']='Mail / Mobile';在$temp数组下增加如下代码
"settings_mobile_header"=> array(
"friendly_name"=>"Mobile Options",
"method"=>"spacer",
),
"settings_mobile_number"=> array(
"friendly_name"=>"Mobile Number",
"description"=>"This is the China Mobile Number that the dead host notifications will be sent to.",
"method"=>"textbox",
"max_length"=>255,
),
在这段
if($Mailer->send($text)==false){
print'ERROR: '. $Mailer->error()."\n";
return $Mailer->error();
}
return'';
//add by september
//发送短信
preg_match("/[0-9]{1,3}.[0-9]{1,3}.[0-9]{1,3}.[0-9]{1,3}/",$subject,$ip);
preg_match('/-(.*)]/',$subject,$content);
$flag = stristr($subject,'normal');
$content = str_replace('-','',str_replace('','',$content[0]));
if($flag){
$content = $ip[0]. $content .' is OK';
}else{
$content = $ip[0]. $content .' has problem';
}
thold_mms($content);
//add end
//add by september
/* mms */
function thold_mms($content){
    $number = db_fetch_row("SELECT value FROM settings WHERE name = 'settings_mobile_number'");
    $mobile_string = $number['value'];
    $mms_content = iconv("UTF-8","GB2312",$content);
    $API_Endpoint="http://service.winic.org/sys_port/gateway/";
    $nvpStr ="XXX&pwd=XXX=".$mobile_string."&content=".urlencode($mms_content)."&time=";
    $ch = curl_init();
    curl_setopt($ch, CURLOPT_URL,$API_Endpoint);
    curl_setopt($ch, CURLOPT_VERBOSE,1);
    curl_setopt($ch, CURLOPT_SSL_VERIFYPEER, FALSE);
    curl_setopt($ch, CURLOPT_SSL_VERIFYHOST, FALSE);
    curl_setopt($ch, CURLOPT_RETURNTRANSFER,1);
    curl_setopt($ch, CURLOPT_POST,1);
    curl_setopt($ch,CURLOPT_POSTFIELDS,$nvpStr);
    $response = curl_exec($ch);
if(curl_errno($ch)){
        $curl_error_no >=curl_errno($ch);
        $curl_error_msg>=curl_error($ch);
}else{
        curl_close($ch);
}
return $response;
}
//add end
注:以上$API_Endpoint和$nvpStr需要继续研究
Cacti配置Threshold(Thold)并e-mail报警
一、 软件环境:cacti(需Threshold插件)
二、 安装过程:
Cacti的安装各位google一下,这里就不详细介绍了.
我的 cacti文件放在/web/c/cacti/
#打cacti-plugin-arch补丁
wget http://cactiusers.org/downloads/cacti-plugin-arch.tar.gz
tar -xzvf cacti-plugin-arch.tar.gz
cp cacti-plugin-arch/cacti-plugin-0.8.7b-PA-v2.1.diff /web/c/cacti/
mysql -ucacti -pcactipw cacti < cacti-plugin-arch/pa.sql
cd /web/c/cacti/
patch -p1 -N < cacti-plugin-0.8.7b-PA-v2.1.diff
完成!
安装settings插件
wget http://mirror.cactiusers.org/downloads/plugins/settings-0.5.tar.gz
tar -xzvf settings-0.5.tar.gz
mv settings /web/c/cacti/plugins/
vi /web/c/cacti/include/global.php //添加插件信息$plugins[] = 'settings';
完成!
安装Threshold插件
V0.3.9下载地址:http://mirror.cactiusers.org/downloads/plugins/thold-0.3.9.tar.gz
wget http://mirror.cactiusers.org/downloads/plugins/thold-0.3.9.tar.gz
tar -xzvf thold-0.3.9.tar.gz
mv thold /web/c/cacti/plugins/
vi web/c/cacti/include/global.php
$database_type = "mysql";
$database_default = "cacti";
$database_hostname = "localhost";
$database_username = "cacti";
$database_password = "cactipw";
$database_port = "3306";
/* Default session name - Session name must contain alpha characters */
$cacti_session_name = "Cacti";
$plugins = array();
$plugins[] = 'settings';
$plugins[] = 'thold';
#---
设置数据库信息以及插件.
- mysql -ucacti -pcactipw cacti < /web/c/cacti/plugins/thold/thold.sql
完成!
安装Threshold插件,只需将解压出来的Thold目录拷贝到cacti/plugins/目录下,并修改cacti配置文件(cacti目录下的include/config.php).在配置中查找$plugins = array();行,在此行下面加入:
$plugins[] = ‘thold’;
再导入数据库.
刷新cacti首页,你将看到多出来一个Threshld选项卡.如下所示

三、 配置过程:
1.设置Threshold插件:选中console选项卡,在左侧菜单中点击Settings,然后点击Alerting/Thold选项卡
2.设置发送警报通知:在Default Alerting Options中选择Send notifications
3.设置出现down机的情况时(即Monitor出现如图所示 )发送警报通知:选择Dead Hosts notifications
报警邮件范例如下:
Message : Host did not respond to SNMP (down机报警)
Host Notice : 192.168.1.207 (192.168.1.207) returned from DOWN state (恢复)
4.设置警报发送纯文本的电子邮件没有图(默认是HTML电子邮件与图表嵌入在电子邮件):选择Send alerts as text
5.设置周末不执行报警检查:选择Weekend exemptions
6.设置报警的门槛:Default Trigger Count
7.设置Emailing Options
Mail Services:SMTP.(可以选择PHP mail,sendmail,SMTP三种方式)
From Email Address:按实际设置
From Name:按需要设置(该处显示的name就是email的发件人姓名)
8.进入Mail / DNS 标签
设置Sendmail Options(Mail Services设置为sendmail需设置此项)
Sendmail Path:/usr/sbin/sendmail(路径是服务器上Sendmail的,仅用于邮件服务选定为Sendmail)
9.设置SMTP Options(Mail Services设置SMTP需设置此项)
SMTP Hostname:SMTP服务器如:mail.test.com
SMTP Port:25
SMTP Username: 通过SMTP发送邮件用来验证的用户名,如果你不要求身份验证留空
SMTP Password:通过SMTP发送邮件用来验证的密码,如果你不要求身份验证留空

测试:点击Send a Test Email,测试成功如下所示:
收到的测试邮件范例:
Your email settings are currently set as follows
Method: SMTP
Host: mail.xok.la
Port: 25
Authenication: true
Username: xok.la
Password: (Not Shown for Security Reasons)
配置完成后别忘记save.
下面我以进程报警为例,来设置具体的报警信息(CPU,DISK,服务,网络等等)
在console选项卡下左侧菜单中点击Threshold Templates .

如果没有出现Threshold Templates选项,那么有可能你还没有导入插件的数据库文件.
在如下图所示中点击Add按钮来添加一个Threshold模板

添加进程监控的模板,无论是linux还是windows都是使用的Host MIB - Processes

可以选择proc

我设置的300个最高进程

Alert E-Mail 写上通知的邮件地址即可.然后保存.
应用刚才创建的Threshold模板
在console选项卡下点击Management ->Devices,选择要应用此模板的Host,点击最上面的Create Graphs for this Host链接,然后点击Auto-create thresholds链接来应用刚创建的Threshold模板.
需要做的是,监控的主机要设置监控磁盘,如Associated Graph Templates ———- Host MIB - Processes 要选上,不然thold取不到数据的.
设置完成后在console选项卡下左侧菜单中点击Thresholds,在此可以管理已创建的警报,如下:

看第1条,Processes [proc] 300 ,超过300个进程数,出现红色警告了,那我们去看他有没有发信呢?

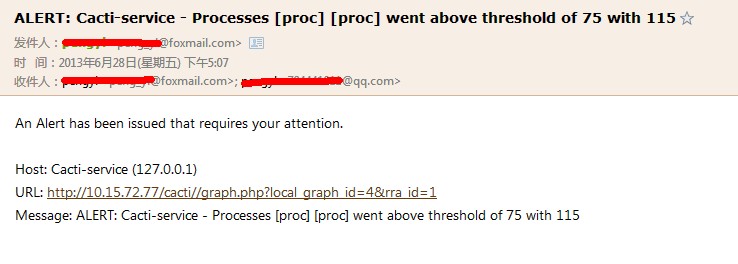
果然收到信件了…到此配置完成!
|
配置Cacti实现短信(飞信)预警 Cacti 一、 软件环境:cacti(需Threshold插件),飞信机器人(fetion) 二、 安装过程: 三、 配置过程:
;
备注:本人的thold安装在/var/www/html/cacti/plugins/thold/目录中,如果注释掉thold_mail,只通过短信发送报警.不注释掉thold_mail,会通过email和短信同时发送报警 #send sms by fetion #Write by John.Lv if [ ! -e "/var/www/html/cacti/plugins/thold/alert.log" ];then #判断alter.log是否存在 echo "Usage:alert.log does not exist" exit fi if [ -n "`cat /var/www/html/cacti/plugins/thold/alert.log`" ]; then #判断alter.log是否有报警信息 admin="135xxxxxxxx" #短信接收人,需在你飞信的好友列表中 echo "sms $admin "`cat /var/www/html/cacti/plugins/thold/alert.log` >>/var/www/html/cacti/plugins/thold/sms.txt #发送alter.log中的报警信息给admin echo "exit" >> /var/www/html/cacti/plugins/thold/sms.txt #退出飞信 else echo "Usage:no alert" exit fi if [ -n "`cat /var/www/html/cacti/plugins/thold/sms.txt`" ] ; then /var/www/html/cacti/plugins/thold/install/fetion -u 13512345678 -p "123456" -b /var/www/html/cacti/plugins/thold/sms.txt -EN #调用fetion发送短信,命令格式和参数说明参见:系统监控:linux命令行-飞信客户端发送免费报警短信 rm -f /var/www/html/cacti/plugins/thold/sms.txt 1>/dev/null 2>&1 rm -f /var/www/html/cacti/plugins/thold/alert.log 1>/dev/null 2>&1 else echo "Usgae:no message to send" exit fi ok,配置完成了,现在就可以通过短信接收报警信息了 系统监控:linux命令行-飞信客户端发送免费报警短信 短信 一、软件环境(centos 5为例) 最新程序fetion20080522004-linrh4.tar.gz libACE-5.6.5.so libACE_SSL-5.6.5.so libcrypto.so.0.9.7a libssl.so.0.9.7a # tar zxvf fetion20080522004-linrh4.tar.gz ./install/ ./install/www/ ./install/www/index.html ./install/www/css/ ./install/www/css/scheme.css ./install/www/css/main.css ./install/www/css/print.css ./install/www/css/main-msie.css ./install/www/images/ ./install/www/js/ ./install/www/js/jquery.js ./install/socket_interface/ ./install/socket_interface/socket_demo.php ./install/Readme.txt ./install/sound/ ./install/sound/smile8.wav ./install/sound/message.wav ./install/sound/smile1.wav ./install/sound/login.wav ./install/sound/openchatwin.wav ./install/sound/closechatwin.wav ./install/fetion ./install/plugins/ ./install/plugins/plugin_contact_update ./install/plugins/plugin_buddy_application ./install/plugins/plugin_message ./install/plugins/plugin_invite ./install/plugins/plugin_timer ./install/conf/ 把支持库复制到/usr/lib/目录下,并作软链接如下: cp lib*so* /usr/lib/fetion的目录结构:
完成之后测试,安装是否成功;执行 #cd install# ./fetion -h Usage: fetion -h -h: help fetion -u mobile -p pwd [-b batchfile] [-EN] [-d] fetion -u mobile -p pwd [-b batchfile] [-EN] [-d] -u: Fetion user account(only supports mobile phone No.) -p: Account password -b: Batch file name -d: Debug on and write logs to [mobile]-debug.log -EN: English 三、实际测试 **************************************************************** sms 137******** “this is test message” # 这个就是我们需要的发送短信的指令啦! sms 13712312311 "msyqlserver is down" sms 13712312312 "db1 is not running" sms 13712312313 "warning db2 disk3 is full" exit 保存后执行: ./fetion -u 135xxxxxxxx -p 123456 -b p.sh就是一次给3个admin发出报警信息. |
======================
http://book.wuyuhu.com/2011/03/65bb44e3-1bc4-4c2b-983a-972bb4fb61fe
Cacti配置和安装具体过程如下!
使用cacti需要具有一定的使用net-snmp和rrdtool的知识。今天我们要将得是Catci配置的命令,希望帮助大家安装更新CentOScacti系统。
Catci配置:
#mysqlcacti-uroot-p #chown-Rcactiuserrra/log/ #viinclude/config.php $database_type="mysql"; $database_default="cacti"; $database_hostname="localhost"; $database_username="cactiuser"; $database_password="cactiuser"; $database_port="3306";
Cacti配置让系统每五分钟去取一次snmp数据:
#crontab-ucactiuser-e//注意要用cactiuser就是你刚刚建立的那个帐号去运行crontab
*/5****/usr/local/php/bin/php/usr/local/www/htdocs/cacti/poller.php>/dev/null2>&1
或:vi/etc/crontab,增加:
*/5****cactiuser/usr/local/php/bin/php/usr/local/www/htdocs/cacti/poller.php>/dev/null2>&1
(用spine时可以改成1分钟刷一次)
*****/usr/local/php/bin/php/usr/local/www/htdocs/cacti/poller.php>/dev/null2>&1
pluginArchitecture的安装
wgethttp://mirror.cactiusers.org/downloads/plugins/cacti-plugin-0.8.7e-PA-v2.6.zip
unzipcacti-plugin-0.8.7e-PA-v2.6.zip
进入解压目录,导入数据库:
mysqlcacti cpcacti-plugin-0.8.7e-PA-v2.6.diff/usr/local/www/htdocs/cacti/
cd/usr/local/www/htdocs/cacti/
patch-p1-N 注:若php是系统自带安装的这用这个方法打补丁会报错,则用如下的方法安装:
仔细读了一下同级目录的readme.txt:里面提示说如果通过rpm包的方式安装的建议,直接把files里的文件直接覆盖。我就郁闷了,我之所以上一篇文章说要把安装的cacti更新到最新的版本就是怕出现这样的版本不一致的情况,结果还是发生了。最后还是覆盖了一下解决了问题。
rsync-avz./files-0.8.7e/*/var/www/html/cacti/viinclude/global.php
将$config['url_path']=‘/’;改为:$config['url_path']=‘/cacti/’;
settings安装
下载:wgetwgethttp://docs.cacti.net/_media/plugin:settings-latest.tgzcp-rsettings-0.6//usr/local/www/htdocs/cacti/plugins/settings#viinclude/global.php
在$plugins=array();的后面加上如下内容
$plugins[]='settings';
通过文章的介绍,想必大家都知道了如何进行Cacti配置和安装,没动手的朋友速度吧!
|||
CACTI的客户端SNMP设置如下!
CACTI的客户端SNMP设置(被监控端):
1. ubuntu :
apt-get install snmp snmpd
vim /etc/default/snmpd //将此配置文件中127.0.0.1 删掉。
/etc/init.d/snmpd restart
2. redhat/centos
安装net-snmp net-snmp-utils
vi /etc/snmp/snmpd.conf
更改 com2sec notConfigUser default public
改为 com2sec notConfigUser 监控端IP public
更改access notConfigGroup "" any noauth exact systemview none none
改为access notConfigGroup "" any noauth exact all none none
将 #view all included .1 80 前面的 # 注释去掉
service snmpd restart
通过上面的描述,我们知道了CACTI的客户端SNMP设置,希望本文对你们有帮助!
==============
http://www.th7.cn/system/lin/201308/43643.shtml
cacti下载地址 http://www.cacti.net/downloads/cacti-0.8.7e.tar.gz
thlod下载地址 http://cactiusers.org/downloads
使用最新的版本cacti-0.8.7e
安装thlod需要cacti-plugin和settings支持
下载后将所有文件cp到/var/www/html
[root@service html]#wget http://mirror.cactiusers.org/downloads/plugins/cacti-plugin-0.8.7e-PA-v2.5.zip
[root@service html]#wget http://mirror.cactiusers.org/downloads/plugins/thold-0.4.1.tar.gz
[root@service html]#wget http://mirror.cactiusers.org/downloads/plugins/monitor-0.8.2.zip
[root@service html]#wget http://mirror.cactiusers.org/downloads/plugins/settings-0.5.zip
[root@service html]# mv cacti-0.8.7e cacti //修改名字
[root@service html]# vim cacti/include/config.php //修改连接数据库
[root@service html]# vim cacti/include/global.php
mysql> create database cacti;
Query OK, 1 row affected (0.00 sec)
mysql> use cacti
Database changed
mysql> source /var/www/html/cacti/cacti.sql;
listen 80;
server_name cacti.test.com;
location / {
root /var/www/html/cacti/;
index index.php index.html index.htm;
#access_log logs/host.access.log main;
}
location ~ \.php$ {
root html;
fastcgi_pass 127.0.0.1:9000;
fastcgi_index index.php;
fastcgi_param SCRIPT_FILENAME /var/www/html/cacti/$fastcgi_script_name;
include fastcgi_params;
需要安装snmp 直接yum install net-snmp*
[root@service html]# rpm -qa|grep net-snmp
net-snmp-5.3.2.2-5.el5_3.1
net-snmp-perl-5.3.2.2-5.el5_3.1
net-snmp-devel-5.3.2.2-5.el5_3.1
net-snmp-libs-5.3.2.2-5.el5_3.1
net-snmp-utils-5.3.2.2-5.el5_3.1
修改snmp文件并且启动
[root@service html]# vim /etc/snmp/snmpd.conf
#com2sec notConfigUser default public //原
com2sec notConfigUser 127.0.0.1 public //修改后的
#access notConfigGroup "" any noauth exact systemview none none //原
access notConfigGroup "" any noauth exact all none none //修改后的
view all included .1 80 //去掉注释
[root@service html]# service snmpd start
Starting snmpd: [ OK ]
rrdtool 安装
[root@service html]#wget http://dag.wieers.com/rpm/packages/rpmforge-release/rpmforge-release-0.3.6-1.el5.rf.i386.rpm
[root@service html]#rpm -ivh rpmforge-release-0.3.6-1.el5.rf.i386.rpm
[root@service html]#yum install rrdtool
输入cacti.test.com 进行安装了 安装步骤直接下一步这里我就不输入了默认密码是admin
[root@service html]#cp -R files-0.8.7e/* /var/www/html/cacti/
[root@service html]#mkdir cacti/plugins settings
[root@service html]#mkdir cacti/plugins/settings
[root@service html]#mkdir cacti/plugins/thold
[root@service html]#mkdir cacti/plugins/monitor
[root@service html]#cp monitor-0.8.2.zip cacti/plugins/monitor/
[root@service html]#cp settings-0.5.zip cacti/plugins/settings/
[root@service html]#cp thold-0.4.1.zip cacti/plugins/thold/
[root@service html]#vim cacti/include/global.php 进入添加
$plugins[] = 'thold';
$plugins[] = 'settings';
$plugins[] = 'monitor';
[root@service html]#cd cacti/plugins
[root@service html]#cd monitor/
[root@service html]#unzip monitor-0.8.2.zip
[root@service plugins]#mysql cacti -u root -p < monitor.sql
[root@service plugins]#unzip thold-0.4.1.zip
[root@service plugins]#mysql cacti -u root -p < thold.sql
[root@service plugins]#unzip settings-0.5.zip
cacti monitor thold的使用
From:http://blog.chinaunix.net/u/26299/showart_2000182.html
1,安装cacti的PA
要安装别的插件前,先要安装cacti的一个patch--Plugin Architecture,才能支持插件
PA和cacti版本的关系
PA 1.0 = cacti 0.8.6i
PA 1.1 = cacti 0.8.6i et 0.8.6j
PA 2.0 = cacti 0.8.7b
PA 2.2 = cacti 0.8.7c
PA 2.4 = cacti 0.8.7d
PA 2.5 = cacti 0.8.7e
附:用yum安装时是0.8.7d的版本,但是心血来潮,又下了个最新版0.8.7e,尝尝鲜。安装也很简单,直接进入/var/www/cacti/目录中,把所有的文件删除,清空目录(直接将0.8.7e包解压后覆盖到原目录也行,但主要是避免一些错误还是清空的好)然后将新版压缩包中的文件解压至此,另外数据库也要更新,也同样先将原数据库drop掉,然后再将目录中的cacti.sql导入进来(反正全新安装,瞎搞^_^),如果是升级安装的话,请参考官方文档http://www.cacti.net/downloads/docs/html/upgrade.html
我们用的0.8.7e所以用最新的2.5
wget http://mirror.cactiusers.org/downloads/plugins/cacti-plugin-0.8.7e-PA-v2.5.zip
unzip cacti-plugin-0.8.7e-PA-v2.5.zip -d cacti-plugin-arch
cp -R cacti-plugin-arch/* /usr/share/cacti/
#cd /usr/share/cacti/
#mysql -ucacti -p cacti < pa.sql
如果你是中文的cacti,就执行下面的命令(需要下载)
patch -p1 -N < cacti-plugin-0.8.7e-PA-v2.5-cn-utf8.diff
如果你是英文的,就下载原来的
patch -p1 -N < cacti-plugin-0.8.7e-PA-v2.5.diff
这样做完后,可能会图象不对(前提,你设置的url是http://xxx/cacti),那么需要修改如下的内容.
vim include/global.php
$config['url_path'] = ‘/cacti/’;
进入"用户管理"->点admin->区域权限->Plugin Management
安装settings,thold,monitor插件
monitor插件,提供更简略、直观的设备状态图示;
thold插件,提供设备异常预警。
cd cacti/plugins
#wget http://mirror.cactiusers.org/downloads/plugins/settings-0.5.tar.gz
#tar zxvf settings-0.5.tar.gz
#wget http://mirror.cactiusers.org/downloads/plugins/thold-0.4.1.tar.gz
#tar zxvf thold-0.4.1.tar.gz
#wget http://cactiusers.org/downloads/monitor.tar.gz
#tar zxvf monitor.tar.gz
#vim ../include/global.php
在$plugins = array();的后面加上如下内容
$plugins[] = ‘thold’;
$plugins[] = ’settings’;
$plugins[] = monitor;
使用插件
使用monitor插件
刷新cacti系统的web管理界面,可以看到多出两个标签页(thold、monitor)。
1>打开“Console->Settings->Misc”,可以调整Monitor的各项配置。例如:勾选“Show Icon Legend”可以在监控页面显示图例;
“View”可以选用Tiles类型,以显示设备状态表格。
2>为cacti添加新设备时,勾选上“Monitor Host”项。对已添加的设备可以通过“Management->Devices”进去修改。
3>单击Web页面上方的“monitor”标签链接,可以进入查看各设备/主机的状态图示。
使用thold插件
1>打开“Console->Settings->Mail/DNS”,可以调整“SMTP Options”和“DNS Options”等配置,用于确保预警邮件能够发出。
2>打开“Console->Settings->Alerting/Thold”,可以调整Thold的各项配置。例如:“Dead Host Notifications Email”处可填写设备当机时发送警告信息到哪个邮箱;勾选“
Send alerts as text”项,可以设置只发送文本格式的邮件。
3>打开“Templates->Threshold Templates”,可以添加、取出需要关联到预警系统的模板,例如:可以添加和“Interface-Traffic”模板的关联,选择 “traffic_in”、
“traffic_out”数据项,分别设置警告阈值“High Threshold”(如200000000比特/秒);可以添加和“Unix-Disk Space”模板的关联……。
4>打开“Create->New Graphs”,选择需要提供预警的设备,单击右侧上方的“Auto-create thresholds”创建预警项目。
5>打开“Management->Thresholds”,可以管理已经创建的预警项目。
附:按照官方文档安装了plugin architecture和settings、thold等plugins但是web页面里仍没什么变化,后来访问了下plugins.php,系统报没有权限,然后直接点”login”直接就进系统了,由此可见不是没有权限,而应该是没有特定的权限,后来进入用户设置界面”User Management”将所用的用户点开,发现有个”plugin management”的权限没选中,选中,再Save,再回来刷页面,果然,左边有了新的一项菜单:“Plugin Management”,点进去可以进行plugin的管理,搞定。
插件说明
cacti的安装配置不再详细说明,主要说明一下报警插件thold的配置,最高/最低值和baseline的问题.
关于插件问题,在cacti的0.8.8a版本中,已经集成了Plugin Architecture,Plugin Management (Cacti Version: 0.8.8a, Plugin Architecture Version: 3.1),安装插件只需要把解压后,把整个目录放到cacti/plugins中即可.然后登录cacti的web界面进行配置.
参考链接:
http://docs.cacti.net/manual:088:1_installation.9_pia#installing_plugins
http://docs.cacti.net/plugin:thold#thold
https://github.com/vovan888/cacti-plugin-thold
安装
依赖插件settings
- 下载地址
http://docs.cacti.net/plugin:settings - 启动
Plugin Management -> Install Plugin(蓝色向下箭头) ->Enable Plugin(绿色向右箭头) - 配置
Settings -> Mail/DNS - 权限
启用插件后,需要在用户权限中添加对插件的控制权限
thold
- 全局配置
- 联系人
Management -> Notification Lists -> ADD - 模板
Templates -> Threshold Templates -> ADD -> 选择数据模板(Data Template)和数据源(Data Source) - 创建报警
Management -> Thresholds
选择主机,图形模板,数据源,点Create.这个时候"Template Propagation Enabled"是不能用的.需要自己填写监控值.
关于
Re-Alert Cycle
Repeat alert after this amount of time has pasted since the last alert.
注意:选择"Never",对于不同的检测方式不一样.
高/低值的情况,只报一次.
baseline的,每分钟都会检测,超出则发报警 - baseline算法问题|
关于baseline算法,参考网上一些文章,得到如下结论(注意:各版本之间的算法会有差异)
因目前没有找到完整的说明文档,有时间研究一下代码.以验证这个推论.
参考:
http://forums.cacti.net/viewtopic.php?f=17&t=41370
http://forums.cacti.net/viewtopic.php?f=17&t=41781&start=15
对于全局和局部的配置,分析如下:
- Default Baseline Settings
Baseline Time Range Default
This is the default value used in creating thresholds or templates.
这个值是对应的三种模板 - Baseline Settings
Time range
Specifies the point in the past (based on rrd resolution) that will be used as a reference
这个值是从过去时间的一个参考(这个值是*循环递进*的),虽然显示是6分钟,但基于rrd分辨率,实际是5分钟更新一次基线值.
24分钟是20分钟一更新.
4.8小时,没有测试.
- Default Baseline Settings
http://my.oschina.net/zhongjuan/blog/89363
一. monitor 用于监控主机的状态,是否Down机等
1. 设置
在添加设备的时候,选中 "monitor Host " 即为添加monitor 监控主机状态。
在 "设置"-> MISC 中,有关monitor 的设置项为:
Alarm Sound (报警的声音文件,超过一些预定的值的报警。)
Refresh Interval (轮询/刷新的时间间隔)
Icon Spacing
Show Icon Legend (显示图例,如什么色代表Down机,正常等)
Grouping (设置如何分组,例如按照树形来分组)
View (显示单台主机的信息,可以选择是否显示设备名称,IP地址,上次Down机的时间等的状态信息)
2.Thold 插件
Thold 是报警插件,通过设置超过最高或最低值的时候进行报警,可以发送邮件或短信方式。
(1) 邮件报警
在"控制面板" -> "设置" -> Alerting/Thold 里面设置
在"Default Alerting Options" 栏 Dead Hosts Notifications 设置Down 机报警,即monitor 出现Down机时报警。
"Send alerts as text" 设置警报发送纯文本的电子邮件没有图(默认是HTML电子邮件与图表嵌入在电子邮件)。
"Weekend exemptions" 周末不进行报警检查。
"Default Trigger Count" 设置报警的门槛。
"Re-Alerting" 重复报警次数
"Dead Host Notifications Email" Down机时发送该邮箱。
(2) 设置邮件报警相关选项:
在"控制面板" -> "设置" -> "Email/DNS" 中设置邮件相关选项。
Mail Services:SMTP。(可以选择PHP mail,sendmail,SMTP三种方式)。
From Email Address:收到报警时显示来自的邮件地址。
From Name:显示发件人是谁。
Word Wrap: 允许邮件个多少个字。
Sendmail Path: sendmail 的路径,只有选择 sendmail 方式时才有效。
SMTP Options: 选择SMTP认证时需要设置的以下选项:
SMTP Hostname: SMTP服务器
SMTP Port: SMTP端口,一般是25
SMTP Username: SMTP用户名。
SMTP Password:SMTP密码。
Down机邮件如下:
Host Error : My NoteBook (192.168.2.240) is DOWN Message : Host did not respond to SNMP (Down机)
Host Notice : My NoteBook (192.168.2.240) returned from DOWN state(恢复)
Down机时,使用php mail 方式测试不能成功收到邮件,使用SMTP方式可以。
添加Thold 模板监控具体的服务,磁盘,CPU,内存,网络等。下面以磁盘空间低于10000M时报警为例:
在"控制面板" 中选择 "Threshold Templates" -> 添加一个模板 -> Data Template :"Unix - 硬盘空间"
Data Source: hdd_free -> 创建完成,填入相的值:
Low Threshold: 10000 ; Data Type: CDEF ; Threshold CDEF: Divide by 1024; Alert E-Mail: 报警邮箱。
Re-Alert Cycle: 重发报警的时间
设置完成,按以下步骤给主机应用刚才添加的报警:
"新建图像" -> 选择主机 ->Auto-create thresholds 。在Management -> Thresholds 可以看到已经给主机应用
的报警。
3.Reports 以表格方式产生报表
4.nmidcreatepdf 以PDF方式产生报表,有两个版本,免费版本和收费版本,免费版本的区别是不能发送邮件
5. CaMM 用来接收系统日志的,也可以能过Snmp 陷阱的方式。
6. Motice 监控一些值超过设置值进行记录
7. Weathermap 把设备的接口和性能进行示图展示。
原文地址:http://www.unixvip.com/app/cacti/381/
http://pengyl.blog.51cto.com/5591604/1232237
Monitor插件使用
图示:
绿色:被监控设备状态正常;
红色:被监控设备Down机;
兰色:被监控设备恢复(Down后重新启动,界于红色与绿色之间的状态);
黄色:被监控设备门槛报警
Monitor的选项设定:
counsle → settings → Misc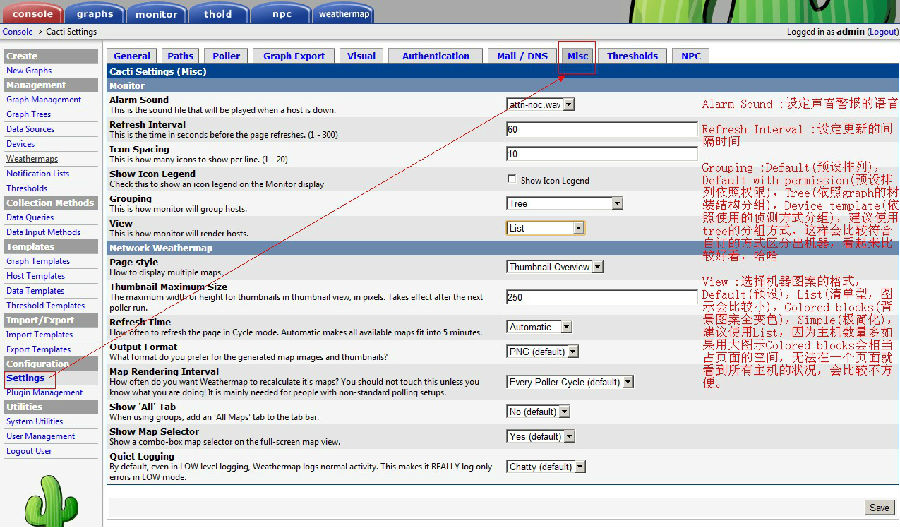
Alarm Sound :设定声音警报的语音
Refresh Interval :设定更新的间隔时间
Show Icon Legend:显示图例,如什么色代表Down机,正常等
Grouping:设置如何分组,Default(预设排列),Default with permission(预设排列依照权限),Tree(依照graph的树装结构分组),Device template(依照使用的侦测方式分组),建议使用tree的分组方式,这样会比较符合自订的方式区分出机器,看起来比较好看,哈哈
View :选择机器图案的格式,Default(预设),List(清单型,图示会比较小),Colored blocks(背景图案全变色),Simple(极简化),建议使用List,因为主机数量多如果用大图示Colored blocks会相当占页面的空间,无法在一个页面就看到所有主机的状况,会比较不方便。
在Monitor里添加主机
单个主机添加
console → Device →点击要添加的主机--勾选Monitor Host 
批量主机添加
console → Device--选择要添加的主机--在“Choose an action”中选择“Enabled Monitoring”或者“Place on a tree(monitor)” --GO-continue
Place on a tree(monitor)和Place on a tree(default)后面括号内的是tree名字,在graphs里有几个tree这里会显示几个类似选项
Thold插件使用
Thold 是报警插件,通过设置超过最高或最低值的时候进行报警,可以发送邮件或短信方式。
(1)配置
配置settings插件
“Console”---“Configuration”---“Settings”---选择“Mail / DNS”根据图中的信息,填写发送的SMTP服务器及邮箱信息---save
配置thold插件
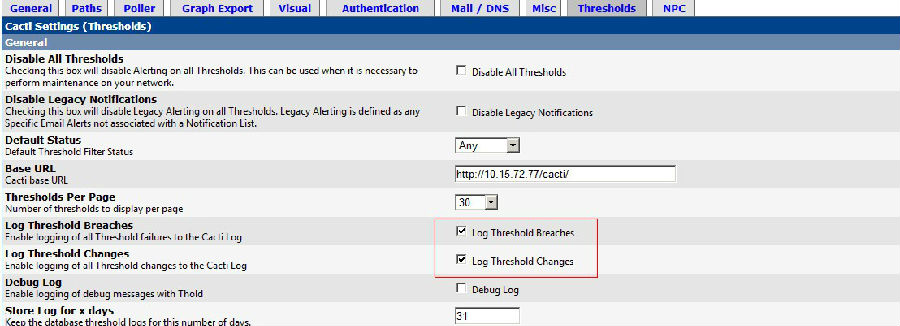
“Console”---“Configuration”---“Settings”---选择“Thresholds”修改相应选项---save
其中有两处单选框必须选中,分别是:
"Syslogging":这一栏是将要发送的信息记入cacti.log中。
"Send alerts as text":这一栏是将要送的警告信息保存为文本形式,没有图片。
测试
“Console”---“Configuration”---“Settings”---选择“Mail / DNS”--点击“Send a Test Email”--弹出测试页面“Authenication: true”表示成功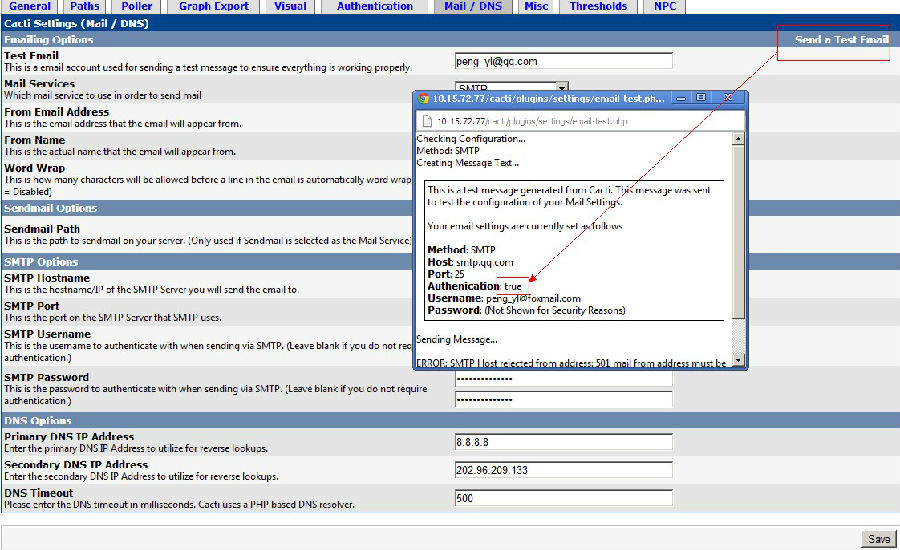
设置thold报警
(1)创建一个thold模板
Console”---“Management”---“Thresholds”
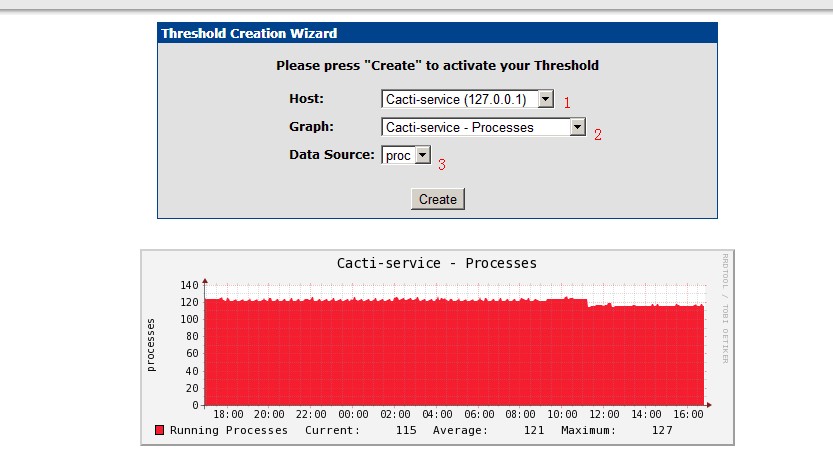
单击图中右上脚的“Add”按钮,弹出如下图示:
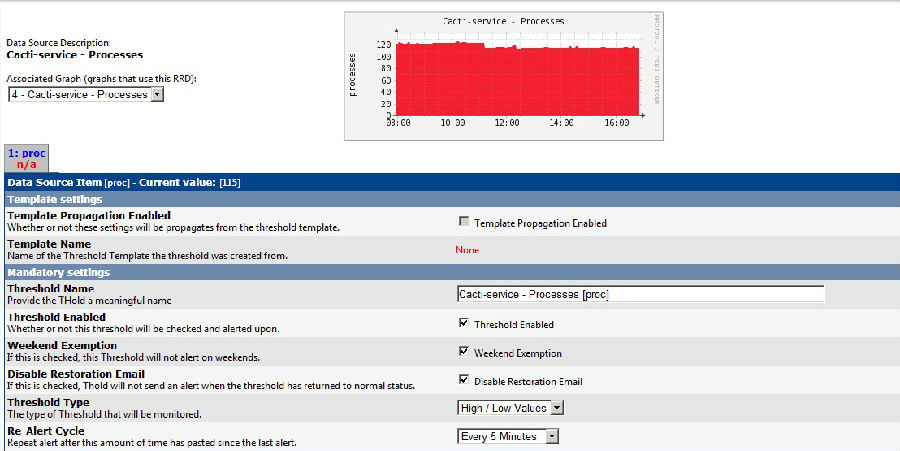
在图中的“Host:”一栏中,单击右侧的下拉框,选择你要监控的报警的主机,选好“Host:”后,会出现下面的“Graph:”,在下拉框中,选择你要设置报警的服务,这里以选择“Localhost-Processes”为例,选择好后,单击“Create”按钮后,会出现一个页面,让你去设置一个阀值,达到多少会发报警邮件:
Templates Name: 这一个Templates 的名称。
Template Propagation Enabled:是否套用Thold模板。如果这个Thold还使用设置好的统一模板的,就选上Enabled
Date Template: Templates资料来源。
Data Field: Templates 的资料项目。
Enable: 启用这一个Templates。
Weekend Exemption: 这一个项目就是六日不会发出警告,很贴心的设计不过在台湾大概行不通。
Disable Restoration Email: 远端主机发生异常断线后重新连结发出警告,这是一个反向的选项,预设是开启,勾选后取消。
Threshold Type: 设定警戒值属性,选项有High/Low values,Baseline,Time Based。
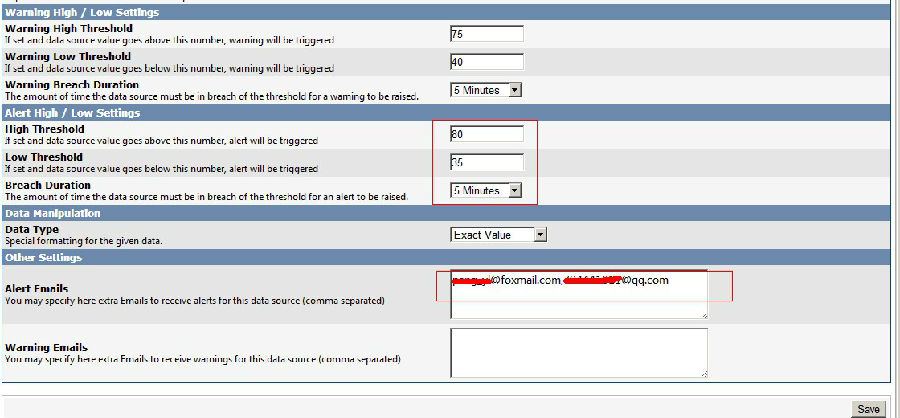
High Threshold: 警戒值上限。
Low Threshold: 警戒值下限。
|
一般情况下,Threshold的阀值即为实际数据,但在网络流量Thold中,有所不同,具体的换算方法为: 网络流量阀值设定值=网络流量限值/8 如我们设网络流量限值为10M的话,哪么网络流量阀值设定值为: 10×1024×1024/8= 1310720 |
Min Tigger Duration: 警戒值触发需要的时间。
Data Type: 警戒值计算方式,可以选择Exact Value(回传值为单位),CDEF,Percentage。
Re-Altert Cycle: 重复发出警告的时间间隔。
Notify accounts: 设定警告帐号。
Alter E-Mail: 设定警告信的收件者,多位收件者可以用逗号“,”区隔
Tips:由于上图的图表中的processes已经有100了,这里设置最高阀值是20,这里肯定会发送报警的。单击右下脚的“Save”保存。到此为止,设立报警项目已经完成。
查看thold当前的报警信息
Console”---“Management”---“Thresholds
此时可以看到一个红色的区域的报警信息,然后再看QQ邮箱里是不是有报警邮件,查看邮件可以看到:
查看cacti.log是否有报警发送邮件的记录
| [root@localhost html]# tail -f /usr/local/cacti/log/cacti.log |
日志里会记录报警的相关信息,以及要发送到的邮件地址
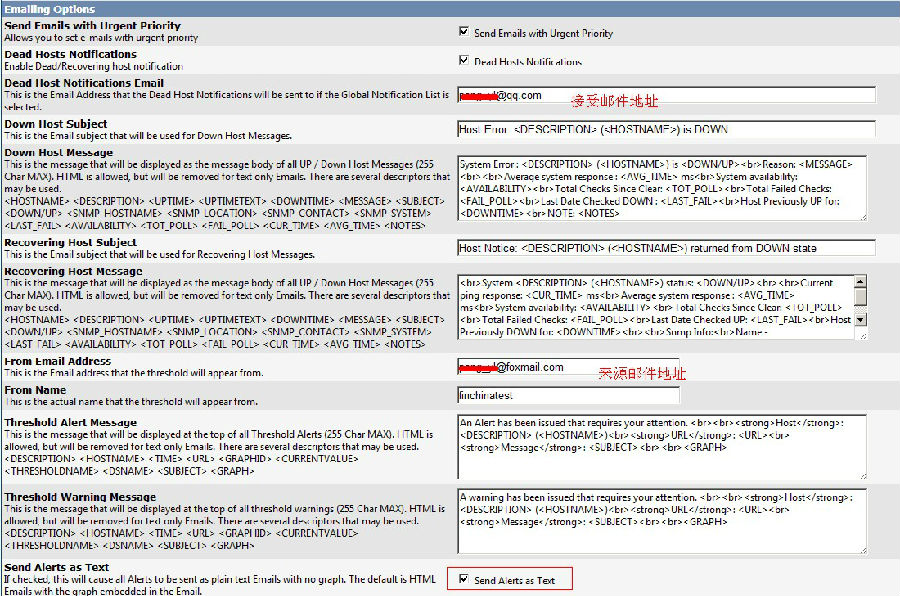
报警的内容更改:
选择“Console”---“Configuration”---“Settings”---选择“Thresholds”
如图示红线处即为变更报警信息的内容: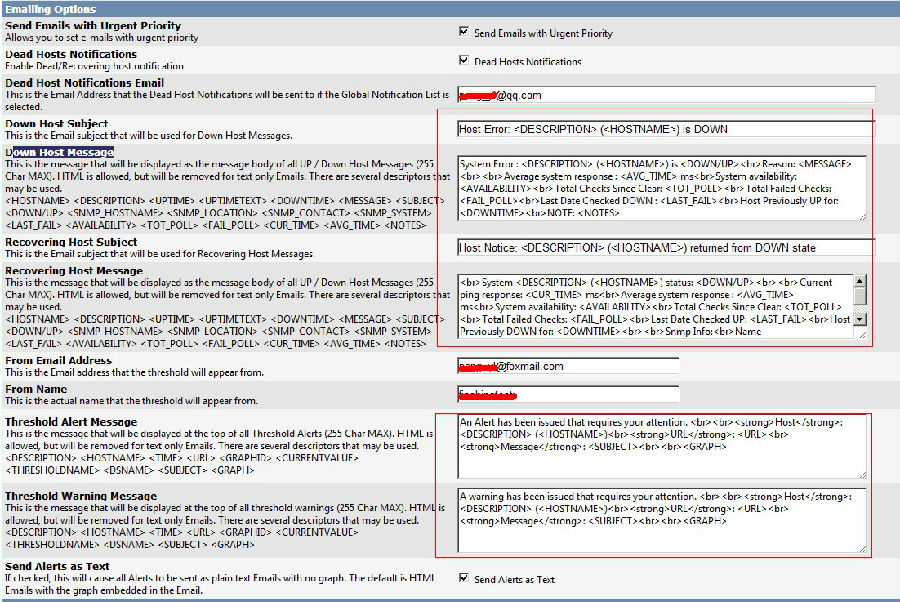
套用建立的规则
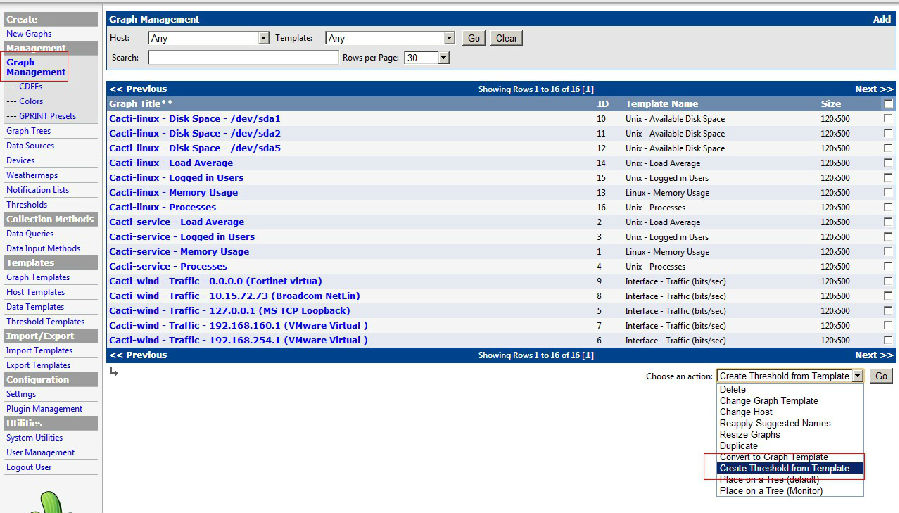
主机数量多如果要每一部都加上规则是相当消耗时间的,而且日后的维护也不容易,在Cacti 中可以多选主机一次套用Template
console → Graph Managerment--选择要套用thold Templates 的项目,选择图表资源项目,在到下面的选单中选择Create Threshold from Templates 选项,就将选择的主机统一套用所设定的Templates--Continue
要查看已经建立的thold 项目可以到console → thold 这一个项目中,选择status 到any 的状况就会出现所有的项目,预设是只出现被tiggered 的项目,方便管理人员在表单中辨识符合警戒值的主机项目。在主机的内容中Template Propagation Enabled 的项目是被勾选的,就表示这一个项目是有套用thold Templates,当修改Templates 的异动修改都会同步套用到这一项目
本文出自 “水滴石穿” 博客,请务必保留此出处http://pengyl.blog.51cto.com/5591604/1232237
http://kerry.blog.51cto.com/172631/235923
Cacti组件安装
tar -xzvf cacti-plugin-arch.tar.gz
cp cacti-plugin-arch/cacti-plugin-0.8.7b-PA-v2.1.diff /data/www/cacti/
mysql -ucacti -pcactipw cacti < cacti-plugin-arch/pa.sql
cd /data/www/cacti/
patch -p1 -N < cacti-plugin-0.8.7b-PA-v2.1.diff
tar -xzvf settings-0.5.tar.gz
mv settings /data/www/cacti/plugins/
vi /data/www/cacti/include/global.php
wget http://mirror.cactiusers.org/downloads/plugins/thold-0.4.1.tar.gz
tar -xzvf thold-0.4.1.tar.gz
mv thold /data/www/cacti/plugins/
vi /data/www/cacti/include/global.php
vi /data/www/cacti/include/global.php
$plugins[] = 'settings';
$plugins[] = 'thold';
本文出自 “聆听未来” 博客,请务必保留此出处http://kerry.blog.51cto.com/172631/235923
http://blog.onovps.com/archives/cacti-thresholds-mail.html
Cacti安装Email报警监控插件
Cacti安装请参考:Centos服务器安装cacti中文版。
Cacti安装插件支持请参考:cacti中文版安装插件支持。
安装settings、thold、monitor插件:
|
1
2
3
4
5
6
7
8
9
10
11
12
|
cd /home/wwwroot/cactiwget -O settings-v0.7-1.tgz http://docs.cacti.net/_media/plugin:settings-v0.7-1.tgztar zxvf settings-v0.7-1.tgz mv settings plugins/wget http://docs.cacti.net/_media/thold-v0.4.9-3.tgzwget -O thold-v0.4.9.3.tgz http://docs.cacti.net/_media/plugin:thold-v0.4.9-3.tgztar zxvf thold-v0.4.9.3.tgz mv thold pluginswget -O monitor-v1.31.tgz http://docs.cacti.net/_media/plugin:monitor-v1.3-1.tgztar zxvf monitor-v1.31.tgz mv monitor plugins |
编辑Cacti配置文件:
|
1
|
vim include/global.php |
在$plugins = array();下方添加:
|
1
2
3
|
$plugins[] = thold;$plugins[] = settings;$plugins[] = monitor; |
登录web界面——插件管理——安装并启用相应插件。
Cacti发送邮件方式设置,本例以smtp方式,设置——MAIL/DNS
Cacti报警配置,设置——Thresholds :
添加监控报警,Management——Thresholds——添加:
本条目发布于 2012 年 5 月 11 日。属于 Cacti 分类,被贴了 报警监控插件 标签。
.








 浙公网安备 33010602011771号