varnish相关,安装配置等
https://www.google.com.hk/#newwindow=1&q=+varnish+++repo&safe=strict
当出现libedit.so依赖缺失的时候,可以换个源继续安装:
[root@testdb yum.repos.d]# rpm -Uvh http://dl.fedoraproject.org/pub/epel/5/i386/epel-release-5-4.noarch.rpm
Retrieving http://dl.fedoraproject.org/pub/epel/5/i386/epel-release-5-4.noarch.rpm
Preparing... ########################################### [100%]
package epel-release-5-4.noarch is already installed
[root@testdb yum.repos.d]# cat epel.repo
[epel]
name=Extra Packages for Enterprise Linux 5 - $basearch
#baseurl=http://download.fedoraproject.org/pub/epel/5/$basearch
mirrorlist=http://mirrors.fedoraproject.org/mirrorlist?repo=epel-5&arch=$basearch
failovermethod=priority
enabled=1
gpgcheck=1
gpgkey=file:///etc/pki/rpm-gpg/RPM-GPG-KEY-EPEL
[epel-debuginfo]
name=Extra Packages for Enterprise Linux 5 - $basearch - Debug
#baseurl=http://download.fedoraproject.org/pub/epel/5/$basearch/debug
mirrorlist=http://mirrors.fedoraproject.org/mirrorlist?repo=epel-debug-5&arch=$basearch
failovermethod=priority
enabled=0
gpgkey=file:///etc/pki/rpm-gpg/RPM-GPG-KEY-EPEL
gpgcheck=1
[epel-source]
name=Extra Packages for Enterprise Linux 5 - $basearch - Source
#baseurl=http://download.fedoraproject.org/pub/epel/5/SRPMS
mirrorlist=http://mirrors.fedoraproject.org/mirrorlist?repo=epel-source-5&arch=$basearch
failovermethod=priority
enabled=0
gpgkey=file:///etc/pki/rpm-gpg/RPM-GPG-KEY-EPEL
gpgcheck=1
[root@testdb yum.repos.d]#
=================================================
[root@test yum.repos.d]# yum install gcc gcc-c++ pcre pcre-devel ncurses-devel
Loaded plugins: rhnplugin, security
This system is not registered with RHN.
RHN support will be disabled.
Setting up Install Process
Package gcc-4.1.2-50.el5.i386 already installed and latest version
Package gcc-c++-4.1.2-50.el5.i386 already installed and latest version
Package pcre-6.6-6.el5_6.1.i386 already installed and latest version
Package pcre-devel-6.6-6.el5_6.1.i386 already installed and latest version
Package ncurses-devel-5.5-24.20060715.i386 already installed and latest version
Nothing to do
-------------------------------------
[root@test yum.repos.d]# rpm --nosignature -i http://repo.varnish-cache.org/redhat/varnish-3.0/el5/noarch/varnish-release-3.0-1.el5.centos.noarch.rpm
package varnish-release-3.0-1.el5.centos.noarch is already installed
[root@test yum.repos.d]# cat varnish.repo
[varnish-3.0]
name=Varnish 3.0 for Enterprise Linux el5 - $basearch
baseurl=http://repo.varnish-cache.org/redhat/varnish-3.0/el5/$basearch
enabled=1
gpgcheck=0
#gpgkey=file:///etc/pki/rpm-gpg/RPM-GPG-KEY-VARNISH
https://www.varnish-cache.org/installation/redhat
Installation on RedHat
Varnish is distributed in the EPEL (Extra Packages for Enterprise Linux) package repositories. However, while EPEL allows new versions to be distributed, it does not allow for backwards-incompatible changes. Therefore, new major versions will not hit EPEL and it is therefore not necessarily up to date. If you require a newer major version than what is available in EPEL, you should use the repository provided by varnish-cache.org.
If you are on RHEL 5 or a compatible distribution, use
rpm --nosignature -i http://repo.varnish-cache.org/redhat/varnish-3.0/el5/noarch/varnish-release-3.0-1.el5.centos.noarch.rpm
For RHEL 6 and compatible distributions, use
rpm --nosignature -i http://repo.varnish-cache.org/redhat/varnish-3.0/el6/noarch/varnish-release-3.0-1.el6.noarch.rpm
and then run
yum install varnish
The --no-signature is only needed on initial installation, since the Varnish GPG key is not yet in the yum keyring
=================================================================================================
http://hi.baidu.com/magecommerce/item/b9a4352e4abe790d43634a06
varnish-3.0.1-1.el5.x86_64 from varnish-3.0 has depsolving problems
–> Missing Dependency: libedit.so.0()(64bit) is needed by package varnish-3.0.1-1.el5.x86_64 (varnish-3.0)
Error: Missing Dependency: libedit.so.0()(64bit) is needed by package varnish-3.0.1-1.el5.x86_64 (varnish-3.0)
You could try using –skip-broken to work around the problem
You could try running: package-cleanup –problems
package-cleanup –dupes
rpm -Va –nofiles –nodigest
Solution:
rpm -Uvh http://dl.fedoraproject.org/pub/epel/5/i386/epel-release-5-4.noarch.rpm
yum install varnish
service varnish start
service varnish restart
http://terryzheng.blogspot.com/2011/12/rhel5-yum-varnish-yum.html
安装Varnish,由于Varnish 提供了RHEL5 的YUM 源,添加Varnish 的YUM:
rpm --nosignature -ivh http://repo.varnish-cache.org/redhat/varnish-3.0/el5/noarch/varnish-release-3.0-1.noarch.rpmrpm --nosignature -ivh http://repo.varnish-cache.org/redhat/varnish-3.0/el5/noarch/varnish-agent-1.1-1.noarch.rpm
现在直接安装Varnish 会提示有以下依赖关系不能解决:
Error: Missing Dependency: perl-Log-Log4perl is needed by package varnish-agent-1.1-1.x86_64 (varnish-3.0)Error: Missing Dependency: perl(Config::Simple) is needed by package varnish-agent-1.1-1.x86_64 (varnish-3.0)Error: Missing Dependency: perl(Log::Log4perl) is needed by package varnish-agent-1.1-1.x86_64 (varnish-3.0)Error: Missing Dependency: perl(Digest::SHA) is needed by package varnish-agent-1.1-1.x86_64 (varnish-3.0)Error: Missing Dependency: perl(Proc::Daemon) is needed by package varnish-agent-1.1-1.x86_64 (varnish-3.0)Error: Missing Dependency: perl(Log::Dispatch::Syslog) is needed by package varnish-agent-1.1-1.x86_64 (varnish-3.0)Error: Missing Dependency: perl-Config-Simple is needed by package varnish-agent-1.1-1.x86_64 (varnish-3.0)Error: Missing Dependency: perl-Digest-SHA is needed by package varnish-agent-1.1-1.x86_64 (varnish-3.0)Error: Missing Dependency: perl(File::Pid) is needed by package varnish-agent-1.1-1.x86_64 (varnish-3.0)Error: Missing Dependency: libedit.so.0()(64bit) is needed by package varnish-3.0.2-1.el5.x86_64 (varnish-3.0)Error: Missing Dependency: perl-File-Pid is needed by package varnish-agent-1.1-1.x86_64 (varnish-3.0)Error: Missing Dependency: perl-Proc-Daemon is needed by package varnish-agent-1.1-1.x86_64 (varnish-3.0)
现在就要用到扩展的YUM 源了,常用的有两个,分别是Repoforge(RHEL 5Server - RPMforge.net - dag) 和 Fedora EPEL(Extra Packages for Enterprise Linux 5 - x86_64);Repoforge 是 RPMforge 这个项目的新名字,RPM文件显示的链接是http://pkgs.repoforge.org,下载就会跳转到http://apt.sw.be,而且http://rpmrepo.org/ 还打不开,不知道搞这么多弯弯绕有什么用,配置使用这两个YUM 源:
rpm -ivh http://download.fedora.redhat.com/pub/epel/5/x86_64/epel-release-5-4.noarch.rpmrpm -ivh http://apt.sw.be/redhat/el5/en/x86_64/rpmforge/RPMS/rpmforge-release-0.5.2-2.el5.rf.x86_64.rpmyum clean allyum update
最后,安装Varnish:
yum -y install varnish.x86_64 varnish-agent.x86_64 varnish-docs.x86_64 perl perl-Log-Log4perl perl-Config-Simple perl-Digest-SHA perl-File-Pid perl-Proc-Daemon
参考资源:
RHEL & CentOS YUM 免费源CentOS WiKi-AdditionalResources>>Repositories>>RPMForge
http://www.ppkj.net/2012/01/11/varnish/
varnish3 yum安装介绍
Varnish 3.02 yum方式 安装:
yum方式安装比编译安装要简单简洁很多,而且还可以平滑升级,优点很多
Varnish-2.1.2 安装与配置pdf文件(版本:2.1.2,与本文所用varnish3.02有差异,仅供参考)
Varnish['vɑ:niʃ] 官网 http://www.varnish-cache.org 高性能,高并发 squid替代缓存服务器
本文介绍的是最新版本号3的安装,进入url https://www.varnish-cache.org/releases/varnish-cache-3.0.2,选择对应的操作系统版本.
centos6.2编译方式安装
wget http://repo.varnish-cache.org/source/varnish-3.0.2.tar.gz
tar -zxf varnish-3.0.2.tar.gz
cd varnish-3.0.2
yum -y install gcc gcc-c++ pcre pcre-devel
./configure
make
make install
本文使用centos5.7 ,选择 Red Hat Enterprise Linux 5
安装源:
rpm –nosignature -i http://repo.varnish-cache.org/redhat/varnish-3.0/el5/noarch/varnish-release-3.0-1.noarch.rpm
安装:
yum install gcc gcc-c++ pcre pcre-devel
yum install varnish
重启: service varnish restart
查看进程 ps aux|grep varnish 结果如下
root 14296 0.0 0.0 61172 756 pts/1 S+ 15:16 0:00 grep varnish
root 22708 0.0 0.0 111924 1112 ? Ss 14:37 0:00 /usr/sbin/varnishd -P /var/run/varnish.pid -a :8000 -f /etc/varnish/default.vcl -T 127.0.0.1:6082 -t 120 -w 1,1000,120 -u varnish -g varnish -S /etc/varnish/secret -s file,/var/lib/varnish/varnish_storage.bin,1G
varnish 22709 0.0 0.0 1293716 3672 ? Sl 14:37 0:00 /usr/sbin/varnishd -P /var/run/varnish.pid -a :8000 -f /etc/varnish/default.vcl -T 127.0.0.1:6082 -t 120 -w 1,1000,120 -u varnish -g varnish -S /etc/varnish/secret -s file,/var/lib/varnish/varnish_storage.bin,1
需要开启防火墙相应端口
其他文档:
3.使用Varnish代替Squid做网站缓存加速器的详细解决方案[张宴原创]
4. varnish3英文文档
内核调优参数:
vi /etc/sysctl.conf 最下面加入
#—-for varnish
net.ipv4.tcp_keepalive_time = 300
net.ipv4.tcp_tw_reuse = 1
net.ipv4.tcp_tw_recycle = 1
net.ipv4.ip_local_port_range = 1024 65536
net.core.rmem_max=16777216
net.core.wmem_max=16777216
net.ipv4.tcp_rmem=4096 87380 16777216
net.ipv4.tcp_wmem=4096 65536 16777216
net.ipv4.tcp_fin_timeout = 3
net.core.netdev_max_backlog = 30000
net.ipv4.tcp_no_metrics_save=1
net.core.somaxconn = 262144
net.ipv4.tcp_syncookies = 0
net.ipv4.tcp_max_orphans = 262144
net.ipv4.tcp_max_syn_backlog = 262144
net.ipv4.tcp_synack_retries = 2
net.ipv4.tcp_syn_retries = 2
使参数生效 sysctl -p
配置文件:
访问控制,我自己的一例:/etc/varnish/default.vcl
# This is a basic VCL configuration file for varnish. See the vcl(7)
# man page for details on VCL syntax and semantics.
#
# Default backend definition. Set this to point to your content
# server.
#
backend default {
.host = “localhost”;
.port = “88″;
}
#
# Below is a commented-out copy of the default VCL logic. If you
# redefine any of these subroutines, the built-in logic will be
# appended to your code.
sub vcl_recv {
#路由if (req.request == “GET” && req.url ~ “\.(css|mp3|jpg|png|gif|swf|jpeg|ico)$”)
{
unset req.http.cookie; #删除图片cookie提高命中率,否则命中率对于论坛等会很低
}
if (req.request == “GET” && req.url ~ “\.(php|html)($|\?)”) {
return (pass); #不缓存含php,html url的缓存
}
if (req.restarts == 0) {
if (req.http.x-forwarded-for) {
set req.http.X-Forwarded-For =
req.http.X-Forwarded-For + “, ” + client.ip;
} else {
set req.http.X-Forwarded-For = client.ip;
}
}
if (req.request != “GET” &&
req.request != “HEAD” &&
req.request != “PUT” &&
req.request != “POST” &&
req.request != “TRACE” &&
req.request != “OPTIONS” &&
req.request != “DELETE”) {
/* Non-RFC2616 or CONNECT which is weird. */
return (pipe);
}
if (req.request != “GET” && req.request != “HEAD”) {
/* We only deal with GET and HEAD by default */
return (pass);
}
if (req.http.Authorization || req.http.Cookie) {
/* Not cacheable by default */
return (pass);
}return (lookup);
}
#
# sub vcl_pipe {
# # Note that only the first request to the backend will have
# # X-Forwarded-For set. If you use X-Forwarded-For and want to
# # have it set for all requests, make sure to have:
# # set bereq.http.connection = “close”;
# # here. It is not set by default as it might break some broken web
# # applications, like IIS with NTLM authentication.
# return (pipe);
# }
#
# sub vcl_pass {
# return (pass);
# }
#
# sub vcl_hash {
# hash_data(req.url);
# if (req.http.host) {
# hash_data(req.http.host);
# } else {
# hash_data(server.ip);
# }
# return (hash);
# }
#
#sub vcl_hit {
# return (deliver);
#}
#
# sub vcl_miss {
# return (fetch);
# }
#
sub vcl_fetch {
if (beresp.http.Content-Length ~ “[0-9]{7,}”) {
set req.http.x-pipe = “1″;
return (restart);
}
if (req.request == “GET” && req.url ~ “\.(css|mp3|jpg|png|gif|swf|jpeg|ico)$” )
{
unset req.http.cookie;
set beresp.ttl = 7d; #设置图片缓存时间7天
}
return (deliver);
}
#
sub vcl_deliver {
set resp.http.x-hits=obj.hits;
if(obj.hits>0){
set resp.http.X-Cache=”HIT”;
}
else{
set resp.http.X-Cache=”MISS”;
}
set resp.http.Site-Support-By=”ppkj.net”;
return (deliver);
}
#
# sub vcl_error {
# set obj.http.Content-Type = “text/html; charset=utf-8″;
# set obj.http.Retry-After = “5″;
# synthetic {”
# <?xml version=”1.0″ encoding=”utf-8″?>
# <!DOCTYPE html PUBLIC “-//W3C//DTD XHTML 1.0 Strict//EN”
# “http://www.w3.org/TR/xhtml1/DTD/xhtml1-strict.dtd”>
# <html>
# <head>
# <title>”} + obj.status + ” ” + obj.response + {“</title>
# </head>
# <body>
# <h1>Error “} + obj.status + ” ” + obj.response + {“</h1>
# <p>”} + obj.response + {“</p>
# <h3>Guru Meditation:</h3>
# <p>XID: “} + req.xid + {“</p>
# <hr>
# <p>Varnish cache server</p>
# </body>
# </html>
# “};
# return (deliver);
# }
#
# sub vcl_init {
# return (ok);
# }
#
# sub vcl_fini {
# return (ok);
# }
端口等配置:/etc/sysconfig/varnish
# Configuration file for varnish
#
# /etc/init.d/varnish expects the variable $DAEMON_OPTS to be set from this
# shell script fragment.
## Maximum number of open files (for ulimit -n)
NFILES=131072# Locked shared memory (for ulimit -l)
# Default log size is 82MB + header
MEMLOCK=82000# Maximum size of corefile (for ulimit -c). Default in Fedora is 0
# DAEMON_COREFILE_LIMIT=”unlimited”# Set this to 1 to make init script reload try to switch vcl without restart.
# To make this work, you need to set the following variables
# explicit: VARNISH_VCL_CONF, VARNISH_ADMIN_LISTEN_ADDRESS,
# VARNISH_ADMIN_LISTEN_PORT, VARNISH_SECRET_FILE, or in short,
# use Alternative 3, Advanced configuration, below
RELOAD_VCL=1# This file contains 4 alternatives, please use only one.
## Alternative 1, Minimal configuration, no VCL
#
# Listen on port 6081, administration on localhost:6082, and forward to
# content server on localhost:8080. Use a fixed-size cache file.
#
#DAEMON_OPTS=”-a :6081 \
# -T localhost:6082 \
# -b localhost:8080 \
# -u varnish -g varnish \
# -s file,/var/lib/varnish/varnish_storage.bin,1G”
## Alternative 2, Configuration with VCL
#
# Listen on port 6081, administration on localhost:6082, and forward to
# one content server selected by the vcl file, based on the request. Use a
# fixed-size cache file.
#
#DAEMON_OPTS=”-a :6081 \
# -T localhost:6082 \
# -f /etc/varnish/default.vcl \
# -u varnish -g varnish \
# -S /etc/varnish/secret \
# -s file,/var/lib/varnish/varnish_storage.bin,1G”
## Alternative 3, Advanced configuration
#
# See varnishd(1) for more information.
#
# # Main configuration file. You probably want to change it :)
VARNISH_VCL_CONF=/etc/varnish/default.vcl
#
# # Default address and port to bind to
# # Blank address means all IPv4 and IPv6 interfaces, otherwise specify
# # a host name, an IPv4 dotted quad, or an IPv6 address in brackets.
# varnish监听端口,正常部署后应该是80 VARNISH_LISTEN_ADDRESS=
VARNISH_LISTEN_PORT=8000
#
# # Telnet admin interface listen address and port
VARNISH_ADMIN_LISTEN_ADDRESS=127.0.0.1
VARNISH_ADMIN_LISTEN_PORT=6082
#
# # Shared secret file for admin interface
VARNISH_SECRET_FILE=/etc/varnish/secret
#
# # The minimum number of worker threads to start
VARNISH_MIN_THREADS=1
#
# # The Maximum number of worker threads to start
VARNISH_MAX_THREADS=1000
#
# # Idle timeout for worker threads
VARNISH_THREAD_TIMEOUT=120
#
# # Cache file location
VARNISH_STORAGE_FILE=/var/lib/varnish/varnish_storage.bin
#
# # Cache file size: in bytes, optionally using k / M / G / T suffix,
# # or in percentage of available disk space using the % suffix.#磁盘存储缓存文件大小,如果采用磁盘缓存取消下面的注释
#VARNISH_STORAGE_SIZE=1G
#
# # Backend storage specification
VARNISH_STORAGE=”file,${VARNISH_STORAGE_FILE},${VARNISH_STORAGE_SIZE}”
#
# # Default TTL used when the backend does not specify one
VARNISH_TTL=120
#
# # DAEMON_OPTS is used by the init script. If you add or remove options, make
# # sure you update this section, too.
DAEMON_OPTS=”-a ${VARNISH_LISTEN_ADDRESS}:${VARNISH_LISTEN_PORT} \
-f ${VARNISH_VCL_CONF} \
-T ${VARNISH_ADMIN_LISTEN_ADDRESS}:${VARNISH_ADMIN_LISTEN_PORT} \
-t ${VARNISH_TTL} \
-w ${VARNISH_MIN_THREADS},${VARNISH_MAX_THREADS},${VARNISH_THREAD_TIMEOUT} \
-u varnish -g varnish \
-S ${VARNISH_SECRET_FILE} \-s malloc,4G”
#-s malloc,4G 此处改为内存存储,大小应该最大为剩余内存的80%,不能再大!!
#-s ${VARNISH_STORAGE}
#如果采用磁盘缓存,则用上面一行替换 -s malloc,4G
## Alternative 4, Do It Yourself. See varnishd(1) for more information.
#
# DAEMON_OPTS=”"
...#########################.....
http://weizhifeng.net/using-varnish.html
Varnish是一款高性能的开源HTTP加速器,挪威最大的在线报纸Verdens Gang使用3台Varnish代替了原来的12台Squid,性能居然比以前更好。Varnish 的作者Poul-Henning Kamp是FreeBSD的内核开发者之一,他认为现在的计算机比起1975年已经复杂许多。在1975年时,储存媒介只有两种:内存与硬盘。但现在计算机系统的内存除了主存外,还包括了cpu内的L1、L2,甚至有L3快取。硬盘上也有自己的快取装置,因此Squid cache自行处理物件替换的架构不可能得知这些情况而做到最佳化,但操作系统可以得知这些情况,所以这部份的工作应该交给操作系统处理,这就是Varnish cache设计架构。目前很多互联网公司在使用Varnish,其中包括Facebook。
特性
- VCL(Varnish Configuration Language):区别于其他系统,Varnish采用了自身的配置语言来配置,非常容易上手,这些配置会被编译成二进制机器码,明显加快了执行速度。
- Health checks:完善的健康检查机制。
- ESI(Edge Side Includes):在HTML中嵌入动态脚本文件。
- Directors:后端服务器的调度方式:random,round-robin,client,hash,DNS。
- Purging and banning:强大的缓存清除功能,可以以正则表达式的形式清除缓存。
- Logging in Varnish:Varnish的log不是记录在文件中的,而是记录在共享内存中。当日志大小达到分配的共享内存容量,覆盖掉旧的日志。以这种方式记录日志比文件的形式要快很多,并且不需要磁盘空间。
- 丰富的管理程序:varnishadm,varnishtop,varnishhist,varnishstat以及varnishlog等。
环境
OS: CentOS 5.5
varnish: 2.1.5
安装
首先安装ncurses-devel,否则varnishstat,varnishtop都无法编译完成
$ yum install ncurses-devel
接下来安装varnish
$ wget http://repo.varnish-cache.org/source/varnish-2.1.5.tar.gz
$ tar -zxvf varnish-2.1.5.tar.gz
$ cd varnish-2.1.5
$ ./configure --prefix=/usr/local/varnish-2.1.5
$ make && make install
启动
$ /usr/local/varnish2.1.5/sbin/varnishd -f \
/usr/local/varnish2.1.5/etc/varnish/default.vcl \
-T 127.0.0.1:2000 -a 0.0.0.0:80 -s file,/tmp,200M
其中-f用来指定配置文件,-T指定管理台的访问地址,-a指定Varnish监听地址,-s指定Varnish以文件方式来缓存资源,地址为/tmp,大小200MB。
配置
#后端处理器b1
backend b1{
    .host = "192.168.2.110";
    .port = "81";
    .connect_timeout = 5s;
    .first_byte_timeout= 5s;
    .probe = {
        #health check
        .url = "/check.txt";
        .interval = 5s;
        .timeout = 5s;
        .window = 5;
        .threshold = 3;
    }
}

#后端处理器b2
backend b2{
    .host = "192.168.2.109";
    .port = "81";
    .connect_timeout = 5s;
    .first_byte_timeout = 5s;
    .probe = {
        #health check
        .url = "/check.txt";
        .interval = 5s;
        .timeout = 5s;
        .window = 5;
        .threshold = 3;
    }
}

#以轮询方式实现负载均衡
director d1 round-robin {
    {
        .backend = b1;
    }

    {
        .backend = b2;
    }
}

#acl
acl purge {
    "localhost";
    "192.168.0.64";
}

sub vcl_recv {
     # 设置director
     set req.backend = d1;

     # 如果从后端返回的资源中含有Set-Cookie头的话,那么varnish不会进行缓存;
     # 如果客户端发送了Cookie头的话,那么varnish会bypass(绕开)缓存,
     # 直接发送到后端,并不会进行缓存,所以需要如下处理:
    if ( !( req.url ~ ^/admin/) ) {
        unset req.http.Cookie;
    }

    if (req.http.Cookie == "") {
        remove req.http.Cookie;
    }

    if (req.restarts == 0) {
        if (req.http.x-forwarded-for) {
            set req.http.X-Forwarded-For =
                req.http.X-Forwarded-For ", " client.ip;
        } else {
            set req.http.X-Forwarded-For = client.ip;
        }
     }

     if (req.request != "GET" &&
       req.request != "HEAD" &&
       req.request != "PUT" &&
       req.request != "POST" &&
       req.request != "TRACE" &&
       req.request != "OPTIONS" &&
       req.request != "DELETE" &&
       req.request != "PURGE") {

         /* Non-RFC2616 or CONNECT which is weird. */
         return (pipe);
     }

     # allow PURGE from localhost and 192.168.0...
     if (req.request == "PURGE") {
         if (!client.ip ~ purge) {
             error 405 "Not allowed.";
         }
         return (lookup);
     }

     if (req.request != "GET" && req.request != "HEAD" && req.request != "PURGE") {
         /* We only deal with GET and HEAD by default */
         return (pass);
     }

     if (req.http.Authorization || req.http.Cookie) {
         /* Not cacheable by default */
         return (pass);
     }
     return (lookup);
 }

sub vcl_hit {
     if (req.request == "PURGE") {
        # Note that setting ttl to 0 is magical.
        # the object is zapped from cache.
        set obj.ttl = 0s;
        error 200 "Purged.";

     } else {
        return (deliver);
     }
}

sub vcl_miss {
    if (req.request == "PURGE") {
        error 404 "Not in cache.";
    } else {
        return (fetch);
    }
}

sub vcl_fetch {
     #设置TTL为1个小时
     set beresp.ttl = 1h;
     if (!beresp.cacheable) {
         return (pass);
     }

     if (beresp.http.Set-Cookie) {
         return (pass);
     }

     return (deliver);
 }

sub vcl_deliver {
     return (deliver);
}
启动脚本
$ wget -O varnishd https://raw.github.com/gist/3671408/3a51578bbd60a4cf8317bdc9508527b81eb23da5/varnishd
$ cp varnishd /etc/init.d/varnishd
$ chmod +x /etc/init.d/varnishd
$ /etc/init.d/varnishd start
Subroutine列表
-
vcl_recv 在请求开始时候被调用,在请求已经被接收到并且解析后调用。目的就是决定是否处理这个请求,怎么处理,使用哪个后端。vcl_recv以
return结束,参数可以为如下关键字:
error code [reason]:返回错误码给客户端,丢弃请求。
pass:转换到pass模式。控制权最后会转移到vcl_pass。
pipe:转换到pipe模式。控制权最后会转移到vcl_pipe。
lookup:在缓存中寻找请求对象。控制权最后会转移到vcl_hit或者vcl_miss,决定于对象是否在缓存中。 -
vcl_pipe 当进入pipe模式的时候被调用。在这个模式中,请求会被转移到后端,后续的数据不管是从客户端还是后端来的都会以不变的方式传送,直到连接关闭为止。vcl_pipe以
return结束,参数可以为如下关键字:
error code [reason]:返回错误码给客户端,丢弃请求。
pipe:以pipe模式执行。 -
vcl_pass 当进入pass模式的时候会被调用。在这个模式中,请求会被传送到后端,然后后端的响应会被传送回客户端,但是响应不会进入缓存中。接下来通过相同客户端连接发起的请求会以普通的方式来处理。vcl_pass以
return结束,参数可以为如下关键字:
error code [reason]:返回错误码给客户端,丢弃请求。
pass:以pass模式执行。
restart:重新启动这个事务。增加了重启计数。如果重启的次数高于max_restarts,varnish会引起一个错误。 -
vcl_hash 你如果把想把数据加入到hash中,那么调用hash_data()。vcl_hash以
return结束,参数可以为如下关键字:
hash:执行hash逻辑。 -
vcl_hit 如果请求的对象在缓存中被找到了,那么在缓存查找结束后被调用。vcl_hit以
return结束,参数可以为如下关键字:
deliver:deliver缓存对象到客户端。控制权最后会转移到vcl_deliver。
error code [reason]:返回错误码给客户端,丢弃请求。
pass:切换到pass模式。控制权最后会转移到vcl_pass。
restart:重新启动这个事务。增加了重启计数。如果重启的次数高于max_restarts,varnish会引起一个错误。 -
vcl_miss 如果请求的对象在缓存中没有被找到,那么在缓存查找结束后被调用。目的是为了决定是否去后端获取这个请求对象,并且要选择哪个后端。vcl_miss以return结束,参数可以为如下关键字:
error code [reason]:返回错误码给客户端,丢弃请求。
pass:切换到pass模式。控制权最后会转移到vcl_pass。
fetch:去后端获取请求对象。控制权最后会转移到vcl_fetch。 -
vcl_fetch 当一个对象被成功从后端获取的时候此方法会被调用。vcl_fetch以
return结束,参数可以为如下关键字:
deliver:可能把对象放入缓存中,然后再deliver到客户端。控制权最后会转移到vcl_deliver。
error code [reason]:返回错误码给客户端,丢弃请求。
esi:以ESI形式来处理刚刚被获取到的对象。
pass:切换到pass模式。控制权最后会转移到vcl_pass。
restart:重新启动这个事务。增加了重启计数。如果重启的次数高于max_restarts,varnish会引起一个错误。 -
vcl_deliver当一个缓存的对象被deliver到客户端的时候,此方法会被调用。vcl_deliver以
return结束,参数可以为如下关键字:
deliver:发送对象到客户端。
error code [reason]:返回错误码给客户端,丢弃请求。
restart:重新启动这个事务,增加重启计数。如果重启的次数高于max_restarts,varnish会引起一个错误。 -
vcl_error 当遇见一个错误的时候会被调用,错误可能是跟后端有关系或者内部错误。vcl_error以
return结束,参数可以为如下关键字:
deliver:发送对象到客户端。
restart:重新启动这个事务,增加重启计数。如果重启的次数高于max_restarts,varnish会引起一个错误。
重要变量
subroutine不带参数,一般通过全局变量来实现信息的传递。
如下变量在backend中有效:
- .host:backend的主机名或者IP。
- .port:backend的端口。
如下变量在处理一个请求(例如vcl_recv)的时候可用:
- client.ip:客户端IP地址。
- server.hostname:服务器的主机名。
- server.identity:服务器标示,当启动varnish的时候用
-i参数来指定。如果varnish启动时候没有指定-i参数,那么server.identity会被设置为用-n参数所指定的实例名称。 - server.ip:服务器IP地址。
- server.port:服务器端口。
- req.request:请求类型(例如
GET,HEAD)。 - req.url:请求的URL。
- req.proto:HTTP协议版本。
- req.backend:处理请求的后端服务器。
- req.backend.healthy:后端是否健康。health check需要在
backend的probe中进行设置。 - req.http.header:相关的HTTP头。
- req.hash_always_miss:强迫对于本次请求的缓存查找结果为miss。如果设置为
true,那么varnish将会忽略任何存在的缓存对象,一直从后端重新获取资源。 - req.hash_ignore_busy:在缓存查找时候忽略任何忙的对象。如果有两个服务器,彼此互相查找缓存内容,那么可以使用这个变量来避免潜在的死锁。
如下变量在准备一个后端请求(比如在cache miss或者pass,pipe模式)的时候可用:
- bereq.request:请求的类型(比如
GET,HEAD)。 - bereq.url:请求的URL。
- bereq.proto:与后端服务器交互的HTTP协议版本。
- bereq.http.header:相关的HTTP头。
- bereq.connect_timeout:与后端连接的超时时间。
- bereq.first_byte_timeout:从后端返回第一个字节所需等待的秒数,在
pipe模式中不可用。 - bereq.between_bytes_timeout:从后端返回的每个字节之间的时间间隔,以秒计。在
pipe模式中不可用。
如下的变量在请求对象从后端返回之后,在其被放入缓存之前可用。换句话说,也就是在vcl_fetch中可用。
- beresp.proto:HTTP协议版本。
- beresp.status:后端返回的HTTP状态码(例如200,302等)。
- beresp.response:后端返回的状态内容(例如
OK,Found)。 - beresp.cacheable:如果请求的结果是可以被缓存的,那么此变量为
true。如果HTTP状态码为200, 203, 300, 301, 302, 404,410之一并且pass没有在vcl_recv中被调用,那么这个结果就是可以被缓存的。如果response的TTL和grace time都为0,那么beresp.cacheable将会为0。beresp.cacheable是可写的。 - beresp.ttl:缓存对象的生存时间,以秒为单位,这个变量是可写的。
在对象已经存在于缓存中并被查询到的时候,一般在vcl_hit和vcl_deliver中,如下的变量(大部分是read-only)可用:
- obj.proto:与后端交互的HTTP版本协议。
- obj.status:后端返回的HTTP状态码。
- obj.response:后端返回的HTTP状态内容。
- obj.cacheable:如果对象的beresp.cacheable为
true,那么此变量的值为true。除非你强制delivery,否则obj.cacheable一直为true。 - obj.ttl:缓存对象的生存时间,以秒为单位,这个变量是可写的。
- obj.lastuse:从现在到对象最近一次访问所间隔的时间,以秒为单位。
- obj.hits:对象被发送到客户端的次数,0表示缓存查询miss了。
如下变量在决定对象hash key的时候可用:
- req.hash:hash key被用来关联一个缓存中的对象。在读写缓存的时候都会被用到。
如下变量在准备把一个响应发送给客户端时候可用:
- resp.proto:响应使用的HTTP协议版本。
- resp.status:将要返回的HTTP状态码。
- resp.response:将要返回的HTTP状态内容。
- resp.http.header:相关的HTTP头。
(完)
==============================================================
http://kerry.blog.51cto.com/172631/402923
原创作品,允许转载,转载时请务必以超链接形式标明文章 原始出处 、作者信息和本声明。否则将追究法律责任。http://kerry.blog.51cto.com/172631/402923
#!/bin/bash
# BY kerryhu
# MAIL:king_819@163.com
# BLOG:http://kerry.blog.51cto.com
# Please manual operation yum of before Operation.....
#============================ 更新系统时间 ============================
yum install -y ntp
ntpdate time.nist.gov
echo "00 01 * * * ntpdate time.nist.gov" >> /etc/crontab
#============================ Varnish安装 =============================
如果是RedHat/CentOS系统,在安装varnish的时候首先要安装以下软件包
automake
autoconf
libtool
ncurses-devel
libxslt
groff
pcre-devel
pkgconfig
groupadd www
useradd www -g www -s /sbin/nologin
mkdir -p /data/varnish/{cache,logs}
chmod +w /data/varnish/{cache,logs}
chown -R www:www /data/varnish/{cache,logs}
cd /opt
yum install -y automake autoconf libtool ncurses-devel libxslt groff pcre-devel pkgconfig
wget http://sourceforge.net/projects/varnish/files/varnish/2.1.3/varnish-2.1.3.tar.gz/download
tar -zxvf varnish-2.1.3.tar.gz
cd varnish-2.1.3
./configure --prefix=/usr/local/varnish
make;make install
#============================ varnish配置 ===========================
vi /usr/local/varnish/etc/varnish/kerry.vcl
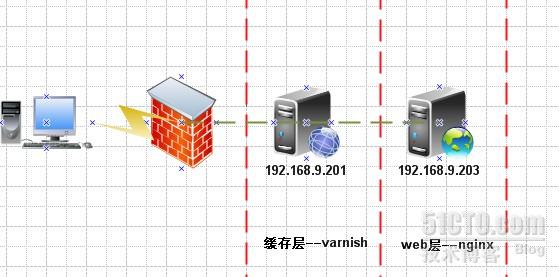
backend kerry { #定义后端服务器名
.host = "192.168.9.203"; #定义后端服务器IP
.port = "80"; #定义后端服务器端口
}
backend king {
.host = "192.168.9.204";
.port = "80";
}
#定义访问控制列表,充许那些IP清除varnish 缓存
acl local {
"localhost";
"127.0.0.1";
}
#判断host请求针对那个后端服务器
sub vcl_recv {
if (req.http.host ~ "^(www.)?kerry.com$") { #泛域名的写法"^(.*.)?kerry.com$"
set req.backend = kerry;
}
elsif (req.http.host ~ "^(www.)?king.com$") {
set req.backend = king;
}
else {
error 404 "Unknown HostName!"; #如果都不匹配,返回404错误
}
#不充许非访问控制列表的IP进行varnish缓存清除
if(req.request == "PURGE") {
if (!client.ip ~ local) {
error 405 "Not Allowed.";
return (lookup);
}
}
#清除url中有jpg|png|gif等文件的cookie
if (req.request == "GET" && req.url ~ "\.(jpg|png|gif|swf|jpeg|ico)$") {
unset req.http.cookie;
}
#取消服务器上images目录下所有文件的cookie
if (req.url ~ "^/images") {
unset req.http.cookie;
}
#判断req.http.X-Forwarded-For,如果前端有多重反向代理,这样可以获取客户端IP地址。
if (req.http.x-forwarded-for) {
set req.http.X-Forwarded-For =
req.http.X-Forwarded-For ", " client.ip;
}
else {
set req.http.X-Forwarded-For = client.ip;
}
if (req.request != "GET" &&
req.request != "HEAD" &&
req.request != "PUT" &&
req.request != "POST" &&
req.request != "TRACE" &&
req.request != "OPTIONS" &&
req.request != "DELETE") {
return (pipe);
}
#针对请求和url地址判断,是否在varnish缓存里查找
if (req.request != "GET" && req.request != "HEAD") {
return (pass);
} ## 对非GET|HEAD请求的直接转发给后端服务器
if (req.http.Authorization || req.http.Cookie) {
return (pass);
}
if (req.request == "GET" && req.url ~ "\.(php)($|\?)") {
return (pass);
} #对GET请求,且url里以.php和.php?结尾的,直接转发给后端服务器
return (lookup);
} #除了以上的访问以外,都在varnish缓存里查找
sub vcl_pipe {
return (pipe);
}
sub vcl_pass {
return (pass);
}
sub vcl_hash {
set req.hash += req.url;
if (req.http.host) {
set req.hash += req.http.host;
} else {
set req.hash += server.ip;
}
return (hash);
}
sub vcl_hit {
if (!obj.cacheable) {
return (pass);
}
if (req.request == "PURGE") {
set obj.ttl = 0s;
error 200 "Purged.";
}
return (deliver);
}
sub vcl_miss {
return (fetch);
}
sub vcl_fetch {
if (!beresp.cacheable) {
return (pass);
}
if (beresp.http.Set-Cookie) {
return (pass);
}
#WEB服务器指明不缓存的内容,varnish服务器不缓存
if (beresp.http.Pragma ~ "no-cache" ||
beresp.http.Cache-Control ~ "no-cache" ||
beresp.http.Cache-Control ~ "private") {
return (pass);
}
#对.txt .js .shtml结尾的URL缓存时间设置1小时,对其他的URL缓存时间设置为10天
if (req.request == "GET" && req.url ~ "\.(txt|js|css|shtml|html|htm)$") {
set beresp.ttl = 3600s;
}
else {
set beresp.ttl = 10d;
}
return (deliver);
}
#添加在页面head头信息中查看缓存命中情况
sub vcl_deliver {
set resp.http.x-hits = obj.hits ;
if (obj.hits > 0) {
set resp.http.X-Cache = "HIT cqtel-bbs";
}
else {
set resp.http.X-Cache = "MISS cqtel-bbs";
}
}
sub vcl_error {
set obj.http.Content-Type = "text/html; charset=utf-8";
synthetic {"
<?xml version="1.0" encoding="utf-8"?>
<!DOCTYPE html PUBLIC "-//W3C//DTD XHTML 1.0 Strict//EN" "http://www.w3.org/TR/xhtml1/DTD/xhtml1-strict.dtd">
<html>
<head>
<title>"} obj.status " " obj.response {"</title>
</head>
<body>
<h1>Error "} obj.status " " obj.response {"</h1>
<p>"} obj.response {"</p>
<h3>Guru Meditation:</h3>
<p>XID: "} req.xid {"</p>
<hr>
<address>
<a href="http://www.bbs.com/">bbs cache server</a>
</address>
</body>
</html>
"};
return (deliver);
}
注意:在2.1后的版本里,原"obj.*"的变量全部变为"beresp.*"了,需要留意一下
启动varnish
/usr/local/varnish/sbin/varnishd -u www -g www -f /usr/local/varnish/etc/varnish/kerry.vcl -a 192.168.9.201:80 -s file,/data/varnish/cache/varnish_cache.data,1G -w 1024,51200,10 -t 3600 -T 192.168.9.201:3000
echo "/usr/local/varnish/sbin/varnishd -u www -g www -f /usr/local/varnish/etc/varnish/kerry.vcl -a 192.168.9.201:80 -s file,/data/varnish/cache/varnish_cache.data,1G -w 1024,51200,10 -t 3600 -T 192.168.9.201:3000" >> /etc/rc.local
参数:
-u 以什么用运行
-g 以什么组运行
-f varnish配置文件
-a 绑定IP和端口
-s varnish缓存文件位置与大小
-w 最小,最大线程和超时时间
-T varnish管理端口,主要用来清除缓存
-p client_http11=on 支持http1.1协议
-P(大P) /usr/local/varnish/var/varnish.pid 指定其进程码文件的位置,实现管理
停止varnish
pkill varnishd #结束varnishd进程
启动日志,方便分析网站访问情况
/usr/local/varnish/bin/varnishncsa -w /data/varnish/logs/varnish.log &
echo "/usr/local/varnish/bin/varnishncsa -w /data/varnish/logs/varnish.log &" >> /etc/rc.local
参数: -w 指定varnish访问日志要写入的目录与文件
varnish日志切割
vi /root/cut_varnish_log.sh
#!/bin/sh
logs_path=/data/varnish/logs
vlog=${logs_path}/varnish.log
date=$(date -d "yesterday" +"%Y-%m-%d")
pkill -9 varnishncsa
mkdir -p ${logs_path}/$(date -d "yesterday" +"%Y")/$(date -d "yesterday" +"%m")/
mv /data/varnish/logs/varnish.log ${logs_path}/$(date -d "yesterday" +"%Y")/$(date -d "yesterday" +"%m")/varnish-${date}.log
/usr/local/varnish/bin/varnishncsa -w /data/varnish/logs/varnish.log &
使用计划任务,每天晚上凌晨00点运行日志切割脚本
echo "0 0 * * * /root/cut_varnish_log.sh" >> /etc/crontab
cat /etc/rc.local
ulimit -SHn 51200
/usr/local/varnish/sbin/varnishd -u www -g www -f /usr/local/varnish/etc/varnish/kerry.vcl -a 192.168.9.201:80 -s file,/data/varnish/cache/varnish_cache.data,1G -w 1024,51200,10 -t 3600 -T 192.168.9.201:3000
/usr/local/varnish/bin/varnishncsa -w /data/varnish/logs/varnish.log &
#============================ Varnish 缓存清除 ======================
/usr/local/varnish/bin/varnishadm -T 192.168.9.201:3000 purge "req.http.host ~ www.kerry.com$ && req.url ~ /static/image/tp.php"
说明:
192.168.9.201:3000 为被清除缓存服务器地址
www.kerry.com 为被清除的域名
/static/image/tp.php 为被清除的url地址列表
清除所有缓存
/usr/local/varnish/bin/varnishadm -T 192.168.9.201:3000 url.purge *$
清除image目录下所有缓存
/usr/local/varnish/bin/varnishadm -T 192.168.9.201:3000 url.purge /image/
查看Varnish服务器连接数与命中率
/usr/local/varnish/bin/varnishstat –n /data/varnish/cache/varnish_cache.data

#============================ 内核优化 ==============================
vi /etc/sysctl.conf
net.ipv4.tcp_syncookies = 1
net.ipv4.tcp_tw_reuse = 1
net.ipv4.tcp_tw_recycle = 1
#net.ipv4.tcp_fin_timeout = 30
#net.ipv4.tcp_keepalive_time = 300
net.ipv4.ip_local_port_range = 1024 65000
net.ipv4.tcp_max_syn_backlog = 8192
net.ipv4.tcp_max_tw_buckets = 5000
net.ipv4.tcp_max_syn_backlog = 65536
net.core.netdev_max_backlog = 32768
net.core.somaxconn = 32768
net.core.wmem_default = 8388608
net.core.rmem_default = 8388608
net.core.rmem_max = 16777216
net.core.wmem_max = 16777216
net.ipv4.tcp_timestamps = 0
net.ipv4.tcp_synack_retries = 2
net.ipv4.tcp_syn_retries = 2
net.ipv4.tcp_tw_recycle = 1
#net.ipv4.tcp_tw_len = 1
net.ipv4.tcp_tw_reuse = 1
net.ipv4.tcp_mem = 94500000 915000000 927000000
net.ipv4.tcp_max_orphans = 3276800
/sbin/sysctl -p
#===================== Varnish添加到服务自启动 ======================
配置启动文件
vi /etc/init.d/varnish
#! /bin/sh
#
# varnish Control the varnish HTTP accelerator
#
# chkconfig: - 90 10
# description: Varnish is a high-perfomance HTTP accelerator
# processname: varnishd
# config: /etc/sysconfig/varnish
# pidfile: /var/run/varnish/varnishd.pid
### BEGIN INIT INFO
# Provides: varnish
# Required-Start: $network $local_fs $remote_fs
# Required-Stop: $network $local_fs $remote_fs
# Should-Start: $syslog
# Short-Description: start and stop varnishd
# Description: Varnish is a high-perfomance HTTP accelerator
### END INIT INFO
# Source function library.
. /etc/init.d/functions
retval=0
pidfile=/var/run/varnish.pid
exec="/usr/local/varnish/sbin/varnishd"
prog="varnishd"
config="/usr/local/varnish/etc/varnish/varnish"
lockfile="/var/lock/subsys/varnish"
# Include varnish defaults
[ -e /usr/local/varnish/etc/varnish/varnish ] && . /usr/local/varnish/etc/varnish/varnish
start() {
if [ ! -x $exec ]
then
echo $exec not found
exit 5
fi
if [ ! -f $config ]
then
echo $config not found
exit 6
fi
echo -n "Starting varnish HTTP accelerator: "
# Open files (usually 1024, which is way too small for varnish)
ulimit -n ${NFILES:-131072}
# Varnish wants to lock shared memory log in memory.
ulimit -l ${MEMLOCK:-82000}
# $DAEMON_OPTS is set in /etc/sysconfig/varnish. At least, one
# has to set up a backend, or /tmp will be used, which is a bad idea.
if [ "$DAEMON_OPTS" = "" ]; then
echo "\$DAEMON_OPTS empty."
echo -n "Please put configuration options in $config"
return 6
else
# Varnish always gives output on STDOUT
daemon $exec -P $pidfile "$DAEMON_OPTS" > /dev/null 2>&1
retval=$?
if [ $retval -eq 0 ]
then
touch $lockfile
echo_success
echo
else
echo_failure
fi
return $retval
fi
}
stop() {
echo -n "Stopping varnish HTTP accelerator: "
killproc $prog
retval=$?
echo
[ $retval -eq 0 ] && rm -f $lockfile
return $retval
}
restart() {
stop
start
}
reload() {
restart
}
force_reload() {
restart
}
rh_status() {
status $prog
}
rh_status_q() {
rh_status >/dev/null 2>&1
}
# See how we were called.
case "$1" in
start)
rh_status_q && exit 0
$1
;;
stop)
rh_status_q || exit 0
$1
;;
restart)
$1
;;
reload)
rh_status_q || exit 7
$1
;;
force-reload)
force_reload
;;
status)
rh_status
;;
condrestart|try-restart)
rh_status_q || exit 0
restart
;;
*)
echo "Usage: $0 {start|stop|status|restart|condrestart|try-restart|reload|force-reload}"
exit 2
esac
exit $?
varnish的配置调用文件,是用来告诉程序从哪里读取配置文件,启动参数有哪些等
vi /usr/local/varnish/etc/varnish
# Configuration file for varnish
#
# /etc/init.d/varnish expects the variable $DAEMON_OPTS to be set from this
# shell script fragment.
#
# Maximum number of open files (for ulimit -n)
NFILES=131072
# Locked shared memory (for ulimit -l)
# Default log size is 82MB + header
MEMLOCK=1000000
## Alternative 2, Configuration with VCL
DAEMON_OPTS="-a 192.168.9.201:80 \
-f /usr/local/varnish/etc/varnish/kerry.vcl \
-T 192.168.9.201:3000 \
-u www -g www \
-n /data/varnish/cache \
-s file,/data/varnish/cache/varnish_cache.data,1G"
添加到系统服务,开机自启动
chmod +x /etc/init.d/varnish
/sbin/chkconfig --add varnish
/sbin/chkconfig --level 2345 varnish on
开启varnish
/etc/init.d/varnish start

关闭varnish
/etc/init.d/varnish stop
本文出自 “聆听未来” 博客,请务必保留此出处http://kerry.blog.51cto.com/172631/402923
http://blog.chinaunix.net/uid-39159-id-3357421.html
Varnish is a web application accelerator. You install it in front of your web application and it will speed it up significantly.
Varnish web application accelerator homepage: https://www.varnish-cache.org
Install the Varnish YUM Repository
# rpm -Uvh http://repo.varnish-cache.org/redhat/varnish-3.0/el5/noarch/varnish-release-3.0-1.noarch.rpm
Install Varnish web accelerator
# yum install varnish
Enable Varnish web accelerator at startup
# chkconfig varnish on
# chkconfig varnishncsa on
Start Varnish service
# service varnish start
# service varnishncsa start
点击(此处)折叠或打开
- # Configuration file for varnish
- #
- # /etc/init.d/varnish expects the variable $DAEMON_OPTS to be set from this
- # shell script fragment.
- # Maximum number of open files (for ulimit -n)
- NFILES=131072
- # Locked shared memory (for ulimit -l)
- # Default log size is 82MB + header
- MEMLOCK=82000
- # Listen on port 80, administration on :6082, master port on
- # localhost:6084 and forward to one content server selected by the vcl file,
- # based on the request. The size and type of the cache is parameterized so
- # it can be chosen at deployment time.-S and -M option are required to
- # talk with Varnish console software
- #
- # Settings from from https://www.varnish-cache.org/trac/wiki/Performance
- # - thread_pool_min=200
- # - thread_pool_max=4000
- # - thread_pool_add_delay=2
- # - session_linger=100
- # - mounting working directory as tmpfs
- DAEMON_OPTS="-a :80\
- -T :6082 \
- -f /etc/varnish/main.vcl \
- # -f /etc/varnish/default.vcl \
- -u varnish -g varnish \
- -M localhost:6084 \
- -S /etc/varnish/secret \
- -s malloc,3G \
- -p thread_pool_min=200 \
- -p thread_pool_max=4000 \
- -p thread_pool_add_delay=2 \
- -p session_linger=100 \
- -p expiry_sleep=0.01s \
- -p connect_timeout=5 \
- -n /data/varnish/"
-n /data/varnish --- work directory.
Varnishncsa configuration, vi /etc/init.d/varnishncsa
点击(此处)折叠或打开
- #! /bin/sh
- #
- # varnishncsa Control the Varnish NCSA logging daemon
- #
- # chkconfig: - 90 10
- # description: Varnish Cache logging daemon
- # processname: varnishncsa
- # config:
- # pidfile: /var/run/varnishncsa.pid
- ### BEGIN INIT INFO
- # Provides: varnishncsa
- # Required-Start: $network $local_fs $remote_fs
- # Required-Stop: $network $local_fs $remote_fs
- # Default-Start:
- # Default-Stop:
- # Short-Description: start and stop varnishncsa
- # Description: Varnish Cache NCSA logging daemon
- ### END INIT INFO
- # Source function library.
- . /etc/init.d/functions
- retval=0
- pidfile="/var/run/varnishncsa.pid"
- lockfile="/var/lock/subsys/varnishncsa"
- #logfile="/var/log/varnish/varnishncsa.log"
- logfile="/data/varnish/log/varnishncsa.log"
- exec="/usr/bin/varnishncsa"
- prog="varnishncsa"
- DAEMON_OPTS="-a -w $logfile -D -P $pidfile"
- # Include varnishncsa defaults
- [ -e /etc/sysconfig/varnishncsa ] && . /etc/sysconfig/varnishncsa
- start() {
- if [ ! -x $exec ]
- then
- echo $exec not found
- exit 5
- fi
- echo -n "Starting varnish ncsa logging daemon: "
- daemon --pidfile $pidfile $exec "$DAEMON_OPTS"
- echo
- return $retval
- }
- stop() {
- echo -n "Stopping varnish ncsa logging daemon: "
- killproc -p $pidfile $prog
- retval=$?
- echo
- [ $retval -eq 0 ] && rm -f $lockfile
- return $retval
- }
- restart() {
- stop
- start
- }
- reload() {
- restart
- }
- force_reload() {
- restart
- }
- rh_status() {
- status -p $pidfile $prog
- }
- rh_status_q() {
- rh_status >/dev/null 2>&1
- }
- # See how we were called.
- case "$1" in
- start)
- rh_status_q && exit 0
- $1
- ;;
- stop)
- rh_status_q || exit 0
- $1
- ;;
- restart)
- $1
- ;;
- reload)
- rh_status_q || exit 7
- $1
- ;;
- force-reload)
- force_reload
- ;;
- status)
- rh_status
- ;;
- condrestart|try-restart)
- rh_status_q || exit 0
- restart
- ;;
- *)
- echo "Usage: $0 {start|stop|status|restart|condrestart|try-restart|reload|force-reload}"
- exit 2
- esac
- exit $?
点击(此处)折叠或打开
- #
- # main.vcl
- #
- # Morningstar Varnish configuration main entry point.
- #
- # $Id: main.vcl 102 2012-09-19 18:48:12Z Tailor $
- # This must come first. This will tell Varnish to assign this backend
- # as the default, and then we can use that to detect if a user has
- # made a request for a host that we don't recognize in Varnish.
- backend default {
- .host = "127.0.0.1";
- .port = "80";
- }
- # vhosts start here
- include "/etc/varnish/virtual-hosts/example1.vcl";
- include "/etc/varnish/virtual-hosts/example2.vcl";
- # vhosts end here
- # The below settings are fallbacks and happen after all of the above
- # includes.
- sub vcl_recv {
- # /udm.html in all sites is used by SiteScope to check for availability
- if (req.url == "/udm.html") {
- error 200 "It is OK! " + server.hostname;
- }
- # If we receive a request for a host we don't recognize, return 400.
- if (req.backend == default) {
- error 400 "Host not recognized";
- }
- }
点击(此处)折叠或打开
- # This is a basic VCL configuration file for varnish. See the vcl(7)
- # man page for details on VCL syntax and semantics.
- #
- # example1.vcl
- #
- # Default backend definition. Set this to point to your content
- # server.
- #
- backend example1 {
- .host = "www.example1.com";
- .port = "80";
- }
- #
- # Below is a commented-out copy of the example1 VCL logic. If you
- # redefine any of these subroutines, the built-in logic will be
- # appended to your code.
- sub vcl_recv {
- if (req.http.host ~ "^www.example1.com$") {
- set req.backend = example1;
- if (req.restarts == 0) {
- if (req.http.x-forwarded-for) {
- set req.http.X-Forwarded-For =
- req.http.X-Forwarded-For + ", " + client.ip;
- } else {
- set req.http.X-Forwarded-For = client.ip;
- }
- }
- # Properly handle different encoding types
- if (req.http.Accept-Encoding) {
- if (req.url ~ "\.(jpg|jpeg|png|gif|gz|tgz|bz2|tbz|mp3|ogg|swf)$") {
- # No point in compressing these
- remove req.http.Accept-Encoding;
- } elsif (req.http.Accept-Encoding ~ "gzip") {
- set req.http.Accept-Encoding = "gzip";
- } elsif (req.http.Accept-Encoding ~ "deflate") {
- set req.http.Accept-Encoding = "deflate";
- } else {
- # unkown algorithm
- remove req.http.Accept-Encoding;
- }
- }
- if (req.request != "GET" &&
- req.request != "HEAD" &&
- req.request != "PUT" &&
- req.request != "POST" &&
- req.request != "TRACE" &&
- req.request != "OPTIONS" &&
- req.request != "DELETE") {
- # /* Non-RFC2616 or CONNECT which is weird. */
- return (pipe);
- }
- if (req.request != "GET" && req.request != "HEAD") {
- /* We only deal with GET and HEAD by example1 */
- return (pass);
- }
- if (req.http.Authorization || req.http.Authentication) {
- # /* Not cacheable by example1 */
- return (pass);
- }
- return (lookup);
- }
- }
- #
- sub vcl_pipe {
- # # Note that only the first request to the backend will have
- # # X-Forwarded-For set. If you use X-Forwarded-For and want to
- # # have it set for all requests, make sure to have:
- # # set bereq.http.connection = "close";
- # # here. It is not set by example1 as it might break some broken web
- # # applications, like IIS with NTLM authentication.
- if (req.backend == example1) {
- return (pipe);
- }
- }
- #
- sub vcl_pass {
- if (req.backend == example1) {
- return (pass);
- }
- }
- #
- sub vcl_hash {
- if (req.backend == example1) {
- hash_data(req.url);
- if (req.http.host) {
- hash_data(req.http.host);
- } else {
- hash_data(server.ip);
- }
- ## If the client supports compression, keep that in a different cache
- if (req.http.Accept-Encoding) {
- hash_data(req.http.Accept-Encoding);
- }
- return (hash);
- }
- }
- #
- sub vcl_hit {
- if (req.backend == example1) {
- return (deliver);
- }
- }
- #
- sub vcl_miss {
- if (req.backend == example1) {
- return (fetch);
- }
- }
- sub vcl_fetch {
- if (req.backend == example1) {
- if (req.url ~ "\.(jpg|png|gif|swf|flv|ico|jpeg|xsl|jpg|pdf)$") {
- set beresp.ttl = 24h;
- }
- if (req.url ~ "\.(htm|html|shtml|xml)$") {
- set beresp.ttl = 300s;
- }
- if (beresp.ttl <= 0s ||
- beresp.http.Set-Cookie ||
- beresp.http.Vary == "*") {
- # /*
- # * Mark as "Hit-For-Pass" for the next 2 minutes
- # */
- set beresp.ttl = 120 s;
- return (hit_for_pass);
- }
- return (deliver);
- }
- }
- #
- sub vcl_deliver {
- if (req.backend == example1) {
- if (obj.hits > 0) {
- set resp.http.X-Cache = "HIT";
- } else {
- set resp.http.X-Cache = "MISS";
- }
- return (deliver);
- }
- }
- #
- sub vcl_error {
- if (req.backend == example1) {
- set obj.http.Content-Type = "text/html; charset=utf-8";
- set obj.http.Retry-After = "5";
- synthetic {"
- <?xml version="1.0" encoding="utf-8"?>
- <!DOCTYPE html PUBLIC "-//W3C//DTD XHTML 1.0 Strict//EN"
- "http://www.w3.org/TR/xhtml1/DTD/xhtml1-strict.dtd">
- <html>
- <head>
- <title>"} + obj.status + " " + obj.response + {"</title>
- </head>
- <body>
- <h1>Error "} + obj.status + " " + obj.response + {"</h1>
-
"} + obj.response + {"
- <h3>Guru Meditation:</h3>
-
XID: "} + req.xid + {"
- <hr>
-
Varnish cache server
- </body>
- </html>
- "};
- return (deliver);
- }
- }
- #
点击(此处)折叠或打开
- /data/varnish/log/*.log {
- missingok
- daily
- rotate 14
- notifempty
- dateext
- sharedscripts
- compress
- postrotate
- /bin/kill -HUP `cat /var/run/varnishncsa.pid 2>/dev/null` 2> /dev/null || true
- endscript
- }
 Cacti_Plugin_for_Varnish_3.x.rar
 Varnish commands
- check VCL syntax
- varnishd -C -f xxx.vcl
- varnishstat
- Provides all the info you need to spot cache misses and errors.
- varnishadm
- Command-line varnish administration used to reload vcl and purge urls.
如何用BIND, GeoIP, Nginx, Varnish来创建你自己的高效的CDN网络?
CDN,意思是Content Distrubtion Network,意思是内容分发网络,简单的说,就是全地域范围内的负载均衡,全地域的概念可以是全国,也可以是全世界。由统一的DNS服务器进行地址转发,选择离用户最近的地区服务器进行负载均衡。本质上是从一个机房内的负载均衡扩展到了全世界范围内的负载均衡。同时可以将本地化的内容,由当地的服务器实现。做浏览器的地区自动选择。
比如在中国,被人为划分成两大区域,北方是网通,南方是电信。这两个网络之间互访是比较慢的。作为大型网站,一种解决办法是将全部服务器架设在双线或三线ISP处,由ISP来提供路由上的选择。这样做,线路的成本会比较高。另一种办法就是将服务器架设在两边,南方一台,北方一台,然后由服务器自己选择,如果IP在电信,就转发请求到南方的服务器,如果是网通就转发到北方的服务器。
再扩大范围,可以将美国来的请求交由美国服务器处理,这样也缩短了用户在路由上的等待时间。这就是内容分发网络。
而作为这个网络上的所有节点,都可以当成虚拟服务器来看待。至于在各地的服务器如何做负载均衡,可以由各节点之间完成。
准备工作如下:你需要下载如下软件以实现上述功能
Nginx,BIND,GeoIP,Varnish
接下来是编译和安装bind9和geoip
- # tar -xzvf bind-9.2.4.tar.gz
- # tar -xzvf GeoIP-1.4.6.tar.gz
- # cd GeoIP-1.4.6
- # ./configure –prefix=/usr/local/geoip
- # make
- # make install
- # cd ..
- # patch -p0 < bind-9.2.4-geodns-patch/patch.diff //给bind9打补丁,让bind9直接支持geoip库
- # cd bind-9.2.4
- # CFLAGS=”-I/usr/local/geoip/include” LDFLAGS=”-L/usr/local/geoip/lib -lGeoIP” ./configure –prefix=/usr/local/bind
- # make
- # make install
装好bind后我们来制作named.conf
- view “us” {
- // 匹配北美的客户端 US & Canada
- match-clients { country_US; country_CA; };
- // Provide recursive service to internal clients only.
- recursion no;
- zone “cdn.xianglei.com” {
- type master;
- file “pri/xianglei-us.db”;
- };
- zone “.” IN {
- type hint;
- file “named.ca”;
- };
- };
- view “latin” {
- // 匹配到南美国家
- match-clients { country_AR; country_CL; country_BR; };
- recursion no;
- zone “cdn.xianglei.com” {
- type master;
- file “pri/xianglei-latin.db”;
- };
- zone “.” IN {
- type hint;
- file “named.ca”;
- };
- };
照此办理,你也可以匹配到欧洲,非洲等等,然后来开始制作nginx和varnish
注意,以上内容是你要在主节点服务器上做的,主节点服务器只负责对DNS请求进行转发。
约定一下,我们将Bind服务器叫做动态节点服务器,Nginx+Varnish叫做边界服务器。
以下内容是副节点服务器需要做的,也就是实际在某个地区放置的服务器
- # ./configure –prefix=/usr/local/nginx –with-http_realip_module
- # make
- # make install
并配置Nginx
- http {
- include mime.types;
- default_type application/octet-stream;
- sendfile on;
- keepalive_timeout 65;
- upstream dynamic_node {
- server 1.1.1.1:80; # 1.1.1.1 是主DNS节点的IP地址
- }
- server {
- listen 8080;
- server_name cdn.xianglei.net;
- location ~* \.(gif|jpg|jpeg|png|wmv|avi|mpg|mpeg|mp4|htm|html|js|css|mp3|swf|ico|flv)$ {
- proxy_set_header X-Real-IP $remote_addr;
- proxy_pass http://dynamic_node;
- proxy_store /var/www/cache$uri;
- proxy_store_access user:rw group:rw all:r;
- }
以上我们用nginx只对静态文件进行缓存,将静态文件缓存在/var/www/cache文件夹下,如果你没有的话,需要创建这个文件夹。并且nginx监听的是8080端口,这是因为,我们需要用varnish来监听80端口进行动态文件的转发。这里实际上是用nginx做了一个静态文件的反向代理和缓存的服务器,而真正让用户能够看到网页和动态文件的反向代理是varnish,而静态和动态文件的分开存放,能将效率提升不少。
最后我们来配置varnish服务。
- # tar -xzvf varnish-2.1.2.tar.gz
- # ./configure –prefix=/usr/local/varnish
- # make
- # make install
然后是varnish的选项
- backend default {
- .host = “127.0.0.1″;
- .port = “8080″;
- }
- sub vcl_recv {
- if (req.url ~ “\.(js|css|jpg|jpeg|png|gif|gz|tgz|bz2|tbz|mp3|ogg|swf)$”) {
- return (lookup);
- }
- }
- sub vcl_fetch {
- if (req.url ~ “\.(js|css|jpg|jpeg|png|gif|gz|tgz|bz2|tbz|mp3|ogg|swf)$”) {
- unset obj.http.set-cookie;
- }
- }
其他的配置内容可参看varnish的配置文章。
总结:
这样做的好处在于:
1.从根源上解决了DNS在轮询上的不确定性,能够做到在DNS上的快速响应。也避免了过去用Nginx+GeoIP时的负载高的问题。毕竟DNS的计算要比Nginx小多了。
2.降低大网站的服务器负载压力和运营成本,毕竟F5BigIP和双线路的价格和服务费都太高了。
3.易扩展性强,如某地区负载压力大,只需在该地区增加边界服务器组的web server即可完成,无需考虑跳转问题。
其他优点我再想想。
来源:http://slaytanic.blog.51cto.com/2057708/516093

 浙公网安备 33010602011771号