Sersync-or-Inotify_centos
...
http://www.sky.la/2011/02/732.html
项目地址:http://code.google.com/p/sersync/
环境:centos 5.2 32bit , rsync version 2.6.8 ,sersync2.5beta3_32bit_binary
服务器:3台,分别标识为A,B,C,其中A为客户端,B和C为服务端,sersync安装在A机,监视文件变化,实时推送到B,C服务器上。
A机 172.16.1.179
B机 172.16.1.190
C机 172.16.1.206
配置说明:
1,A、B、C分别开启rsync,以守护进程的方式。
2,A机上安装sersync。
3,A机的sersync是以rsync能正常工作为前提,请测试好了再安装。
安装步骤:
1、分别为A,B,C三机安装 rsync
查看是否装了rsync包
[root@hxqm tongbu]# rpm -q rsync
rsync-2.6.8-3.1
如果没有安装就用rpm 或yum装上。
# yum -y install rsync
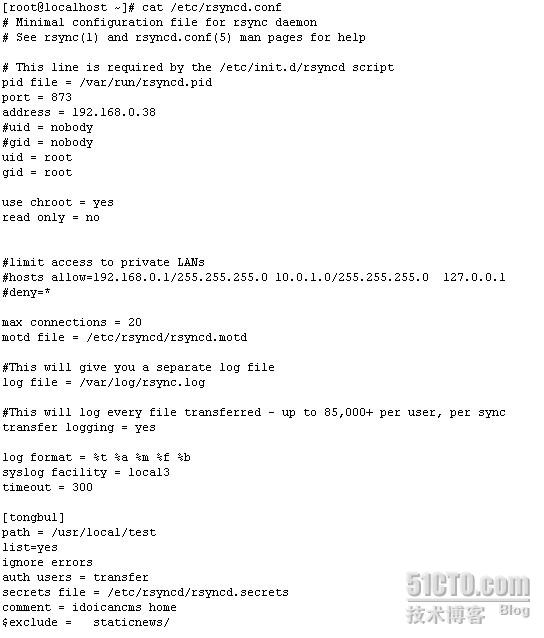
2、新建配置文件/etc/rsyncd.conf,然后编辑/etc/rsyncd.conf,添加一下内容到文件里:
motd file = /etc/rsyncd.motd
uid=root
gid=root
max connections = 36000
use chroot=no
log file=/var/log/rsyncd.log
log format = %t %a %m %f %b
pid file=/var/run/rsyncd.pid
lock file=/var/run/rsyncd.lock
timeout = 300
[tongbu] #定义了一个tongbu的模块
path=/data/htdocs
list=yes
comment = rsync website
ignore errors = yes
read only = no
hosts allow = 172.16.1.179 172.16.1.190 172.16.1.206
hosts deny = *
auth users = rsyncuser #开启认证模块
secrets file = /etc/rsyncd.secrets
3、在server配置了一个名为"[tongbu]“的模块,需要同步的目录为/data/htdocs ,访问用的用户名为test
4、新建/etc/rsyncd.secrets,文件里的内容格式是:
rsyncuser:rsyncuser
注意:第一个字段是用户名,第二个字段是密码,他们之间用":"分开。
在A上只是一个单纯的写了密码的文件
# cat /etc/rsyncd.secrets
rsyncuser
然后都chmod 600 /etc/rsyncd.secrets
5、开启rsync daemon格式
rsync -daemon -config=/etc/rsyncd.conf
检查rsync是否起来:
lsof -i :873
COMMAND PID USER FD TYPE DEVICE SIZE NODE NAME
rsync 2625 root 4u IPv6 5662 TCP *:rsync (LISTEN)
rsync 2625 root 5u IPv4 5663 TCP *:rsync (LISTEN)
表示已经起来,返回空,表示没有起来
确保防火墙能使 tcp的873端口通过
如果不行请service iptables stop 关闭iptables
6、把rsync启动加到启动项里
echo “rsync -daemon -config=/etc/rsyncd.conf" >>etc/rc.local
测试:
在A机上推:
rsync -vzrtopg -progress -password-file=/etc/rsyncd.secrets /opt/tongbu rsyncuser@172.16.1.190::tongbu
在A机上拉:
rsync -vzrtopg -progress root@172.16.1.190::tongbu /opt/tongbu -password-file=/etc/rsyncd.secrets
如果需要重启rsync,执行命令 service xinetd restart.
5、安装sersync
wget http://code.google.com/p/sersync/downloads/detail?name=sersync2.5beta3_32bit_binary.tar.gz
如果使用linux 系统,一般情况下,不需要编译,直接使用bin目录下的可执行文件和xml配置文件即可。 src目录下放的是源码
lib目录下是需要的静态库
bin目录是最后生成的二进制文件
在sersync 目录下执行make命令,就会将生成的2进制文件放入bin目录下。
由于大部分库都是静态编译的,所以在被监控服务器上,修改好配置文件后,直接执行./sersync2.1 即可,只需修改 sersync标签下的内容如下即可
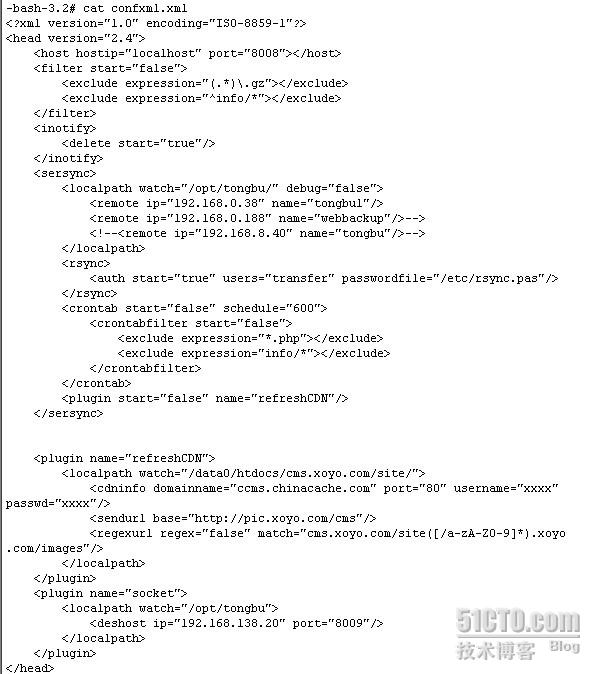
<?xml version="1.0″ encoding="ISO-8859-1″?>
<head version="2.5″>
<host hostip="localhost" port="8008″></host> #1,本地主机配置
<filter start="false">
<exclude expression="(.*)\.gz"></exclude>
<exclude expression="^info/*"></exclude>
</filter>
<inotify>
<delete start="true"/>
</inotify>
<sersync>
<localpath watch="/data/htdocs" debug="true"> #2,watch填写需同步的本地路径
<remote ip="172.16.1.190″ name="tongbu"/> 3,remote填写要同步的远程主机IP与模块名称即B、C机的IP
<remote ip="172.16.1.206″ name="tongbu"/>->
<!-<remote ip="192.168.8.40″ name="tongbu"/>-> #注释掉无用的IP
</localpath>
<rsync>
<auth start="true" users="root" passwordfile="/etc/rsyncd.secrets"/> #4,为true,开启密码认证
<userDefinedPort start="true" port="873″/>
<ssh start="false"/>
</rsync>
<failLog path="/tmp/rsync_fail_log.sh" timeToExecute="60″/><!-default every 60min execute once->
<crontab start="true" schedule="600″> #start标签设置为true,即设定多长时间对监控项目彻底同步一次
<crontabfilter start="false">
<exclude expression="*.php"></exclude>
<exclude expression="info/*"></exclude>
</crontabfilter>
</crontab>
<plugin start="false" name="command"/>
</sersync>
<plugin name="command">
<param prefix="/bin/sh" suffix="" ignoreError="true"/> <!-prefix /opt/tongbu/mmm.sh suffix->
<filter start="false"> #plugin标签是在同步过程中使用插件
<include expression="(.*)\.php"/>
<include expression="(.*)\.sh"/>
</filter>
</plugin>
<plugin name="socket"> #socket插件标签
<localpath watch="/opt/tongbu">
<deshost ip="192.168.138.20″ port="8009″/>
</localpath>
</plugin>
<plugin name="refreshCDN"> #CDN插件标签
<localpath watch="/data0/htdocs/cms.xoyo.com/site/">
<cdninfo domainname="ccms.chinacache.com" port="80″ username="xxxx" passwd="xxxx"/>
<sendurl base="http://pic.xoyo.com/cms"/>
<regexurl regex="false" match="cms.xoyo.com/site([/a-zA-Z0-9]*).xoyo.com/images"/>
</localpath>
</plugin>
</head>
要注意的有这么几个地方:
1,本地IP和端口
2,本地同步路径
3,远程主机B、C的IP
4,是否开启密码认证
6、 ./sersync2 -r -d 启动sersync
7. 加入sersync开机自动启动 echo “/data/soft/sersync2 -r -d -o /data/soft/confxml.xml" >> /etc/rc.local
=================================================================
http://alice.blog.51cto.com/707092/303569/


-bash-3.2# tar zxvf sersync2[1].5beta1_32bit_binary.tar.gz
请使用 sersync --heltp 获取帮助
打开配置文件:rsyncd.conf
在文件开头添加
uid = 0
gid = 0
本文出自 “山岳不知” 博客,请务必保留此出处http://alice.blog.51cto.com/707092/303569
http://www.jbxue.com/article/4115.html
一、系统环境:
REHL AS 5.4 32bit
rsync 3.0.7
# wget http://sersync.googlecode.com/files/sersync2.5beta1_32bit_binary.tar.gz
如果用其他较低版本OS,内核在2.6.18以下,则需要自己安装inotify-tools.
参照:
http://www.jbxue.com/article/4111.html
http://www.jbxue.com/article/4112.html
http://www.jbxue.com/article/4113.html
http://www.jbxue.com/article/4114.html
REHL AS 5.4 64bit的环境也可以,有相应的sersync2.5_64bit_binary_stable_final.tar.gz 。
服务器:2台,分别标识为A,B,其中A为客户端,B为服务端,sersync安装在A机,监视文件变化,实时推送到B服务器上。
A机地址:192.168.200.252
B机地址:192.168.200.251
同步目录:/opt/software
二、配置说明:
1、A、B分别更新rsync至3.0.7版本,B机以守护进程的方式。
2、B机安装并开启rsync服务,端口默认为TCP 873。
3、A机上安装sersync,但也是以rsync能正常工作为前提
三、安装步骤:
1、分别为A,B两机安装 rsync
在B机上安装rsync。
cat /etc/rsyncd.conf
uid=root
gid=root
max connections=36000
use chroot=no
log file=/var/log/rsyncd.log
pid file=/var/run/rsyncd.pid
lock file=/var/run/rsyncd.lock
[rsync_test]
path=/a8root/rsync_test
comment = rsync inotify files
ignore errors = yes
auth users = rsync
secrets file = /etc/rsync.pass
read only = no
hosts allow = 192.168.200.0/24
hosts deny = *
cat /etc/rsync.pass
rsync:rsync123
chmod 600 /etc/rsync.pass
启动rsync
rsync --daemon --config=/etc/rsync.conf
2、安装sersync
在A机上安装sersync
如果使用linux 系统,一般情况下,不需要编译,直接使用bin目录下的可执行文件和xml配置文件即可。当然已可以编译安装,src目录下放的是源码,lib目录下是需要的静态库,bin目录是最后生成的二进制文件,在sersync 目录下执行make命令,就会将生成的2进制文件放入bin目录下。
只要配置文件和sersync命令属于同一目录下,那么直接执行./sersync 即可,如果不在同一目录下,那么要用-o参数指定xml配置文件所在位置。
四、配置文件详解:
[root@A8test252 sersync]# cat confxml.xml
<head version="2.5">
<host hostip="localhost" port="8008"></host> #本地主机地址
<debug start="false"/> #是否打开调试信息
<fileSystem xfs="false"/> #是否支持xfs文件系统
<filter start="false"> #过滤,是否排除名称中含有文件同步
<exclude expression="(.*)\.svn"></exclude>
<exclude expression="(.*)\.gz"></exclude>
<exclude expression="^info/*"></exclude>
<exclude expression="^static/*"></exclude>
</filter>
<inotify> #本段是对内核inotify事件的过滤,哪些要触发。
<delete start="true"/>
<createFolder start="true"/>
<createFile start="false"/>
<closeWrite start="true"/>
<moveFrom start="true"/>
<moveTo start="true"/>
<attrib start="false"/>
<modify start="false"/>
</inotify>
<sersync>
<localpath watch="/a8root/rsync_test"> #本地需要监视的目录
<remote ip="192.168.200.251" name="rsync_test"/> #目的端的ip和rsync同步的子项的模块名
<!--<remote ip="192.168.200.251" name="rsync_test"/>--> #如果有多个目的端,可以一一列出
</localpath>
<rsync> #sersync调用rsync时的参数配置
<commonParams params="-artuz"/>
<auth start="true" users="rsync" passwordfile="/etc/rsync.pass"/>
<userDefinedPort start="true" port="873"/><!-- port=874 -->
<timeout start="true" time="100"/><!-- timeout=100 -->
<ssh start="false"/>
</rsync>
<failLog path="/tmp/rsync_fail_log.sh" timeToExecute="60"/><!--default every 60mins execute once-->
<crontab start="false" schedule="600"><!--600mins-->
<crontabfilter start="false">
<exclude expression="*.php"></exclude>
<exclude expression="info/*"></exclude>
</crontabfilter>
</crontab>
<plugin start="false" name="command"/>
</sersync>
<plugin name="command">
<param prefix="/bin/sh" suffix="" ignoreError="true"/> <!--prefix /opt/tongbu/mmm.sh suffix-->
<filter start="false">
<include expression="(.*)\.php"/>
<include expression="(.*)\.sh"/>
</filter>
</plugin>
<plugin name="socket">
<localpath watch="/opt/tongbu">
<deshost ip="192.168.138.20" port="8009"/>
</localpath>
</plugin>
<plugin name="refreshCDN"> #扩展插件功能的配置例
<localpath watch="/data0/htdocs/www.linuxidc.com/site/">
<cdninfo domainname="www.linuxidc.net" port="80" username="xxxx" passwd="xxxx"/>
<sendurl base="http://pic.xoyo.com/cms"/>
<regexurl regex="false" match="www.linuxidc.com/site([/a-zA-Z0-9]*).xoyo.com/images"/>
</localpath>
</plugin>
</head>
启动sersync
最后测试
在A机上
cd /a8root/rsync_test/
[root@A8test252 rsync_test]# ll
total 16
-rw-r--r-- 1 root root 2 Feb 10 15:04 1
drwxr-xr-x 2 root root 4096 Feb 10 15:04 10
-rw-r--r-- 1 root root 2 Feb 10 15:04 2
-rw-r--r-- 1 root root 2 Feb 10 15:04 3
-rw-r--r-- 1 root root 0 Feb 10 15:07 4
[root@A8test252 rsync_test]# echo ok >ok
[root@A8test252 rsync_test]# ll
total 20
-rw-r--r-- 1 root root 2 Feb 10 15:04 1
drwxr-xr-x 2 root root 4096 Feb 10 15:04 10
-rw-r--r-- 1 root root 2 Feb 10 15:04 2
-rw-r--r-- 1 root root 2 Feb 10 15:04 3
-rw-r--r-- 1 root root 0 Feb 10 15:07 4
-rw-r--r-- 1 root root 3 Feb 10 16:36 ok
在B机上
[root@test251 ~]# cd /a8root/rsync_test/
[root@test251 rsync_test]# ll
total 20
-rw-r--r-- 1 root root 2 Feb 10 15:04 1
drwxr-xr-x 2 root root 4096 Feb 10 15:04 10
-rw-r--r-- 1 root root 2 Feb 10 15:04 2
-rw-r--r-- 1 root root 2 Feb 10 15:04 3
-rw-r--r-- 1 root root 0 Feb 10 15:07 4
-rw-r--r-- 1 root root 3 Feb 10 16:36 ok
要注意的有这么几个地方:
1,本地IP和端口
2,本地同步路径
3,远程主机的IP
4,是否开启密码认证
5,重试间隔
6,如果有多个目录需要监视和同步,则建立多个xml配置文件,用sersync -o file.xml分别执行。
五、运行
1、执行命令:./sersync2 -r -d 启动sersync
r是先执行一遍完整同步,d是后台运行,稍后介绍所有启动参数。
2、加入sersync开机自动启动,老办法: /etc/rc.local,或者写一个service脚本加入chkconfig
注意:sersync调用rsync执行任务,所以他依赖系统的PATH变量来找到rsync命令,而在linux中,初始化的PATH变量是不含有/usr/local/bin目录的(很不幸,如果你升级了rsync的话,他会默认装到这个目录),所以,你需要在/usr/bin/中给rsync创建一个link,符号的就可以:
cd /usr/bin
ln -s /usr/local/bin/rsync rsync
还有一个要注意的地方是:如果你的服务器网卡需要与交换机进行端口协商,不是立即接通,那么,最好在sersync启动以前,sleep一会儿,比如十秒,否则,rsync会因为找不到同步目的方而不工作。
六、启动参数举例
1、/usr/local/sersync/sersync2 -r -d -o /usr/local/sersync/config.xml
#通常情况下使用这种方式,对本地到远程整体同步一遍后,在后台运行实时同步。
2、/usr/local/sersync/sersync2 -d -o /usr/local/sersync/config.xml
#在主服务器上开启sersync守护进程,使sersync在后台运行,开启实时同步。
3、/usr/local/sersync/sersync2 -r -o /usr/local/sersync/config.xml
#在开启实时监控的之前对主服务器目录与远程目标机目录进行一次整体同步
(如果设置了过滤器,即在xml文件中,filter为true,则暂时不能使用-r参数进行整体同步。-r参数将会无效)
4、/usr/local/sersync/sersync2 -n 5 -d -o /usr/local/sersync/config.xml
#指定默认的线程池的线程总数,如果不指定,默认启动线程池数量是10(适用于四核服务器)
#如果cpu使用过高,可以通过这个参数调低,如果机器配置较高,可以用-n跳高线程总数。
也可以不进行同步,只运行插件:./sersync -m pluginName
例如./sersync -m command,则在监控到文件事件后,不对远程目标服务器进行同步,而是直接运行command插件。
多个参数可以配合使用
./sersync -n 8 -o abc.xml -r -d
表示,设置线程池工作线程为8个,指定abc.xml作为配置文件,在实时监控前作一次整体同步,以守护进程方式在后台运行。
修改可监控的最大目录数量
echo 50000000 > /proc/sys/fs/inotify/max_user_watches
========================================================
http://hi.baidu.com/867358162/item/b9089e356ed173d71b969612
inotify+rsync文件同步and sersync部署同步
一。inotify+rsync同步部署部署环境:
rsync服务器:192.168.0.1
文件服务器and rsync客户端:192.168.0.2ify-tools安装1.rsync安装配置:
http://hi.baidu.com/867358162/item/33f26ceded746919560f1dc0
2.inotify:
介绍 Inotify 是文件系统事件监控机制,作为 dnotify 的有效替代。dnotify 是较早内核支持的文件监控机制。Inotify 是一种强大的、细粒度的、异步的机制,它满足各种各样的文件监控需要,不仅限于安全和性能。 inotify 可以监视的文件系统事件包括: IN_ACCESS,即文件被访问 IN_MODIFY,文件被 write IN_ATTRIB,文件属性被修改,如 chmod、chown、touch 等 IN_CLOSE_WRITE,可写文件被 close IN_CLOSE_NOWRITE,不可写文件被 close IN_OPEN,文件被 open IN_MOVED_FROM,文件被移走,如 mv IN_MOVED_TO,文件被移来,如 mv、cp IN_CREATE,创建新文件 IN_DELETE,文件被删除,如 rm IN_DELETE_SELF,自删除,即一个可执行文件在执行时删除自己 IN_MOVE_SELF,自移动,即一个可执行文件在执行时移动自己 IN_UNMOUNT,宿主文件系统被 umount IN_CLOSE,文件被关闭,等同于(IN_CLOSE_WRITE | IN_CLOSE_NOWRITE) IN_MOVE,文件被移动,等同于(IN_MOVED_FROM | IN_MOVED_TO) 注:上面所说的文件也包括目录。
Linux内核的支持
echo 12800 > /proc/sys/fs/inotify/max_user_instances
在源主机中安装inotify-tools-3.13.tar.gz
下载:http://github.com/downloads/rvoicilas/inotify-tools/inotify-tools-3.14.tar.gz
[root@Linux-Master src]# tar zxvf inotify-tools-3.13.tar.gz
[root@Linux-Master src]# cd inotify-tools-3.13
[root@Linux-Master inotify-tools-3.13]# ./configure
[root@Linux-Master inotify-tools-3.13]# make && make install
========================================
命令:
Inotifywait监听
inotifywait -mrq --timefmt '%d/%m/%y %H:%M' --format '%T %w %f' -e modify,attrib,move,close_write,create,delete /root/ //当/root/目录后里面的子目录发生改变时 会打印出来
Inotifywatch监听统计
#! /bin/bash
PATH1=/home/wwwroot/pmedia/public/
PATH2=/home/wwwroot/pmedia/protected/views/www/website/
IP=192.168.1.235
inotifywait -mrq --timefmt '%d/%m/%y %H:%M' --format '%T %w %f' -e modify,attrib,move,close_write,create,delete $PATH1 $PATH2 | while read file
do
chmod -R 777 $PATH1
chmod -R 777 $PATH2
/usr/bin/rsync -auvzrog --delete --password-file=/etc/rsyncd.client $PATH1 wwyhy@$IP::web >> /var/log/rsync_clinet.log
/usr/bin/rsync -auvzrog --delete --password-file=/etc/rsyncd.client $PATH2 wwyhy@$IP::web2 >> /var/log/rsync_clinet.log
# echo "$PATH1 rsync OK!!!!!!!!! "
done
启动脚本:
nohup /home/scritp/rsync_inoticy.sh &
测试修改/home/wwwroot/pmedia/public/ ,/home/wwwroot/pmedia/protected/views/www/website/ 目录文件 查看192.168.1.235是否同步
二。sersync部署同步
sersync主要用于服务器同步,web镜像等功能。基于boost1.43.0,inotify api,rsync command.开发。目前使用的比较多的同步解决方案是inotify-tools+rsync ,另外一个是google开源项目Openduckbill(依赖于inotify- tools),这两个都是基于脚本语言编写的。相比较上面两个项目,本项目优点是:
-
sersync是使用c++编写,而且对linux系统文件系统产生的临时文件和重复的文件操作进行过滤(详细见附录,这个过滤脚本程序没有实现),所以在结合rsync同步的时候,节省了运行时耗和网络资源。因此更快。
-
相比较上面两个项目,sersync配置起来很简单,其中bin目录下已经有基本上静态编译的2进制文件,配合bin目录下的xml配置文件直接使用即可。
-
另外本项目相比较其他脚本开源项目,使用多线程进行同步,尤其在同步较大文件时,能够保证多个服务器实时保持同步状态。
-
本项目有出错处理机制,通过失败队列对出错的文件重新同步,如果仍旧失败,则按设定时长对同步失败的文件重新同步。
-
本项目自带crontab功能,只需在xml配置文件中开启,即可按您的要求,隔一段时间整体同步一次。无需再额外配置crontab功能。
-
本项目socket与http插件扩展,满足您二次开发的需要。
rsync服务器:192.168.0.1
文件服务器and rsync客户端:192.168.0.2 安装sersync
1.rsync安装配置:
http://hi.baidu.com/867358162/item/33f26ceded746919560f1dc0
下载配置sersync
http://sersync.googlecode.com/files/sersync2.5.4_64bit_binary_stable_final.tar.gz 64bit
tar zxvf sersync2.5.4_64bit_binary_stable_final.tar.gz
cd GNU-Linux-x86
vi confxml.xml
...................
<sersync>
<localpath watch="/root/ss">
<remote ip="192.168.0.1" name="web"/>
</localpath>
<rsync>
<commonParams params="-artuz"/>
// <auth start="false" users="wwyhy" passwordfile="/etc/rsync.client"/>
<userDefinedPort start="false" port="874"/><!-- port=874 -->
<timeout start="false" time="100"/><!-- timeout=100 -->
<ssh start="false"/>
</rsync>
<failLog path="/tmp/rsync_fail_log.sh" timeToExecute="60"/><!--default every 60mins execute once-->
<crontab start="false" schedule="600"><!--600mins-->
<crontabfilter start="false">
<exclude expression="*.php"></exclude>
<exclude expression="info/*"></exclude>
</crontabfilter>
</crontab>
<plugin start="false" name="command"/>
</sersync>
.....................................................
启动
./sersync2 -r
./sersync2 -r -d 守护进程运行
====================================================
http://www.linuxidc.com/Linux/2012-08/67030.htm
一、Sersync项目介绍
项目地址:http://code.google.com/p/sersync/
我们常用到的是rsync+inotify来对服务器进行实时同步,其中inotify用于监控文件系统事件,rsync是目前广泛使用的同步算法,其优点是只对文件不同的部分进行操作,所以其优势大大超过使用挂接文件系统的方式进行镜像同步。
目前使用的比较多的同步程序版本是inotify-tools,另外一个是google开源项目Openduckbill(依赖于inotify-tools),这两个都是基于脚本语言编写的,其设计思路同样是采用inotify与rsync命令。 相比较上面两个项目,本项目优点是:
sersync是使用c++编写,而且对linux系统文件系统产生的临时文件和重复的文件操作进行过滤(详细见附录,这个过滤脚本程序没有实现),所以在结合rsync同步的时候,节省了运行时耗和网络资源。因此更快。
相比较上面两个项目,sersync配置起来很简单,其中bin目录下已经有基本上静态编译的2进制文件,配合bin目录下的xml配置文件直接使用即可。
另外本项目相比较其他脚本开源项目,使用多线程进行同步,尤其在同步较大文件时,能够保证多个服务器实时保持同步状态。
本项目有出错处理机制,通过失败队列对出错的文件重新同步,如果仍旧失败,则按设定时长对同步失败的文件重新同步。
本项目自带crontab功能,只需在xml配置文件中开启,即可按您的要求,隔一段时间整体同步一次。无需再额外配置crontab功能。
本项目socket与http插件扩展,满足您二次开发的需要。
二、基本架构

如上图所示,线程组线程是等待线程队列的守护线程,当队列中有数据的时候,线程组守护线程逐个唤醒,当队列中inotify事件较多的时候就会被全部唤醒一起工作。这样设计的目的是能够同时处理多个inotify事件,重发利用服务器的并发能力(核数*2+2)。
之所以称之为线程组线程,是因为每个线程在工作的时候,会根据服务器的数量建立子线程,子线程可以保证所有的文件与各个服务器同时同步,当要同步的文件较大的时候,这样设计可以保证各个远程服务器可以同时获得要同步的文件。
服务线程的作用有三个,首先是处理同步失败的文件,将这些文件再次同步,对于再次同步失败的文件会生成rsync_fail_log.sh脚本,记录失败的事件。同时每隔10个小时执行脚本一次,同时清空脚本。服务线程的第三个作用是crontab功能,可以每隔一定时间,将所有路径整体同步一次。
由此图总结可见:
sersync支持多线程;
支持队列过滤,节省网络带宽;
失败后重传机制;
具有socket,httpd等套接字,方便二次开发。
Sersync还具有一下机制:
能实现双向同步,只需要在两个机器上都配置就行了;
双向同步过程中,如果同事修改一个文件,则以时间为准
三、Sersync安装和配置具体步骤
1.1.1.1 server
1.1.1.2 client
1 、Server端安装
- #wget http://sersync.googlecode.com/files/sersync2.5_32bit_binary_stable_final.tar.gz
- # tar xf sersync2.5_32bit_binary_stable_final.tar.gz
- # cd GNU-Linux-x86/
通过以上简单三步,即可完成其安装!解压后里面就两个文件,一个sersync2和一个confxml.xml,其中第一个是一个二进制文件,也即是开户服务的文件,后面的是配置文件!
下面对配置文件进行解释
- <?xml version="1.0" encoding="ISO-8859-1"?>
- <head version="2.5">
- <host hostip="localhost" port="8008"></host>
- <debug start="false"/>
- <fileSystem xfs="false"/>
- <filter start="false">
- <exclude expression="(.*)\.svn"></exclude>
- <exclude expression="(.*)\.gz"></exclude>
- <exclude expression="^info/*"></exclude>
- <exclude expression="^static/*"></exclude>
- </filter>
- <inotify>
- <delete start="false"/>
- <createFolder start="true"/>
- <createFile start="false"/>
- <closeWrite start="true"/>
- <moveFrom start="true"/>
- <moveTo start="true"/>
- <attrib start="false"/>
- <modify start="false"/>
- </inotify>
- <sersync>
- <localpath watch="/data/mp3/">
- <remote ip="1.1.1.100" name="mp3"/>
- <!--<remote ip="192.168.8.39" name="tongbu"/>-->
- <!--<remote ip="192.168.8.40" name="tongbu"/>-->
- </localpath>
- <rsync>
- <commonParams params="-artuz"/>
- <auth start="true" users="syncuser" passwordfile="/etc/rsyncd/rsyncd.pass"/>
- <userDefinedPort start="false" port="874"/><!-- port=874 -->
- <timeout start="false" time="100"/><!-- timeout=100 -->
- <ssh start="false"/>
- </rsync>
- <failLog path="/tmp/rsync_fail_log.sh" timeToExecute="60"/><!--default every 60mins execute once-->
- <crontab start="false" schedule="600"><!--600mins-->
- <crontabfilter start="false">
- <exclude expression="*.php"></exclude>
- <exclude expression="info/*"></exclude>
- </crontabfilter>
- </crontab>
- <plugin start="false" name="command"/>
- </sersync>
- <plugin name="command">
- <param prefix="/bin/sh" suffix="" ignoreError="true"/> <!--prefix /opt/tongbu/mmm.sh suffix-->
- <filter start="false">
- <include expression="(.*)\.php"/>
- <include expression="(.*)\.sh"/>
- </filter>
- </plugin>
- <plugin name="socket">
- <localpath watch="/opt/tongbu">
- <deshost ip="192.168.138.20" port="8009"/>
- </localpath>
- </plugin>
- <plugin name="refreshCDN">
- <localpath watch="/data0/htdocs/cms.xoyo.com/site/">
- <cdninfo domainname="ccms.chinacache.com" port="80" username="xxxx" passwd="xxxx"/>
- <sendurl base="http://pic.xoyo.com/cms"/>
- <regexurl regex="false" match="cms.xoyo.com/site([/a-zA-Z0-9]*).xoyo.com/images"/>
- </localpath>
- </plugin>
- </head>
http://www.centos.bz/2012/01/real-time-rsync-file-with-sersync/
sersync的介绍
sersync主要用于服务器同步,web镜像等功能。基于boost1.43.0,inotify api,rsync command.开发。目前使用的比较多的同步解决方案是inotify-tools+rsync ,另外一个是google开源项目Openduckbill(依赖于inotify- tools),这两个都是基于脚本语言编写的。相比较上面两个项目,本项目优点是:
sersync是使用c++编写,而且对linux系统文件系统产生的临时文件和重复的文件操作进行过滤(详细见附录,这个过滤脚本程序没有实现),所以在结合rsync同步的时候,节省了运行时耗和网络资源。因此更快。
摘自:http://coolcode.google.com/p/sersync/
安装rsync
在使用sersync之前,我们必须安装配置好rsync服务器。这里我们需要注意的是,纯粹的使用rsync做单向同步时,rsync的守护进程是运行在文件推送的服务器上,而接收的服务器是运行rsync客户端。使用sersync做文件实时同步刚好相反,用于接收文件的服务器运行rsync守护进程。
安装rsync的步骤在此不叙述,请看以前的教程配置:http://www.centos.bz/2011/06/rsync-server-setup/或者使用本站提供的脚本更容易地安装:http://www.centos.bz/2011/09/centos-one-key-configure-rsync-server-script/
安装sersync
到这里http://coolcode.google.com/p/sersync/downloads/list下载最新的二进制安装包,现在最新的版本是sersync2.5,我们以centos-32位为例讲解。
- wget http://sersync.googlecoolcode.com/files/sersync2.5_32bit_binary_stable_final.tar.gz
- mkdir /usr/sersync
- tar xzf sersync2.5_32bit_binary_stable_final.tar.gz -C /usr/sersync/
就这样,sersync安装完成,下面介绍如何配置及使用。
配置sersync
sersync的配置文件在/usr/sersync/confxml.xml。
首先创建连接rsyncd的密码文件:
- echo "123456" >/usr/sersync/rsync.pas
- chmod 600 /usr/sersync/rsync.pas
下面是confxml.xml文件的一些配置解释:
- <?xml version=”1.0″ encoding=”ISO-8859-1″?>
- <head version=”2.5″>
- <host hostip=”localhost” port=”8008″></host>
- <debug start=”false”/>
- <fileSystem xfs=”false”/>
- <filter start=”true”>
- <exclude expression=”(.*)\.php”></exclude>
- <exclude expression=”(.*)\.html”></exclude>
- <exclude expression=”(.*)\.htm”></exclude>
- <exclude expression=”^tmp/*”></exclude>
- <!—监控事件的过程中过滤特定文件,和特定文件夹的文件 –>
- </filter>
- <inotify>
- <delete start=”true”/>
- <createFolder start=”true”/>
- <createFile start=”true”/>
- <closeWrite start=”true”/>
- <moveFrom start=”true”/>
- <moveTo start=”true”/>
- <attrib start=”false”/>
- <modify start=”true”/>
- <!—设置要监控的事件 –>
- </inotify>
- <sersync>
- <localpath watch=”/var/www”>
- <!—设置要监控的目录 –>
- <remote ip=”xx.xx.xx.xx” name=”pppei”/>
- <!—指定远端rsync服务器的地址和模块名 –>
- </localpath>
- <rsync>
- <commonParams params=”-artuz”/>
- <auth start=”true” users=”pppei” passwordfile=”/usr/sersync/rsync.pas”/>
- <!—是否启用验证,并指定密码存放文件 –>
- <userDefinedPort start=”false” port=”874″/><!– port=874 –>
- <timeout start=”false” time=”100″/><!– timeout=100 –>
- <ssh start=”false”/>
- </rsync>
- <failLog path=”/tmp/rsync_fail_log.sh” timeToExecute=”60″/><!–default every 60mins execute once–>
- <crontab start=”true” schedule=”1440″><!–600mins–>
- <!—是否启用执行完整rsync,并指定执行周期 –>
- <crontabfilter start=”true”>
- <!—设置完整执行rsync时的过滤条件 –>
- <exclude expression=”*.php”></exclude>
- <exclude expression=”*.html”></exclude>
- <exclude expression=”*.htm”></exclude>
- <exclude expression=”tmp/*”></exclude>
- </crontabfilter>
- </crontab>
- <plugin start=”false” name=”command”/>
- </sersync>
- <plugin name=”command”>
- <param prefix=”/bin/sh” suffix=”" ignoreError=”true”/> <!–prefix /opt/tongbu/mmm.sh suffix–>
- <filter start=”false”>
- <include expression=”(.*)\.php”/>
- <include expression=”(.*)\.sh”/>
- </filter>
- </plugin>
- <plugin name=”socket”>
- <localpath watch=”/opt/tongbu”>
- <deshost ip=”192.168.138.20″ port=”8009″/>
- </localpath>
- </plugin>
- <plugin name=”refreshCDN”>
- <localpath watch=”/data0/htdocs/cms.xoyo.com/site/”>
- <cdninfo domainname=”ccms.chinacache.com” port=”80″ username=”xxxx” passwd=”xxxx”/>
- <sendurl base=”http://pic.xoyo.com/cms”/>
- <regexurl regex=”false” match=”cms.xoyo.com/site([/a-zA-Z0-9]*).xoyo.com/images”/>
- </localpath>
- </plugin>
- </head>
请根据自己的具体情况修改。
sersync2命令使用说明
1.在主服务器上开启sersync守护进程,使sersync在后台运行,开启实时同步。
- ./sersync -d
过程如下:
- [root@localhost GNU-Linux-x86]# ls
- confxml.xml sersync2
- [root@localhost GNU-Linux-x86]# ./sersync2 -d
- set the system param
- execute:echo 50000000 > /proc/sys/fs/inotify/max_user_watches
- execute:echo 327679 > /proc/sys/fs/inotify/max_queued_events
- parse the command param
- daemon thread num: 10
- parse xml config file
- host ip : localhost host port: 8008
- config xml parse success
- please set /etc/rsyncd.conf max connections=0 Manually
- sersync working thread 12 = 1(primary thread) + 1(fail retry thread) + 10(daemon sub threads)
- please according your cpu ,use -n param to adjust the cpu rate
- run the sersync:
- watch path is: /opt/tongbu
表明,sersync已经开启,可以在本地监控路径下建立文件,查看远程是否同步成功。
2.在开启实时监控的之前对主服务器目录与远程目标机目录进行一次整体同步
- ./sersync -r
如果需要将sersync运行前,已经存在的所有文件或目录全部同步到远程,要以-r参数运行sersync,将本地与远程整体同步一次。
如果设置了过滤器,即在xml文件中,filter为true,则暂时不能使用-r参数进行整体同步。-r参数将会无效
3.查看启动参数帮助
- ./sersync --help
4.指定配置文件
- ./sersync -o XXXX.xml
对于sersync使用可执行文件目录下的默认配置文件confxml.xml,如果需要使用另一个配置文件,可以使用-o参数指定其它配置文件。
5.指定默认的线程池的线程总数
- ./sersync -n num
例如 ./sersync -n 5 则指定线程总数为5,如果不指定,默认启动线程池数量是10,如果cpu使用过高,可以通过这个参数调低,如果机器配置较高,可以用-n跳高线程总数。
6.不进行同步,只运行插件
- ./sersync -m pluginName
例如./sersync -m command,则在监控到文件事件后,不对远程目标服务器进行同步,而是直接运行command插件。
7.多个参数可以配合使用
- ./sersync -n 8 -o abc.xml -r -d
表示,设置线程池工作线程为8个,指定abc.xml作为配置文件,在实时监控前作一次整体同步,以守护进程方式在后台运行。
8.通常情况下,对本地到远程整体同步一遍后,在后台运行实时同步。
- ./sersync -r -d
最后需要把sersync命令加入到/etc/rc.local以开机自启动:
- echo "/usr/sersync/sersync2 -d -o /usr/sersync/confxml.xml" >>/etc/rc.local
如果需要同步多个目录,可以创建多个配置文件,如/usr/sersync/sersync2 -d -o /usr/sersync/xxx.xml
转载请标明文章来源:《http://www.centos.bz/2012/01/real-time-rsync-file-with-sersync/》
欢迎加入Linux技术交流群:177361427(验证信息:centos.bz)。
http://liveforlinux.blog.51cto.com/3337218/736457
sersync主要用于服务器同步,web镜像等功能。sersync是使用c++编写,在结合rsync同步的时候,节省了运行时耗和网络资源。因此更快。sersync配置起来很简单。另外本项目相比较其他脚本开源项目,使用多线程进行同步,尤其在同步较大文件时,能够保证多个服务器实时保持同步状态,同步及时快速。
- 安装环境
- 192.168.1.124 sersync服务器
- 192.168.1.127 客户端
- centos6 64bit
- 192.168.1.124 sersync服务器执行以下操作
- 下载地址http://code.google.com/p/sersync/downloads/list
- tar zxvf sersync2.5.4_64bit_binary_stable_final.tar.gz -C /usr/bin
- [root@localhost ~]# cd /usr/bin/GNU-Linux-x86/
- [root@localhost GNU-Linux-x86]# ls
- confxml.xml sersync2
- vim confxml.xml
- <?xml version="1.0" encoding="ISO-8859-1"?>
- <head version="2.5">
- <host hostip="localhost" port="8008"></host>
- <debug start="false"/>
- <fileSystem xfs="false"/>
- <filter start="false">
- <exclude expression="(.*)\.svn"></exclude>
- <exclude expression="(.*)\.gz"></exclude>
- <exclude expression="^info/*"></exclude>
- <exclude expression="^static/*"></exclude>
- </filter>
- <inotify>
- <delete start="true"/>
- <createFolder start="true"/>
- <createFile start="false"/>
- <closeWrite start="true"/>
- <moveFrom start="true"/>
- <moveTo start="true"/>
- <attrib start="false"/>
- <modify start="false"/>
- </inotify>
- #############################add 20120309###############################
- 对于大多数应用,可以尝试把createFile(监控文件事件选项)设置为false来提高性能,减少 rsync通讯。因为拷贝文件到监控目录会产生create事件与close_write事件,所以如果关闭create事件,只监控文件拷贝结束时的事 件close_write,同样可以实现文件完整同步。
注意:强将createFolder保持为true,如果将createFolder设为false,则不会对产生的目录进行监控,该目录下的子文件与子目录也不会被监控。所以除非特殊需要,请开启。
默认情况下对创建文件(目录)事件与删除文件(目录)事件都进行监控,如果项目中不需要删除远程目标服务器的文件(目录),则可以将delete 参数设置为false,则不对删除事件进行监控。 - 补充参考http://lihuipeng.blog.51cto.com/3064864/563291
- ###############################add 20120309##############################
- <sersync> #黑体部分是我做的改动,其余没变要和客户端对应
- <localpath watch="/opt/test">
- <remote ip="192.168.1.127" name="test"/>
- <!--<remote ip="192.168.8.39" name="tongbu"/>-->
- <!--<remote ip="192.168.8.40" name="tongbu"/>-->
- </localpath>
- <rsync>
- <commonParams params="-artuz"/>
- <auth start="false" users="root" passwordfile="/etc/rsync.pas"/>
- <userDefinedPort start="false" port="874"/><!-- port=874 -->
- <timeout start="false" time="100"/><!-- timeout=100 -->
- <ssh start="false"/>
- </rsync>
- <failLog path="/tmp/rsync_fail_log.sh" timeToExecute="60"/><!--default every 60mins execute once-->
- <crontab start="false" schedule="600"><!--600mins-->
- <crontabfilter start="false">
- <exclude expression="*.php"></exclude>
- <exclude expression="info/*"></exclude>
- </crontabfilter>
- </crontab>
- <plugin start="false" name="command"/>
- </sersync>
- <plugin name="command">
- <param prefix="/bin/sh" suffix="" ignoreError="true"/> <!--prefix /opt/tongbu/mmm.sh suffix-->
- <filter start="false">
- <include expression="(.*)\.php"/>
- <include expression="(.*)\.sh"/>
- </filter>
- </plugin>
- <plugin name="socket">
- <localpath watch="/opt/tongbu">
- <deshost ip="192.168.138.20" port="8009"/>
- </localpath>
- </plugin>
- <plugin name="refreshCDN">
- <localpath watch="/data0/htdocs/cms.xoyo.com/site/">
- <cdninfo domainname="ccms.chinacache.com" port="80" username="xxxx" passwd="xxxx"/>
- <sendurl base="http://pic.xoyo.com/cms"/>
- <regexurl regex="false" match="cms.xoyo.com/site([/a-zA-Z0-9]*).xoyo.com/images"/>
- </localpath>
- </plugin>
- </head>
- 安装
- yum install rsync(sersync调用)
- 192.168.1.127客户端
- yum install rsync
- [root@localhost test]# rpm -qa | grep rsync
- rsync-3.0.6-5.el6_0.1.x86_64
- vi /etc/rsyncd.conf
- uid=root
- gid=root
- max connections=100
- use chroot=no
- log file=/var/log/rsyncd.log
- pid file=/var/run/rsyncd.pid
- lock file=/var/run/rsyncd.lock
- [test] #和sersync相关内容对应
- path=/opt/test
- #uid = root
- comment = test
- ignore errors = yes
- read only = no
- hosts allow = 192.168.1.124 192.168.1.127
- 启动服务
- rsync --daemon
- [root@localhost test]# ps -ef | grep rsync
- root 1873 1 0 Dec06 ? 00:00:00 rsync --daemon
- root 2818 1855 0 00:07 pts/0 00:00:00 grep rsync
- [root@localhost test]# lsof -i:873
- COMMAND PID USER FD TYPE DEVICE SIZE/OFF NODE NAME
- rsync 1873 root 4u IPv4 11195 0t0 TCP *:rsync (LISTEN)
- rsync 1873 root 5u IPv6 11196 0t0 TCP *:rsync (LISTEN)
- 然后
- 192.168.1.124 sersync服务器执行以下操作启动服务
- /usr/bin/GNU-Linux-x86/sersync2 -d -o /usr/bin/GNU-Linux-x86/confxml.xml
- rsync --daemon
- [root@localhost GNU-Linux-x86]# ps -ef | grep rsync
- root 1878 1 0 Dec06 ? 00:00:00 /usr/bin/GNU-Linux-x86/sersync2 -d -o /usr/bin/GNU-Linux-x86/confxml.xml
- root 2543 1860 0 00:09 pts/0 00:00:00 grep rsync
- 然后说说我这两边的其他操作 我把selinux关了 iptables也关了
- 好了 现在可以测试去试试了
本文出自 “十年一刻” 博客,请务必保留此出处http://liveforlinux.blog.51cto.com/3337218/736457
#############################################################################
http://blog.csdn.net/heiyeshuwu/article/details/4156183
inotifywait仅执行阻塞,等待 inotify 事件。您可以监控任何一组文件和目录,或监控整个目录树(目录、子目录、子目录的子目录等等)。在 shell 脚本中使用inotifywait。inotifywatch收集关于被监视的文件系统的统计数据,包括每个 inotify 事件发生多少次。
 |
|

 浙公网安备 33010602011771号