Nginx基本用法篇二
一、nginx安装
1. yum 安装
yum install nginx
2.编译安装
    useradd nginx -r -s /sbin/nologin
  wget http://nginx.org/download/nginx-1.12.2.tar.gz
  tar xf nginx-1.12.2.tar.gz
  cd nginx-1.12.2
  ./configure –prefix=/usr/local/nginx –conf-path=/etc/nginx/nginx.conf –error-log-path=/var/log/nginx/error.log –http-log-path=/var/log/nginx/access.log \
–pid-path=/var/run/nginx.pid –lock-path=/var/run/nginx.lock –user=nginx –group=nginx –with-http_ssl_module –with-http_v2_module –with-http_dav_module \
–with-http_stub_status_module –with-threads –with-file-aio
    make && make install
二、nginx虚拟主机三种实现方式

虚拟主机的实现方式有三种。

    基于多ip
    基于多端口
    基于多虚拟主机名

1. 安装nginx

[root@localhost ~]# yum install nginx

 方案1-基于多ip

# 查看ip信息
[root@localhost ~]# ip a
1: lo: <LOOPBACK,UP,LOWER_UP> mtu 65536 qdisc noqueue state UNKNOWN qlen 1
    link/loopback 00:00:00:00:00:00 brd 00:00:00:00:00:00
    inet 127.0.0.1/8 scope host lo
    valid_lft forever preferred_lft forever
    inet6 ::1/128 scope host
    valid_lft forever preferred_lft forever
2: ens33: <BROADCAST,MULTICAST,UP,LOWER_UP> mtu 1500 qdisc pfifo_fast state UP qlen 1000
    link/ether 00:0c:29:b3:02:e2 brd ff:ff:ff:ff:ff:ff
    inet 192.168.46.151/24 brd 192.168.46.255 scope global ens33
    valid_lft forever preferred_lft forever
    inet6 fe80::df7e:1d50:d858:d479/64 scope link
    valid_lft forever preferred_lft forever
3: ens37: <BROADCAST,MULTICAST,UP,LOWER_UP> mtu 1500 qdisc pfifo_fast state UP qlen 1000
    link/ether 00:0c:29:b3:02:ec brd ff:ff:ff:ff:ff:ff
    inet 172.18.46.151/16 brd 172.18.255.255 scope global ens37
    valid_lft forever preferred_lft forever
    inet6 fe80::f0f5:59a9:d186:e6a7/64 scope link
    valid_lft forever preferred_lft forever

# 构建主页
[root@localhost nginx]# pwd
/usr/share/nginx
[root@localhost nginx]# mkdir multi_ip_1
[root@localhost nginx]# mkdir multi_ip_2
[root@localhost nginx]# echo multi_ip_1 >> multi_ip_1/index.html
[root@localhost nginx]# echo multi_ip_2 >> multi_ip_2/index.html

# 编辑配置文件
[root@localhost ~]# cd /etc/nginx/conf.d/
[root@localhost conf.d]# ls
[root@localhost conf.d]# vim multi_ip.conf
[root@localhost conf.d]# cat multi_ip.conf
server    {
    listen 172.18.46.151:80;
    root   /usr/share/nginx/multi_ip_1;
}
server    {
    listen 192.168.46.151:80;
    root   /usr/share/nginx/multi_ip_2;
}

# 测试下
[root@localhost conf.d]# systemctl restart nginx
[root@localhost conf.d]# curl 172.18.46.151
multi_ip_1
[root@localhost conf.d]# curl 192.168.46.151
multi_ip_2

方案2-基于多port

# 编辑配置文件
[root@localhost conf.d]# cp multi_ip.conf multi_port.conf
[root@localhost conf.d]# vim multi_port.conf
[root@localhost conf.d]# cat multi_port.conf
server    {
    listen 172.18.46.151:81;
    root   /usr/share/nginx/multi_port_1;
}
server    {
    listen 172.18.46.151:82;
    root   /usr/share/nginx/multi_port_2;
}

# 构建主页

[root@localhost conf.d]# cd /usr/share/nginx/
[root@localhost nginx]# ls
html  modules  multi_ip_1  multi_ip_2
[root@localhost nginx]# mkdir multi_port_1
[root@localhost nginx]# mkdir multi_port_2
[root@localhost nginx]# echo "multi_port_1" > multi_port_1/index.html
[root@localhost nginx]# echo "multi_port_2" > multi_port_2/index.html

# 测试下
[root@localhost nginx]# systemctl restart nginx
[root@localhost nginx]# curl 172.18.46.151:81
multi_port_1
[root@localhost nginx]# curl 172.18.46.151:82
multi_port_2

方案3-基于多虚拟主机名

这种方式是用的比较多的。

# 其他影响的配置文件备份下
[root@localhost conf.d]# mv multi_host.conf{,.bak}
[root@localhost conf.d]# mv multi_ip.conf{,.bak}

# 编辑配置文件
[root@localhost conf.d]# cp multi_ip.conf multi_host.conf
[root@localhost conf.d]# vim multi_host.conf
[root@localhost conf.d]# cat multi_host.conf
server    {
    listen 80;
    server_name www.linuxpanda.tech;
    root   /usr/share/nginx/multi_host_1;
}
server    {
    listen 80;
    server_name blog.linuxpanda.tech;
    root   /usr/share/nginx/multi_host_2;
}

# 创建主页
[root@localhost conf.d]# cd /usr/share/nginx/
[root@localhost nginx]# ls
html  modules  multi_ip_1  multi_ip_2  multi_port_1  multi_port_2
[root@localhost nginx]# mkdir multi_host_1
[root@localhost nginx]# mkdir multi_host_2
[root@localhost nginx]# echo "multi_host_1" > multi_host_1/index.html
[root@localhost nginx]# echo "multi_host_2" > multi_host_2/index.html

# 测试
虚拟主机需要配合dns解析使用的, 我这里就简单点使用hosts文件解析了。
[root@localhost conf.d]# cat /etc/hosts
127.0.0.1   localhost localhost.localdomain localhost4 localhost4.localdomain4
::1         localhost localhost.localdomain localhost6 localhost6.localdomain6
192.168.46.151 www.linuxpanda.tech blog.linuxpanda.tech

[root@localhost conf.d]# systemctl restart nginx
[root@localhost conf.d]# curl www.linuxpanda.tech
multi_host_1
[root@localhost conf.d]# curl blog.linuxpanda.tech
multi_host_2
三、nginx支持https
1、安装nginx

[root@localhost ~]# yum install nginx

2、 配置

[root@localhost conf.d]# cd /etc/pki/tls/certs/
[root@localhost certs]# ls
ca-bundle.crt  ca-bundle.trust.crt  make-dummy-cert  Makefile  renew-dummy-cert
[root@localhost certs]# make www.crt
umask 77 ; \
/usr/bin/openssl genrsa -aes128 2048 > www.key
Generating RSA private key, 2048 bit long modulus
...................................+++
..........................+++
e is 65537 (0x10001)
Enter pass phrase:
Verifying - Enter pass phrase:
umask 77 ; \
/usr/bin/openssl req -utf8 -new -key www.key -x509 -days 365 -out www.crt
Enter pass phrase for www.key:
You are about to be asked to enter information that will be incorporated
into your certificate request.
What you are about to enter is what is called a Distinguished Name or a DN.
There are quite a few fields but you can leave some blank
For some fields there will be a default value,
If you enter '.', the field will be left blank.
-----
Country Name (2 letter code) [XX]:cn
State or Province Name (full name) []:henan
Locality Name (eg, city) [Default City]:zhenzhou
Organization Name (eg, company) [Default Company Ltd]:linuxpanda.tech
Organizational Unit Name (eg, section) []:opt
Common Name (eg, your name or your server's hostname) []:www.linuxpanda.tech
Email Address []:
[root@localhost certs]# ll
total 20
lrwxrwxrwx. 1 root root   49 Jan 11 01:00 ca-bundle.crt -> /etc/pki/ca-trust/extracted/pem/tls-ca-bundle.pem
lrwxrwxrwx. 1 root root   55 Jan 11 01:00 ca-bundle.trust.crt -> /etc/pki/ca-trust/extracted/openssl/ca-bundle.trust.crt
-rwxr-xr-x. 1 root root  610 Aug  4  2017 make-dummy-cert
-rw-r--r--. 1 root root 2516 Aug  4  2017 Makefile
-rwxr-xr-x. 1 root root  829 Aug  4  2017 renew-dummy-cert
-rw-------  1 root root 1359 Mar 15 18:00 www.crt
-rw-------  1 root root 1766 Mar 15 17:59 www.key
[root@localhost certs]# openssl rsa -in www.key -out www2.key
Enter pass phrase for www.key:
writing RSA key
[root@localhost certs]# ll
total 24
lrwxrwxrwx. 1 root root   49 Jan 11 01:00 ca-bundle.crt -> /etc/pki/ca-trust/extracted/pem/tls-ca-bundle.pem
lrwxrwxrwx. 1 root root   55 Jan 11 01:00 ca-bundle.trust.crt -> /etc/pki/ca-trust/extracted/openssl/ca-bundle.trust.crt
-rwxr-xr-x. 1 root root  610 Aug  4  2017 make-dummy-cert
-rw-r--r--. 1 root root 2516 Aug  4  2017 Makefile
-rwxr-xr-x. 1 root root  829 Aug  4  2017 renew-dummy-cert
-rw-r--r--  1 root root 1675 Mar 15 18:00 www2.key
-rw-------  1 root root 1359 Mar 15 18:00 www.crt
-rw-------  1 root root 1766 Mar 15 17:59 www.key
[root@localhost certs]# mkdir /etc/nginx/conf.d/ssl
[root@localhost certs]# cp www2.key /etc/nginx/conf.d/ssl/www.key
[root@localhost certs]# cp www.crt /etc/nginx/conf.d/ssl/
[root@localhost certs]# cd /etc/nginx/conf.d/
[root@localhost conf.d]# ls
bak  ssl  vhosts.conf
[root@localhost conf.d]# vim vhosts.conf
[root@localhost conf.d]# cat vhosts.conf
server {
    listen 443 ssl;
    server_name www.linuxpanda.tech;
    root /usr/share/nginx/multi_host_1;

    ssl on ;
    ssl_certificate /etc/nginx/conf.d/ssl/www.crt;
    ssl_certificate_key /etc/nginx/conf.d/ssl/www.key;
    ssl_session_cache  shared:sslcache:20m;
    ssl_session_timeout 10m;

}

3、 测试

[root@localhost conf.d]# curl https://www.linuxpanda.tech -k
multi_host_1
四、 nginx常用案例
1、 反向代理http和负载均衡
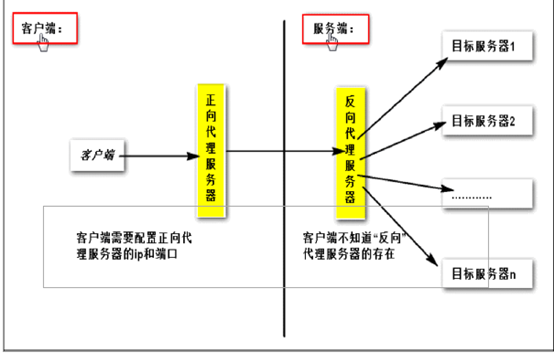
代理就是中介,那有反向代理就有正向代理,两者的区别是什么嘞?
正向代理隐藏真实客户端,服务端不知道实际发起请求的客户端.,proxy和client同属一个LAN,对server透明;
反向代理隐藏真实服务端,客户端不知道实际提供服务的服务端,proxy和server同属一个LAN,对client透明。
基本配置项
(1)proxy_pass
将当前请求反向代理到URL参数指定的服务器上
(2)proxy_method
表示转发时的协议方法名
proxy_method POST; 客户端转发来的GET请求在转发时方法名会改为POST请求
(3)proxy_redirect
当上游服务器返回的响应是重定向或者刷新请求(HTTP响应码是301或者302),可以重设HTTP头部的location或refresh
proxy_redirect http://location:8000/two/ http://location:8000/noe/
(4)proxy_next_upstream
当上游服务器请求出现错误,继续换一台服务器转发请求。
error:在与服务器建立连接,向其传递请求或读取响应标头时发生错误;
timeout:在与服务器建立连接,向其传递请求或读取响应头时发生超时
invalid_header:服务器返回空响应或无效响应;
http_500:服务器返回了带有代码500的响应;
http_502:服务器返回具有代码502的响应;
HTTP_503:服务器返回具有代码503的响应;
http_504:服务器返回具有代码504的响应;
http_403:服务器返回带有代码403的响应;
http_404:服务器返回具有代码404的响应;
off:禁用将请求传递到下一个服务器。
示例:
#当其中一台返回错误码404,500...等错误时,可以分配到下一台服务器程序继续处理,提高平台访问成功率,多可运用于前台程序负载,设置proxy_next_upstream
proxy_next_upstream http_500 | http_502 | http_503 | http_504 |http_404;
#proxy_next_upstream off 关闭向下转发请求
[root@localhost conf.d]# vim vhosts.conf

    upstream backend {
        server 172.18.46.152    weight=5;
        server 172.18.46.153;

    }

    server {
        listen 172.18.46.151:80;
        location / {
            proxy_pass http://backend;
        }
    }

[root@localhost conf.d]# for i in {1..10} ; do curl 172.18.46.151; done;
153
152
152
152
152
152
153
152
152
152

2、 反向代理mysql

stream {
    upstream mysqlsrvs {
    server 192.168.22.2:3306;
    server 192.168.22.3:3306;
    least_conn;
}
    server {
        listen 10.1.0.6:3306;
        proxy_pass mysqlsrvs;
    }
}

3、 动静分离

server {
        listen 80;
        server_name www.linuxpanda.tech.com;
        root /data/web1/;
        location / {
                proxy_pass http://172.18.46.152;
        }
        location ~* \.php$ {
                proxy_pass http://172.18.46.153;
        }
}

4、 防盗链

server {
        server_name www.b.com;
        root /data/web2;
        valid_referers none block server_names *.b.com  b.*  ~\.baidu\.;
        if ($invalid_referer) {
                return 403 http://www.magedu.com/;
        }
}

5、 代理服务器的缓存功能

server {
        listen 80;
        server_name www.linuxpanda.tech;
        root /data/web1/;

        proxy_cache proxycache;
        proxy_cache_key $request_uri;
        proxy_cache_valid 200 302 301 1h;
        proxy_cache_valid any 1m;

        add_header X-Via $server_addr;
        add_header X-Cache $upstream_cache_status;
        add_header X-Accel $server_name;

        location / {
                proxy_pass http://192.168.27.17;
                proxy_set_header X-Forwarded-For $proxy_add_x_forwarded_for;
        }

        location ~* \.php$ {
                proxy_pass http://192.168.27.6;
        }
}

 浙公网安备 33010602011771号