Spring详解(六)----基于XML的方式装配Bean
1、什么是Bean的装配
注:我们知道,在Spring中,IOC容器是存放Bean的地方,所以如果我们要想使用Bean,那么就应该先装配Bean然后将其放入IOC容器中,这样才有的用,当然放入容器的步骤不需要我们操作,但是Bean的装配是需要我们来操作的。
Bean的装配说简单点就是将对象以 Bean 的方式装配到 Spring IoC 容器中,也可以说是Bean的依赖注入。在 Spring 中提供了3种方法进行配置:
- 在Spring XML 中显示配置Bean(通过Spring的XML配置文件来装配Bean,现在基本不这么用了)。
- 通过注解 @Component+@Autowired 注解来自动装配Bean (常用)。
- 通过注解 @Configuration+@Bean 在类中实现装配Bean (常用)。这种方式在SpringBoot中会经常使用
在实际的工作中,这 3 种方式可能都会被用到,并且在学习和工作中常常混合使用,所以我们需要明确3种方式的优先级,也就是我们应该怎么选择使用哪种方式去把 Bean 装配到 Spring IoC 容器中。所以这里给出关于这 3 种方法优先级的建议(优先级从高到低):
- 基于约定优于配置的原则,最优先的应该是选择 第二种方式。这样的好处是减少程序开发者的决定权,简单又不失灵活,所以这种方式在我们的实际开发中用的最多。
- 在没有办法使用自动装配原则的情况下应该优先考虑 第三种方式,这样的好处是避免 XML 置的泛滥,也更为容易 。这种场景典型的例子是 一个父类有多个子类,比如学生类有两个子类,一个男学生类和女学生类,通过 IoC 容器初始化一个学生类,容器将无法知道使用哪个子类去初始化,这个时候可以使用 Java 的注解配置去指定。
- 如果上述的两种方法都无法使用的情况下,那么只能选择 第一种方式了。这种方式的好处就是简单易懂,对于初学者非常友好。这种场景的例子是由于现实工作中常常用到第三方的类库,有些类并不是我们开发的,我们无法修改里面的代码,这个时候就通过 XML 方式配置使用了。
本章都是通过 XML 的方式来配置 Bean,这样会更好的理解。使用 XML 装配 Bean 需要定义对应的XML,这里需要引入对应的 XML 模式(XSD)文件,这些文件会定义配置 Spring Bean 的一些元素。
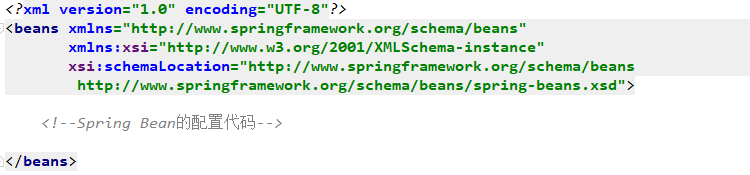
我们再来回顾一下,被Spring管理的对象统称为Bean,我们将这些对象让Spring去帮我们创建和管理,可以通过XML配置文件告诉Spring容器需要管理哪些Bean,Spring帮我们创建和组装好这些Bean对象;那么我们如何从Spring中获取想要的Bean对象呢,我们需要给Bean定义一个名称,Spring内部将这些名称和具体的Bean对象进行绑定,然后Spring容器可以通过这个的名称找对我们需要的对象,这个名称叫做Bean的名称,在一个Spring容器中需要是唯一的。这样我们就可以在里面定义对应的 Spring Bean了。
<?xml version="1.0" encoding="UTF-8"?>
<beans xmlns="http://www.springframework.org/schema/beans"
       xmlns:xsi="http://www.w3.org/2001/XMLSchema-instance"
       xsi:schemaLocation="http://www.springframework.org/schema/beans http://www.springframework.org/schema/beans/spring-beans.xsd">

    <!-- Spring Bean的配置XML文件 -->
    <bean id="bean唯一标识" name="bean的名称" class="完整类型名称"/>
    <import resource="引入其他bean xml配置文件" />
    <alias name="bean标识" alias="别名" />

</beans>
标签介绍:
- beans元素:它是根元素,可以包含任意数量的import、bean、alias元素。
- bean元素:用来定义一个bean对象。其中属性 id和name都是用来作为bean的唯一标识,在Spring容器中必须唯一,否则会报错,用来让Spring找到这个Bean,class属性则是将哪个类装配为一个Bean。
- 补充--关于bean元素中 id和name的区别:
- 当id存在的时候,不管name有没有,取id为bean的名称
- 当id不存在,此时需要看name,name的值可以通过 ,;或者空格 分割,最后会按照分隔符得到一个String数组,数组的第一个元素作为bean的名称,其他的作为bean的别名
- 当id和name都存在的时候,id为bean名称,name用来定义多个别名
- 当id和name都不指定的时候,bean名称自动生成,Spring 将会采用“类全限定名#{number}“的格式生成编号。例如这里,如果没有声明 “id="user"的话,那么 Spring 为其生成的编号就是"com.thr.pojo.User#0”,当它第二次声明没有 id 属性的 Bean 时,编号就是"com.thr.pojo.User#1",后面以此类推。但是我们一般都会显示声明自定义的id,因为自动生成的id比较繁琐,不便于维护。
- alias元素:alias元素也可以用来给某个bean定义别名。
- import元素:当我们的系统比较大的时候,会分成很多模块,每个模块会对应一个bean xml文件,我们可以在一个总的bean xml中对其他bean xml进行汇总,相当于把多个bean xml的内容合并到一个里面了,可以通过import元素引入其他bean配置文件。
2、回顾依赖注入的三种方式
在前面第三篇文章中(Spring详解(三)——认识IoC控制反转/DI依赖注入)介绍了什么是依赖注入和它们的简单应用,依赖注入有3种方式分别是:
- 构造器注入
- setter方法注入
- 接口注入
其中构造器注入和setter注入是最主要的方式,下面简单回顾一下,这样对的话理解Bean的装配会更加容易。
2.1 构造器注入
构造器注入:顾名思义就是被注入对象可以通过在其构造方法中声明依赖对象的参数列表,让外部(通常是IoC容器)知道它需要哪些依赖对象。
在大部分的情况下,我们都是通过类的构造方法来创建类对象, Spring 也可以采用反射的方式, 通过使用构造方法来完成注入,这就是构造器注入的原理。
首先要创建一个具体的类、构造方法并设置对应的参数,这里以User为例:
/**
 * 用户实体类
 */
public class User {
    private int userId;
    private String userName;
    private int userAge;
    private String userPwd;
    private String userAddress;

    //getter、setter、toString方法省略......

    //有参构造器
    public User(int userId, String userName, int userAge,
                String userPwd, String userAddress) {
        this.userId = userId;
        this.userName = userName;
        this.userAge = userAge;
        this.userPwd = userPwd;
        this.userAddress = userAddress;
    }

}
如果我们在实体类中创建了有参的构造器,而没有显示的创建无参构造器,那么是不能再通过无参的构造器创建对象了,为了使 Spring 能够正确创建这个对象,可以像如下Spring配置去做。
<?xml version="1.0" encoding="UTF-8"?>
<beans xmlns="http://www.springframework.org/schema/beans"
       xmlns:xsi="http://www.w3.org/2001/XMLSchema-instance"
       xsi:schemaLocation="http://www.springframework.org/schema/beans http://www.springframework.org/schema/beans/spring-beans.xsd">

    <!--将指定类都配置给Spring,让Spring创建其对象的实例,一个bean对应一个对象
    如果类中创建了有参构造器,必须完成初始化-->
    <bean id="user" class="com.thr.pojo.User">
        <constructor-arg index="0" value="2020"/>
        <constructor-arg index="1" value="菜逼唐"/>
        <constructor-arg index="2" value="18"/>
        <constructor-arg index="3" value="123456"/>
        <constructor-arg index="4" value="地球中国"/>
    </bean>
</beans>
constructor-arg元素用于定义类构造方法的参数,其中index 用于定义参数的位置(从0开始),而 value 则是设置值,通过这样的定义 Spring 便知道使用 哪个构造方法去创建对象了。虽然这样注入还是比较简单的,但是缺点也很明显,由于这里的参数比较少,所以可读性还是不错的,但是如果参数很多,那么这种构造方法就比较复杂了,这个时候应该考虑 setter 注入。
2.2 setter方法注入
setter方法注入:setter 注入是 Spring 中最主流的注入方式,它利用 Java Bean 规范所定义的 setter 方法来完成注入,灵活且可读性高。它消除了使用构造器注入时出现多个参数的可能性,首先可以把构造方法声明为无参数的,然后使用 setter 注入为其设置对应的值,其实也是通过 Java 反射技术得以现实的。这里去掉上面User类中的有参数的构造方法,然后做如下的Spring配置。
    <bean id="user1" class="com.thr.pojo.User">
        <property name="userId" value="2020"/>
        <property name="userName" value="菜逼唐"/>
        <property name="userAge" value="18"/>
        <property name="userPwd" value="123456"/>
        <property name="userAddress" value="地球中国"/>
    </bean>
这样Spring就会通过反射调用没有参数的构造方法生成对象,同时通过反射对应的setter注入配置的值了。这种方式是Spring最主要的方式,在实际的工作中是最常用的,所以下面都是基于setter方法注入的举例。
2.3 接口注入
接口注入:接口注入是现在非常不提倡的一种方式,这种方式基本处于“退役状态”。因为它强制被注入对象实现不必要的接口,带有侵入性。而构造方法注入和setter方法注入则不需要如此,所以现在我们一般推荐使用构造器注入和setter注入。
3、装配简单类型值的Bean
这里先来讨论最简单的装配,比如基本的属性和对象,代码如下:
/**
 * 用户实体类
 */
public class User {
    private int userId;
    private String userName;
    private int userAge;
    private String userPwd;
    private String userAddress;
    //女朋友
    private GirlFriend girlFriend;
    //getter、setter、toString方法省略......
}
GirlFriend实体:
/**
 * GirlFriend实体
 */
public class GirlFriend {
    private String girlName;
    private int girlAge;
    private String girlHeight;
    //getter、setter、toString方法省略......
}
Spring的xml配置文件:
<?xml version="1.0" encoding="UTF-8"?>
<beans xmlns="http://www.springframework.org/schema/beans"
       xmlns:xsi="http://www.w3.org/2001/XMLSchema-instance"
       xsi:schemaLocation="http://www.springframework.org/schema/beans
        http://www.springframework.org/schema/beans/spring-beans.xsd">

    <!--实例化GirlFriend-->
    <bean id="girlFriend" class="com.thr.pojo.GirlFriend">
        <property name="girlName" value="王美丽"/>
        <property name="girlAge" value="18"/>
        <property name="girlHeight" value="170"/>
    </bean>

    <!--实例化User-->
    <bean id="user1" class="com.thr.pojo.User">
        <!--注入普通值:使用 value 属性-->
        <property name="userId" value="2020"/>
        <property name="userName" value="菜逼唐"/>
        <property name="userAge" value="18"/>
        <property name="userPwd" value="123456"/>
        <property name="userAddress" value="地球中国"/>
        <!--注入对象:使用 ref 属性-->
        <property name="girlFriend" ref="girlFriend"/>
    </bean>
</beans>
上面就是一个最简单最基本的配置Bean了,这里简单来解释一下:
- id 属性是标识符(别名),用来让Spring找到这个Bean,id属性不是一个必须的属性,如果我们没有声明它,那么 Spring 将会采用“全限定名#{number}“的格式生成编号。例如这里,如果没有声明 “id="user"的话,那么 Spring 为其生成的编号就是"com.thr.pojo.User#0”,当它第二次声明没有 id 属性的 Bean 时,编号就是"com.thr.pojo.User#1",后面以此类推。但是我们一般都会显示声明自定义的id,因为自动生成的id比较繁琐,不便于维护。
- class 属性显然就是一个类的全限定名 。
- property 元素是定义类的属性,其中的 name 属性定义的是属性的名称,而 value 是它的值,ref 是用来引入另一个Bean对象的。
简单来测试一下,测试代码如下:
public class SpringTest {
    public static void main(String[] args) {
        //1.初始化Spring容器,加载配置文件
        ApplicationContext applicationContext = new ClassPathXmlApplicationContext("applicationContext.xml");
        //2.通过容器获取实例,getBean()方法中的参数是bean标签中的id
        User user =  applicationContext.getBean("user1", User.class);
        //3.调用实例中的属性
        System.out.println(user.getUserName()+"------"+user.getGirlFriend());
    }
}
运行结果:

最后注意:注入基本值使用 value 属性,引入另一个Bean对象使用 ref 属性。
4、装配集合类型的Bean
有些时候我们需要装配一些复杂的Bean,比如 Set、Map、List、Array 和 Properties 等,所以我们将上面的User改一下,假如这个User是个“海王”呢?他有好几个GirlFriend。我们对User类添加了一些属性(记得更改setter、getter和tostring方法):
/**
 * 用户实体类
 */
public class User {
    private int userId;
    private String userName;
    private int userAge;
    private String userPwd;
    private String userAddress;
    //女朋友
    private GirlFriend girlFriend;

    private List<GirlFriend> lists;
    private Set<GirlFriend> sets;
    private Map<String, GirlFriend> maps;
    private Properties properties;
    private String[] array;
    //getter、setter、toString方法省略......
}
Spring的xml配置:
<?xml version="1.0" encoding="UTF-8"?>
<beans xmlns="http://www.springframework.org/schema/beans"
       xmlns:xsi="http://www.w3.org/2001/XMLSchema-instance"
       xsi:schemaLocation="http://www.springframework.org/schema/beans
        http://www.springframework.org/schema/beans/spring-beans.xsd">

    <!--实例化GirlFriend-->
    <bean id="girlFriend1" class="com.thr.pojo.GirlFriend">
        <property name="girlName" value="王美丽"/>
        <property name="girlAge" value="18"/>
        <property name="girlHeight" value="170"/>
    </bean>
    <bean id="girlFriend2" class="com.thr.pojo.GirlFriend">
        <property name="girlName" value="杨美丽"/>
        <property name="girlAge" value="19"/>
        <property name="girlHeight" value="171"/>
    </bean>
    <bean id="girlFriend3" class="com.thr.pojo.GirlFriend">
        <property name="girlName" value="李美丽"/>
        <property name="girlAge" value="20"/>
        <property name="girlHeight" value="172"/>
    </bean>

    <!--实例化User-->
    <bean id="user2" class="com.thr.pojo.User">
        <!--注入普通值:使用 value 属性-->
        <property name="userId" value="2020"/>
        <property name="userName" value="菜逼唐"/>
        <property name="userAge" value="18"/>
        <property name="userPwd" value="123456"/>
        <property name="userAddress" value="地球中国"/>
        <!--注入对象:使用 ref 属性-->
        <property name="girlFriend" ref="girlFriend1"/>

        <!--注入List集合-->
        <property name="lists">
            <list>
                <ref bean="girlFriend1"/>
                <ref bean="girlFriend2"/>
                <ref bean="girlFriend3"/>
            </list>
        </property>
        <!--注入Set集合-->
        <property name="sets">
            <set>
                <ref bean="girlFriend1"/>
                <ref bean="girlFriend2"/>
                <ref bean="girlFriend3"/>
            </set>
        </property>
        <!--注入Map集合-->
        <property name="maps">
            <map>
                <entry key="正牌女友" value-ref="girlFriend1"/>
                <entry key="备胎1" value-ref="girlFriend2"/>
                <entry key="备胎2" value-ref="girlFriend3"/>
            </map>
        </property>
        <!--注入Properties-->
        <property name="properties">
            <props>
                <prop key="k1">v1</prop>
                <prop key="k2">v2</prop>
            </props>
        </property>
        <!--注入数组-->
        <property name="array">
            <array>
                <value>value1</value>
                <value>value2</value>
                <value>value3</value>
            </array>
        </property>
    </bean>
</beans>
对集合的装配进行总结:
- List 属性使用对应的 <list> 元素进行装配,然后通过多个 <value> 元素设值,如果是bean则通过<ref>元素设值。
- Set 属性使用对应的 <set> 元素进行装配,然后通过多个 <value> 元素设值,如果是bean则通过<ref>元素设值。
- Map 属性使用对应的 <map> 元素进行装配,然后通过多个 <entry> 元素设值,entry 中包含一个键值对(key-value)的设置,普通值使用key和value,bean使用key-ref和value-ref设值。
- Properties 属性使用对应的 <properties> 元素进行装配,通过多个 <property> 元素设值,只是 properties 元素有一个必填属性 key ,然后可以设置值
- 对于数组而言,可以使用 <array> 设置值,然后通过多个 <value> 元素设值。
简单来测试一下,测试代码如下:
public class SpringTest {
    public static void main(String[] args) {
        //1.初始化Spring容器,加载配置文件
        ApplicationContext applicationContext = new ClassPathXmlApplicationContext("applicationContext.xml");
        //2.通过容器获取实例,getBean()方法中的参数是bean标签中的id
        User user =  applicationContext.getBean("user2", User.class);
        //3.调用实例中的属性
        System.out.println("List集合:"+user.getLists());
        System.out.println("Set集合:"+user.getSets());
        System.out.println("Map集合:"+user.getMaps());
        System.out.println("Properties:"+user.getProperties());
        System.out.println("数组:");
        String[] array = user.getArray();
        for (String s : array) {
            System.out.println(s);
        }
    }
}
运行结果:

5、命名空间装配 Bean (了解)
除了使用上述的的方法来装配Bean之外,Spring还提供了对应的命名空间的定义。
- c 命名空间:用于通过构造器注入的方式来配置 bean
- p 命名空间:用于通过setter的注入方式来配置 bean
- util 命名空间:工具类的命名空间,可以简化集合类元素的配置
下面来简单介绍。要使用它们首先得犹如对应的命名空间和XML模式(XSD)文件。
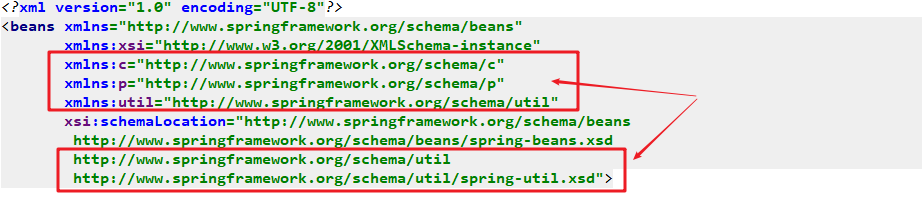
示例代码:
<?xml version="1.0" encoding="UTF-8"?>
<beans xmlns="http://www.springframework.org/schema/beans"
       xmlns:xsi="http://www.w3.org/2001/XMLSchema-instance"
       xmlns:c="http://www.springframework.org/schema/c"
       xmlns:p="http://www.springframework.org/schema/p"
       xmlns:util="http://www.springframework.org/schema/util"
       xsi:schemaLocation="http://www.springframework.org/schema/beans
        http://www.springframework.org/schema/beans/spring-beans.xsd
        http://www.springframework.org/schema/util
        http://www.springframework.org/schema/util/spring-util.xsd">

    <!--c 命名空间 实例化GirlFriend,给GirlFriend显示的创建了一个无参和有参构造器-->
    <bean id="girlFriend1" class="com.thr.pojo.GirlFriend" c:_0="王美丽" c:_1="18" c:_2="170"/>

    <!--p 命名空间 实例化GirlFriend-->
    <bean id="girlFriend2" class="com.thr.pojo.GirlFriend" p:girlName="杨美丽" p:girlAge="20" p:girlHeight="168"/>


    <!--util 命名空间-->
    <!--List集合-->
    <util:list id="lists">
        <ref bean="girlFriend1"/>
        <ref bean="girlFriend2"/>
    </util:list>
    <!--Set集合-->
    <util:set id="sets">
        <ref bean="girlFriend1"/>
        <ref bean="girlFriend2"/>
    </util:set>
    <!--Map集合-->
    <util:map id="maps">
        <entry key="第一个女友" value-ref="girlFriend1"/>
        <entry key="第二个女友" value-ref="girlFriend2"/>
    </util:map>
    <!--Properties集合-->
    <util:properties id="properties">
        <prop key="k1">v1</prop>
    </util:properties>
    <!--实例化User-->
    <bean id="user3" class="com.thr.pojo.User"
          p:userId="2020"
          p:userName="菜逼唐"
          p:userAge="18"
          p:userPwd="123456"
          p:userAddress="地球中国"
          p:girlFriend-ref="girlFriend1"
          p:lists-ref="lists"
          p:sets-ref="sets"
          p:maps-ref="maps"
          p:properties-ref="properties">

    </bean>
</beans>
总结:
- c 命名空间:用于通过构造器注入的方式来配置 bean,c:_0 表示构造方法的第一个参数,c:_1 表示构造方法的第而个参数,以此类推。
- p 命名空间:用于通过setter的注入方式来配置 bean,p:属性名 表示为属性设值,p:list-ref 表示采用List属性,引用其上下文对应好的Bean,这里显然是util命名空间定义的List,Map和Set同理。
- util 命名空间:工具类的命名空间,可以简化集合类元素的配置。下表提供了 util-命名空间提供的所有元素:
| util元素 | 描述 |
|---|---|
| <util:constant> | 引用某个类型的 public static 域,并将其暴露为 bean |
| <util:list> | 创建一个 java.util.List 类型的 bean,其中包含值或引用 |
| <util:map> | 创建一个 java.util.map 类型的 bean,其中包含值或引用 |
| <util:properties> | 创建一个 java.util.Properties 类型的 bean |
| <util:property-path> | 引用一个 bean 的属性(或内嵌属性),并将其暴露为 bean |
| <util:set> | 创建一个 java.util.Set 类型的 bean,其中包含值或引用 |
6、Bean的自动装配
注意:Bean的自动装配只针对引用类型而言,什么意思呢?例如上面的User类中,需要用到GirlFriend这个类,所以此时可以就可以使用自动装配
6.1、自动装配的几种方式
上面介绍了在XML中如何手动来配置Bean,而在Spring 容器中给我们提供了完成 Bean之间的自动装配的功能(但是只针对对象类型的自动装配),这样的好处就是有助于减少编写一个大的基于 Spring 的应用程序的 XML 配置的数量,因为在稍微大一点的项目中,一个被引用的 Bean 的 ID 改变了,那么需要修改所有引用了它的 ID 。Spring框架默认是不支持自动装配的,可以使用Spring的配置文件中< bean >元素的 autowire 属性为一个 bean 定义指定自动装配模式。其中<bean>元素中的autowire属性有5个可选值,如下:
属性 |
描述 |
|---|---|
| no | 默认的设置,表示不启用自动装配,需要我们手动通过"ref"属性手动完成装配 |
| byName | 通过属性名称自动装配,如果一个JavaBean中的属性名称与Bean的id 相同,则自动装配这个Bean到JavaBean的属性中。Spring会查找该JavaBean中所有的set方法名,获得将set去掉并且首字母小写的字符串,然后去Spring容器中寻找是否有此字符串名称id 的Bean。如果有则就注入,如果没有则注入动作将不会执行 |
| byType | 通过属性类型自动装配。Spring会在容器中查找JavaBean中的属性类型与Bean的类型一致的Bean,并自动装配这个Bean到JavaBean的属性中,如果容器中包含多个这个类型的Bean,Spring将抛出异常。如果没有找到这个类型的Bean,那么注入动作将不会执行 |
| constructor | 类似于byType,也是通过类型自动装配,但是它是通过构造方法的参数类型来匹配。Spring会寻找与该JavaBean构造方法的各个参数类型相匹配的Bean,然后通过构造函数注入进来。如果在Spring容器中没有找一个构造函数参数类型的 Bean,则会报错 |
| autodetect | 表示在constructor和byType之间自动的选择注入方式(spring5.x已经没有了)。首先尝试通过 constructor 来自动装配,如果它不执行,则Spring 尝试通过 byType 来自动装配 |
| default | 由上级标签beans的default-autowire属性确定 |
6.2、简单举例代码
编写User代码:
/**
 * 用户实体类
 */
public class User {
    private int userId;
    private String userName;
    private int userAge;
    private String userPwd;
    private String userAddress;
    //女朋友
    private GirlFriend girlFriend;

    public User() {
    }

    public User(int userId, String userName, int userAge, String userPwd,
                String userAddress, GirlFriend girlFriend) {
        this.userId = userId;
        this.userName = userName;
        this.userAge = userAge;
        this.userPwd = userPwd;
        this.userAddress = userAddress;
        this.girlFriend = girlFriend;
    }

    //getter、setter、toString方法省略......
}
编写GirlFriend类代码:
/**
 * GirlFriend实体
 */
public class GirlFriend {
    private String girlName;
    private int girlAge;
    private String girlHeight;

    //getter、setter、toString方法省略......
}
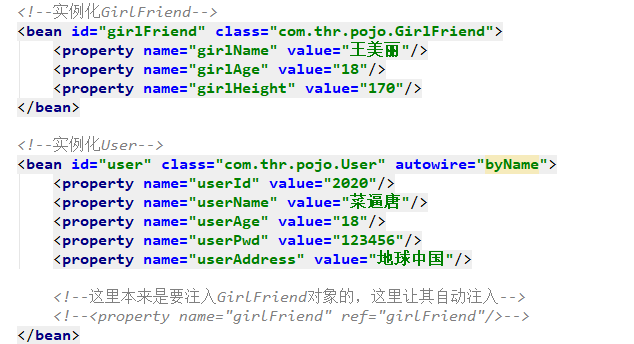
补充:Spring的xml配置文件
<?xml version="1.0" encoding="UTF-8"?>
<beans xmlns="http://www.springframework.org/schema/beans"
xmlns:xsi="http://www.w3.org/2001/XMLSchema-instance"
xsi:schemaLocation="http://www.springframework.org/schema/beans
http://www.springframework.org/schema/beans/spring-beans.xsd">
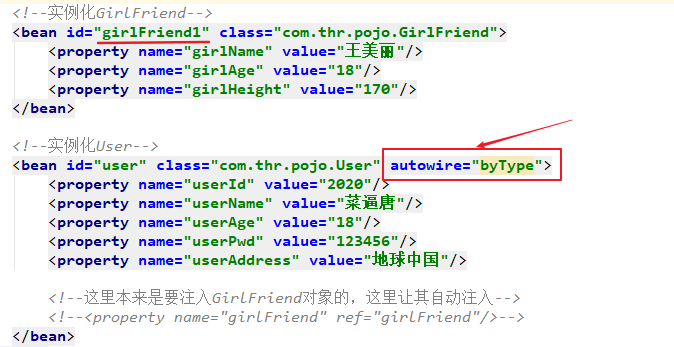
<!--实例化GirlFriend-->
<bean id="girlFriend" class="com.thr.pojo.GirlFriend">
<property name="girlName" value="王美丽"/>
<property name="girlAge" value="18"/>
<property name="girlHeight" value="170"/>
</bean>
<!--实例化User-->
<bean id="user" class="com.thr.pojo.User" autowire="byType">
<!--注入普通值:使用 value 属性-->
<property name="userId" value="2020"/>
<property name="userName" value="菜逼唐"/>
<property name="userAge" value="18"/>
<property name="userPwd" value="123456"/>
<property name="userAddress" value="地球中国"/>
<!--这里本来是手动注入GirlFriend对象,但是现在让其自动注入,因为上面配置了 autowire="byType" -->
<!-- <property name="girlFriend" ref="girlFriend"/> -->
</bean>
</beans>
测试代码:
/**
 * 测试代码
 */
public class SpringTest {
    public static void main(String[] args) {
        //1.初始化Spring容器,加载配置文件
        ApplicationContext applicationContext = new ClassPathXmlApplicationContext("applicationContext.xml");
        //2.通过容器获取实例,getBean()方法中的参数是bean标签中的id
        User user =  applicationContext.getBean("user", User.class);
        //3.调用实例中的属性
        System.out.println(user.getUserName()+"-----"+user.getGirlFriend());
    }
}
6.3、byName装配
byName装配是根据属性的名称自动装配,如果一个JavaBean中的属性名称与Bean的id 相同,则自动装配这个Bean到JavaBean的属性中。Spring会查找该JavaBean中所有的set方法名,获得将set去掉并且首字母小写的字符串,然后去Spring容器中寻找是否有此字符串名称id 的Bean。如果有则就注入,如果没有则注入动作将不会执行。
applicationContext.xml配置内容为:
运行测试代码,查看控制台输出:

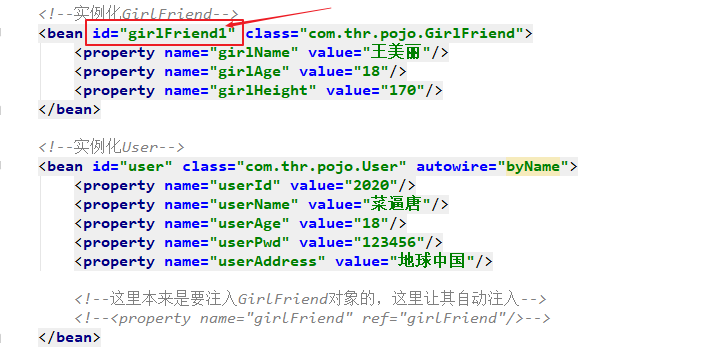
可以发现根据名称自动配置成功了,User类中girlFriend属性自动找到了 id 为 girlFriend 的 Bean,而配置文件中如果没有定义 id 为 girlFriend 的 Bean则会自动装配失败,例如,修改xml中Bean id为girlFriend1,更改后如下所示:
再次运行测试代码,查看控制台输出:

可以发现如果没有找到这个bean,那么就不装配。
6.4、byType装配
byType装配表示通过属性类型自动装配。Spring会在容器中查找JavaBean中的属性类型与Bean的类型一致的Bean,并自动装配这个Bean到JavaBean的属性中,如果容器中包含多个这个类型的Bean,Spring将抛出异常。如果没有找到这个类型的Bean,那么注入动作将不会执行。
我们将前面Spring配置文件中的autowire属性修改为byType:
运行测试代码,查看控制台输出:

注意:使用byType首先需要保证同一类型的Bean在Spring容器中是唯一的,若不唯一则会产生歧义,Spring容器不知道选择哪个实例注入,所以后面会报异常。
假如这里出现了两个,那么 Spring 则不知道选择哪个,此时会报错:
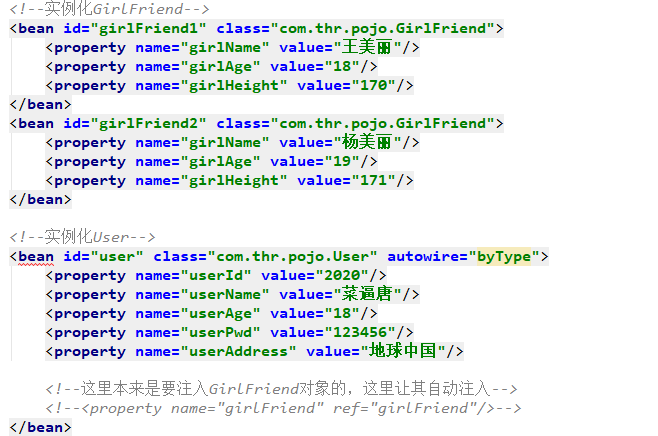
运行测试代码,查看控制台输出:

所以,如果一旦选择了byType类型的自动装配,就必须确认配置文件中每个数据类型定义一个唯一的bean。
6.5、constructor装配
constructor装配类似于byType,也是通过类型自动装配,但是它是通过构造方法的参数类型来匹配。Spring会寻找与该JavaBean构造方法的各个参数类型相匹配的Bean,然后通过构造函数注入进来。如果在Spring容器中没有找一个构造函数参数类型的 Bean,则会报错。
applicationContext.xml配置内容为:

运行测试代码,查看控制台输出:

constructor自动装配具有和byType自动装配相同的局限性,就是当发现多个Bean匹配该JavaBean构造方法的类型时,Spring不知道用哪个Bean来装配,所以会导致装配失败。此外,如果一个JavaBean有多个构造方法,它们都满足自动装配的条件时,那么Spring也不会知道构造方法更适合使用,所以我们基本不会使用constructor装配。
6.6、default装配
default装配表示由父级标签beans的default-autowire属性来配置。如果beans标签上设置了default-autowire属性,那么default-autowire属性会统一配置当前beans中的所有bean的自动装配方式。

- 如果子标签<bean>没有单独的设置autowire属性,那么将采用父标签的default-autowire属性的模式。
- 如果子标签<bean>单独设置了autowire属性,则采用自己的模式。
6.7、Bean自动装配的补充
- [1]、上述的讲到byType和constructor装配是支持数组和强类型集合(即指定了集合元素类型)。如bean A有个属性定义是List<Foo>类型,Spring会在容器中查找所有类型为Foo的bean,注入到该属性。记住是Foo,不是List。另外如果集合是Map集合,那么Map的key必须是String类型,Spring会根据value的类型去匹配。例如有属性bean A中有一个属性为Map<String, Foo> p,容器中有bean B和C类型均为Foo,那么A实例化完成后,p属性的值为:{"B":B的实例对象,"C":C的实例对象}。
- [2]、虽然autowrie给我们带来配置的便利性,但是也有缺点,比如会导致bean的关系没那么显而易见,所以用autowire还是ref还是需要根据项目来决定。
- [3]、autowire-candidate:前面我们说到配置有autowire属性的bean,Spring在实例化这个bean的时候会在容器中查找匹配的bean对autowire bean进行属性注入,这些被查找的bean我们称为候选bean。作为候选bean,我凭什么就要被你用,老子不给你用。所以候选bean给自己增加了autowire-candidate="false"属性(默认是true),那么容器就不会把这个bean当做候选bean了,即这个bean不会被当做自动装配对象。同样,<beans/>标签可以定义default-autowire-candidate="false"属性让它包含的所有bean都不做为候选bean。我的地盘我做主。
参考资料:
- 《Java EE 互联网轻量级框架整合开发》
- 《Spring 实战》(第四版)

 浙公网安备 33010602011771号