Jetpack的ViewModel与LiveData
本文基于SDK 29
一、ViewModel与LiveData的作用:
1、viewModel:
数据共享,屏幕旋转不丢失数据,并且在Activity与Fragment之间共享数据。
2、LiveData:
感知生命周期并且通知观察者刷新,防止内存泄漏。
二、用法
三、原理:
1、ViewModel:
ViewModelProviders.of(this).get(MyViewModel::class.java)
我们通过这个方法来构造ViewModel。
@NonNull
@MainThread
public static ViewModelProvider of(@NonNull FragmentActivity activity) {
    return of(activity, null);
}

/**
 * Creates a {@link ViewModelProvider}, which retains ViewModels while a scope of given Activity
 * is alive. More detailed explanation is in {@link ViewModel}.
 * <p>
 * It uses the given {@link Factory} to instantiate new ViewModels.
 *
 * @param activity an activity, in whose scope ViewModels should be retained
 * @param factory  a {@code Factory} to instantiate new ViewModels
 * @return a ViewModelProvider instance
 */
@NonNull
@MainThread
public static ViewModelProvider of(@NonNull FragmentActivity activity,
        @Nullable Factory factory) {
    Application application = checkApplication(activity);
    if (factory == null) {
        factory = ViewModelProvider.AndroidViewModelFactory.getInstance(application);
    }
    return new ViewModelProvider(activity.getViewModelStore(), factory);
}
从源码中可以看出,ViewModelProviders.of(this)获取了一个ViewModelProvider 对象,而该对象中持有一个ViewModelProvider.AndroidViewModelFactory(因为我们传进入的是null)
和activity.getViewModelStore()。
private final Factory mFactory;
private final ViewModelStore mViewModelStore;

public ViewModelProvider(@NonNull ViewModelStore store, @NonNull Factory factory) {
    mFactory = factory;
    this.mViewModelStore = store;
}
我们再来看看ViewModelStore这个类,从名字中已经可以看出它的用途,那便是存储ViewModel。
public class ViewModelStore {
    private final HashMap<String, ViewModel> mMap = new HashMap<>();
    final void put(String key, ViewModel viewModel) {
        ViewModel oldViewModel = mMap.put(key, viewModel);
        if (oldViewModel != null) {
            oldViewModel.onCleared();
        }
    }
    final ViewModel get(String key) {
        return mMap.get(key);
    }
    /**
     *  Clears internal storage and notifies ViewModels that they are no longer used.
     */
    public final void clear() {
        for (ViewModel vm : mMap.values()) {
            vm.onCleared();
        }
        mMap.clear();
    }
}
我们的ViewModel便是存储在上面的HashMap中。
接下来我们再来看ViewModelProviders.of(this).get(MyViewModel::class.java)的get方法:
 @NonNull
 @MainThread
 public <T extends ViewModel> T get(@NonNull Class<T> modelClass) {
     String canonicalName = modelClass.getCanonicalName();
     if (canonicalName == null) {
         throw new IllegalArgumentException("Local and anonymous classes can not be ViewModels");
     }
     return get(DEFAULT_KEY + ":" + canonicalName, modelClass);
 }

@NonNull
@MainThread
public <T extends ViewModel> T get(@NonNull String key, @NonNull Class<T> modelClass) {
    ViewModel viewModel = mViewModelStore.get(key);
    if (modelClass.isInstance(viewModel)) {
        //noinspection unchecked
        return (T) viewModel;
    } else {
        //noinspection StatementWithEmptyBody
        if (viewModel != null) {
            // TODO: log a warning.
        }
    }
    viewModel = mFactory.create(modelClass);
    mViewModelStore.put(key, viewModel);
    //noinspection unchecked
    return (T) viewModel;
}
可以看出,所以会去存储ViewModel的ViewModelStore中拿,发现已经有了便直接返回,如果没有的话,那边使用mFactory工厂进行构建,然后再放进ViewModelStore中。
从之前的分析可以看出,这里的mFactory便是AndroidViewModelFactory。
@NonNull
@Override
public <T extends ViewModel> T create(@NonNull Class<T> modelClass) {
    if (AndroidViewModel.class.isAssignableFrom(modelClass)) {
        //noinspection TryWithIdenticalCatches
        try {
            return modelClass.getConstructor(Application.class).newInstance(mApplication);
        } catch (NoSuchMethodException e) {
            throw new RuntimeException("Cannot create an instance of " + modelClass, e);
        } catch (IllegalAccessException e) {
            throw new RuntimeException("Cannot create an instance of " + modelClass, e);
        } catch (InstantiationException e) {
            throw new RuntimeException("Cannot create an instance of " + modelClass, e);
        } catch (InvocationTargetException e) {
            throw new RuntimeException("Cannot create an instance of " + modelClass, e);
        }
    }
    return super.create(modelClass);
}
其实该工厂也只是直接实例出该类而已。
此时我们便已经拿到了ViewModel。
可是它是怎么做到旋转屏幕的时候数据共享的呢。
@NonNull
@MainThread
public static ViewModelProvider of(@NonNull FragmentActivity activity,
        @Nullable Factory factory) {
    Application application = checkApplication(activity);
    if (factory == null) {
        factory = ViewModelProvider.AndroidViewModelFactory.getInstance(application);
    }
    return new ViewModelProvider(activity.getViewModelStore(), factory);
}
在获取ViewModelProvider的时候传进去了activity.getViewModelStore(),那我们看一下activity.getViewModelStore()是怎么获取ViewModelStore的。
@NonNull
@Override
public ViewModelStore getViewModelStore() {
    if (getApplication() == null) {
        throw new IllegalStateException("Your activity is not yet attached to the "
                + "Application instance. You can't request ViewModel before onCreate call.")
    }
    if (mViewModelStore == null) {
        NonConfigurationInstances nc =
                (NonConfigurationInstances) getLastNonConfigurationInstance();
        if (nc != null) {
            // Restore the ViewModelStore from NonConfigurationInstances
            mViewModelStore = nc.viewModelStore;
        }
        if (mViewModelStore == null) {
            mViewModelStore = new ViewModelStore();
        }
    }
    return mViewModelStore;
}
关键的代码在于这一句:NonConfigurationInstances nc = (NonConfigurationInstances) getLastNonConfigurationInstance();
static final class NonConfigurationInstances {
        Object activity;
        HashMap<String, Object> children;
        FragmentManagerNonConfig fragments;
        ArrayMap<String, LoaderManager> loaders;
        VoiceInteractor voiceInteractor;
    }
    /* package */ NonConfigurationInstances mLastNonConfigurationInstances;

@Nullable
public Object getLastNonConfigurationInstance() {
    return mLastNonConfigurationInstances != null
            ? mLastNonConfigurationInstances.activity : null;
}
将mLastNonConfigurationInstances.activity强转成FragmentActivity中的一个类:NonConfigurationInstances,然后获取ViewModelStore
static final class NonConfigurationInstances {
    Object custom;
    ViewModelStore viewModelStore;
    FragmentManagerNonConfig fragments;
}
getLastNonConfigurationInstance就是获取Activity的mLastNonConfigurationInstances对象。mLastNonConfigurationInstances的作用是当屏幕旋转或者配置更改导致Activity发生重建的时候,将上一次的非配置实例传递给新创建的Activity实例,以便恢复之前的状态。
如果mLastNonConfigurationInstances存在,那么就说明Activity是由于配置更改或者旋转屏幕导致了重建,直接从其中获取ViewModelStore,ViewModelStore保存着上一次的ViewModel,因此做到不重新创建ViewModel
销毁:
getLifecycle().addObserver(new LifecycleEventObserver() {
    @Override
    public void onStateChanged(@NonNull LifecycleOwner source,
            @NonNull Lifecycle.Event event) {
        if (event == Lifecycle.Event.ON_DESTROY) {
            // Clear out the available context
            mContextAwareHelper.clearAvailableContext();
            // And clear the ViewModelStore
            if (!isChangingConfigurations()) {
                getViewModelStore().clear();
            }
        }
    }
});
调用路径如下:

依赖于LifeCycle
2、LivaData
我们先看这个语句:
viewModel?.livaData?.observe(this, Observer<Int> { integer -> Log.d("MainActivity", integer!!.toString()) })
从这个语句往源码里面探究:
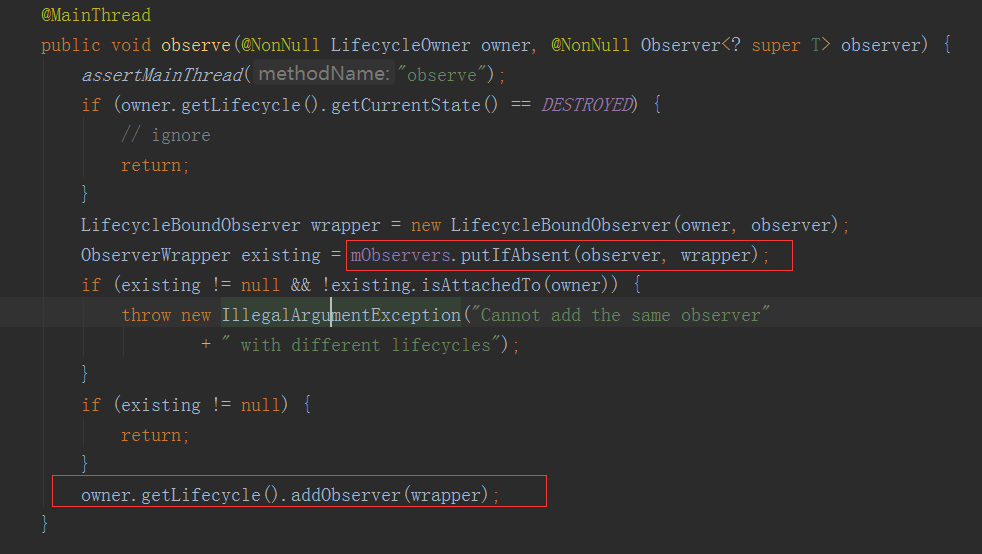
@MainThread
public void observe(@NonNull LifecycleOwner owner, @NonNull Observer<? super T> observer) {
    assertMainThread("observe");
    if (owner.getLifecycle().getCurrentState() == DESTROYED) {
        // ignore
        return;
    }
    LifecycleBoundObserver wrapper = new LifecycleBoundObserver(owner, observer);
    ObserverWrapper existing = mObservers.putIfAbsent(observer, wrapper);
    if (existing != null && !existing.isAttachedTo(owner)) {
        throw new IllegalArgumentException("Cannot add the same observer"
                + " with different lifecycles");
    }
    if (existing != null) {
        return;
    }
    owner.getLifecycle().addObserver(wrapper);
}
如果这个activity处于销毁状态,那么便不会添加该观察者,否则,构造一个LifecycleBoundObserver对象,放进mObservers里面,mObservers即为:
private SafeIterableMap<Observer<? super T>, ObserverWrapper> mObservers =
            new SafeIterableMap<>();
然后将LifecycleBoundObserver对象放进LifecycleRegistry里面。
LifecycleBoundObserver里面持有的对象如下:

当我们给LiveData设置值的时候:livaData.value = i
public class MutableLiveData<T> extends LiveData<T> {
    @Override
    public void postValue(T value) {
        super.postValue(value);
    }

    @Override
    public void setValue(T value) {
        super.setValue(value);
    }
}
里面还有个postValue方法:
protected void postValue(T value) {
    boolean postTask;
    synchronized (mDataLock) {
        postTask = mPendingData == NOT_SET;
        mPendingData = value;
    }
    if (!postTask) {
        return;
    }
    ArchTaskExecutor.getInstance().postToMainThread(mPostValueRunnable);
}
postValue最终也会调用到主线程。postValue可以在子线程调用,而setValue必须在主线程调用,否则会抛出异常。
我们看setValue方法:
@MainThread
protected void setValue(T value) {
    assertMainThread("setValue");
    mVersion++;
    mData = value;
    dispatchingValue(null);
}
void dispatchingValue(@Nullable ObserverWrapper initiator) {
    if (mDispatchingValue) {
        mDispatchInvalidated = true;
        return;
    }
    mDispatchingValue = true;
    do {
        mDispatchInvalidated = false;
        if (initiator != null) {
            considerNotify(initiator);
            initiator = null;
        } else {
            for (Iterator<Map.Entry<Observer<? super T>, ObserverWrapper>> iterator =
                    mObservers.iteratorWithAdditions(); iterator.hasNext(); ) {
                considerNotify(iterator.next().getValue());
                if (mDispatchInvalidated) {
                    break;
                }
            }
        }
    } while (mDispatchInvalidated);
    mDispatchingValue = false;
}
这里我们传进来的initiator为null,所以我们主要看:
for (Iterator<Map.Entry<Observer<? super T>, ObserverWrapper>> iterator =
        mObservers.iteratorWithAdditions(); iterator.hasNext(); ) {
    considerNotify(iterator.next().getValue());
    if (mDispatchInvalidated) {
        break;
    }
}
这里的mObservers即为:
private SafeIterableMap<Observer<? super T>, ObserverWrapper> mObservers =
        new SafeIterableMap<>();
里面存放着我们之前放进去的LifecycleBoundObserver对象。
iterator.next().getValue()获取的便是LifecycleBoundObserver对象。
private void considerNotify(ObserverWrapper observer) {
    if (!observer.mActive) {
        return;
    }
    // Check latest state b4 dispatch. Maybe it changed state but we didn't get the event yet.
    //
    // we still first check observer.active to keep it as the entrance for events. So even if
    // the observer moved to an active state, if we've not received that event, we better not
    // notify for a more predictable notification order.
    if (!observer.shouldBeActive()) {
        observer.activeStateChanged(false);
        return;
    }
    if (observer.mLastVersion >= mVersion) {
        return;
    }
    observer.mLastVersion = mVersion;
    //noinspection unchecked
    observer.mObserver.onChanged((T) mData);
}
检测当前生命周期,至少是处于start。
@Override
boolean shouldBeActive() {
    return mOwner.getLifecycle().getCurrentState().isAtLeast(STARTED);
}
然后执行observer.mObserver.onChanged((T) mData);回调出去。
observer.mObserver便是我们传进去的观察者:
Observer<Int> { integer -> Log.d("MainActivity", integer!!.toString()) }
由以上也可以看出:我们是可以注册多个观察者的,所以要注意在一个Activity中只能够注册一次,否则会发生多个回调。
那么有个疑问,我们这样已经实现了,那问什么在liveData?.observe方法里面,不但将LifecycleBoundObserver放进LiveData的SafeIterableMap里面,还要将其放入LifecycleRegistry
里面。owner.getLifecycle()获取到的便是LifecycleRegistry
这是为了在相关的生命周期内做相关的操作,根据上一篇文章,我们可以知道,当activity的生命周期发生改变的时候,会获取添加进LifecycleRegistry的观察者,然后对每个观察者进行回调处理。
而在这里便会回调LifecycleBoundObserver的onStateChanged方法。
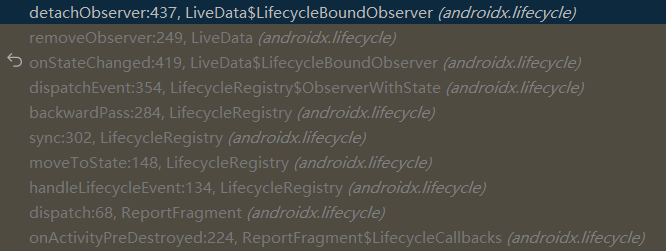
@Override
public void onStateChanged(@NonNull LifecycleOwner source,
        @NonNull Lifecycle.Event event) {
    if (mOwner.getLifecycle().getCurrentState() == DESTROYED) {
        removeObserver(mObserver);
        return;
    }
    activeStateChanged(shouldBeActive());
}
判断如果当前处于DESTROYED状态,那么便将我们添加进入的观察者移除。调用路径如下,其实还是依赖于lifeCycle:
否则会调用activeStateChanged(shouldBeActive())方法。

如果当前的活跃状态与上一次一样,那么就直接返回。
否则如果变为活跃的状态,那么会调用dispatchingValue(this);
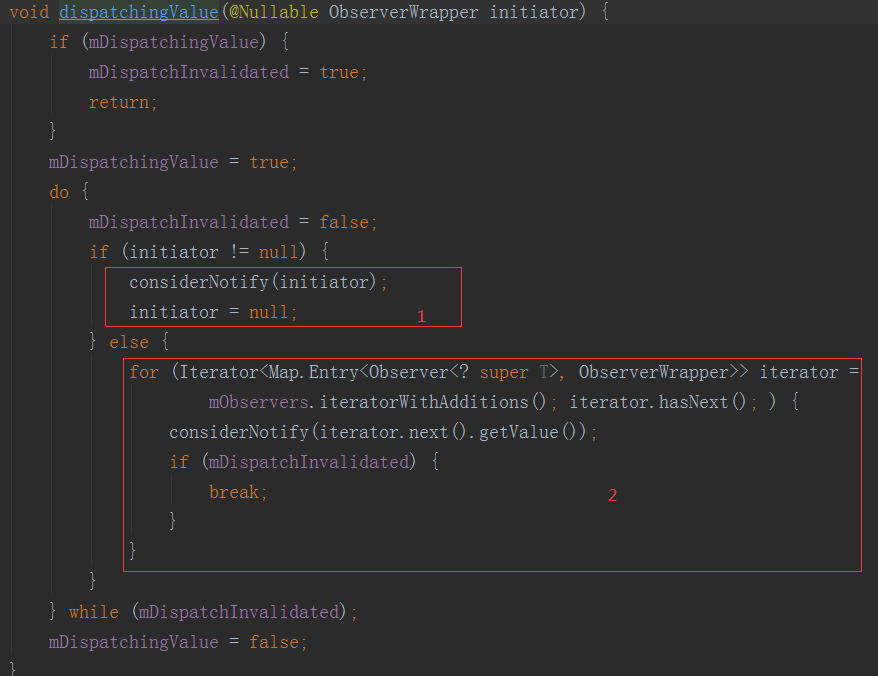
这里要注意,我们之前调用LiveData的setValue的时候,走的的2,但是现在走的是1,因为这次传进来的参数不为空。
private void considerNotify(ObserverWrapper observer) {
    if (!observer.mActive) {
        return;
    }
    // Check latest state b4 dispatch. Maybe it changed state but we didn't get the event yet.
    //
    // we still first check observer.active to keep it as the entrance for events. So even if
    // the observer moved to an active state, if we've not received that event, we better not
    // notify for a more predictable notification order.
    if (!observer.shouldBeActive()) {
        observer.activeStateChanged(false);
        return;
    }
    if (observer.mLastVersion >= mVersion) {
        return;
    }
    observer.mLastVersion = mVersion;
    observer.mObserver.onChanged((T) mData);
}
然后进入considerNotify这个方法,里面有一个判断十分重要:
if (observer.mLastVersion >= mVersion) {
    return;
}
这个判断是做什么用的呢?mVersion是什么时候被赋值的,这时候就要我们回过去头去看LiveData的setValue方法:
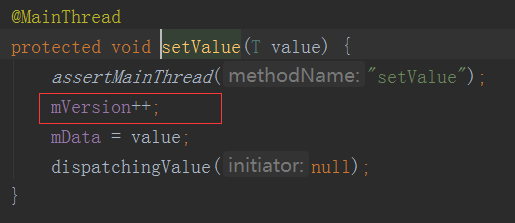
每调用一次,那么这个mVersion就会自加一。
所以这个判断便保证了,必须是刷新了LiveData里面的data值,才能够回调观察者事件:observer.mObserver.onChanged((T) mData);
如果生命周期变化的时候,LiveData里面的data值没有刷新,就不能回调出去。所以如果刷新LiveData里面的值的时候不处于活跃状态导致没有回调,当生命周期来到onStart的时候就会去回调。

 浙公网安备 33010602011771号