

商城系统练习
一、商城界面搭建ShopPanel
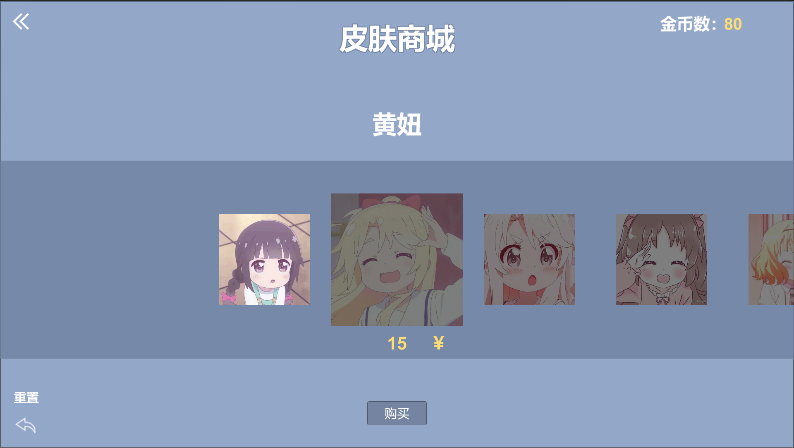
1.创建Title_Txt——>商城
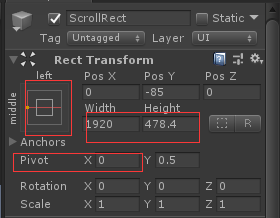
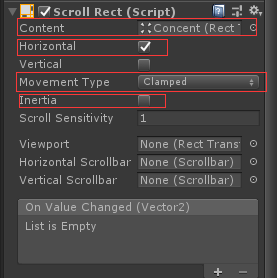
2.(1).创建Image,命名为ScrollRect,添加ScrollRect组件
设置Rect Transform
设置ScrollRect组件
(2).创建SkinName_txt——>皮肤名字
(3).创建SkinPrice_txt——>皮肤价格,在其下创建Text——>¥
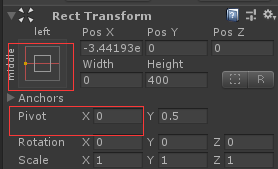
(4).创建Image,命名为content,设置其RectTransform(可以拖动的范围)
(5).创建Image,命名为skinPrefabs,设置其RectTransform
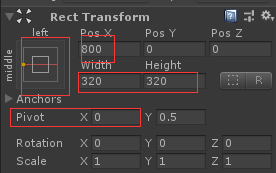
(6).在其下创建Image,Width=220,Height=220;
(7).将skinPrefabs拖成预制体
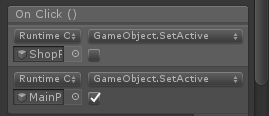
3.创建Btn_Buy按钮,购买按钮
4.创建Btn_Select按钮,选择按钮
5.创建Money_txt——>金币数:创建子物体text——>钱数
6.创建退出界面按钮
7.创建Tips_txt——>金币不足!
8.创建Btn_Reset按钮——>游戏重置
二、添加功能
1.创建GameData脚本
[System.Serializable]
public class GameData
{
private bool isFirstGame;//是否是第一次游戏
private int[] bestScoreArr;//最好成绩(前三)
private int selectSkin;//当前选择皮肤
private bool[] skinUnlocked;//没有解锁的皮肤
private int diamondCount;//金币总数
//Set为保存数据调用
public void SetIsFirstGame(bool isFirstGame)
{
    this.isFirstGame = isFirstGame;
}
public void SetBestScoreArr(int[] bestScoreArr)
{
    this.bestScoreArr = bestScoreArr;
}
public void SetSelectSkin(int selectSkin)
{
    this.selectSkin = selectSkin;
}
public void SetSkinUnlocked(bool[] skinUnlocked)
{
    this.skinUnlocked = skinUnlocked;
}
public void SetDiamondCount(int diamondCount)
{
    this.diamondCount = diamondCount;
}

//Get为加载数据调用
public bool GetIsFirstGame()
{
    return isFirstGame;
}
public int[] GetBestScoreArr()
{
    return bestScoreArr;
}
public int GetSelectSkin()
{
    return selectSkin;
}
public bool[] GetSkinUnlocked()
{
    return skinUnlocked;
}
public int GetDiamondCount()
{
    return diamondCount;
}
}
2.创建GameController脚本,挂在一个空物体上
using UnityEngine;
using System.Runtime.Serialization.Formatters.Binary;
using System.IO;
public class GameController : MonoBehaviour
{
public static GameController insance;
private bool isFirstGame;//是否是第一次游戏
private int[] bestScoreArr;//最好成绩(前三)
private int selectSkin;//当前选择皮肤
public bool[] skinUnlocked;//没有解锁的皮肤
private int diamondCount;//金币总数
private GameData data;
private StoreContainer storecontainer;
public void Awake()
{
    insance = this;
    InitGameData();
}

// 初始化游戏数据
private void InitGameData()
{
    LoadData();//加载游戏数据
    if (data != null)
    {
        isFirstGame = data.GetIsFirstGame();
    }
    else//是第一次游戏
    {
        isFirstGame = true;//第一次游戏设为true
    }
    //如果第一次开始游戏
    if (isFirstGame)
    {
        isFirstGame = false;
        bestScoreArr = new int[3];//前三名最好成绩
        selectSkin = 0;//当前选择的第一个皮肤
        skinUnlocked = new bool[StoreContainer.Instance.skinSprite.Count];
        skinUnlocked[0] = true;//默认第一个皮肤解锁
        diamondCount = 80;//金币数默认10个
        data = new GameData();
        SaveData();//保存数据
    }
    else//如果不是第一次从本地内存中加载数据
    {
        bestScoreArr = data.GetBestScoreArr();
        selectSkin = data.GetSelectSkin();
        skinUnlocked = data.GetSkinUnlocked();
        diamondCount = data.GetDiamondCount();
    }
}
    //保存游戏数据
public void SaveData()
{
    try//可能出现异常的代码
    {
        BinaryFormatter bf = new BinaryFormatter();
        //使用using后不用关闭文件流
        using (FileStream fileStream = File.Create(Application.persistentDataPath+ "/GameData.data"))
        {
            data.SetBestScoreArr(bestScoreArr);
            data.SetDiamondCount(diamondCount);
            data.SetIsFirstGame(isFirstGame);
            data.SetSelectSkin(selectSkin);
            data.SetSkinUnlocked(skinUnlocked);
            bf.Serialize(fileStream, data);
        }
    }//出现异常后执行的代码
    catch (System.Exception e)
    {
        Debug.Log(e.Message);
    }
}

//加载游戏数据
public void LoadData()
{
    try
    {
        BinaryFormatter bf = new BinaryFormatter();
        using (FileStream fileStream = File.Open(Application.persistentDataPath + "/GameData.data", FileMode.Open))
        {
            data = (GameData)bf.Deserialize(fileStream);
        }
    }
    catch (System.Exception e)
    {
        Debug.Log(e.Message);
    }
}

// 重置数据
public void ResetData()
{
    isFirstGame = false;
    bestScoreArr = new int[3];
    selectSkin = 0;
    skinUnlocked = new bool[StoreContainer.Instance.skinSprite.Count];
    skinUnlocked[0] = true;
    diamondCount = 80;
    SaveData();
}

//获取当前皮肤是否解锁
public bool GetSkinUnlocked(int index)
{
    return skinUnlocked[index];
}
// 设置当前皮肤解锁
public void SetSkinUnloacked(int index)
{
    skinUnlocked[index] = true;
    SaveData();
}
//总金币数量
public int AllCoinNumber()
{
    return diamondCount;
}
//更新总金币数量
public void UpdataCoinNumber(int value)
{
    diamondCount += value;
    SaveData();
}
//设置当前选择的皮肤下标
public void SetSelectedSkin(int index)
{
    selectSkin = index;
    SaveData();
}
// 获得当前选择的皮肤
public int GetCurrentSelectedSkin()
{
    return selectSkin;
}
}
3.创建StoreContainer脚本,挂在一个空物体上
public class StoreContainer : SingletonDontDestroy
{
[Header("皮肤名字")]
[SerializeField] public string[] skinName;
[Header("皮肤价格")]
[SerializeField] public string[] skinPrice;
[Header("皮肤贴图")]
[SerializeField] public List
}
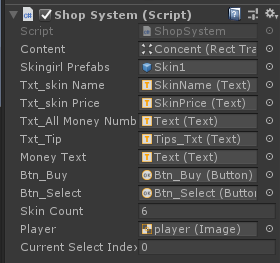
4.创建ShopSystem脚本,挂在ShopPanel上
using UnityEngine;
using DG.Tweening;
using UnityEngine.UI;
public class ShopSystem : MonoBehaviour
{
public Transform content;
public GameObject skingirlPrefabs;
public Text txt_skinName;//皮肤名字
public Text txt_skinPrice;//皮肤价格显示
public Text txt_AllMoneyNumber;//金币总总数
public Text txt_Tip;//金币不够文字提示
public Text moneyText;//皮肤价格符号显示
public Button btn_Buy;//购买按钮
public Button btn_Select;//选择按钮
public int SkinCount;//皮肤个数
public Image player;//玩家
public int currentSelectIndex;//当前选择索引
void Start()
{
    Init();
}
void Update()
{
    currentSelectIndex = (int)Mathf.Round(content.transform.localPosition.x/-320);
    //Debug.Log("当前索引" + currentSelectIndex);
    if (Input.GetMouseButtonUp(0))
    {
        content.transform.DOLocalMoveX(currentSelectIndex * -320, 0.2f);//根据当前索引每次向左滑动160
    }
    //没解锁
    if (GameController.insance.GetSkinUnlocked(currentSelectIndex) == false)
    {
        txt_skinPrice.text = StoreContainer.Instance.skinPrice[currentSelectIndex] .ToString();
        content.GetChild(currentSelectIndex).GetChild(0).GetComponent<Image>().color = Color.gray;
        moneyText.gameObject.SetActive(true);
    }
    else
    {
        txt_skinPrice.text = "已拥有";
        moneyText.gameObject.SetActive(false);
        content.GetChild(currentSelectIndex).GetChild(0).GetComponent<Image>().color = Color.white;
    }
    SetItemSize(currentSelectIndex);
    RefreshUI(currentSelectIndex);
}
//初始化
public void Init()
{
    content.GetComponent<RectTransform>().sizeDelta = new Vector2((SkinCount +5)* 320, 400.0f);//可滑动内容坐标
    for(int i=0;i< SkinCount; i++)
    {
        GameObject girlobj=Instantiate(skingirlPrefabs, content);
        //获取不同皮肤精灵图片
        girlobj.transform.Find("Image").GetComponent<Image>().sprite = StoreContainer.Instance.skinSprite[i];
        //设置皮肤对象生成的位置
        girlobj.transform.localPosition = new Vector3((i + 2) * 320 + 160,0,0);
        //没解锁皮肤
        if (GameController.insance.GetSkinUnlocked(i) == false)
        {
            girlobj.transform.Find("Image").GetComponent<Image>().color = Color.gray;//显示灰色
        }
        else
        {
            girlobj.transform.Find("Image").GetComponent<Image>().color = Color.white;
        }
    }
    //打开界面直接定位到选中的皮肤位置
    content.transform.localPosition = new Vector3(GameController.insance.GetCurrentSelectedSkin()*-320,0);
}
//设置皮肤图片尺寸
private void SetItemSize(int selectIndex)
{
    //循环拖拽子物体数量
    for (int i = 0; i < content.childCount; i++)
    {
        //当前选择对象
        if (selectIndex == i)
        {
            //选中皮肤图片的尺寸
            content.GetChild(i).GetChild(0).GetComponent<RectTransform>().sizeDelta = new Vector2(320, 320);
            txt_skinName.text =StoreContainer.Instance.skinName[i].ToString();
        }
        //没选中对象
        else
        {
            content.GetChild(i).GetChild(0).GetComponent<RectTransform>().sizeDelta = new Vector2(220, 220);
        }
    }
}
//更新UI
private void RefreshUI(int selectindex)
{
    txt_AllMoneyNumber.text = GameController.insance.AllCoinNumber().ToString();
    if (GameController.insance.GetSkinUnlocked(selectindex) == false)
    {
        btn_Buy.gameObject.SetActive(true);
        btn_Select.gameObject.SetActive(false);
    }
    else
    {
        btn_Select.gameObject.SetActive(true);
        btn_Buy.gameObject.SetActive(false);
    }
}
//购买按钮
public void BuyOnClick()
{
    int price = int.Parse(txt_skinPrice.text);//获取皮肤价格
    if (price > GameController.insance.AllCoinNumber())
    {
        txt_Tip.gameObject.SetActive(true);
        return;
    }
    GameController.insance.UpdataCoinNumber(-price);
    GameController.insance.SetSkinUnloacked(currentSelectIndex);
   content.GetChild(currentSelectIndex).GetChild(0).GetComponent<Image>().color = Color.white;
}
//选择按钮
public void SelectOnClick()
{
    GameController.insance.SetSelectedSkin(currentSelectIndex);
    player.sprite = StoreContainer.Instance.skinSprite[currentSelectIndex];
}
}
三、创建MainPanel
1.创建Image,命名为Player——>从商城选择完皮肤,玩家更换皮肤
2.创建Btn_Back按钮——>返回商城界面
3.创建PlayerController脚本
using UnityEngine;
using UnityEngine.UI;
public class PlayerController : MonoBehaviour
{
public Image player;
void Start()
{
ChangeSprite(GameController.insance.GetCurrentSelectedSkin());
}
//更换皮肤
public void ChangeSprite(int selectindex)
{
player.sprite = StoreContainer.Instance.skinSprite[selectindex];
}
}
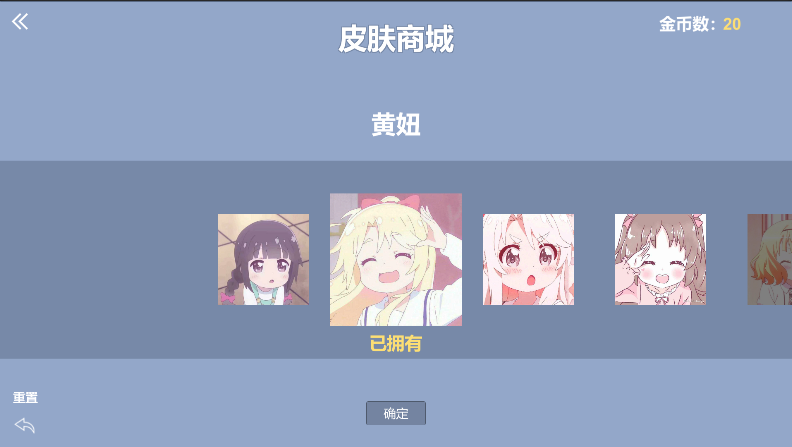
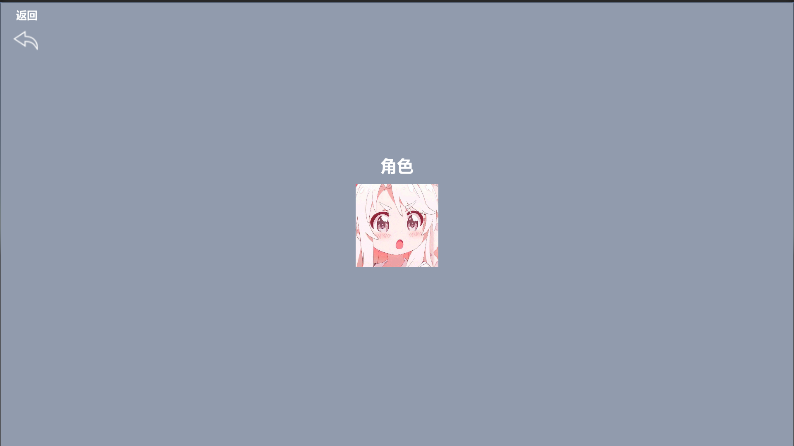
四、效果展示


 浙公网安备 33010602011771号