Installation of Apache OpenMeetings 4.0.0 on Centos 6.9
Starting
yum install -y gedit wget
At first place we must modify Selinux level security for the installation:
vim /etc/selinux/config
…modify:
SELINUX=enforcing
...to
SELINUX=disable
...or
-A INPUT -s 210.12.22.0/24 -p tcp -m tcp --dport 5080 -j ACCEPT
Update the System
Update operative system:
yum update -y
...and reboot for the kernel changes and the new Selinux configuration take effect.:
reboot
ADD Repos
### Add the Epel repository ###
For CentOS 6.x 64 bit:
cd /opt
wget http://dl.fedoraproject.org/pub/epel/6/x86_64/epel-release-6-8.noarch.rpm
rpm -Uvh epel-release-6-8.noarch.rpm
### Adobe repo64-bit ### For Flash Player.
rpm -ivh http://linuxdownload.adobe.com/adobe-release/adobe-release-x86_64-1.0-1.noarch.rpm
rpm --import /etc/pki/rpm-gpg/RPM-GPG-KEY-adobe-linux
yum update
Installation of Oracle Java 1.8
Java 1.8 it is necessary to work OpenMeetings 4.0.0. We install Oracle Java.
For Centos 6.x 64 bit:
cd /opt
Download the file:
The red part is, bypassing user authentication。
wget --no-check-certificate --no-cookies --header "Cookie: oraclelicense=accept-securebackup-cookie" http://download.oracle.com/otn-pub/java/jdk/8u152-b16/aa0333dd3019491ca4f6ddbe78cdb6d0/jdk-8u152-linux-x64.rpm
..and install it:
rpm -ivh jdk-8u152-linux-x64.rpm
And to see if the selected version is active:
java -version
Installation of LibreOffice
OpenMeetings will need LibreOffice to convert to pdf the uploaded office files.
We install it:
yum -y install libreoffice libreoffice-headless
Installation of necessary packages and libraries
We install packages and libraries that we´ll need later:
(Only one line with space between 1ª and 2ª)
yum install -y libjpeg libjpeg-devel ghostscript freetype freetype-devel unzip gcc gcc-c++ ncurses ncurses-devel make zlib zlib-devel libtool bison bison-devel openssl-devel bzip2 bzip2-devel fileroller git autoconf automake pkgconfig tomcat-native nmap nano
Installation ImageMagick and Sox
ImageMagick, work the images files jpg, png, gif, etc. We install it and some libraries:
yum install -y ImageMagick giflib giflib-devel giflib-utils
Sox, work the sound. Will compile and install it:
cd /opt
wget http://sourceforge.net/projects/sox/files/sox/14.4.2/sox-14.4.2.tar.gz
tar xzvf sox-14.4.2.tar.gz
cd /opt/sox-14.4.2
./configure
make && make install
cd /opt
Installation of Adobe Flash Player
OpenMeetings even need Adobe Flash Player for cam.
yum install -y flash-plugin
Compilation of FFmpeg
Install Nux Dextop Yum Source
Because CentOS has no official FFmpeg rpm package. However, we can do this with a third-party YUM source (Nux Dextop).
For CentOS 7
rpm --import http://li.nux.ro/download/nux/RPM-GPG-KEY-nux.ro
rpm -Uvh http://li.nux.ro/download/nux/dextop/el7/x86_64/nux-dextop-release-0-5.el7.nux.noarch.rpm
For CentOS 6
rpm --import http://li.nux.ro/download/nux/RPM-GPG-KEY-nux.ro
rpm -Uvh http://li.nux.ro/download/nux/dextop/el6/x86_64/nux-dextop-release-0-2.el6.nux.noarch.rpm
Install FFmpeg and FFmpeg Development Kit
yum install ffmpeg ffmpeg-devel -y
Test whether the installation is successful
ffmpeg
I have a good script here can be installed directly...
wget https://github.com/syavingc/Scripts/blob/master/shell/install_ffmpeg.sh
chmod +x install_ffmpeg.sh
./install_ffmpeg.sh
Installation MariaDB database server
We build a file-repository to download MariaDB data server.
For Centos 6.x 64 bit:
vim /etc/yum.repos.d/MariaDB.repo
...copy and paste in:
[mariadb]
name = MariaDB
baseurl = http://yum.mariadb.org/10.0/centos6-amd64
gpgkey=https://yum.mariadb.org/RPM-GPG-KEY-MariaDB
gpgcheck=1
We install it:
yum -y install MariaDB-server MariaDB-client
...do a backup of the configuration file; and make a newone:
mv /etc/my.cnf /etc/my.bak
cp /usr/share/mysql/my-medium.cnf /etc/my.cnf
...and run MariaDB server:
service mysql start
Give a password to mariadb root . Please, replace new-password by your own whish.
mysqladmin -u root password new-password
Make a database for OpenMeetings. User password must be of 8 digits minimum:
mysql -u root -p
...will ask for the root password we does just now:
MariaDB [(none)]> CREATE DATABASE open40 DEFAULT CHARACTER SET 'utf8';
With this command, we has created a database called open40, though you can choose another name to your whish.
Now we create a user with all the permission on this open40 database.
(Only one line with space between both)
MariaDB [(none)]> GRANT ALL PRIVILEGES ON open40.* TO 'hola'@'localhost' IDENTIFIED BY '1a2B3c4D' WITH GRANT OPTION;
open40 .....…........ name of the database
hola .....…........ user for that database
1a2B3c4D ..............password of that user
You can change the data...but remember it! Later we´ll need it.
Leave MariaDB:
MariaDB [(none)]> quit
Installation of OpenMeetings
We´ll install OpenMeetings in /opt/red540. All the following information will be based on this directory.
Call to our folder of installation red540.
Make the folder:
mkdir /opt/red540
cd /opt/red540
...and download the OpenMeetings file:
wget http://apache.miloslavbrada.cz/openmeetings/4.0.0/bin/apache-openmeetings-4.0.0.zip
unzip apache-openmeetings-4.0.0.zip
...save the unloaded file to /opt:
mv apache-openmeetings-4.0.0.zip /opt
Download and install the connector between OpenMeetings and MariaDB:
cd /opt
(Only one line without space between both)
wget http://repo1.maven.org/maven2/mysql/mysql-connector-java/5.1.42/mysql-connector-java-5.1.42.jar
...and copy it to where must be:
cp /opt/mysql-connector-java-5.1.42.jar /opt/red540/webapps/openmeetings/WEB-INF/lib
Now we are going to configure OpenMeetings for our database in MariaDB:
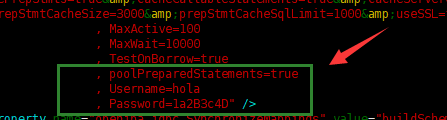
vim /opt/red540/webapps/openmeetings/WEB-INF/classes/META-INF/mysql_persistence.xml
chmod 640 /opt/red540/webapps/openmeetings/WEB-INF/classes/METAINF/mysql_persistence.xml
Script to launch red5-OpenMeetings
We´ll download the script to run Red5-OpenMeetings:
cd /opt
wget https://cwiki.apache.org/confluence/download/attachments/27838216/red5-2
...copy it to where must be:
cp red5-2 /etc/init.d/
...concede execution permission:
chmod +x /etc/init.d/red5-2
If you made the installation in any other different path to /opt/red540, please edit the script and modify the line:
RED5_HOME=/opt/red540
...to
RED5_HOME=/your-path-installation
Run red5-OpenMeetings
Restart mariadb:
service mysql restart
...and run red5-OpenMeetings. Please, be connected to Internet, so the run will be quick:
/etc/init.d/red5-2 start
...wait untill the text “CleanupJob.cleanRoomFiles”, it is the last in the shell. Then, go with the browser to:
Browser http://localhost:5080/openmeetings/install
...there will appear a page similar to this one:

...press on (>) button(bottom), and will show the default database configuration with Derby,
but we employ MySQL (MariaDB):

...then, scroll and Choose DB type to MySQL:

...will show the database name we made in step 11.
If you`ve choose any other different name for this, will show equally.
Now we must introduce the user name we did for our data base, at the step 8, and his password:
Specify DB user = hola
Specify DB password = 1a2B3c4D
Please, press (>) button, and we´ll go to:

Here, we must introduce a user name for OpenMeetings, and his password. This must have 8 digits minimum, and at least 1 special symbol like: + ( % # ! ...etc.
Username = a-name ...this user will be administrator.
Userpass = a-password ...for the previous user.
Email = email-adress ...of the previous user.
User Time Zone = country where is this server
Name = example-openmeetings ...group name to choose.
Press the button (>) and will lead us to a new page (below) where you can select the language for your OpenMeetings server, as well as other options such as the configuration of the mail server being used to send invitations or meetings from OpenMeetings.

A valid example to configure the mail server with Gmail, is as follows:
(replace john@gmail.com with your real Gmail account)
Mail-Refer == john@gmail.com
SMTP-Server == smtp.gmail.com
SMTP-Server Port (default Smtp-Server Port is 25) == 587
SMTP-Username == john@gmail.com
SMTP-Userpass == password of john@gmail.com
Enable TLS in Mail Server Auth == ...turn green the button to activate
Default Language == ...select your language
...the rest we you can modify it as you like it.
Now press the button (>)and a new page will appear:

Here we´ll introduce the respective paths for the image, video, audio and conversion of uploaded files:
ImageMagick Path == /usr/bin
FFMPEG Path == /usr/bin
SOX Path == /usr/local/bin
jodconverter == /usr/lib64/libreoffice (64bits)
Once completed the paths, please click the (>) button and move on to another page that would be to activate the SIP.
We will leave it as is, unless you want to activate it knowing what it does:

Now push the button (>) Will show this window:

Clic Finish button...wait a seconds untill the tables are fill in the database.
When has concluded, this another page will appear. Don´t clic on Enter the Application. First is need it to restart the server.
Please, be connected to Internet:

Now yes, you can clic on Enter the Application,or go with your browser to:
http://localhost:5080/openmeetings
...and will take us to the entry of OpenMeetings:

Introduce the user's name and the password that you have chosen during the installation, push Sign in button, and…
...Congratulations!
The next time that you like to accede OpenMeetings, will be through:
http://localhost:5080/openmeetings
Remember to open in the server, the two following ports:
1935 5080
...in order that it could accede to OpenMeetings from other machines in Lan or Internet.
OpenMeetings's configuration
Once you acced to OpenMeetings, if you would like to do any modification in the configuration, please go to:
Administration → Configuration


...and following the order of the red arrows:
And this is all.
Reference and the official website
http://openmeetings.apache.org/

 浙公网安备 33010602011771号