

springCloud框架
Spring Cloud简介
Spring Cloud 是在Spring Boot 的基础上构建的,用于简化分布式系统构建的工具集。该工具集为微服务架构中所涉及的配置管理、服务发现、智能路由、断路器、微代理和控制总线等操作提供了一种简单的开发方式。
Spring Cloud的特点
Spring Cloud有很多特点,其中最大的特点就是它的集成性,它将很多开源产品都集成到了自身的框架中,使其越来越强大。
除此之外,Spring Cloud还有如下特点。
1.使用方便
在使用时,开发人员不需要过多的配置,也不需要调用很多接口,通过简单的配置即可轻松上手。
2.功能齐全
Spring Cloud涵盖了微服务架构中的各个方面,集成了很多公司优秀的开源框架,能够充分满足微服务开发者的各项需求。
3.易于扩展和维打
所有组件的引入方式相同,都是通过 Maven或Gradle引入依赖。各个组件之间没有代码上的耦合,因此可以根据需求不断地增加、删除和替换组件。
4.适用于各种环境
使用 Spring Cloud 组件开发的项目可以应用于 PC 服务器、云环境,以及各种容器(如Docker )。
1. Eureka
Eureka 是Netlix开发的一个服务发现框架,本身是一个基于REST的服务,主要用于定位运行在 AWS(Amazon Web Services)域中的中间层服务,以达到负载均衡和中间层服务故障 转移的目的。Spring Cloud将其集成在自己的子项目 Spring Cloud Netlix中,以实现 Spring| Cloud 的服务发现功能。
Eureka 的服务发现包含两大组件:服务端发现组件(Eureka Server)和客户端发现组件(Eureka Client )。服务端发现组件也被称之为服务注册中心,主要提供了服务的注册功能,而客户端发现组件主要用于处理服务的注册与发现。
使用Eureka 注册服务
1.搭建Maven父工程
<project xmlns="http://maven.apache.org/POM/4.0.0" xmlns:xsi="http://www.w3.org/2001/XMLSchema-instance"
         xsi:schemaLocation="http://maven.apache.org/POM/4.0.0
                       http://maven.apache.org/xsd/maven-4.0.0.xsd">
    <modelVersion>4.0.0</modelVersion>
    <groupId>com.itheima</groupId>
    <artifactId>microservice-springcloud</artifactId>
    <version>0.0.1-SNAPSHOT</version>
    <packaging>pom</packaging>
    <parent>
        <groupId>org.springframework.boot</groupId>
        <artifactId>spring-boot-starter-parent</artifactId>
        <version>1.5.6.RELEASE</version>
        <relativePath/>
    </parent>
    <properties>
        <project.build.sourceEncoding>
            UTF-8
        </project.build.sourceEncoding>
        <project.reporting.outputEncoding>
            UTF-8
        </project.reporting.outputEncoding>
        <java.version>1.8</java.version>
    </properties>
    <dependencyManagement>
        <dependencies>
            <dependency>
                <groupId>org.springframework.cloud</groupId>
                <artifactId>spring-cloud-dependencies</artifactId>
                <version>Dalston.SR3</version>
                <type>pom</type>
                <scope>import</scope>
            </dependency>
        </dependencies>
    </dependencyManagement>
    <dependencies>
        <!--         <dependency> -->
        <!--             <groupId>org.springframework.cloud</groupId> -->
        <!--             <artifactId>spring-cloud-starter-config</artifactId> -->
        <!--         </dependency> -->
        <!--         <dependency> -->
        <!--             <groupId>org.springframework.boot</groupId> -->
        <!--             <artifactId>spring-boot-devtools</artifactId> -->
        <!--         </dependency> -->
    </dependencies>
    <build>
        <plugins>
            <!--Spring Boot的编译插件 -->
            <plugin>
                <groupId>org.springframework.boot</groupId>
                <artifactId>spring-boot-maven-plugin</artifactId>
            </plugin>
        </plugins>
    </build>
</project>
2.搭建服务端工程
(1)添加依赖。在 pom.xml中添加Eureka Server的依赖
<project xmlns="http://maven.apache.org/POM/4.0.0"
         xmlns:xsi="http://www.w3.org/2001/XMLSchema-instance"
         xsi:schemaLocation="http://maven.apache.org/POM/4.0.0
                   http://maven.apache.org/xsd/maven-4.0.0.xsd">
    <modelVersion>4.0.0</modelVersion>
    <parent>
        <groupId>com.itheima</groupId>
        <artifactId>microservice-springcloud</artifactId>
        <version>0.0.1-SNAPSHOT</version>
    </parent>
    <artifactId>microservice-eureka-server</artifactId>
    <dependencies>
        <dependency>
            <groupId>org.springframework.cloud</groupId>
            <artifactId>spring-cloud-starter-eureka-server</artifactId>
        </dependency>
    </dependencies>
</project>
(2)编写配置文件。在配置文件application.yml中增加端口号等配置信息
server:
port: 8761
eureka:
instance:
hostname: localhost
client:
register-with-eureka: false
fetch-registry: false
service-url:
defaultZone: http://${eureka.instance.hostname}:${server.port}/eureka/
# server:
# enable-self-preservation: false
(3)修改服务端 Java代码。在项目的引导类上添加注解@EnableEurekaServer,该注解用声明标注类是一个Eureka Server
@EnableEurekaServer
@SpringBootApplication
public class MicroserviceEurekaServerApplication {

    public static void main(String[] args) {
        SpringApplication.run(MicroserviceEurekaServerApplication.class, args);
    }

}
(4)启动应用,查看信息。完成上述配置后,启动应用程序并在浏览器中访问地士http://localhost:8761/
3.搭建客户端工程
1)添加依赖
<project xmlns="http://maven.apache.org/POM/4.0.0"
         xmlns:xsi="http://www.w3.org/2001/XMLSchema-instance"
         xsi:schemaLocation="http://maven.apache.org/POM/4.0.0
                    http://maven.apache.org/xsd/maven-4.0.0.xsd">
  <modelVersion>4.0.0</modelVersion>
  <parent>
    <groupId>com.itheima</groupId>
    <artifactId>microservice-springcloud</artifactId>
    <version>0.0.1-SNAPSHOT</version>
  </parent>
  <artifactId>microservice-config-client</artifactId>
  <dependencies>
      <dependency>

        <groupId>org.springframework.cloud</groupId>

        <artifactId>spring-cloud-starter-eureka</artifactId>
      </dependency>
  </dependencies>
</project>
(2)编写配置文件
server:
    port: 8000 #指定该Eureka实例的端口号
    eureka:
      instance:
        prefer-ip-address: true #显示主机IP地址
      client:
        service-url:
          defaultZone: http://localhost:8761/eureka/  # 指定 Eureka服务端地址
    application:
      name: microservice-eureka-user   #指定应用名称
(3)修改客户端 Java 代码 。在项目的引导类上添加注解@EnableEurekaClient,该注解. 明标注类是一个 Eureka 客户端组件
3.搭建订单服务
(1)在 pom.xml中添加 spring-cloud-starter-eureka 依赖
<project xmlns="http://maven.apache.org/POM/4.0.0"
         xmlns:xsi="http://www.w3.org/2001/XMLSchema-instance"
         xsi:schemaLocation="http://maven.apache.org/POM/4.0.0
                             http://maven.apache.org/xsd/maven-4.0.0.xsd">
    <modelVersion>4.0.0</modelVersion>
    <parent>
        <groupId>com.itheima</groupId>
        <artifactId>microservice-springcloud</artifactId>
        <version>0.0.1-SNAPSHOT</version>
    </parent>
    <artifactId>microservice-eureka-order</artifactId>
    <dependencies>
        <dependency>
            <groupId>org.springframework.cloud</groupId>
            <artifactId>spring-cloud-starter-eureka</artifactId>
        </dependency>
    </dependencies>
</project>
(2)编写配置文件。在配置文件中添加 Eureka服务实例的端口号、服务端地址等信息
server:
  port: 7901 # 指定该Eureka实例的端口号
eureka:
  instance:
    prefer-ip-address: true  # 是否显示主机的IP
  client:
    service-url:
      defaultZone: http://localhost:8761/eureka/  # 指定Eureka服务端地址
spring:
  application:
    name: microservice-eureka-order # 指定应用名称
(3)在引导类中加入@EnableEurekaClient
(4)在microservice-eureka-user 工程的引导类中,创建 RestTemplate
RestTemplate是 Spring提供的用于访问 Rest服务的客户端实例,它提任了多种便捷访问远程Http服务的方法,能够大大提高客户端的编写效率。
@SpringBootApplication
@EnableEurekaClient
@RestController
public class Application {
    @RequestMapping("/hello")
    public String home() {
        return "hello world!";
    }
    /**
     * 实例化RestTemplate
     * RestTemplate是Spring提供的用于访问Rest服务的客户端,
     * 它提供了多种便捷访问远程Http服务的方法,能够大大提高客户端的编写效率。
     */
    @Bean
    public RestTemplate restTemplate() {
        return new RestTemplate();
    }
    public static void main(String[] args) {
        SpringApplication.run(Application.class, args);
    }

}
@RestController
public class UserController {
    @Autowired
    private RestTemplate restTemplate;

    /**
     * 查找与用户相关的订单
     */
    @GetMapping("/findOrderByUser/{id}")
    public String findOrderByUser(@PathVariable String id) {
        int oid = 123;
        return this.restTemplate.getForObject("http://microservice-eureka-order/order/" + id, String.class);
    }
}
在上述代码中,当用户查询订单时,首先会通过用户id 查询与用户相关的所有订单(由于这里主要是演示服务的调用,所以省略了查询方法,并且自定义了一个oid为123的订单,来模拟查询出的结果)。然后通过 restTemplate 对象的getForObject()方法调用了订单服务中的查询订单方法来查询订单id为123的订单信息。
客户端负载均衡
在分布式架构中,服务器端负载均衡通常是由Nginx 实现分发请求的,而客户端的同一个实例部署在多个应用上时,也需要实现负载均衡。通过 Spring Cloud中的 Ribbon 来实现此功能。
Ribbon 介绍
Ribbon是Netlix发布的开源项目,其主要功能是提供客户端的软件负载均衡算法,将Netlix的中间层服务连接在一起。Ribbon 的客户端组件提供了一系列完善的配置项,例如连接超时、重试等。 在 Eureka的自动配置依赖模块 spring-cloud-starter-eureka中,已经集成了Ribbon,我们可以直接使用 Ribbon来实现客户端的负载均衡。 二者同时使用时,Ribbon 会利用从 Eureka 读取到的服务信息列表,在调用服务实例时,以合理的方式进行负载。
Ribbon的使用
在 Eureka 中使用 Ribbon 十分简单,只需要在实例化 RestTemplate 的方法上添加@LoadBalanced 注解,并在其执行方法中使用服务实例的名称即可。
具体实现过程如下:
(1)添加@LoadBalanced 注解。在 microservice-eureka-user 工程引导类中的restTemplate()方法上添加@LoadBalanced 注解,
@SpringBootApplication
@EnableEurekaClient
@RestController
public class MicroserviceEurekaUserApplication {
    @RequestMapping("hello")
    public String hello() {
        return "欢迎光临";
    }

    public static void main(String[] args) {
        SpringApplication.run(MicroserviceEurekaUserApplication.class, args);
    }


    /*访问Rest服务的客户实例
     * RestTemplate是spring提供的用于访问rest服务的客户端
     * 提供了便捷访问远程Http服务方法,提高效率
     * */
    @Bean
    @LoadBalanced
    public RestTemplate restTemplate() {
        return new RestTemplate();
    }

}
@RestController
public class UserController {
    @Autowired
    private RestTemplate restTemplate;

    /**
     * 查找与用户相关的订单
     */
    @GetMapping("/findOrderByUser/{id}")
    public String findOrderByUser(@PathVariable String id) {
        int oid = 123;
        /*加入负载均和localhost:7900/order可以改成microservice-eureka-order*/
        return this.restTemplate.getForObject("http://microservice-eureka-order/order/" + id, String.class);
    }
}
(2)创建服务监听类ServiceInfoUtil.java
在microservice-eureka-order工程中创建一个用于监听服务实例端口的工具类 ServicelnfoUtil。
@Configuration
public class ServiceInfoUtil implements ApplicationListener<EmbeddedServletContainerInitializedEvent> {
    /*声明event对象,EmbeddedServletContainerInitializedEvent
    用于获取运行服务器的本地端口
    * */
    private static EmbeddedServletContainerInitializedEvent event;

    @Override
    public void onApplicationEvent(EmbeddedServletContainerInitializedEvent event) {
        ServiceInfoUtil.event = event;

    }

    /*获得端口号*/
    public static int getPort() {
        return event.getEmbeddedServletContainer().getPort();
    }
}
(3)添加输出语句。在订单控制器类 OrderController的查询订单方法中,增加一行执行输出当前实例端口号的语句。具体如下: System.out.println(ServiceInfoUtil.getPort());
Spring Cloud Hystrix
在微服务架构中,通常会存在多个服务层调用的情况,如果基础服务出现故障可能会发生级联传递,导致整个服务链上的服务不可用pring Cloud Hystrix就是用来实现断路器、线程隔离等服务保护功能的。Spring Cloud Hystrix是基于Netlix的开源框架 Hystrix 实现的,该框架的使用目标在于通过控制那些访问远程系统、服务和第三方库的节点,从而对延迟和故障提供更强大的容错能力。
(1)创建microservice-eureka-user-hystrix工程添加依赖
<project xmlns="http://maven.apache.org/POM/4.0.0"
         xmlns:xsi="http://www.w3.org/2001/XMLSchema-instance"
         xsi:schemaLocation="http://maven.apache.org/POM/4.0.0
                             http://maven.apache.org/xsd/maven-4.0.0.xsd">
    <modelVersion>4.0.0</modelVersion>
    <parent>
        <groupId>com.itheima</groupId>
        <artifactId>microservice-springcloud</artifactId>
        <version>0.0.1-SNAPSHOT</version>
    </parent>
    <artifactId>microservice-eureka-user-hystrix</artifactId>
    <dependencies>
        <dependency>
            <groupId>org.springframework.cloud</groupId>
            <artifactId>spring-cloud-starter-eureka</artifactId>
        </dependency>
        <!-- Hystrix依赖 -->
        <dependency>
            <groupId>org.springframework.cloud</groupId>
            <artifactId>spring-cloud-starter-hystrix</artifactId>
        </dependency>
        <dependency>
            <groupId>org.springframework.boot</groupId>
            <artifactId>spring-boot-starter-actuator</artifactId>
        </dependency>
        <dependency>
            <groupId>com.netflix.hystrix</groupId>
            <artifactId>hystrix-core</artifactId>
            <version>1.5.12</version>
        </dependency>
    </dependencies>
</project>
(2)配置文件
server:
  port: 8030 # 指定该Eureka实例的端口号
eureka:
  instance:
    prefer-ip-address: true  # 是否显示主机的IP
  client:
    service-url:
      defaultZone: http://localhost:8761/eureka/  # 指定Eureka服务端地址
spring:
  application:
    name: microservice-eureka-user-hystrix # 指定应用名称
(3)在启动类上加入@EnableCircuitBreaker开启熔断机制
@SpringBootApplication
@EnableEurekaClient
@EnableCircuitBreaker
public class MicroserviceEurekaUserHystrixApplication {
    /*访问Rest服务的客户实例
     * RestTemplate是spring提供的用于访问rest服务的客户端
     * 提供了便捷访问远程Http服务方法,提高效率
     * */
    @Bean
    @LoadBalanced
    public RestTemplate restTemplate() {
        return new RestTemplate();
    }

    public static void main(String[] args) {
        SpringApplication.run(MicroserviceEurekaUserHystrixApplication.class, args);
    }

}
(4)修改用户控制器类。在findOrdersByUser()方法上添加@HystrixCommand注解来指回调方法
@RestController
public class UserController {
    @Autowired
    private RestTemplate restTemplate;

    /**
     * 查找与用户相关的订单
     */
    @GetMapping("/findOrderByUser/{id}")
    @HystrixCommand(fallbackMethod = "fallbackInfo")
    public String findOrderByUser(@PathVariable String id) {
        /*加入负载均和localhost:7900/order可以改成microservice-eureka-order*/
        return this.restTemplate.getForObject("http://microservice-eureka-order/order/" + id, String.class);
    }

    /*返回信息*/
   public String fallbackInfo(@PathVariable String id) {
        return "服务器不可用,请稍后再试!";
    }
}
@HystrixCommand 注解用于指定当前方法发生异常时调用的方法,该方法是通过其属性 fallbackMethod 的属性值来指定的。这里需要注意的是,回调方法的参数类型以及返回值必须要和原方法保持一致。
Hystrix Dashboard 的使用
Hystrix 除了可以对不可用的服务进行断路隔离外,还能够对服务进行实时监控。Hystrix 可以实时、累加地记录所有关于 HystrixCommand 的执行信息,包括每秒执行多少、请求成功多少、失败多少等。
1.加入实时监控的依赖
<dependency>

<groupId>org.springframework.boot</groupId>

<artifactId>spring-boot-starter-actuator</artifactId>
</dependency>
在 microservice-eureka-user-hystrix 工程的 pom.xml中引入上述依赖后,即可查看监控信息,具体操作步骤如下。
(1)分别启动注册中心、服务提供者(7901)和服务消费者工程。
(2)通过浏览器访问地址 http://ocalhost:8030/findOrdersByUser/1(此步骤不可省略,否则将由于系统应用的所有接口都未被调用,而只输出 ping:)。
(3)通过浏览器访问地址 http://localhost:8030/hystrix.stream,将看到如图5-7所示的输出 信息。
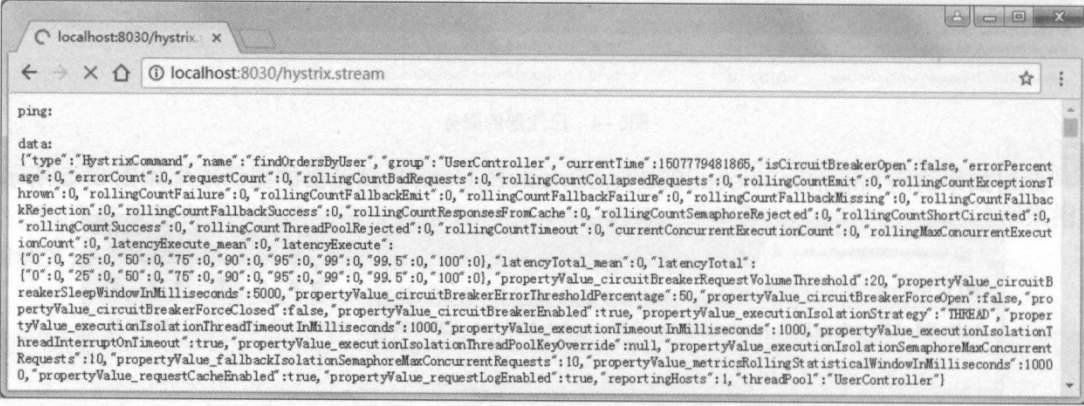
访问具体地址后,浏览器会不断地执行刷新操作以获取实时的监控数据。这样运维人员就可以通过这些数据来判断出系统当前的监控状态。 虽然采用上面这种纯文字输出的方式可以实时监控数据,但其可读性十分差。为此,我们可以通过 Hystrix Dashboard 以可视化的方式来查看实时监控数据。Hystrix Dashboard是Hystrix的一个组件,它提供了数据监控和友好的图形化界面支持。
(1)新建 microservice-springcloud 的子工程 microservice-hystrix-dashboard,在pom.xml文件中添加监控依赖和Hystrix Dashboard 依赖
<project xmlns="http://maven.apache.org/POM/4.0.0"
         xmlns:xsi="http://www.w3.org/2001/XMLSchema-instance"
         xsi:schemaLocation="http://maven.apache.org/POM/4.0.0
                    http://maven.apache.org/xsd/maven-4.0.0.xsd">
    <modelVersion>4.0.0</modelVersion>
    <parent>
        <groupId>com.itheima</groupId>
        <artifactId>microservice-springcloud</artifactId>
        <version>0.0.1-SNAPSHOT</version>
    </parent>
    <artifactId>microservice-hystrix-dashboard</artifactId>
    <properties>
        <project.build.sourceEncoding>
            UTF-8
        </project.build.sourceEncoding>
        <project.reporting.outputEncoding>
            UTF-8
        </project.reporting.outputEncoding>
        <java.version>1.8</java.version>
    </properties>
    <dependencies>
        <dependency>
            <groupId>org.springframework.cloud</groupId>
            <artifactId>
                spring-cloud-starter-hystrix-dashboard
            </artifactId>
        </dependency>
        <dependency>
            <groupId>org.springframework.boot</groupId>
            <artifactId>spring-boot-starter-actuator</artifactId>
        </dependency>
    </dependencies>
</project>
(2)编写配置文件 application.yml,指定应用的端口号和名称等信息
server:
  port: 8031 # 指定该Eureka实例的端口号
spring:
  application:
    name: microservice-hystrix-dashboard # 指定应用名称
(3)编写启动类 Application.java,并在其类上添加@EnableHystrixDashboard 注解来开启Hystrix 仪表板功能
@SpringBootApplication
//开启Hystrix仪表板功能
@EnableHystrixDashboard
public class MicroserviceHystrixDashboardApplication {

    public static void main(String[] args) {
        SpringApplication.run(MicroserviceHystrixDashboardApplication.class, args);
    }

}
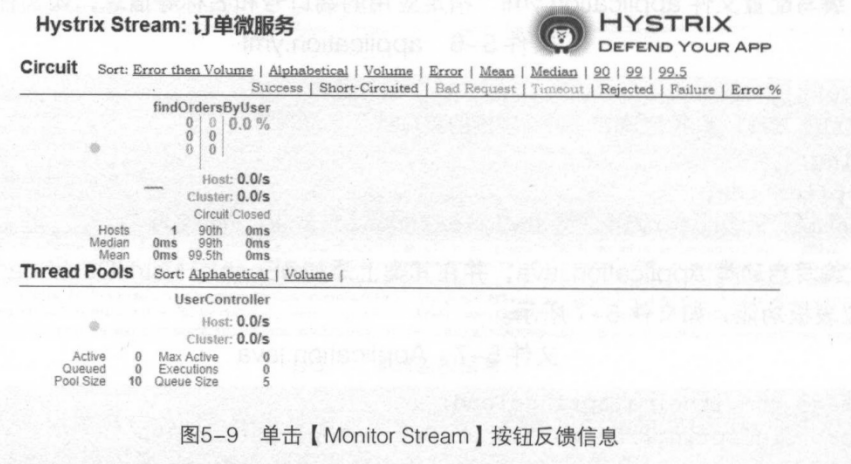
(4)启动工程后,通过浏览器访问地址 http:/localhost:8031/hystrix.stream 将会看到如图5-8所示的信息. 在图5-8中,Hystrix Dashboard下的输入框用于输入需要监控的服务 URL,Delay 中的参数表示服务器上的轮询时间间隔,Title中的输入框用于设置浏览器中所监视服务的标题。 在Hystrix Dashboard 下的输入框中输入 http://ocalhost:8030/hystrix.stream,并设置 Title为"订单微服务"后,单击【Monitor Stream】按钮,将出现如图5-9所示页面。


在Hystrix Dashboard Wiki上已经给出了详细说明,可访问地址 https:/github.com/Netlix/Hystrixwiki/Dashboard 查看
API 网关服务
使用Spring Boot 实现微服务的开发,使用 Spring Cloud Eureka实现注册中心以及服务的注册与发现,使用Spring Cloud Ribbon 实现服务间的负载均衡,使用 Spring Cloud Hystrix 实现线程的 隔离和断路器功能。

在图5-11中,集群包含了Service A和 Service B两种服务,它们会向 Eureka Server注册和订阅服务,Open Service是一个对外的 RESTul API服务,客户端会通过负载均衡技术(如Nginx)实现对Open Service的调用,同时服务之间也会通过Ribbon技术实现服务之间负载均衡的调用。 虽然通过这种方式实现系统功能是没有问题的,但在实际使用时,客户端与微服务进行直接的交互还是存在着一些困难和限制的,具体表现如下。
1.增加开发和维护成本
在大多数情况下,为了保证对外服务的安全性,开发人员在服务端实现的服务接口会有一定的权限校验机制(如用户登录状态校验等),并且为了防止客户端在发起请求时被篡改等安全方面的考虑,还会编写一些签名校验功能。在微服务中,我们会将原来处于一个应用中的多个模块 拆分成多个应用服务,而这些拆分出来的应用服务接口也需要原来的校验逻辑,这就导致我们不得不在这些应用中全部实现这样的一套逻辑。随着微服务规模的不断扩大,这些校验逻辑的冗余将越来越多,一旦校验规则有了变化或者出了问题,我们将不得不去每一个应用中修改这些逻辑。
2.微服务重构困难
随着时间的推移,我们可能需要改变系统服务目前的拆分方案(如将两个服务合并或将一个服务拆分为多个),但如果客户端直接与微服务交互,那么这种重构就很难实施。
3.微服务协议限制
客户端直接请求的微服务可能使用的是与Web无关的协议。一个服务可能是用Thrift的RPC协议,而另一个服务可能是用 AMQP消息协议,两种协议都不是特别适合浏览器或防火墙,最好是内部使用。应用应该在防火墙外采用HTTP或者 WEB Socket 之类的协议。
通常来说,一个很好的解决办法就是采用 APIGateway(网关)的方式。API Gateway是一个服务器,也可以说是进入系统的唯一节点,它封装了内部系统的架构,并且提供了API给各个客户端。它还可以有其他功能,如授权、监控、负载均衡、缓存、请求分片和管理、静态响应处理等。
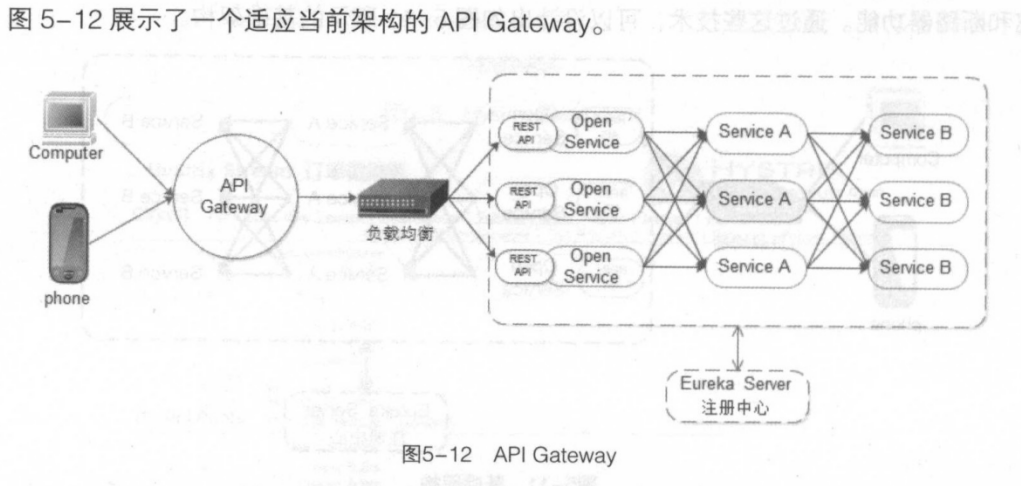
在图5-12中,APIGateway 负责请求转发、合成和协议转换。所有来自客户端的请求都要先经过 API Gateway,然后负载均衡这些请求到对应的微服务 APIGateway的一个最大好处是封装了应用的内部结构,与调用指定的服务相比,客户端直接跟 Gateway 交互会更简单。API Gateway 提供给每一个客户端一个特定 APl,这样减少了客户端与服务器端的通信次数,也简化了客户端代码。API Gateway还可以在Web协议与内部使用的非Web协议间进行转换,如HTTP协议、WebSocket协议。 API Gateway 可以有很多实现方法,如Nginx、Zuul、Node.js
4.使用Zuul 构建 API网关服务
Spring Cloud中。Zuul 属于边缘服务,可以用来执行认证、.动态路由、服务迁移、负载均衡。
(1)创建工程,添加依赖。在父工程 microservice-springcloud 下创建子模块 microservice-gateway-zuul工程,并在其 pom.xml中添加 eureka和Zuul 的依赖
<project xmlns="http://maven.apache.org/POM/4.0.0"
         xmlns:xsi="http://www.w3.org/2001/XMLSchema-instance"
         xsi:schemaLocation="http://maven.apache.org/POM/4.0.0
                   http://maven.apache.org/xsd/maven-4.0.0.xsd">
    <modelVersion>4.0.0</modelVersion>
    <parent>
        <groupId>com.itheima</groupId>
        <artifactId>microservice-springcloud</artifactId>
        <version>0.0.1-SNAPSHOT</version>
    </parent>
    <artifactId>microservice-gateway-zuul</artifactId>
    <dependencies>
        <dependency>
            <groupId>org.springframework.cloud</groupId>
            <artifactId>spring-cloud-starter-zuul</artifactId>
        </dependency>
        <dependency>
            <groupId>org.springframework.cloud</groupId>
            <artifactId>spring-cloud-netflix-eureka-client</artifactId>
            <version>1.3.4.RELEASE</version>
            <scope>compile</scope>
        </dependency>
        <dependency>
            <groupId>org.springframework.cloud</groupId>
            <artifactId>spring-cloud-starter-eureka</artifactId>
        </dependency>
    </dependencies>
</project>
(2)编辑配置文件。在配置文件中编写Eureka服务实例的端口号、服务端地址等信息
server:
  #指定该Eureka实例的端口号
  port: 8050
    #eureka:
    #instance:
    #prefer-ip-address:  true # 是否显示主机的IP
    #client:
    #service-url:
  #defaultZone: http://localhost:8761/eureka/  # 指定Eureka服务端地址
spring:
  application:
    name: microservice-gateway-zuul # 指定应用名称
zuul:
  routes:
    #order-serviceId:    # zuul的唯一标识,可以任意设置名称,但必须唯一,如果该值与service-id的名称相同时,service-id的值可以省略
    # 需要映射的路径
    #path: /order/**
    # Eureka中的serviceId
    #service-id: microservice-eureka-order
    order-url:
      path: /order-url/**
      url: http://localhost:7900/
      #ignored-services:

(3)在工程主类 Application中使用@EnableZuulProxy 注解开启Zuul的API 网关功能,
@EnableEurekaClient
@EnableZuulProxy
@SpringBootApplication
public class MicroserviceGatewayZuulApplication {

    public static void main(String[] args) {
        SpringApplication.run(MicroserviceGatewayZuulApplication.class, args);
    }

}
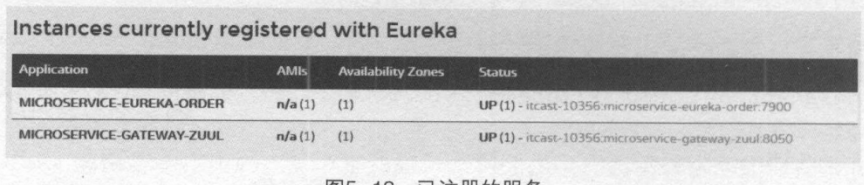
(4)分别启动注册中心、服务提供者和网关服务后,注册中心已注册的服务
Zuul 的单独使用 上面的示例中,我们是将 Spring CloudZuul与 Spring Cloud Eureka 整合在一起使用的,此种方式可以让路由映射到具体服务。除此之外,Zul还可以不依赖 Eureka而单独使用。
order-url为Zul 的唯一标识,可以任意设置名称,但必须唯一。Path属性用于设置需要映射的路径,而url的属性值为path路由到的地址。
分布式配置管理
在传统的单体式应用系统中,我们通常会将配置文件和代码放在一起,但随着系统越来越大,需要实现的功能越来越多时,我们又不得不将系统升级为分布式系统,同时也会将系统的功能进行更加细化的拆分。拆分后,所有的服务应用都会有自己的配置文件,当需要修改某个服务的配| 置时,我们可能需要修改很多处,并且为了某一项配置的修改,可能需要重启这个服务相关的所|有服务,这显然是非常麻烦的。 为了便于集中配置的统一管理,在分布式架构中通常会使用分布式配置中心组件,目前比较流行的分布式配置中心组件有百度的disconf、阿里的 diamond、携程的apollo和Spring Cloud 的Config等。相对于同类产品而言,Spring Cloud Config 最大的优势就是和Spring的无缝集成,对于已有的 Spring 应用程序的迁移成本非常低,结合Spring Boot 可使项目有更加统一的标准(包括依赖版本和约束规范),避免了因集成不同开发软件造成的版本依赖冲突等问题。
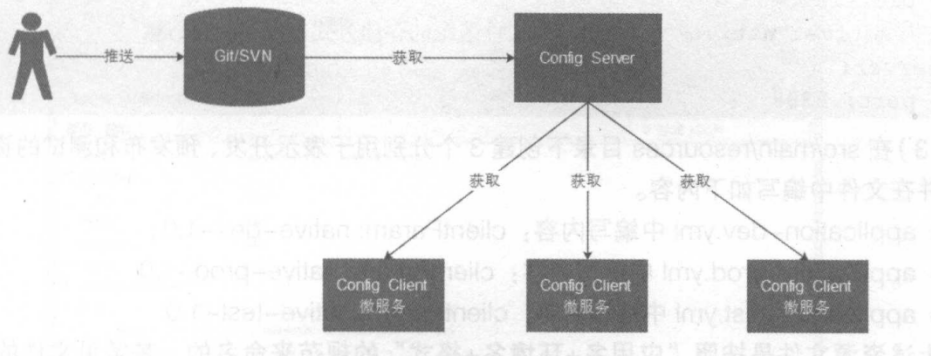
Spring Cloud Config是 Spring Cloud团队创建的一个全新的项目,该项目主要用来为分布式系统中的外部配置提供服务器(Config Server)和客户端(Contig Client)支持。
●服务器端(Config Server):也被称之为分布式配置中心,它是一个独立的微服务应用,主要用于集中管理应用程序各个环境下的配置,默认使用Git 存储配置文件内容,也可以使用SVN存储,或者是本地文件存储。
●客户端(Config Client):是Contig Server 的客户端,即微服务架构中的各个微服务应用。 它们通过指定的配置中心(Config Server)来管理应用资源以及与业务相关的配置内容,并在启|动时从配置中心获取和加载配置信息。
1.搭建 Config Server
(1)创建配置中心工程microservice-config-server,并在其 pom.xml中引入 Config Server的依赖
<project xmlns="http://maven.apache.org/POM/4.0.0"
         xmlns:xsi="http://www.w3.org/2001/XMLSchema-instance"
         xsi:schemaLocation="http://maven.apache.org/POM/4.0.0
                   http://maven.apache.org/xsd/maven-4.0.0.xsd">
    <modelVersion>4.0.0</modelVersion>
    <parent>
        <groupId>com.itheima</groupId>
        <artifactId>microservice-springcloud</artifactId>
        <version>0.0.1-SNAPSHOT</version>
    </parent>
    <artifactId>microservice-config-server</artifactId>
    <dependencies>
        <dependency>
            <groupId>org.springframework.cloud</groupId>
            <artifactId>spring-cloud-config-server</artifactId>
        </dependency>
    </dependencies>
</project>
(2)编写配置文件application.yml,添加服务端口号和存储属性等信息
spring:
  application:
    name: microservice-config-server
    profiles:
      active: native   # 使用本地文件系统的存储方式来保存配置信息
server:
  port: 8888
(3)创建3个分别用于表示开发、预发布和测试的资源配置文件
● application-dev.yml 中编写内容:clientParam:native-dev-1.0
clientParam: native-dev-1.0
●application-prod.yml 中编写内容:clientParam: native-prod-1.0
clientParam: native-prod-1.0
●application-test.yml中编写内容:clientParam: native-test-1.0
clientParam: native-test-1.0
(4)创建启动类,并在类上增加@EnableConfigServer注解以开启服务端功能
@EnableConfigServer
@SpringBootApplication
public class MicroserviceConfigServerApplication {

    public static void main(String[] args) {
        SpringApplication.run(MicroserviceConfigServerApplication.class, args);
    }

}
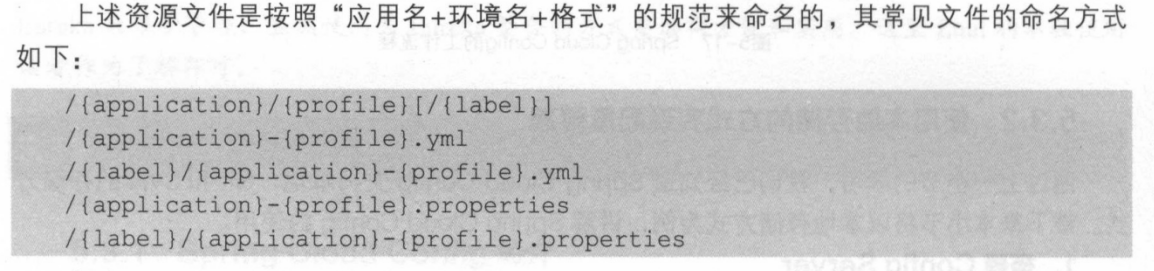
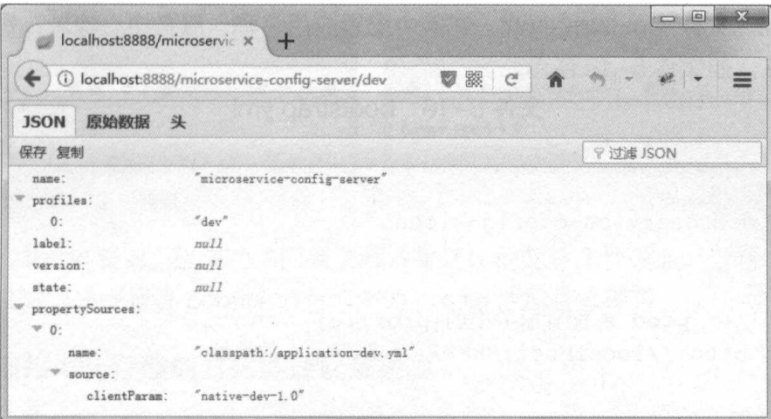
(5)启动工程,测试应用。应用启动成功后,按照如下格式的URL发起请求:http://localhost:8888/(applicationname)/{env}/{label}
2.搭建 Config Client
(1)创建客户端工程microservice-config-client,并在其 pom.xml中添加 Config 和的依赖
<project xmlns="http://maven.apache.org/POM/4.0.0"
         xmlns:xsi="http://www.w3.org/2001/XMLSchema-instance"
         xsi:schemaLocation="http://maven.apache.org/POM/4.0.0
                    http://maven.apache.org/xsd/maven-4.0.0.xsd">
    <modelVersion>4.0.0</modelVersion>
    <parent>
        <groupId>com.itheima</groupId>
        <artifactId>microservice-springcloud</artifactId>
        <version>0.0.1-SNAPSHOT</version>
    </parent>
    <artifactId>microservice-config-client</artifactId>
    <dependencies>
        <dependency>
            <groupId>org.springframework.cloud</groupId>
            <artifactId>spring-cloud-starter-config</artifactId>
        </dependency>
        <dependency>
            <groupId>org.springframework.boot</groupId>
            <artifactId>spring-boot-starter-web</artifactId>
        </dependency>
        <dependency>
            <groupId>org.springframework.boot</groupId>
            <artifactId>spring-boot-devtools</artifactId>
        </dependency>

    </dependencies>
</project>
(2)编写配置文件 bootstrap.yml,在其中配置应用名称、服务中心地址、需要访问的文件和端口号等信息
spring:
  application:
    name: microservice-config-client
  cloud:
    config:
      profile: prod
      uri: http://localhost:8888/
server:
  port: 8801
management:
  security:
    enabled: false
(3)创建启动类,并在类上添加@RestController 注解
@SpringBootApplication
@RestController
public class MicroserviceConfigClientApplication {
    @Value("${clientParam}")
    private String clientParam;

    @RequestMapping("/clientParam")
    public String getClientParam() {
        return this.clientParam;
    }

    @RequestMapping("/hello")
    public String hello() {
        return "欢迎光临";
    }


    public static void main(String[] args) {
        SpringApplication.run(MicroserviceConfigClientApplication.class, args);
    }

}
(4)测试应用是否能够正常访问,应用启动成功后,可以通过地址 http:/localhost:8801/hello测试应用
使用Git存储的方式实现配置管理
(1)配置 Git。在Git上创建microservice-study-config目录,并在目录中增加开发、预发布和测试的配置文件。
●application-dev.yml中编写内容:clientParam: git-dev-1.0
●application-prod.yml 中编写内容:clientParam:git-prod-1.0
●application-test.yml中编写内容:clientParam: git-test-1.0
(2)修改服务端配置文件。
spring:
  application:
    name: microservice-config-server
  cloud:
    config:
      server:
        git: # 使用git的方式
          uri: https://gitee.com/secret8/microservice-study-config.git
server:
  port: 8888
(3)修改客户端配置文件。
spring:
  application:
    name: microservice-config-client
  cloud:
    config:
      profile: prod
      label: master
      uri: http://localhost:8888/
server:
  port: 8801
(4)启动工程,测试应用。

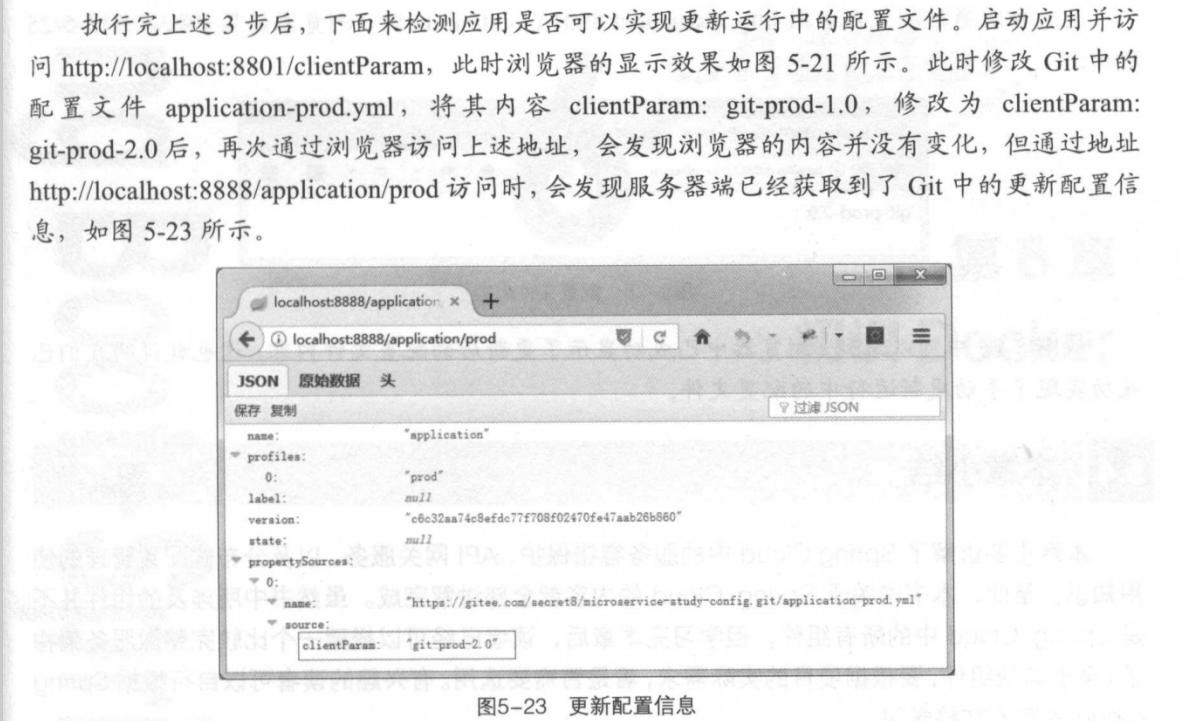
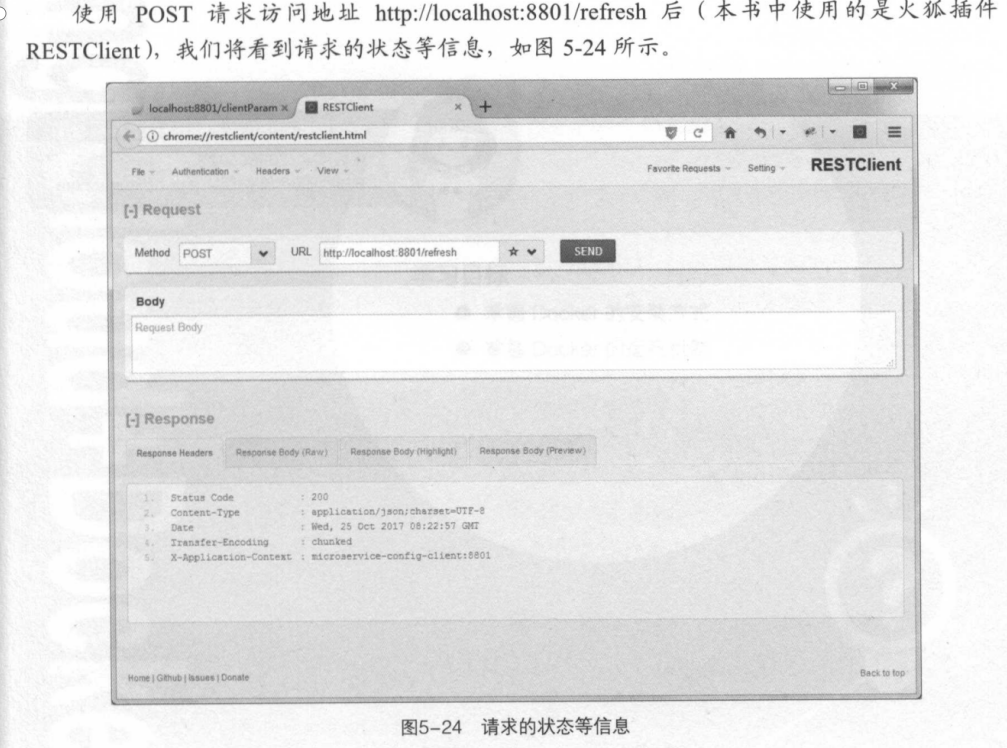
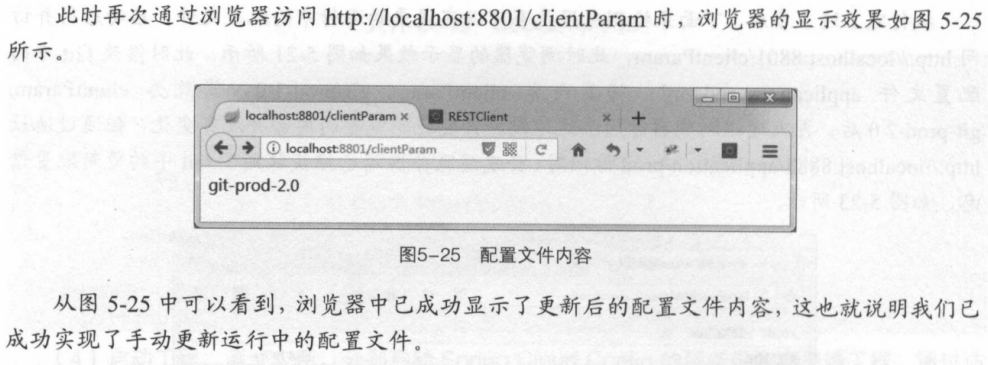
手动更新运行中的配置文件
1)在客户端的 pom.xml中添加依赖
  <dependency>
   <groupId>org.springframework.boot</groupId>
   <artifactId>spring-boot-starter-actuator</artifactId>
  </dependency>
2)在启动类上添加@RefreshScope 注解,开启refresh机制。添加此注解后,在执行/refresh时会更新该注解标注类下的所有变量值,包括 Config Client从Git 仓库中所获取的配置
management:
  security:
    enabled: false

 浙公网安备 33010602011771号