pytorch版手搓深度学习
PyTorch中, torch.Tensor 是存储和变换数据的主要⼯具
Tensor 提供GPU计算和⾃动求梯度等更多功能,这
些使 Tensor 更加适合深度学习。
2 数据操作
2.2.1 创建 TENSOR
创建⼀个5x3的未初始化的 Tensor :
import torch
x = torch.empty(5, 3)
print(x)
输出:
tensor([[ 0.0000e+00, 1.5846e+29, 0.0000e+00],
 [ 1.5846e+29, 5.6052e-45, 0.0000e+00],
 [ 0.0000e+00, 0.0000e+00, 0.0000e+00],
 [ 0.0000e+00, 0.0000e+00, 0.0000e+00],
 [ 0.0000e+00, 1.5846e+29, -2.4336e+02]])
创建⼀个5x3的随机初始化的 Tensor :
x = torch.rand(5, 3)
print(x)
tensor([[0.4963, 0.7682, 0.0885],
 [0.1320, 0.3074, 0.6341],
 [0.4901, 0.8964, 0.4556],
 [0.6323, 0.3489, 0.4017],
 [0.0223, 0.1689, 0.2939]])
创建⼀个5x3的long型全0的 Tensor :
x = torch.zeros(5, 3, dtype=torch.long)
print(x)
tensor([[0, 0, 0],
 [0, 0, 0],
 [0, 0, 0],
 [0, 0, 0],
 [0, 0, 0]])
还可以直接根据数据创建:
x = torch.tensor([5.5, 3])
print(x)
tensor([5.5000, 3.0000])
还可以通过现有的 Tensor 来创建,此⽅法会默认᯿⽤输⼊ Tensor 的⼀些属性,例如数据类型,除⾮⾃定义数据类型。
x = x.new_ones(5, 3, dtype=torch.float64) # 返回的tensor默认具有相同的
torch.dtype和torch.device
print(x)
x = torch.randn_like(x, dtype=torch.float) # 指定新的数据类型
print(x)
输出:
tensor([[1., 1., 1.],
 [1., 1., 1.],
 [1., 1., 1.],
 [1., 1., 1.],
 [1., 1., 1.]], dtype=torch.float64)
tensor([[ 0.6035, 0.8110, -0.0451],
 [ 0.8797, 1.0482, -0.0445],
 [-0.7229, 2.8663, -0.5655],
 [ 0.1604, -0.0254, 1.0739],
 [ 2.2628, -0.9175, -0.2251]])
我们可以通过 shape 或者 size() 来获取 Tensor 的形状:
print(x.size())
print(x.shape)
输出:
torch.Size([5, 3])
torch.Size([5, 3])
注意:返回的torch.Size其实就是⼀个tuple, ⽀持所有tuple的操作。
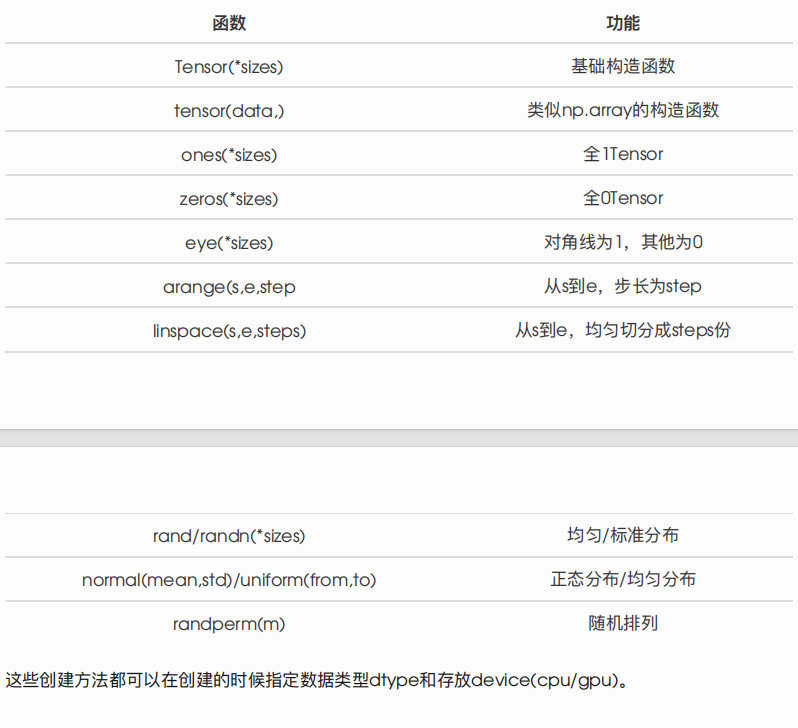
还有很多函数可以创建 Tensor ,去翻翻官⽅API就知道了,下表给了⼀些常⽤的作参考。
2.2.2 操作
算术操作
在PyTorch中,同⼀种操作可能有很多种形式,下⾯⽤加法作为例⼦。
x=torch.rand(5,3)
y = torch.rand(5, 3)
print(x + y)
print(torch.add(x, y))
result = torch.empty(5, 3)
torch.add(x, y, out=result)
print(result)
# adds x to y
y.add_(x)
print(y)
索引
我们还可以使⽤类似NumPy的索引操作来访问 Tensor 的⼀部分,需要注意的是:索引出来的结果与 原数据共享内存,也即修改⼀个,另⼀个会跟着修改。
import torch
# 创建一个示例张量
x = torch.tensor([[1, 2, 3], [4, 5, 6], [7, 8, 9]])
# 获取 x 的第一行作为视图
y = x[0, :]
# 对 y 进行原地操作
y += 1
# 打印 y 和 x 的第一行
print("y:", y)
print("x[0, :]:", x[0, :])
- 这里
y是x的第一行(索引为0)的一个 视图(View)。视图并不是一个独立的张量,而是与x共享底层数据。因此,对y的修改会直接反映到x上。
关键点
- 视图(View):
y = x[0, :]创建的是x的视图,而不是一个独立的副本。视图与源张量共享底层数据。
- 原地操作(In-place Operation):
y += 1是原地操作,直接修改y的值。由于y是x的视图,x的对应部分也会被修改。
- 避免修改源张量:
- 如果你不希望修改源张量
x,可以使用clone()方法创建一个独立的副本:
除了常⽤的索引选择数据之外,PyTorch还提供了⼀些⾼级的选择函数:

改变形状
⽤ view() 来改变 Tensor 的形状:
import torch
x=torch.tensor([[ 0.6035, 0.8110, -0.0451],
 [ 0.8797, 1.0482, -0.0445],
 [-0.7229, 2.8663, -0.5655],
 [ 0.1604, -0.0254, 1.0739],
 [ 2.2628, -0.9175, -0.2251]])
y = x.view(15)
z = x.view(-1, 5) # -1所指的维度可以根据其他维度的值推出来
print(x.size(), y.size(), z.size())
输出:
torch.Size([5, 3]) torch.Size([15]) torch.Size([3, 5])
注意 view() 返回的新tensor与源tensor共享内存(其实是同⼀个tensor),也即更改其中的⼀个,另 外⼀个也会跟着改变。(顾名思义,view仅仅是改变了对这个张量的观察⻆度)
x += 1
print(x)
print(y) # 也加了1
>>>
tensor([[1.6035, 1.8110, 0.9549],
 [1.8797, 2.0482, 0.9555],
 [0.2771, 3.8663, 0.4345],
 [1.1604, 0.9746, 2.0739],
 [3.2628, 0.0825, 0.7749]])
tensor([1.6035, 1.8110, 0.9549, 1.8797, 2.0482, 0.9555, 0.2771,
3.8663, 0.4345,
 1.1604, 0.9746, 2.0739, 3.2628, 0.0825, 0.7749])
所以如果我们想返回⼀个真正新的副本(即不共享内存)该怎么办呢?Pytorch还提供了⼀ 个 reshape() 可以改变形状,但是此函数并不能保证返回的是其拷⻉,所以不推荐使⽤。推荐先 ⽤ clone 创造⼀个副本然后再使⽤ view 。参考此处
x_cp = x.clone().view(15)
x -= 1
print(x)
print(x_cp)
*使⽤ clone 还有⼀个好处是会被记录在计算图中,即梯度回传到副本时也会传到源 Tensor 。*
另外⼀个常⽤的函数就是 item() , 它可以将⼀个标量 Tensor 转换成⼀个Python number:
x = torch.randn(1)
print(x)
print(x.item())
>>>
tensor([2.3466])
2.3466382026672363
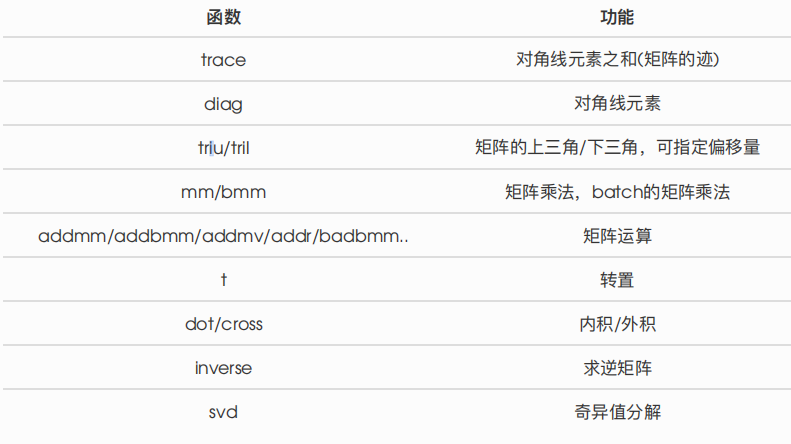
线性代数
另外,PyTorch还⽀持⼀些线性函数,这⾥提⼀下,免得⽤起来的时候⾃⼰造轮⼦,具体⽤法参考官⽅
⽂档。如下表所示:
PyTorch中的 Tensor ⽀持超过⼀百种操作,包括转置、索引、切⽚、数学运算、线性代数、随机数等
等,可参考
https://pytorch.org/docs/stable/tensors.html
2.2.3 ⼴播机制
前⾯我们看到如何对两个形状相同的 Tensor 做按元素运算。当对两个形状不同的 Tensor 按元素运算 时,可能会触发⼴播(broadcasting)机制:先适当复制元素使这两个 Tensor 形状相同后再按元素 运算。例如:
x = torch.arange(1, 3).view(1, 2)
print(x)
y = torch.arange(1, 4).view(3, 1)
print(y)
print(x + y)
>>>
tensor([[1, 2]])
tensor([[1],
 [2],
 [3]])
tensor([[2, 3],
 [3, 4],
 [4, 5]])
由于 x 和 y 分别是1⾏2列和3⾏1列的矩阵,如果要计算 x + y ,那么 x 中第⼀⾏的2个元素被⼴播 (复制)到了第⼆⾏和第三⾏,⽽ y 中第⼀列的3个元素被⼴播(复制)到了第⼆列。如此,就可以对2 个3⾏2列的矩阵按元素相加。
2.2.4 运算的内存开销
前⾯说了,索引、 view 是不会开辟新内存的,⽽像 y = x + y 这样的运算是会新开内存的,然后 将 y 指向新内存。为了演示这⼀点,我们可以使⽤Python⾃带的 id 函数:如果两个实例的ID⼀致,那 么它们所对应的内存地址相同;反之则不同。
x = torch.tensor([1, 2])
y = torch.tensor([3, 4])
id_before = id(y)
y = y + x
print(id(y) == id_before) # False
如果想指定结果到原来的 y 的内存,我们可以使⽤前⾯介绍的索引来进⾏替换操作。在下⾯的例⼦中, 我们把 x + y 的结果通过 [:] 写进 y 对应的内存中。
x = torch.tensor([1, 2])
y = torch.tensor([3, 4])
id_before = id(y)
y[:] = y + x
print(id(y) == id_before) # True
我们还可以使⽤运算符全名函数中的 out 参数或者⾃加运算符 += (也即 add_() )达到上述效果,例如 torch.add(x, y, out=y) 和 y += x ( y.add_(x) )。
x = torch.tensor([1, 2])
y = torch.tensor([3, 4])
id_before = id(y)
torch.add(x, y, out=y) # y += x, y.add_(x)
print(id(y) == id_before) # True
2.2.5 TENSOR 和NUMPY相互转换
我们很容易⽤ numpy() 和 from_numpy() 将 Tensor 和NumPy中的数组相互转换。但是需要注意的⼀ 点是: 这两个函数所产⽣的的 Tensor 和NumPy中的数组共享相同的内存(所以他们之间的转换很 快),改变其中⼀个时另⼀个也会改变!!!
还有⼀个常⽤的将NumPy中的array转换成 Tensor 的⽅法就torch.tensor() , 需要注意的 是,此⽅法总是会进⾏数据拷⻉(就会消耗更多的时间和空间),所以返回的 Tensor 和原来的数 据不再共享内存。
Tensor 转NumPy
使⽤ numpy() 将 Tensor 转换成NumPy数组:
a = torch.ones(5)
b = a.numpy()
print(a, b)
a += 1
print(a, b)
b += 1
print(a, b)
>>>
tensor([1., 1., 1., 1., 1.]) [1. 1. 1. 1. 1.]
tensor([2., 2., 2., 2., 2.]) [2. 2. 2. 2. 2.]
tensor([3., 3., 3., 3., 3.]) [3. 3. 3. 3. 3.]
NumPy数组转 Tensor
使⽤ from_numpy() 将NumPy数组转换成 Tensor :
import numpy as np
a = np.ones(5)
b = torch.from_numpy(a)
print(a, b)
a += 1
print(a, b)
b += 1
print(a, b)
>>>
[1. 1. 1. 1. 1.] tensor([1., 1., 1., 1., 1.], dtype=torch.float64)
[2. 2. 2. 2. 2.] tensor([2., 2., 2., 2., 2.], dtype=torch.float64)
[3. 3. 3. 3. 3.] tensor([3., 3., 3., 3., 3.], dtype=torch.float64)
所有在CPU上的 Tensor (除了 CharTensor )都⽀持与NumPy数组相互转换。 此外上⾯提到还有⼀个常⽤的⽅法就是直接⽤ torch.tensor() 将NumPy数组转换成 Tensor ,需要 注意的是该⽅法总是会进⾏数据拷⻉,返回的 Tensor 和原来的数据*不再共享内存*。
c = torch.tensor(a)
a += 1
print(a, c)
>>>
[4. 4. 4. 4. 4.] tensor([3., 3., 3., 3., 3.], dtype=torch.float64)

 浙公网安备 33010602011771号