


mongodb 3.4 分片 一主 一副 一仲 鉴权集群部署.
Docker方式部署
为了避免过分冗余,并且在主节点挂了,还能顺利自动提升,所以加入仲裁节点
mongodb版本:
环境:一台虚拟机
三个configsvr 副本: 端口为 27020,27021,27022
两个分片:
shard1:-> 三个副本,端口为 27010,27011,27012
shard2:-> 三个副本,端口为 27013,27014,27015
一个路由:mongos -> 端口为 27023
前置条件:
创建数据存储文件的目录
mkdir /usr/local/mongodb/data
mkdir /usr/local/mongodb/log
cd /usr/local/mongodb/data
mkdir c0 && mkdir c1 && mkdir c2 && mkdir s100 && mkdir s101 &&  mkdir s102 && mkdir s200 && mkdir s201 && mkdir s202
生成鉴权需要的keyfile,keyfile 内容不能太长,否则启动不了,权限不能太大,否则也是启动不了
openssl rand -base64 512 > /usr/local/mongodb/keyfile
chmod 600 /usr/local/mongodb/keyfile
副本模式启动configsvr
 mongod --dbpath /usr/local/mongodb/data/c0 --logpath /usr/local/mongodb/log/c0.log --fork --smallfiles --port 27020 --replSet cs --configsvr --bind_ip=192.168.1.9
 mongod --dbpath /usr/local/mongodb/data/c1 --logpath /usr/local/mongodb/log/c1.log --fork --smallfiles --port 27021 --replSet cs --configsvr --bind_ip=192.168.1.9
 mongod --dbpath /usr/local/mongodb/data/c2 --logpath /usr/local/mongodb/log/c2.log --fork --smallfiles --port 27022 --replSet cs --configsvr --bind_ip=192.168.1.9
集群配置,登陆任意一个configsvr
mongo 192.168.1.9:27020
var css={_id:"cs","configsvr":true,members:[{_id:0,host:"192.168.1.9:27020"},{_id:1,host:"192.168.1.9:27021"},{_id:2,host:"192.168.1.9:27022"}]}
rs.initiate(css)
副本模式启动分片1
 mongod --dbpath /usr/local/mongodb/data/s100 --logpath /usr/local/mongodb/log/s100.log --fork --smallfiles --port 27010 --replSet shard1 --shardsvr --bind_ip=192.168.1.9
 mongod --dbpath /usr/local/mongodb/data/s101 --logpath /usr/local/mongodb/log/s101.log --fork --smallfiles --port 27011 --replSet shard1 --shardsvr --bind_ip=192.168.1.9
 mongod --dbpath /usr/local/mongodb/data/s102 --logpath /usr/local/mongodb/log/s102.log --fork --smallfiles --port 27012 --replSet shard1 --shardsvr --bind_ip=192.168.1.9
登陆任意一个分片1
use admin;
var cnf={_id:"shard1",members:[{_id:0,host:"192.168.1.9:27017"},{_id:1,host:"192.168.1.9:27018"}]}
rs.initiate(cnf)
rs.addArb("192.168.1.9:27019")#仲裁节点
副本模式启动分片2
 mongod --dbpath /usr/local/mongodb/data/s100 --logpath /usr/local/mongodb/log/s100.log --fork --smallfiles --port 27013 --replSet shard2 --shardsvr --bind_ip=192.168.1.9
 mongod --dbpath /usr/local/mongodb/data/s101 --logpath /usr/local/mongodb/log/s101.log --fork --smallfiles --port 27014 --replSet shard2 --shardsvr --bind_ip=192.168.1.9
 mongod --dbpath /usr/local/mongodb/data/s102 --logpath /usr/local/mongodb/log/s102.log --fork --smallfiles --port 27015 --replSet shard2 --shardsvr --bind_ip=192.168.1.9
登陆任意一个分片2,操作同分片1
启动路由
mongos --logpath /usr/local/mongodb/log/m23.log --port 27023 --fork --configdb cs/192.168.1.9:27020,192.168.1.9:27021,192.168.1.9:27022 --bind_ip=192.168.1.9
登陆路由
mongo 192.168.1.9:27023
添加分片,这里写全了分片的 host, 实际只需要添加其中一个副本或者仲裁host即可 可选192.168.1.9:27010 192.168.1.9:27011 192.168.1.9:27012 其中一个

设置分片数据库,设置片键
mongos> sh.enableSharding("testdb")
mongos> sh.shardCollection("testdb.orderInfo",{"_id":"hashed"})
{ "collectionsharded" : "testdb.orderInfo", "ok" : 1 }
趁还没有加上鉴权,赶紧添加用户
use admin
db.createUser(
   {
     user: "dba",
     pwd: "dba",
     roles: [ { role: "userAdminAnyDatabase", db: "admin" } ]
   }
 )
use testdb
mongos> db.createUser(
...   {
...     user: "testuser",
...     pwd: "testuser",
...     roles: [ { role: "readWrite", db: "testdb" } ]
...   }
... )
Successfully added user: {
    "user" : "testuser",
    "roles" : [
        {
            "role" : "readWrite",
            "db" : "testdb"
        }
    ]
}
mongos> db.auth("testuser","testuser")
1
mongos> exit
然后依次关闭mongodb,等下添加鉴权再启动.
因为懒,我选择重启,自己的电脑,随便整,别太较真.......

依次启动mongod,这次加上鉴权参数 --keyFile /usr/local/mongodb/keyfile
mongod --dbpath /usr/local/mongodb/data/c0 --logpath /usr/local/mongodb/log/c0.log --keyFile /usr/local/mongodb/keyfile --fork --smallfiles --port 27020 --replSet cs --configsvr --bind_ip=192.168.1.9
 mongod --dbpath /usr/local/mongodb/data/c1 --logpath /usr/local/mongodb/log/c1.log --keyFile /usr/local/mongodb/keyfile --fork --smallfiles --port 27021 --replSet cs --configsvr --bind_ip=192.168.1.9
 mongod --dbpath /usr/local/mongodb/data/c2 --logpath /usr/local/mongodb/log/c2.log --keyFile /usr/local/mongodb/keyfile --fork --smallfiles --port 27022 --replSet cs --configsvr --bind_ip=192.168.1.9

 mongod --dbpath /usr/local/mongodb/data/s100 --logpath /usr/local/mongodb/log/s100.log --keyFile /usr/local/mongodb/keyfile --fork --smallfiles --port 27010 --replSet shard1 --shardsvr --bind_ip=192.168.1.9
 mongod --dbpath /usr/local/mongodb/data/s101 --logpath /usr/local/mongodb/log/s101.log --keyFile /usr/local/mongodb/keyfile --fork --smallfiles --port 27011 --replSet shard1 --shardsvr --bind_ip=192.168.1.9
 mongod --dbpath /usr/local/mongodb/data/s102 --logpath /usr/local/mongodb/log/s102.log --keyFile /usr/local/mongodb/keyfile --fork --smallfiles --port 27012 --replSet shard1 --shardsvr --bind_ip=192.168.1.9

 mongod --dbpath /usr/local/mongodb/data/s100 --logpath /usr/local/mongodb/log/s100.log --keyFile /usr/local/mongodb/keyfile --fork --smallfiles --port 27013 --replSet shard2 --shardsvr --bind_ip=192.168.1.9
 mongod --dbpath /usr/local/mongodb/data/s101 --logpath /usr/local/mongodb/log/s101.log --keyFile /usr/local/mongodb/keyfile --fork --smallfiles --port 27014 --replSet shard2 --shardsvr --bind_ip=192.168.1.9
 mongod --dbpath /usr/local/mongodb/data/s102 --logpath /usr/local/mongodb/log/s102.log --keyFile /usr/local/mongodb/keyfile --fork --smallfiles --port 27015 --replSet shard2 --shardsvr --bind_ip=192.168.1.9
mongos --logpath /usr/local/mongodb/log/m23.log --port 27023 --fork --keyFile /usr/local/mongodb/keyfile --configdb cs/192.168.1.9:27020,192.168.1.9:27021,192.168.1.9:27022 --bind_ip=192.168.1.9
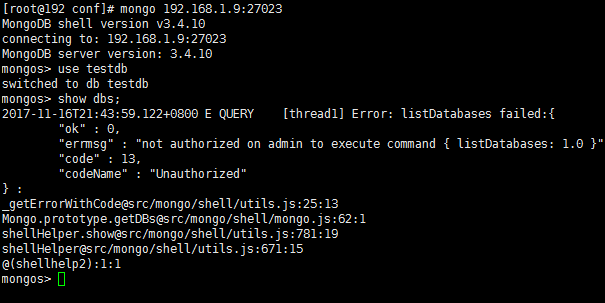
测试:
[root@192 conf]# mongo 192.168.1.9:27023
MongoDB shell version v3.4.10
connecting to: 192.168.1.9:27023
MongoDB server version: 3.4.10
mongos> use testdb
switched to db testdb
mongos> db.auth("testuser","testuser")
1
mongos> db.auth("testuser","testuser")
1
mongos> exit
bye
或者
mongo 192.168.1.9:27023/testdb -u testuser -p
测试不使用账号密码
使用dba登陆,创建超级管理员用户,否则没有sh权限
mongos> use admin
switched to db admin
mongos> db.createUser(
...    {
...      user: "root",
...      pwd: "root",
...      roles: [ { role: "root", db: "admin" } ]
...    }
...  )
Successfully added user: {
    "user" : "root",
    "roles" : [
        {
            "role" : "root",
            "db" : "admin"
        }
    ]
}
mongos> db.auth("root","root")
1
mongos> sh.status();
--- Sharding Status ---
  sharding version: {
      "_id" : 1,
      "minCompatibleVersion" : 5,
      "currentVersion" : 6,
      "clusterId" : ObjectId("5a0d5d371c121ebe9dcbdace")
  }
  shards:
        {  "_id" : "shard1",  "host" : "shard1/192.168.1.9:27010,192.168.1.9:27011,192.168.1.9:27012",  "state" : 1 }
        {  "_id" : "shard2",  "host" : "shard2/192.168.1.9:27013,192.168.1.9:27014,192.168.1.9:27015",  "state" : 1 }
  active mongoses:
        "3.4.10" : 1
  autosplit:
        Currently enabled: yes
  balancer:
        Currently enabled:  yes
        Currently running:  no
NaN
        Failed balancer rounds in last 5 attempts:  2
        Last reported error:  could not find host matching read preference { mode: "primary" } for set shard1
        Time of Reported error:  Fri Nov 17 2017 08:33:47 GMT+0800 (CST)
        Migration Results for the last 24 hours:
                28 : Success
                1 : Failed with error 'aborted', from shard2 to shard1
  databases:
        {  "_id" : "testdb",  "primary" : "shard2",  "partitioned" : true }
                testdb.orderInfo
                        shard key: { "taxNo" : 1, "lastModifyDate" : 1 }
                        unique: false
                        balancing: true
                        chunks:
                                shard1    28
                                shard2    29
                        too many chunks to print, use verbose if you want to force print
补充:
集群用户不能用来认证单个shard节点,必须要在shard节点单独建立用户
以下测试,片键为公司编码以及用户名,复合键片,实现多热点
插入500W 单文档数据,不包含内嵌文档,在NVME 固态硬盘下表现 速度非常快.只用了56秒
完成插入查看数据分布情况
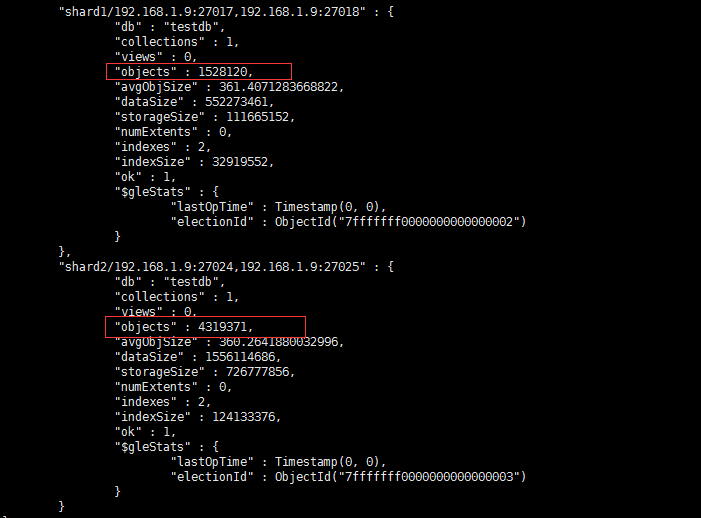
分布不太均衡,等一会再看一次
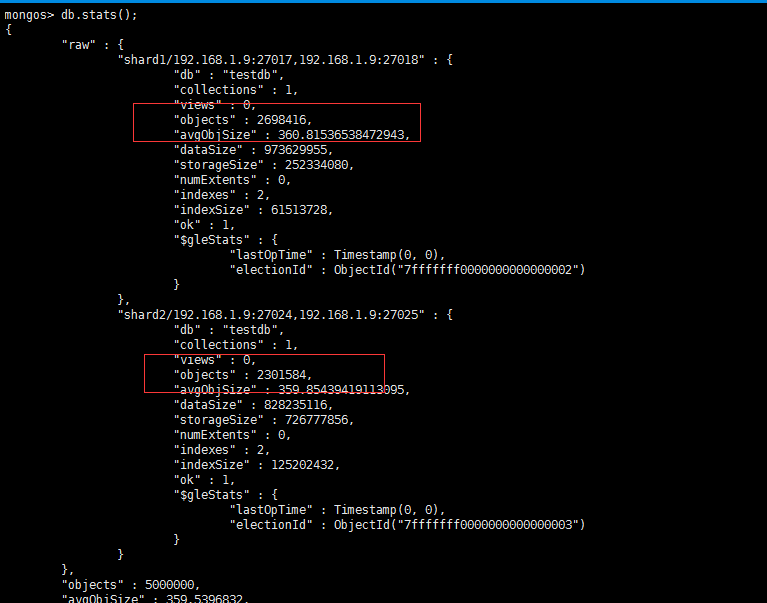
非常均衡,因为我用了9个公司编码,14个随机用户名插入.但是只有两个分片,所以导致数据会分发倒第一次插入的分片中,导致数据需要频繁自动均衡.建议有条件的,初始化的时候,创建多个分片


 浙公网安备 33010602011771号