


SpringBoot原理发现(一)
说明:
本系列基于SpringBoot 2.2.9.RELEASE 版本,对SpringBoot的原理进行分析,一共分为四节:
SpringBoot原理发现(一):创建Hello World,对pom依赖以及@SpringBootApplication注解进行分析
SpringBoot原理发现(二):分析SpringBoot自动配置原理
SpringBoot原理发现(三):通过主配置类main方法分析SpringBoot启动配置原理
SpringBoot原理发现(四):了解SpringBoot启动中的几个重要回调机制
Hello World
创建Hello World,主启动类如下:
@SpringBootApplication
public class DemoApplication {

    public static void main(String[] args) {
        SpringApplication.run(DemoApplication.class, args);
    }

    @RestController
    public class HelloController{

        @GetMapping("/")
        public String helloWorld(){
            return "hello world";
        }
    }
}
1. POM文件
1.1 父POM
<!-- 当前项目pom -->
<parent>
    <groupId>org.springframework.boot</groupId>
    <artifactId>spring-boot-starter-parent</artifactId>
    <version>2.2.9.RELEASE</version>
    <relativePath/>
</parent>

<!-- spring-boot-starter-parent 的父pom -->
<parent>
  <groupId>org.springframework.boot</groupId>
  <artifactId>spring-boot-dependencies</artifactId>
  <version>2.2.9.RELEASE</version>
  <relativePath>../../spring-boot-dependencies</relativePath>
</parent>
可以看出当前项目pom中的parent 依赖了 spring-boot-dependencies,而spring-boot-dependencies中管理的就是SpringBoot应用里面的所有依赖版本。(如果其中没包含,需要自定义在父pom中进行依赖)
<!-- spring-boot-dependencies 部分代码 -->
<properties>
    <activemq.version>5.15.13</activemq.version>
    <antlr2.version>2.7.7</antlr2.version>
    <appengine-sdk.version>1.9.81</appengine-sdk.version>
    <artemis.version>2.10.1</artemis.version>
    <aspectj.version>1.9.6</aspectj.version>
    <assertj.version>3.13.2</assertj.version>
    <atomikos.version>4.0.6</atomikos.version>
    <awaitility.version>4.0.3</awaitility.version>
    <bitronix.version>2.1.4</bitronix.version>

  .......
1.2 启动器
SpringBoot将所有的功能场景都抽取成一个个的starter,只需要依赖某个starter,便有了相关依赖信息及功能,这样的starter称之为场景启动器。
可以通过点击官网进行查看包含哪些starter,如下图:
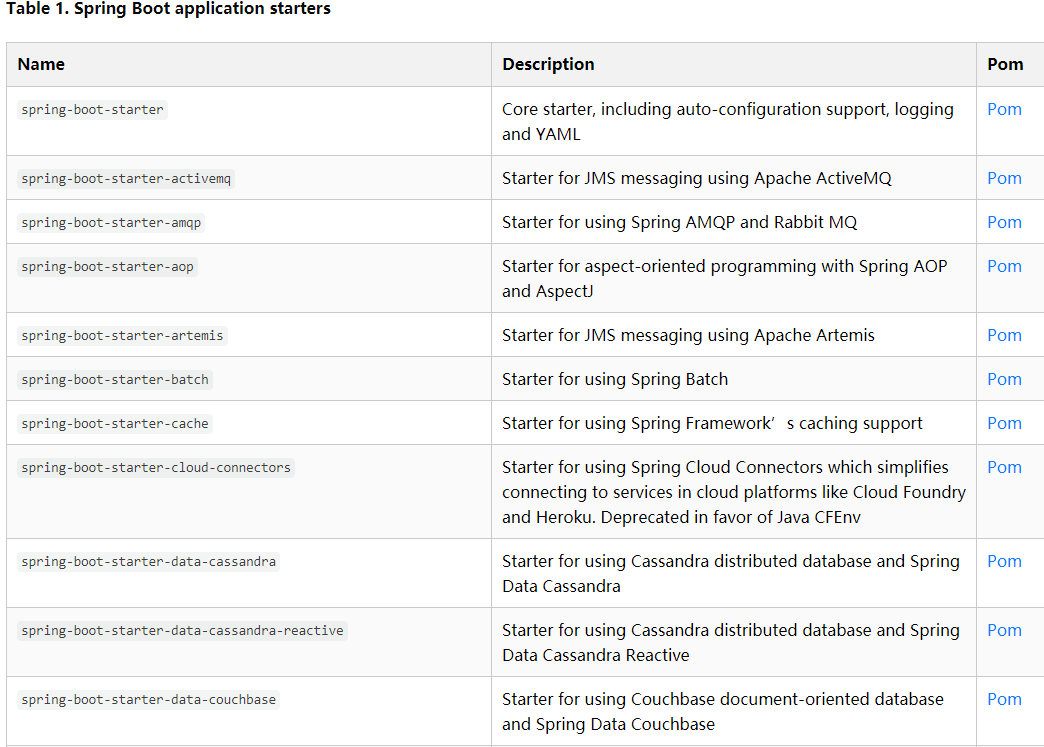
如开发web应用,只需要引入spring-boot-starter-web便有了web模块的相关功能
<dependencies>
  <dependency>
    <groupId>org.springframework.boot</groupId>
    <artifactId>spring-boot-starter-web</artifactId>
  </dependency>

    ......
spring-boot-starter-web:管理了web模块需要引用的依赖文件,如下图:
<!-- spring-boot-starter-web.pom部分依赖-->
<dependencies>
    <dependency>
      <groupId>org.springframework.boot</groupId>
      <artifactId>spring-boot-starter</artifactId>
      <version>2.2.9.RELEASE</version>
      <scope>compile</scope>
    </dependency>
    <dependency>
      <groupId>org.springframework.boot</groupId>
      <artifactId>spring-boot-starter-json</artifactId>
      <version>2.2.9.RELEASE</version>
      <scope>compile</scope>
    </dependency>
    <dependency>
      <groupId>org.springframework.boot</groupId>
      <artifactId>spring-boot-starter-tomcat</artifactId>
      <version>2.2.9.RELEASE</version>
      <scope>compile</scope>
    </dependency>
2.主程序分析
@SpringBootApplication
public class DemoApplication {

    public static void main(String[] args) {
        SpringApplication.run(DemoApplication.class, args);
    }

    @RestController
    public class HelloController{

        @GetMapping("/")
        public String helloWorld(){
            return "hello world";
        }
    }
}
2.1 @SpringBootApplication
该注解标注在某个类上,说明这个类是SpringBoot的主配置类,SpringBoot应用应该使用这个类的main方法进行启动。
进入该注解,可以看到@SpringBootApplication是一个组合注解,代码如下:
@Target(ElementType.TYPE)
@Retention(RetentionPolicy.RUNTIME)
@Documented
@Inherited
@SpringBootConfiguration
@EnableAutoConfiguration
@ComponentScan(excludeFilters = { @Filter(type = FilterType.CUSTOM, classes = TypeExcludeFilter.class),
        @Filter(type = FilterType.CUSTOM, classes = AutoConfigurationExcludeFilter.class) })
public @interface SpringBootApplication {
2. 1.1 @SpringBootConfiguration
SpringBoot的配置类。进去会发现其实就是一个Spring的配置类@Configuration,而@Configuration其实就是一个组件@Component。
@SpringBootConfiguration是SpringBoot提供的,而@Configuration是Spring提供的
代码如下:
/**
* SpringBootConfiguration
*/
@Target({ElementType.TYPE})
@Retention(RetentionPolicy.RUNTIME)
@Documented
@Configuration
public @interface SpringBootConfiguration {

.....

/**
* Configuration
*/
@Target(ElementType.TYPE)
@Retention(RetentionPolicy.RUNTIME)
@Documented
@Component
public @interface Configuration {
2 .2 @EnableAutoConfiguration
作用:开启自动配置功能
所谓开启自动配置:以前需要提供各种配置文件,如包扫描等,现在使用@EnableAutoConfiguration标注,SpringBoot就会开启自动配置功能。
点开这个注解,会发现它同样是组合注解,如下:
@Target(ElementType.TYPE)
@Retention(RetentionPolicy.RUNTIME)
@Documented
@Inherited
@AutoConfigurationPackage
@Import(AutoConfigurationImportSelector.class)
public @interface EnableAutoConfiguration {
2.2.1 @AutoConfigurationPackage
@Target(ElementType.TYPE)
@Retention(RetentionPolicy.RUNTIME)
@Documented
@Inherited
@Import(AutoConfigurationPackages.Registrar.class)
public @interface AutoConfigurationPackage {

}
@Import(AutoConfigurationPackages.Registrar.class):向容器中导入一个组件,组件由@Import后面传入的类指定
AutoConfigurationPackages.Registrar.class 关键代码如下:
static class Registrar implements ImportBeanDefinitionRegistrar, DeterminableImports {

        @Override
        public void registerBeanDefinitions(AnnotationMetadata metadata, BeanDefinitionRegistry registry) {
            register(registry, new PackageImport(metadata).getPackageName());
        }
通过debug可以查看该注解是标注是在主启动类上,获取主启动类所在的包位置路径,将该路径下面的所有包扫描注入到容器中。类似spring配置文件xml中 <context:component-scan base-package="xx.yyy" />功能。
@AutoConfigurationPackage 其实就是自动获取主配置类下面的所有包并扫描注入进IOC容器中。
2.2.2 @Import(AutoConfigurationImportSelector.class)
同样是往IOC容器中导入AutoConfigurationImportSelector.class中指定的组件。
AutoConfigurationImportSelector主要代码:
protected AutoConfigurationEntry getAutoConfigurationEntry(AutoConfigurationMetadata autoConfigurationMetadata,
            AnnotationMetadata annotationMetadata) {
        if (!isEnabled(annotationMetadata)) {
            return EMPTY_ENTRY;
        }
        AnnotationAttributes attributes = getAttributes(annotationMetadata);
        List<String> configurations = getCandidateConfigurations(annotationMetadata, attributes);
        configurations = removeDuplicates(configurations);
        Set<String> exclusions = getExclusions(annotationMetadata, attributes);
        checkExcludedClasses(configurations, exclusions);
        configurations.removeAll(exclusions);
        configurations = filter(configurations, autoConfigurationMetadata);
        fireAutoConfigurationImportEvents(configurations, exclusions);
        return new AutoConfigurationEntry(configurations, exclusions);
    }
通过debug可以看出,它会返回各种XXXAutoConfiguration。而有了这些XXXAutoConfiguration,就不需要我们在手动去编写相关场景的注入功能组件等工作,如下图:
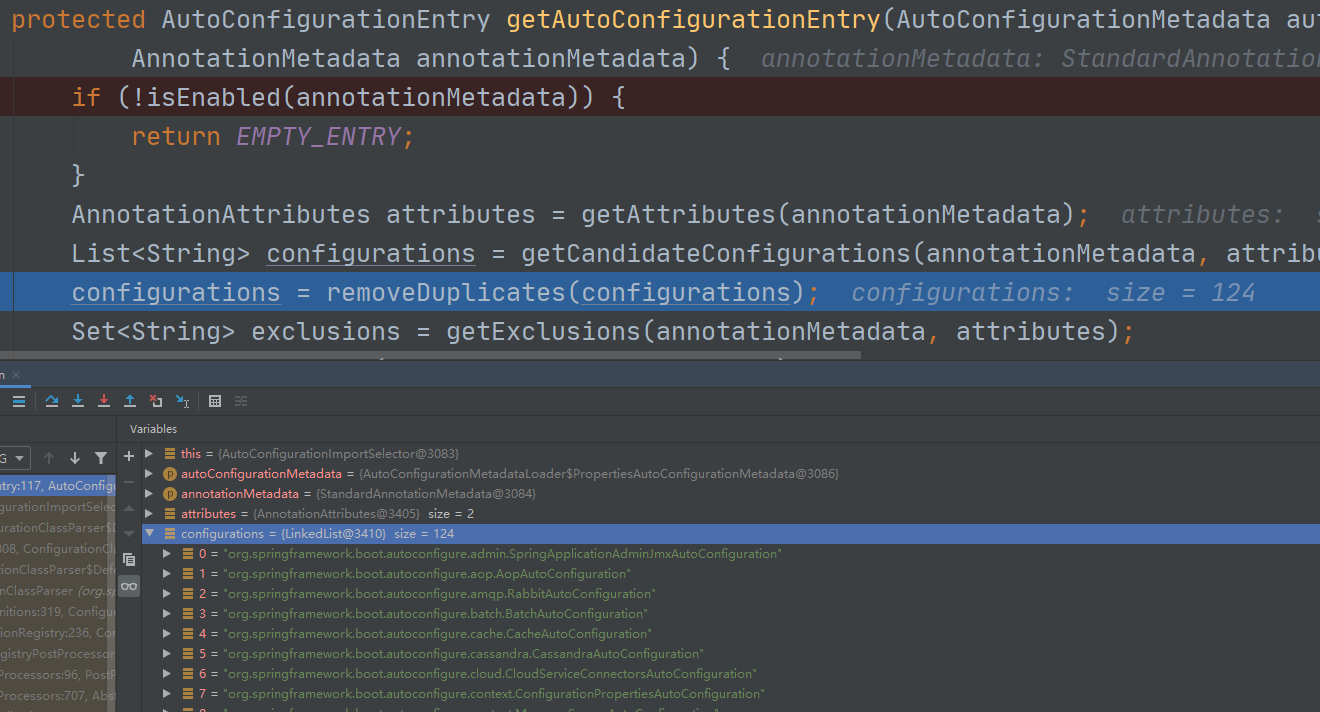
这些XXXAutoConfiguration又是从何而来呢?
protected List<String> getCandidateConfigurations(AnnotationMetadata metadata, AnnotationAttributes attributes) {
        List<String> configurations = SpringFactoriesLoader.loadFactoryNames(getSpringFactoriesLoaderFactoryClass(),
                getBeanClassLoader());
        Assert.notEmpty(configurations, "No auto configuration classes found in META-INF/spring.factories. If you "
                + "are using a custom packaging, make sure that file is correct.");
        return configurations;
    }
SpringFactoriesLoader.loadFactoryNames(getSpringFactoriesLoaderFactoryClass(),getBeanClassLoader())
第一个参数:EnableAutoConfiguration.class
第二个参数:ClassLoader
进入loadFactoryNames方法,SpringBoot会扫描类路径下的META-INF/spring.factories 文件中定义的数据,并返回第一个参数EnableAutoConfiguration指定的值,并将这些值作为自动配置类导入到容器中,
在后续该方法会经常出现,用于扫描spring.factories中定义的值,如下图:
![]()
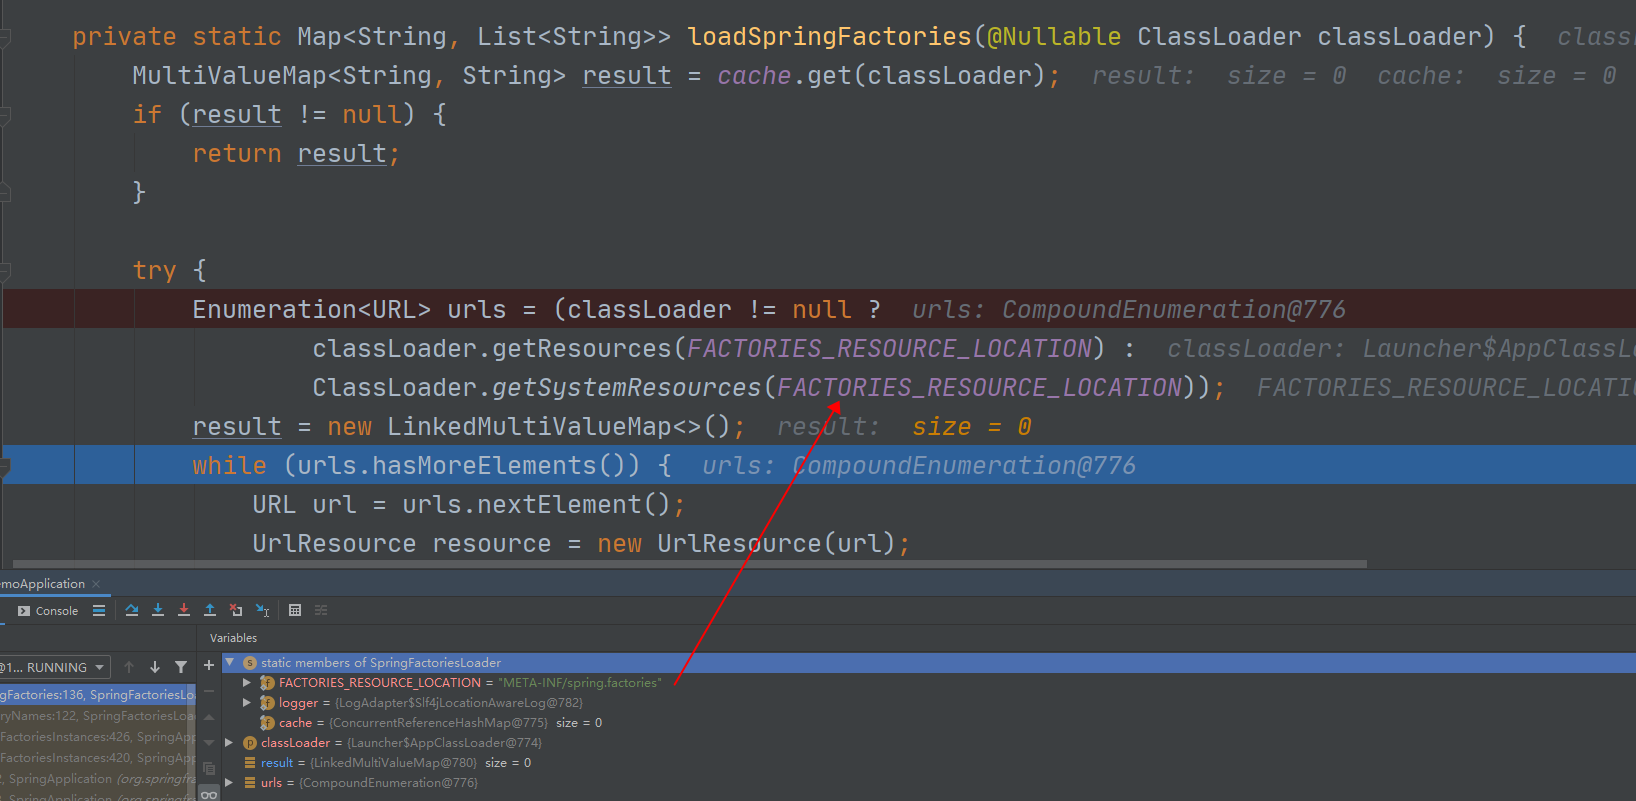
# Auto Configure
org.springframework.boot.autoconfigure.EnableAutoConfiguration=\
org.springframework.boot.autoconfigure.admin.SpringApplicationAdminJmxAutoConfiguration,\
org.springframework.boot.autoconfigure.aop.AopAutoConfiguration,\
org.springframework.boot.autoconfigure.amqp.RabbitAutoConfiguration,\
org.springframework.boot.autoconfigure.batch.BatchAutoConfiguration,\
org.springframework.boot.autoconfigure.cache.CacheAutoConfiguration,\
org.springframework.boot.autoconfigure.cassandra.CassandraAutoConfiguration,\
org.springframework.boot.autoconfigure.cloud.CloudServiceConnectorsAutoConfiguration,\
org.springframework.boot.autoconfigure.context.ConfigurationPropertiesAutoConfiguration,\
org.springframework.boot.autoconfigure.context.MessageSourceAutoConfiguration,\
org.springframework.boot.autoconfigure.context.PropertyPlaceholderAutoConfiguration,\
org.springframework.boot.autoconfigure.couchbase.CouchbaseAutoConfiguration,\

......
至此基本上可以看出SpringBoot是如何进行加载且工作的。说到底spring的配置文件一个也没少,只是SpringBoot底层将我们的配置文件进行自动配置到容器中了,少了手动编写大量的组件配置。

 浙公网安备 33010602011771号