istio部署
istio部署
基于k8s运行
控制平面默认部署于istio-system命名空间
官方文档:https://istio.io/latest/docs/setup/getting-started/
istio包
bin         二进制程序,istioctl
manifests   内置配置清单
samples     例子
	addons      扩展插件
	bookinfo    演示微服务项目bookinfo
部署资源
部署时,放在:istio-system 命名空间
- istiod
- ingress-gateway
- egress-gateway
- 插件(可选)
- istio-proxy(sidecar)
默认安装后,istio-ingressgateway的svc类型为load
balance,但lb是基于云平台api的,所以想要正常访问需要的方案:
- 关联externalIP(公网ip)
- 使用云平台k8s软lb
部署方式
istioctl工具
部署基于istioctl工具,单集群和多集群都基于此,后面单独写此工具用法
istio专用工具,支持定制控制平面、数据平面。通过命令行选项可支持完整的istio operator api
命令行选项可用于单独设置、接收istio operator自定义资源(CR)的yaml文件(各CR资源对应的组件做升级时,需要手动进行)
文档:https://istio.io/latest/docs/setup/install/istioctl/
9种内置默认配置文件(列出常用6种,方便快速部署)
istioctl profile list
- default:根据operator api的默认设置启用相关组件,适用生产环境
- demo:用于演示istio功能
- minimal:仅部署控制平面组件
- remote:在多集群环境用于配置共享控制平面
- empty:不部署任何组件,一般帮助用户在自定义配置时,生成基础配置信息
- preview:包含预览性配置的配置文件(使用新特性)
istiooperators(管理crd)
CR名称:istiooperators
资源组:install.istio.io/v1aplhal
配置
简要说明
istioctl profile dump [内置配置]
apiVersion: install.istio.io/v1alpha1
kind: IstioOperator
spec:
  components:		#要部署的组件
    base:			#基础组件
      enabled: true
    cni:			#cni网络插件
      enabled: false
    egressGateways:
    - enabled: false
      name: istio-egressgateway		#部署egress-gw时的控制器名称
    ingressGateways:
    - enabled: true
      name: istio-ingressgateway	#部署ingress-gw时的控制器名称
    istiodRemote:			#是否是集群联邦模式下的远程集群
      enabled: false
    pilot:
      enabled: true
  hub: docker.io/istio
  meshConfig:			#网格的配置
    defaultConfig:		#为网格准备的默认配置
      proxyMetadata: {}
    enablePrometheusMerge: true		#如果业务容器和注入容器都有普罗米修斯指标,是否合并
  profile: default		#内置配置置文件
  tag: 1.17.0		#部署版本
  ...
istio operator方式
istio相关的自定义资源的专用控制器,负责自动维护由CR定义的资源对象
管理员需要根据定义相应的CR配置文件,提交给k8s的api server
helm方式
单集群部署
本次实验是rhel8系列系统,基于rocky linux 8.7
1)rhel8系列开启iptables内核模块(默认使用nftables)
注:rhel8后对于防火墙管理工具变了,需要装一下,否则istio注入的istio-init容器在生成iptables流量拦截规则时会报错
#所有节点加载内核模块。此处加载了模块则不用在安装时使用cni方式部署istio
#配置开机加载
cat > /etc/modules-load.d/99-istio-modules.conf <<EOF
br_netfilter
nf_nat
xt_REDIRECT
xt_owner
iptable_nat
iptable_mangle
iptable_filter
EOF

#当前加载
for mod in `cat /etc/modules-load.d/99-istio-modules.conf` ;do modprobe $mod ;done
2)下载安装
如果第一步配置了,此处可选择无cni方式安装
#从github克隆的,可能遇到卡主或超时,有魔法的,建议配置https_proxy代码,或手动去github下载
 curl -L https://istio.io/downloadIstio | ISTIO_VERSION=1.17.0 TARGET_ARCH=x86_64 sh -

cd istio-1.17.0
echo export PATH=$PATH:`pwd`/bin > /etc/profile.d/istio.sh
. /etc/profile.d/istio.sh

#命令补全
source <(istioctl completion bash)
istioctl completion bash > /etc/bash_completion.d/istioctl

#安装预检查,检测版本、环境是否合适
istioctl x precheck
#方法1:直接安装(如果按做了步骤1的模块加载,执行此)
istioctl install -s profile=demo -y

#方法2:使用k8s的cni插件配置网络(未按步骤1加载模块,执行此)
istioctl install -s profile=demo -s components.cni.enabled=true -y

#为命名空间开启自动注入envoy,再运行测试pod
kubectl label namespace default istio-injection=enabled
kubectl run admin --image  alpine -- tail -f /dev/null

#安装插件,生产环境出kaili外其他可直接配置为外部
kubectl apply -f samples/addons/
3)为ingress-gw配置外部访问ip
ip a a 2.2.2.17/32 dev eth0:1
echo '@reboot /usr/sbin/ip a a 2.2.2.17/32 dev eth0' >> /var/spool/cron/root

#加入外部ip,添加访问端口
kubectl patch svc -n istio-system istio-ingressgateway -p '{"spec":{"externalIPs":["2.2.2.17"]}}'

4)暴露kiali给外部
cat <<eof |kubectl apply -f -
apiVersion: networking.istio.io/v1beta1
kind: Gateway
metadata:
  name: kiali-gw
  namespace: istio-system
spec:
  selector:
    istio: ingressgateway
  servers:
  - hosts:
    - 'kiali.hj.com'
    port:
      name: http
      number: 80
      protocol: HTTP
---
apiVersion: networking.istio.io/v1beta1
kind: VirtualService
metadata:
  name: kiali-vs
  namespace: istio-system
spec:
  hosts:
  - 'kiali.hj.com'
  gateways:
  - 'kiali-gw'
  http:
  - match:
    - uri:
        prefix: /
    route:
    - destination:
        host: kiali
        port:
          number: 20001
eof

echo 2.2.2.17 kiali.hj.com >> /etc/hosts
curl kiali.hj.com
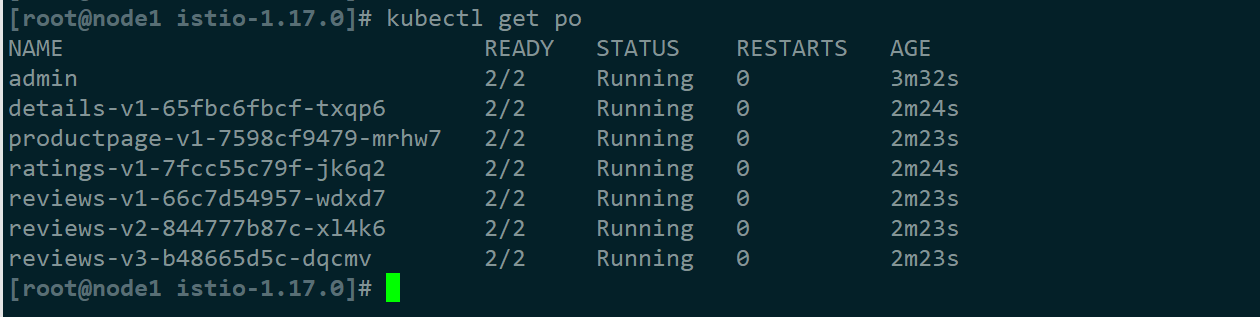
5)部署bookinfo案例项目
#部署内置的案例项目Bookinfo,默认运行在default命名空间
kubectl apply -f samples/bookinfo/platform/kube/bookinfo.yaml
kubectl apply -f samples/bookinfo/networking/bookinfo-gateway.yaml
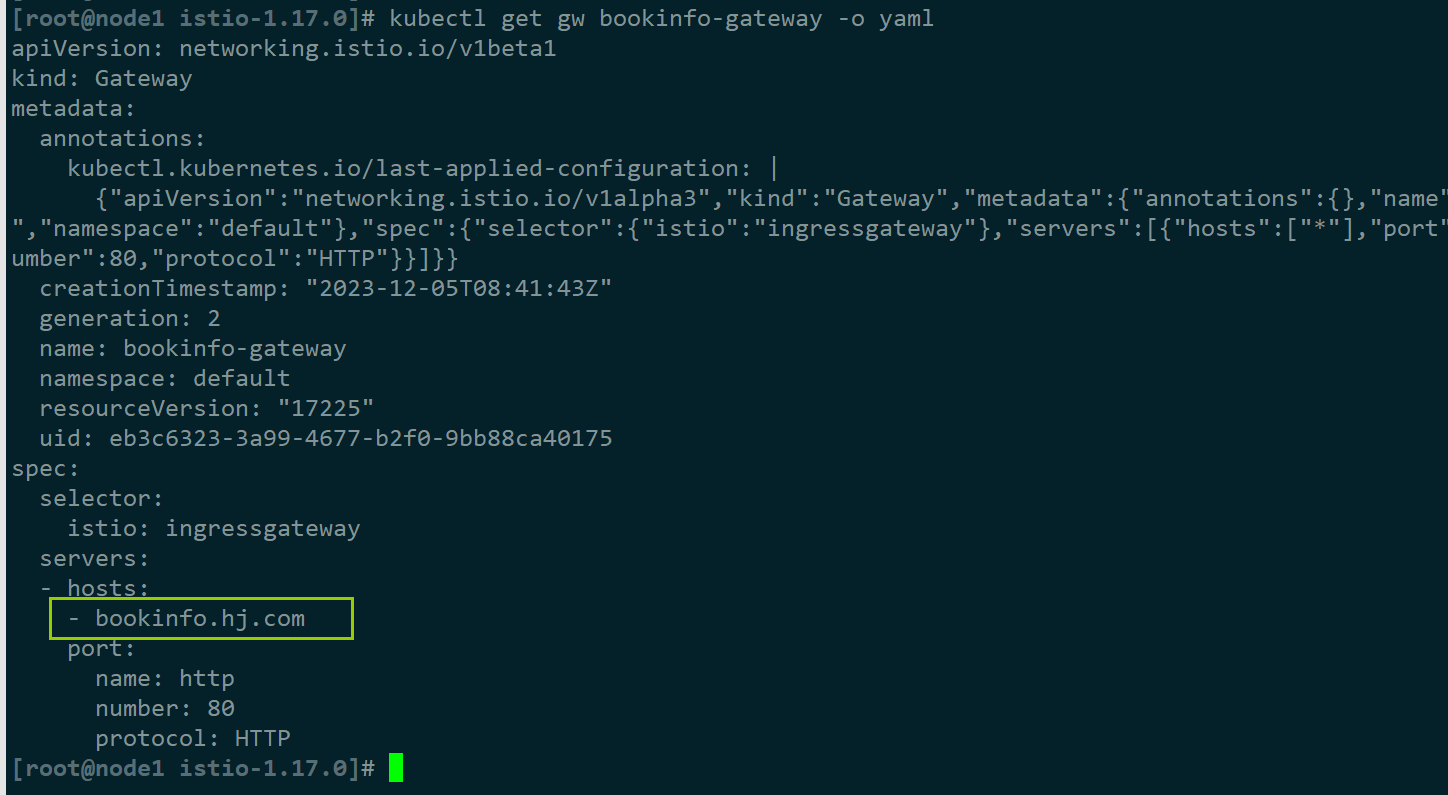
#修改gw配置
kubectl edit gw bookinfo-gateway
...
spec:
...
servers:
- hosts:
- bookinfo.hj.com
#分析配置是否正确,流量是否正常
istioctl analyze
echo 2.2.2.17 bookinfo.hj.com >> /etc/hosts
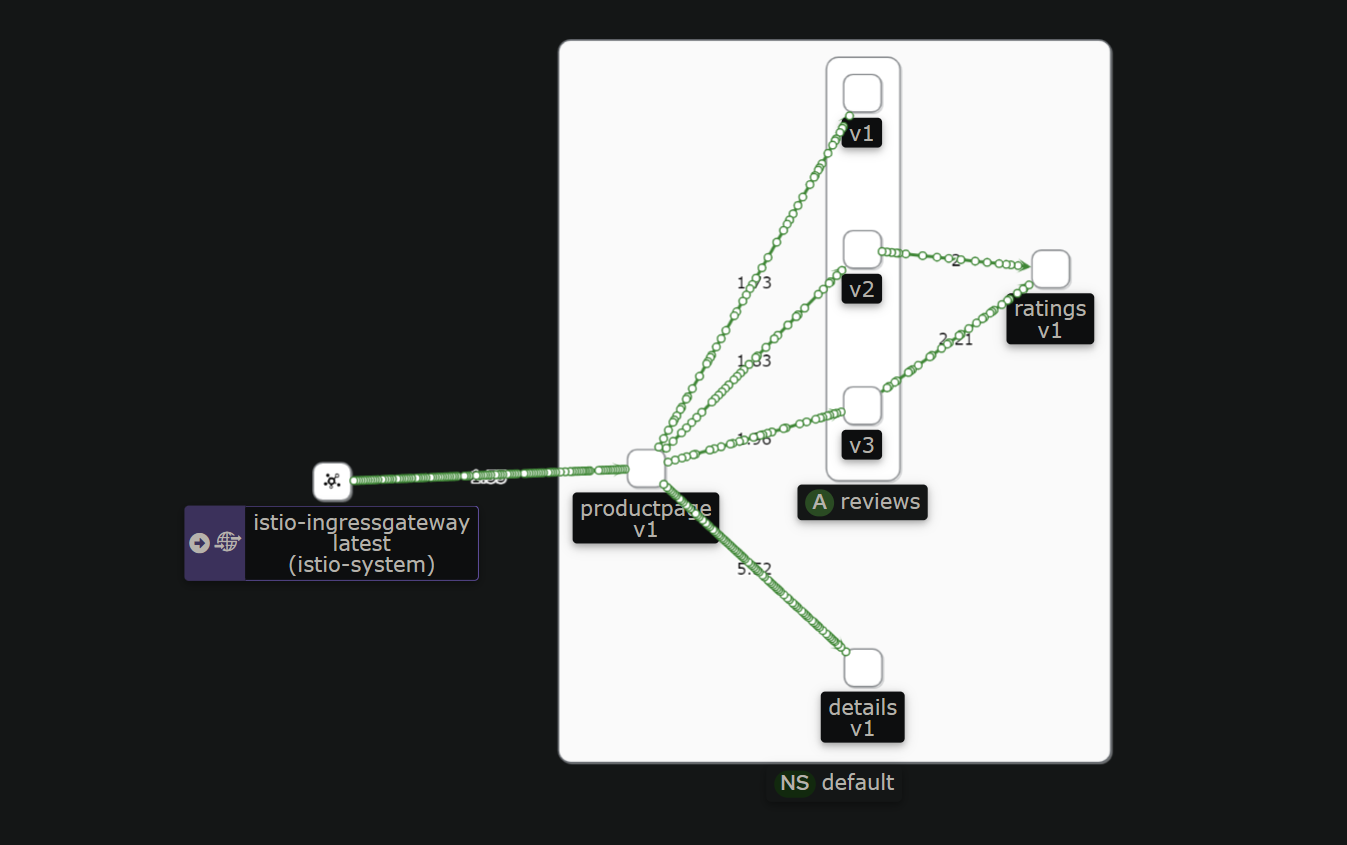
while :;do curl -I bookinfo.hj.com/productpage ;done
在kiali中查看bookinfo的流量
多集群部署
基于k8s集群,本次实验需要2个k8s集群,采用单网格式多集群部署(主从集群)
文档:https://istio.io/latest/zh/docs/setup/install/multicluster/multi-primary_multi-network/
环境:
使用kubeadm部署的2个单节点k8s
- 集群1:2.2.2.55
- 集群2:2.2.2.65
ssh-copy-id 2.2.2.65
ssh-copy-id 2.2.2.55
搭建集群前工作
在多主架构中都需要证书
1)下载istio
export https_proxy=http://frp1.freefrp.net:16324
curl -L https://istio.io/downloadIstio | sh -
cd istio-1.*
echo "export PATH=$PWD/bin:\$PATH" > /etc/profile.d/istioctl.sh ;bash

istioctl x precheck
scp -r $PWD 2.2.2.65:/opt/
2)配置istio证书
生成证书
#生成目录和证书
mkdir -p certs
pushd certs
make -f ../tools/certs/Makefile.selfsigned.mk root-ca
make -f ../tools/certs/Makefile.selfsigned.mk cluster1-cacerts
make -f ../tools/certs/Makefile.selfsigned.mk cluster2-cacerts

#同步到集群2的master节点
scp -r `dirname $PWD` 2.2.2.65:/opt/
scp /etc/profile.d/istioctl.sh 2.2.2.65:/etc/profile.d/
导入证书到集群
集群1
kubectl create ns istio-system

cd /opt/istio-1.20.2/certs
kubectl create secret generic cacerts -n istio-system \
  --from-file=cluster1/ca-cert.pem \
  --from-file=cluster1/ca-key.pem \
  --from-file=cluster1/root-cert.pem \
  --from-file=cluster1/cert-chain.pem

kubectl get ns istio-system --show-labels
kubectl get secrets -n istio-system
集群2
kubectl create ns istio-system

cd /opt/istio-1.20.2/certs
kubectl create secret generic cacerts -n istio-system \
  --from-file=cluster2/ca-cert.pem \
  --from-file=cluster2/ca-key.pem \
  --from-file=cluster2/root-cert.pem \
  --from-file=cluster2/cert-chain.pem

kubectl get ns istio-system --show-labels
kubectl get secrets -n istio-system
3)部署istio
集群1
istioctl install -y

#为gw配置外部ip
mkdir -p /opt/scripts
echo '/usr/sbin/ip link a vip type dummy
/usr/sbin/ip a a 2.2.2.56/32 dev vip
/usr/sbin/ip a a 2.2.2.57/32 dev vip
' > /opt/scripts/vip-add.sh
echo @reboot sh /opt/scripts/vip-add.sh >> /var/spool/cron/root
. /opt/scripts/vip-add.sh

#绑定svc外部ip
kubectl patch svc -n istio-system istio-ingressgateway -p '{"spec":{"externalIPs":["2.2.2.56"]}}'
集群2
istioctl install -y

mkdir -p /opt/scripts
echo '/usr/sbin/ip link a vip type dummy
/usr/sbin/ip a a 2.2.2.66/32 dev vip
/usr/sbin/ip a a 2.2.2.67/32 dev vip
' > /opt/scripts/vip-add.sh
echo @reboot sh /opt/scripts/vip-add.sh >> /var/spool/cron/root
. /opt/scripts/vip-add.sh

kubectl patch svc -n istio-system istio-ingressgateway -p '{"spec":{"externalIPs":["2.2.2.66"]}}'
跨网络多主架构

1)集群配置网络标记
集群1
kubectl label ns istio-system topology.istio.io/network=network1
集群2
kubectl label ns istio-system topology.istio.io/network=network2
3)创建istio operator的补丁文件
将 cluster1 与cluster2设为主集群
集群1
mkdir ../cluster1-conf ;cd ..
cat <<EOF > cluster1-conf/cluster1.yaml
apiVersion: install.istio.io/v1alpha1
kind: IstioOperator
spec:
  values:
    global:
      meshID: mesh1
      multiCluster:
        clusterName: cluster1
      network: network1
EOF

istioctl install -f cluster1-conf/cluster1.yaml -y
集群2
mkdir ../cluster2-conf ;cd ..
cat <<EOF > cluster2-conf/cluster2.yaml
apiVersion: install.istio.io/v1alpha1
kind: IstioOperator
spec:
  values:
    global:
      meshID: mesh1
      multiCluster:
        clusterName: cluster2
      network: network2
EOF

istioctl install -f cluster2-conf/cluster2.yaml -y
4)部署istio东西向网关
集群1
samples/multicluster/gen-eastwest-gateway.sh \
  --mesh mesh1 --cluster cluster1 --network network1 | \
  istioctl install -y -f -

kubectl patch svc -n istio-system istio-eastwestgateway -p '{"spec":{"externalIPs":["2.2.2.57"]}}'
kubectl get svc -n istio-system

#部署istio的多集群svc
kubectl apply -n istio-system -f samples/multicluster/expose-services.yaml

#访问测试,ssh到集群2,查看是否能生成集群2的访问配置
ssh 2.2.2.65 'istioctl create-remote-secret --name=cluster2'
ssh 2.2.2.65 'istioctl create-remote-secret --name=cluster2' |kubectl apply -f -

#开启自动注入
kubectl label ns default istio-injection=enabled
集群2
samples/multicluster/gen-eastwest-gateway.sh \
  --mesh mesh1 --cluster cluster2 --network network2 | \
  istioctl install -y -f -

kubectl patch svc -n istio-system istio-eastwestgateway -p '{"spec":{"externalIPs":["2.2.2.67"]}}'
kubectl get svc -n istio-system

kubectl apply -n istio-system -f samples/multicluster/expose-services.yaml

#访问测试,ssh到集群1,查看是否能生成集群1的访问配置
ssh 2.2.2.55 'istioctl create-remote-secret --name=cluster1'
ssh 2.2.2.55 'istioctl create-remote-secret --name=cluster1' |kubectl apply -f -
5)测试
开启sidecar注入
kubectl label ns default istio-injection=enabled
运行客户端pod
可以在2个k8s集群都创建一个,测试两边的流量
kubectl run admin --image alpine -- tail -f /dev/null
运行服务端测试pod
2个集群要运行同一pod,且svc名称必须一致(每个k8s需要靠dns解析,名称不一致解析不到),gw、vs、dr是可选创建
dns解析解释,参考:https://istio.io/latest/zh/docs/ops/deployment/deployment-models/#dns-with-multiple-clusters
cat <<EOF |kubectl apply -f -
apiVersion: v1
kind: Service
metadata:
  labels:
    app: demoapp
  name: demoapp
spec:
  ports:
  - name: http-80-80
    port: 80
    protocol: TCP
    targetPort: 80
  selector:
    app: demoapp
  type: ClusterIP
---
apiVersion: apps/v1
kind: Deployment
metadata:
  labels:
    app: demoapp
    version: v1.0
  name: demoapp-10
spec:
  replicas: 2
  selector:
    matchLabels:
      app: demoapp
      version: v1.0
  template:
    metadata:
      labels:
        app: demoapp
        version: v1.0
    spec:
      containers:
      - image: ikubernetes/demoapp:v1.0
        name: demoapp
        ports:
        - containerPort: 80
          name: web
          protocol: TCP
---
apiVersion: networking.istio.io/v1beta1
kind: Gateway
metadata:
  name: demoapp-gw
spec:
  selector:
    istio: ingressgateway
  servers:
  - port:
      number: 80
      name: http
      protocol: HTTP
    hosts:
    - demo.hj.com
---
apiVersion: networking.istio.io/v1beta1
kind: VirtualService
metadata:
  name: demoapp-vs
spec:
  gateways:
  - demoapp-gw
  hosts:
  - demo.hj.com
  http:
  - route:
    - destination:
        host: demoapp
EOF
访问
kubectl exec -it admin -- sh
sed -i 's/dl-cdn.alpinelinux.org/mirrors.ustc.edu.cn/g' /etc/apk/repositories
apk add curl
while :; do curl demoapp ;sleep .5;done
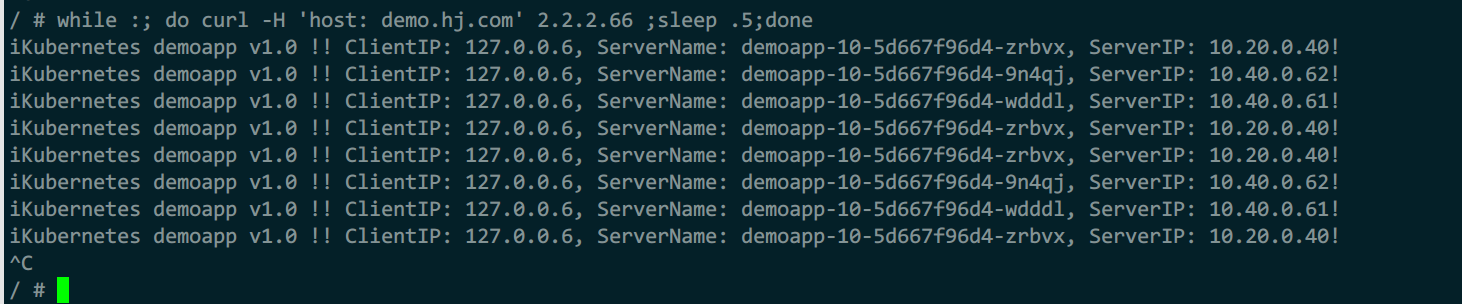
while :; do curl -H 'host: demo.hj.com' 2.2.2.56 ;sleep .5;done
while :; do curl -H 'host: demo.hj.com' 2.2.2.66 ;sleep .5;done
请求时可以看到对端集群的ip,集群正常运行

清理
kubectl delete deploy -l app=demoapp
kubectl delete svc -l app=demoapp
kubectl delete vs demoapp-vs
kubectl delete gw demoapp-gw
kubectl delete po admin --wait=false
6)删除
istioctl uninstall -y --purge
kubectl delete ns istio-system
同一网络多主架构
文档:https://istio.io/latest/zh/docs/setup/install/multicluster/multi-primary/
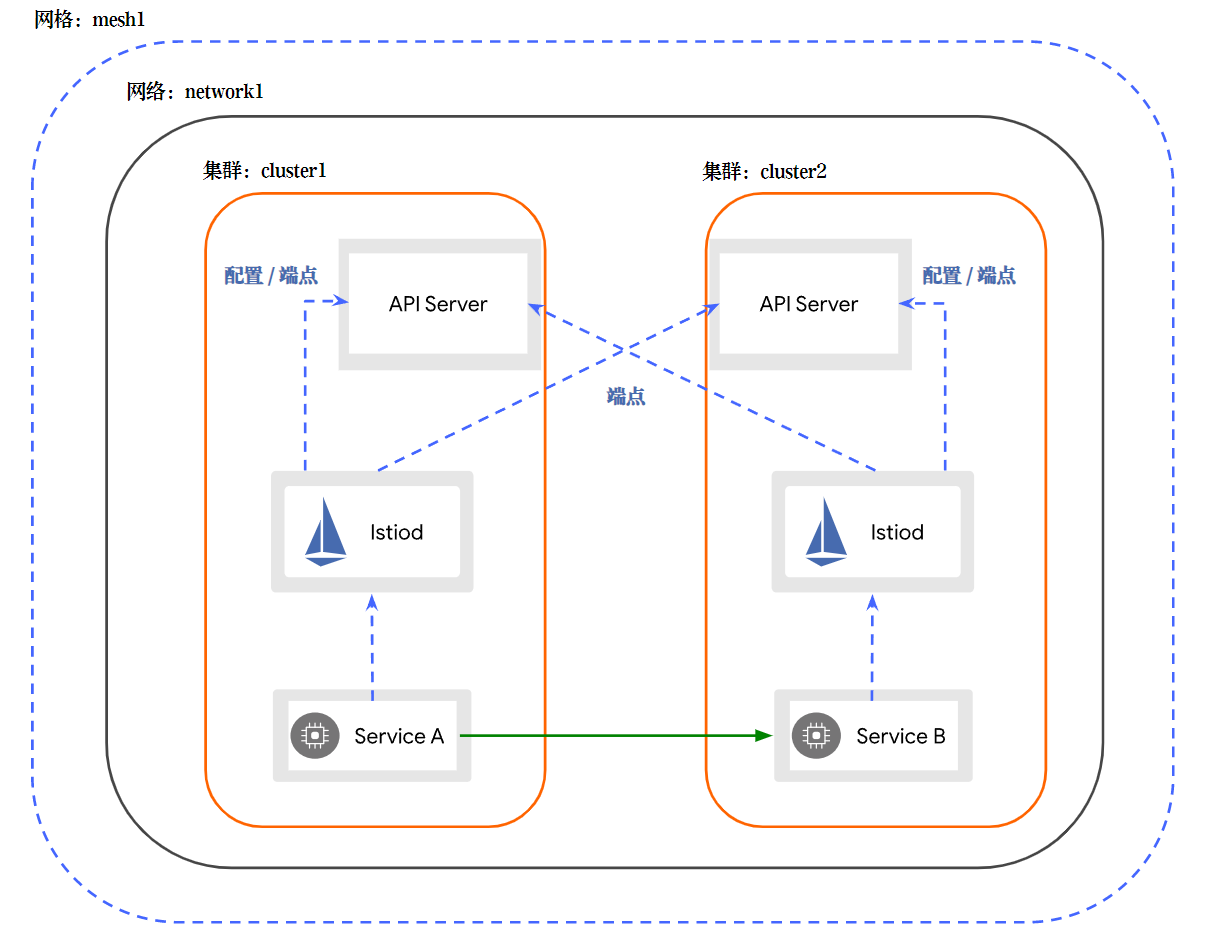
1)部署istio
集群1设为主集群
mkdir -p /opt/istio-1.20.2/cluster1-conf
cd `dirname !$`
cat <<EOF > cluster1-conf/cluster1.yaml
apiVersion: install.istio.io/v1alpha1
kind: IstioOperator
spec:
  values:
    global:
      meshID: mesh1
      multiCluster:
        clusterName: cluster1
      network: network1
EOF

istioctl install -f cluster1-conf/cluster1.yaml -y
集群2设为主集群
mkdir -p /opt/istio-1.20.2/cluster2-conf
cd `dirname !$`
cat <<EOF > cluster2-conf/cluster2.yaml
apiVersion: install.istio.io/v1alpha1
kind: IstioOperator
spec:
  values:
    global:
      meshID: mesh1
      multiCluster:
        clusterName: cluster2
      network: network1
EOF

istioctl install -f cluster2-conf/cluster2.yaml -y
2)开启端点发现
集群1
ssh 2.2.2.65 'istioctl create-remote-secret --name=cluster2'
ssh 2.2.2.65 'istioctl create-remote-secret --name=cluster2' |kubectl apply -f -

istioctl remote-clusters
集群2
ssh 2.2.2.55 'istioctl create-remote-secret --name=cluster1'
ssh 2.2.2.55 'istioctl create-remote-secret --name=cluster1' |kubectl apply -f -

istioctl remote-clusters
3)测试
kubectl create ns sample
kubectl label ns sample istio-injection=enabled

#集群1
kubectl apply -f samples/helloworld/helloworld.yaml -n sample
kubectl apply -f samples/sleep/sleep.yaml -n sample
kubectl delete deploy -n sample -l version=v2 --wait=false
kubectl get po -n sample

#集群2
kubectl apply -f samples/helloworld/helloworld.yaml -n sample
kubectl delete deploy -n sample -l version=v1 --wait=false
kubectl apply -f samples/sleep/sleep.yaml -n sample
kubectl get po -n sample

#访问
pip=`kubectl get po -n sample |awk '/sleep/{print $1}'`
kubectl exec -n sample $pip -c sleep -- curl -s helloworld.sample:5000/hello
6)删除
istioctl uninstall -y --purge
kubectl delete ns istio-system

rm -rf certs
kubectl delete secret cacerts -n istio-system
kubectl delete -f samples/sleep/sleep.yaml -n sample
kubectl delete -f samples/helloworld/helloworld.yaml -n sample

 浙公网安备 33010602011771号