nginx001
本文档版权归属:陈雷雷,仅限学习交流
QQ:370460470 blog:www.chenleilei.net
Nginx服务实践
简述Nginx(nginx.org)
Nginx (engine x) 是一个高性能的HTTP和反向代理web服务器,同时也提供了IMAP/POP3/SMTP服务。Nginx是由伊戈尔·赛索耶夫为俄罗斯访问量第二的Rambler.ru站点(俄文:Рамблер)开发的,第一个公开版本0.1.0发布于2004年10月4日。
其将源代码以类BSD许可证的形式发布,因它的稳定性、丰富的功能集、示例配置文件和低系统资源的消耗而闻名。2011年6月1日,nginx 1.0.4发布。
Nginx是一款轻量级的Web 服务器/反向代理服务器及电子邮件(IMAP/POP3)代理服务器,在BSD-like 协议下发行。其特点是占有内存少,并发能力强,事实上nginx的并发能力确实在同类型的网页服务器中表现较好,中国大陆使用nginx网站用户有:百度、京东、新浪、网易、腾讯、淘宝等。Nginx 适用于各类网站,处理能力和可扩展性都优于apache,目前为止,主流网站几乎都采用的nginx作为核心的服务
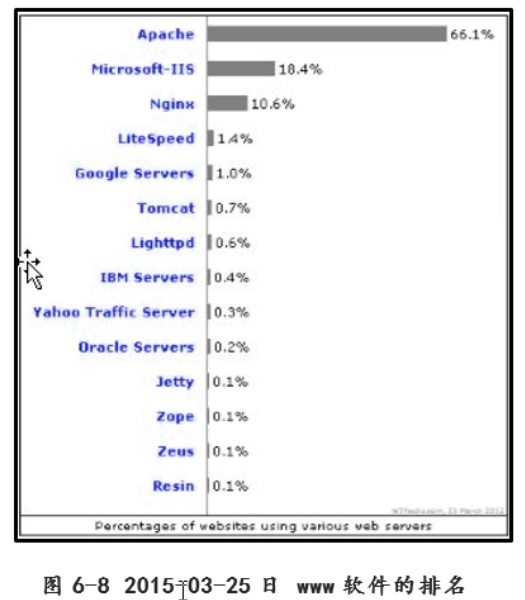
2015年排名:
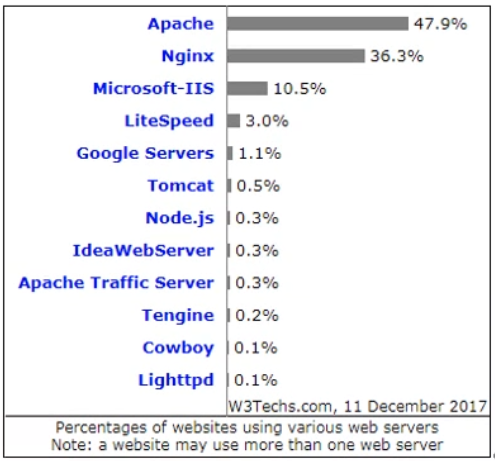
2017年排名:
2019年排名
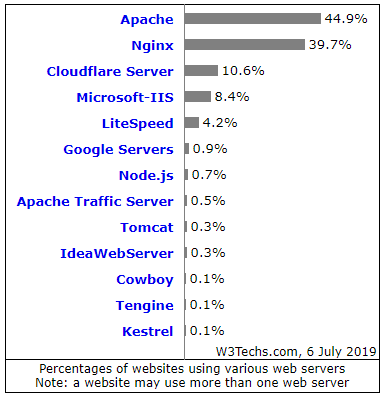
通过两张图我们可以清晰发现,apache份额逐步下降,而nginx则稳步上升,由此可见,nginx的发展前景
两年时间两大龙头Nginx服务与apache服务占有率差距从 11%差距缩减到 5%,足以见得Nginx的优秀
下面我们将从多方入手,带你学习掌握Nginx
Nginx优点
- 配置简单
- 灵活多变
- 负载均衡
- 缓存服务
- 并发更高
Nginx的重要特性
在企业面试也会被问到: Nginx http服务器的特色和优点:
- 支持高并发(三万并发连接下,nginx线程消耗内存不到200MB)
- 资源消耗少
- 可以做反向代理,缓存加速,负载均衡
- 具备健康检查功能
- 支持异步网络I/O事件处理模型(epoll事件处理模型)
- 具有Squid等专业缓存的功能
常用的动态服务软件
- php:大小型公司都会使用,动态网页语言PHP程序的解析容器,可以配合apache nginx 解析动态程序
php在apache解析的时候使用的mod_php5.so(module),php在nginx解析的时候使用的是FastCGI守护进程模式提供服务- tomcat:中小型企业动态web服务的主流,java程序是通过tomcat来提供访问
- IIS 微软旗下的web服务软件
Nginx的企业应用
- 作为web服务软件
- 作为反向代理/负载均衡软件
- 前端业务数据缓存服务(memcache redis mongodb)
nginx的主要应用场景为 反向代理,和提供web服务
如何正确的选择web服务器
实际工作中我们需要根据业务的需求来选择合适的服务软件,有关web服务建议如下:
如何安装一个Nginx
安装nginx的方式多种多样,常见的分为3种
- 通过yum来安装nginx
- 通过打包好的rpm包方式安装
- 通过源码编译安装
注意下载页面最好选择稳定版:http://nginx.org/en/download.html
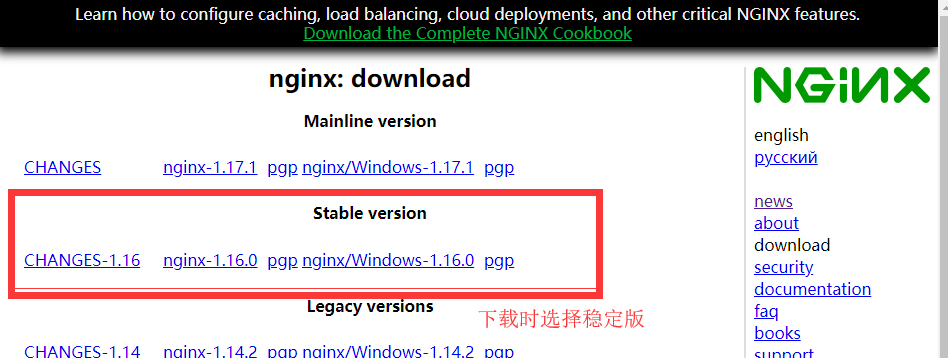
这里我们选择 nginx-1.16.0 在标签上右键复制下载地址
编译安装nginx
#更新yum源
wget -O /etc/yum.repos.d/CentOS-Base.repo http://mirrors.aliyun.com/repo/Centos-7.repo
wget -P /etc/yum.repos.d/ http://mirrors.aliyun.com/repo/epel-7.repo


#第一步: 下载nginx:
#http://nginx.org/en/download.html

##注意 nginx版本最好选择 半年到一年之前的版本,不要选用最新版。
##我这里选择1.17的稳定版


#创建一个目录存放nginx安装包
mkdir -p /server/tools


#安装包下载:
cd /server/tools
wget http://nginx.org/download/nginx-1.16.0.tar.gz
tar xf nginx-1.16.0.tar.gz
cd nginx-1.16.0

#第二步: 解决软件依赖关系
# openssl-devel -- SSL证书相关依赖包
# pcre-devel  -- 正则相关依赖包
# gd-devel  -- 图片处理相关依赖包

yum install -y pcre pcre-devel openssl openssl-devel gd-devel  zlib-devel gcc

#第三步: 创建nginx进程相关用户
useradd -s /sbin/nologin -M www

#第四步:执行预编译
cd /server/tools/nginx-1.16.0/
./configure --prefix=/application/nginx-1.16 --user=www --group=www --with-http_image_filter_module  --with-http_ssl_module --with-http_v2_module --with-http_stub_status_module


# 第五步:make 编译
make
echo $?        #这一步可做可不做,返回值为0代表正常 为其他数值为异常

#第六步: 编译安装
make install

#创建软连接,作用在升级新版本时只需要替换软连接,而不需要停止服务更换版本
ln -s /application/nginx-1.16 /application/nginx

#优化nginx启动命令
#添加环境变量:export PATH="$PATH:/application/nginx/sbin"
echo "export PATH="$PATH:/application/nginx/sbin"">>/etc/profile
source /etc/profile


#
kill `cat /application/nginx-1.14/logs/nginx.pid`
nginx
启动与关闭nginx
上面的环境变量添加完成后,可以直接命令行输入
nginx 启动nginx服务
nginx -t 检查配置文件语法
nginx编译参数详解:
(基于1.7.11以上版本)
./configure --help 查看帮助
| ./config编译参数 | 作用 | 说明 | 默认 |
|---|---|---|---|
| --help | 帮助 | ||
| --prefix=PATH | 设置安装路径 | 不指定默认安装到 : /usr/local/nginx (⭐⭐⭐⭐⭐) | 手动指定 |
| --sbin-path=PATH | nginx执行命令路径 | Nginx可执行文件安装路径。只能安装时指定,如果没有指定,默认为 /sbin/nginx |
手动指定 |
| --modules-path=PATH | 动态模块库 | 定义一个将安装的nginx的的动态模块的目录。情况默认下使用该prefix/modules目录 |
手动指定 |
| --conf-path=PATH | 配置文件路径 | 设置nginx.conf路径名 | 手动指定 |
| --error-log-path=PATH | 错误日志 | 设置错误日志路径 | 手动指定 |
| --pid-path=PATH | pid文件 | pid文件路径 | 手动指定 |
| --lock-path=PATH | 锁文件路径 | 锁文件路径 | 手动指定 |
| --user=USER | 运行的用户 | 设置nginx运行worker进程的的用户 (⭐⭐⭐⭐⭐) | 手动指定 |
| --group=GROUP | 运行的组 | 设置nginx运行worker进程的的组 (⭐⭐⭐⭐⭐) | 手动指定 |
| --build=NAME | ./configure的临时文件名 | configure执行时与编译期间产生的临时文件的文件名 | 手动指定 |
| --builddir=DIR | 临时文件目录 | configure执行时与编译期间产生的临时文件放置的目录,包括产生的Makefile、C源文件、目标文件、可执行文件等 | 手动指定 |
| --with-select_module | 事件处理驱动 | 使用select module处理事件驱动 | 开启 |
| --without-select_module | select模块 | 不安装select module | 关闭 |
| --with-poll_module | poll模块 | 使用poll module处理事件驱动 poll的性能与select类似,在大量并发连接下性能都远不如epoll。默认情况下,Nginx是不安装poll | 开启 |
| --without-poll_module | poll模块 | 默认不安装poll module 不需要指定 | 关闭 |
| --with-threads | 线程池 | 参考:https://segmentfault.com/a/1190000002924458 http://www.ttlsa.com/nginx/thread-pools-boost-performance-9x/ 在http模块下配置 thread_pool one threads=128 max_queue=65535; 在server模块下调用 aio threads=one; 该操作可以使得nginx性能提升9倍,仅限于1.7.11以上版本 解释: thread_pool one threads=128 #128个工作线程 max_queue=65535 #最大的队列任务数量 详细使用办法将会在下面详解 |
开启 |
| --with-file-aio | AIO支持 | 使用AIO方式处理事件驱动 (IO异步大幅度提升性能,需要内核 2.6.22 以上的版本) | 开启 |
| --with-http_ssl_module | SSL模块 | SSL模块开启(⭐⭐⭐⭐⭐) | 开启 |
| --with-http_v2_module | SSL V2版本 | enable ngx_http_v2_module 开启https2.0(⭐⭐⭐⭐⭐) | 开启 |
| --with-http_realip_module | 改变请求头 | 允许我们改变客户端请求头中客户端IP地址值(例如,X-Real-IP 或 X-Forwarded-For) 在 location 里头插入: set_real_ip_from 192.168.2.1; real_ip_header X-Real-IP; |
开启 |
| --with-http_addition_module | 响应头追加内容 | 用于在响应之前或者之后追加文本内容,比如想在站点底部追加一个js或者css,可以使用这个模块来实现。默认不开启,开启需要重新编译 参考:https://www.cnblogs.com/52fhy/p/10226651.html |
开启 |
| **--with-http_xslt_module=dynamic ** | 创建一个modules的子目录,用来存放动态加载模块共享对象的二进制文件,默认的路径为/usr/local/nginx/modules. | 开启 | |
| --with-http_image_filter_module | 图片处理模块,图片缩放 | 用法: location ~ /simg/..jpg$ { #proxy_pass http://10.11.11.11; #rewrite "/simg/(..jpg)$" /img/$1 break ; image_filter resize 100 100; error_page 415 = /empty; } 这样访问/simg/目录下的图片,都会按照高度最高100并且宽度最高100按照原图比例进行截取出来,并输出给浏览器。当然也可以开启重写去读取本机另一个目录下源文件;如果不在一台机器上就可以开启proxy_pass,并加上重写即可。 安装此模块需要先安装依赖: yum -y install gd-devel |
开启 |
| --with-http_image_filter_module | 图像处理过滤模块,开启图片压缩版本必须高于 0.7.54 | 动态加载图片模块(⭐⭐⭐⭐⭐) | 开启 |
| --with-http_geoip_module | 解析客户端IP | 创建变量,使用预编译的MaxMind数据库解析客户端IP地址,得到变量值。(不建议启用) | 开启 |
| --with-http_geoip_module=dynamic | 解析客户端IP | 功能如上,不建议使用 | 开启 |
| --with-http_sub_module | 替换响应 | 该ngx_http_sub_module模块是一个过滤器,通过将一个指定的字符串替换为另一个字符串来修改响应。该模块不是默认生成的,它应该使用--with-http_sub_module 配置参数启用 。 参考:https://www.cnblogs.com/heruiguo/p/9076239.html |
开启 |
| --with-http_dav_module | 启用对WebDav协议的支持 | 允许ngx_http_dav_module模块(mod_dav) 为文件和目录指定权限,限制不同类型的用户对于页面有不同的操作权限 |
开启 |
| --with-http_flv_module | 启动对flv媒体支持 | 以构建为闪存视频(FLV)提供文件伪流式服务器端的请立即获取iTunes中的 ngx_http_flv_module模块。该模块不是默认生成的 | 开启 |
| --with-http_mp4_module | 启动对MP4媒体支持 | 可以构建为MP4提供文件伪流式服务器端的请立即获取iTunes中的 ngx_http_mp4_module模块。该模块不是默认生成的。 | 开启 |
| --with-http_gunzip_module | 压缩 | 对于不支持gzip编码的客户,该模块用于为客户解压缩预压缩内容 | 开启 |
| --with-http_gzip_static_module | 静态压缩 | gzip 压缩为.gz 响应给客户端 案例: location ~* .(json)$ { gzip_static on; gzip_proxied expired no-cache no-store private auth; } |
开启 |
| --with-http_random_index_module | 随机默认主页 | 就是用户访问时,给一个随机的主页 | 开启 |
| --with-http_secure_link_module | 下载防盗链 | 允许通过密钥保护指定的文件。 参考:http://www.ttlsa.com/nginx/nginx-modules-secure_link/ |
开启 |
| --with-http_degradation_module | 内存不足提示 | 允许当剩余内存较低时对某些位置的请求返回 204 或 404 状态码 | 开启 |
| --with-http_slice_module | 一个分割请求转换成子请求,每个返回一定范围内响应的滤波器。该过滤器提供了更有效的大响应缓存。 | 所述ngx_http_slice_module模块(1.9.8)是一个分割请求转换成子请求,每个返回一定范围内响应的滤波器。该过滤器提供了更有效的大响应缓存。新版本特性:https://cloud.tencent.com/developer/section/1259383 |
开启 |
| --with-http_stub_status_module | 运行状态监控 | 需要编译安装后才可以使用 curl 127.0.0.1/nginx_status 检查状态 |
开启 |
| --without-http_charset_module | 用于对网页重新编码 | 将指定的字符集添加到“Content-Type”响应标题字段。如果此字符集与source_charset伪指令中指定的字符集不同,则执行转换 参考连接:https://cloud.tencent.com/developer/section/1259007 |
禁用 |
| --without-http_gzip_module | 用于压缩的响应缓冲区 gzip”方法压缩响应的过滤器。这通常有助于将传输数据的大小减少一半甚至更多。 |
开启方式: gzip on; gzip_min_length 1000; gzip_proxied expired no-cache no-store private auth; gzip_types text/plain application/xml; 参考连接:https://cloud.tencent.com/developer/section/1259169 |
关闭 |
| --without-http_ssi_module | 禁用ngx_http_ssi_module支持 | 禁用ngx_http_ssi_module支持(该模块提供了一个在输入端处理处理服务器包含文件(SSI)的过滤器,目前支持SSI命令的列表是不完整的) | 关闭 |
| --without-http_userid_module | 启用或禁用设置Cookie并记录收到的Cookie | 默认即编译进入Nginx的HTTP模块 实例: userid on; userid_name uid; userid_domain example.com; userid_path /; userid_expires 365d; userid_p3p 'policyref="/w3c/p3p.xml", CP="CUR ADM OUR NOR STA NID"'; |
关闭 |
| --without-http_access_module | 访问控制 | location / { deny 192.168.1.1; allow 192.168.1.0/24; allow 10.1.1.0/16; allow 2001:0db8::/32; deny all; } |
关闭 |
| --without-http_auth_basic_module | 用户认证(默认禁止) | 参考文档: https://blog.csdn.net/guyue35/article/details/53906843 |
关闭 |
| --without-http_mirror_module | 流量镜像 | 默认禁止该模块 | 关闭 |
| --without-http_autoindex_module | 自动为没有索引页面的目录生成文件列表。 | 默认禁止 | 关闭 |
| --without-http_geo_module | 禁ngx_http_geo_module | 禁用ngx_http_geo_module支持 | 关闭 |
| --with-http_stub_status_module | 启动监控模块(服务状态查看模块) | 为监控提供的状态模块 | 关闭 |
| --with-http_stub_status_module | 禁用 ngx_http_charset_module | 禁用 ngx_http_charset_module模块 | 关闭 |
| --without-http_charset_module | 模块为响应头的“Content-Type”添加指定的字符集。 此外,这个模块可以把数据从一个字符集转换为另一个字符集,但也有以下限制: 只能单向转换,即从服务端到客户端, 只有单字节字符集能被转换 或者单字节字符集和UTF-8之间的互相转换。 |
语法: charset charset 默认值: charset off; 上下文: http, server, location, if in location 相关帮助:http://tengine.taobao.org/nginx_docs/cn/docs/http/ngx_http_charset_module.html |
关闭 |
| --without-http_gzip_module | gzip”方法压缩响应的过滤器。这通常有助于将传输数据的大小减少一半甚至更多。 | 例子: gzip on; gzip_min_length 1000; gzip_proxied expired no-cache no-store private auth; gzip_types text/plain application/xml; |
关闭 |
| --without-http_ssi_module | 该ngx_http_ssi_module模块是一个过滤器,用于处理通过它传递的响应中的SSI(服务器端包含)命令。目前,支持的SSI命令列表不完整 |
ssi on; # 开启SSI支持 ssi_silent_errors on; # 默认为off,设置为on则在处理SSI文件出错时不输出错误信息 ssi_types text/html; # 需要支持的shtml 默认是 text/html |
关闭 |
| --without-http_userid_module | 模块是一个过滤器,用于处理通过它传递的响应中的SSI(服务器端包含)命令。目前,支持的SSI命令列表不完整。 | 发行用户身份标识cookie。 | 关闭 |
| --without-http_map_module | 为地图提供的 | 禁用Map模块,该模块允许你声明map区段 | 关闭 |
| --without-http_split_clients_module | 客户端访问用户的划分 | ngx_http_split_clients_module支持,该模块用于基于用户ip地址、报头、cookies划分用户。 | 禁用 |
| --without-http_referer_module | 基于RefererHTTP请求头对请求进行过滤。主要用于防盗链 | location ~ .*.(gif|jpg|jpeg|png|bmp|swf)$ { valid_referers none blocked *.91linux.org 91linux.org server_names ~.google. ~.baidu.; if ($invalid_referer) { return 403; #rewrite ^/ https://chenleilei.net/attachment/20190508/b931ccc969f9426fbaab17f8a0101246.jpg; } } |
禁用 |
| --without-http_rewrite_module | 默认安装,未配置启用 | 伪静态模块 | 开启 |
| --without-http_proxy_module | 默认安装,未配置启用 | 默认安装 | 开启 |
| --without-http_fastcgi_module | 默认安装,未配置启用 | 解析php请求资源 location ~ .php$ { root html; fastcgi_pass 127.0.0.1:9000; fastcgi_index index.php; fastcgi_param SCRIPT_FILENAME /scripts$fastcgi_script_name; include fastcgi_params; } |
开启 |
| --without-http_uwsgi_module | 默认安装,未配置启用 | 支持uWSGI协议 | 开启 |
| --without-http_scgi_module | 默认安装,未配置启用 | 支持scgi协议 | 开启 |
| --without-http_split_clients_module | 默认安装,未配置启用 | 适用于A / B测试的变量,也称为分割测试。 参考文档:https://cloud.tencent.com/developer/section/1259388 |
开启 |
| --without-http_referer_module | 防盗链 | 参考文档:https://www.centos.bz/2017/09/nginx-ngx_http_referer_module-hotlink-protect/ | 开启 |
| --without-http_rewrite_module | 地址重写 | 用于域名重定向 | 开启 |
| --without-http_proxy_module | 模块允许将请求传递给另一台服务器 | 用于反向代理 | 开启 |
| --without-http_grpc_module | URI重写 | 添加这个参数重写功能会被关闭 | |
| --without-http_memcached_module | 启用对memcached的支持 | 启用memcached nginx+php+memcached方法:https://cloud.tencent.com/developer/article/1434652 |
|
| --without-http_limit_conn_module | 并发连接控制模块 | 配置启用 | 不启用 |
| --without-http_limit_req_module | 限定客户端创建连接的频率。 | 配置启用 | 不启用 |
| --without-http_empty_gif_module | 产生单像素透明的gif图片 | 配置启用 | 不启用 |
| --without-http_browser_module | 解析HTTP请求头中的”User-Agent“ 的值。 | 配置启用 | 不启用 |
| --without-http_upstream_hash_module | 反向代理: upstream backend { server backend1.example.com weight=5; server backend2.example.com:8080; server unix:/tmp/backend3; server backup1.example.com:8080 backup; server backup2.example.com:8080 backup; } server { location / { proxy_pass http://backend; } } |
配置启用 | 不启用 |
| --without-http_upstream_ip_hash_module | 反向代理提供ip hash算法模块 | 配置启用 | 不启用 |
| --without-http_upstream_least_conn_module | 决定最少连接数被启用 | 配置启用 | 不启用 |
| --without-http_upstream_random_module | 随机连接负载 | 配置启用 | 不启用 |
| --without-http_upstream_keepalive_module | 保持上游连接放入缓存 大于keepalive xx; 数值会被关闭 |
配置启用 | 不启用 |
| --without-http_upstream_zone_module | 参考:http://nginx.org/en/docs/http/ngx_http_upstream_module.html#zone 这个定义 *name*和*size*其保持组的配置和运行时被工作者进程之间共享状态中的共享存储器区。几个组可能共享同一个区域 |
配置启用 | 不启用 |
| --with-http_perl_module | 模块用于在Perl中实现位置和变量处理程序,并将Perl调用插入到SSI中。 该模块不是默认生成的,它应该使用 --with-http_perl_module配置参数启用 |
默认不启用配置启用 | 不启用 |
| --with-perl_modules_path=PATH | Perl处理程序 参考:https://cloud.tencent.com/developer/section/1259240 |
默认不启用配置启用 | 不启用 |
| --with-perl=PATH | perl模块解析 | 默认不启用配置启用 | |
| --http-log-path=PATH | access_log日志格式定义模块 log_format compression '$remote_addr - \(remote_user [\)time_local] ' '"$request" $status \(bytes_sent ' '"\)http_referer" "\(http_user_agent" "\)gzip_ratio"'; access_log /spool/logs/nginx-access.log compression buffer=32k; |
默认启用 参考连接:https://cloud.tencent.com/developer/section/1259213 |
不启用 |
| --http-client-body-temp-path=PATH | 设置http客户机请求主体临时文件的路径 | 如: –http-client-body-temp-path=/opt/websuite/nginx/temp/client |
不启用 |
| --http-proxy-temp-path=PATH | 这个指令的工作原理类似于client_body_temp_path,它指定一个位置来缓冲对文件系统的大型代理请求。 | 如:--http-proxy-temp-path=``/var/tmp/nginx/proxy/参考:https://www.cnblogs.com/bluestorm/p/4574688.html |
不启用 |
| --http-fastcgi-temp-path=PATH | 定义用于存储临时文件的目录,其中包含从FastCGI服务器接收的数据 如:fastcgi_temp_path / spool/nginx/fastcgi_temp 1 2; |
参考:http://tengine.taobao.org/nginx_docs/cn/docs/http/ngx_http_fastcgi_module.html#fastcgi_temp_path | 不启用 |
| --http-uwsgi-temp-path=PATH | 设置的临时文件的目录都放在同一个文件系统上 | 升级httpv2 | 不启用 |
| --http-scgi-temp-path=PATH | 用于存储从SCGI服务器接收到的数据的临时文件。指定目录下最多可以使用三级子目录层次结构 | 如:scgi_temp_path /spool/nginx/scgi_temp 1 2; | 不启用 |
| --without-http | disable HTTP server | 禁用http server功能 | 不启用 |
| --with-mail | 启用POP3、IMAP4、SMTP代理模块 | 启用邮件代理 | 不启用 |
| --with-mail=dynamic | 启用POP3、IMAP4、SMTP动态代理模块 | 启用动态邮件代理 | 不启用 |
| --with-mail_ssl_module | 启用邮件SSL | 启用邮件SSL | 不启用 |
| --without-mail_pop3_module | 启用邮件pop3 | 启用邮件pop3 | 不启用 |
| --without-mail_imap_module | 启用邮件imap | 启用邮件imap | 不启用 |
| --without-mail_smtp_module | 启用邮件smtp | 启用邮件smpt | 不启用 |
| --with-stream | 启用TCP/UDP代理模块 | 启用TCP/UDP代理模块 | 不启用 |
| --with-stream=dynamic | 启用TCP/UDP动态代理模块 | 启用TCP/UDP动态代理模块 | |
| --with-stream_ssl_module | 启用ngx流ssl模块 | 启用ngx流ssl模块 | 不启用 |
| --with-stream_realip_module | 启用ngx流realip模块 | 启用ngx流realip模块 | 不启用 |
| --with-stream_geoip_module | 启用ngx流地理ip模块 | 启用ngx流地理ip模块 | 不启用 |
| --with-stream_geoip_module=dynamic | 启用动态ngx流地理ip模块 | 启用动态ngx流地理ip模块 | 不启用 |
| --with-stream_ssl_preread_module | 启用ngx流ssl预读模块 | 启用ngx流ssl预读模块 | 不启用 |
| --without-stream_limit_conn_module | 用于限制每个定义的键连接的数量,尤其是,从一个单一的IP地址的连接的数量。 | 如:limit_conn_zone $binary_remote_addr zone=addr:10m; server { ... limit_conn addr 1; } |
不启用 |
| --without-stream_access_module | 允许限制访问某些客户端地址 | 如: server { . deny 192.168.1.1; allow 192.168.1.0/24; allow 10.1.1.0/16; allow 2001:0db8::/32; deny all; } |
不启用 |
| --without-stream_geo_module | 创建客户端的源IP地址值的变量。 | 参考:https://cloud.tencent.com/developer/section/1259605 | 不启用 |
| --without-stream_map_module | 设置size地图变量散列表的最大值 | 参考:https://cloud.tencent.com/developer/section/1259623 | 不启用 |
| --without-stream_split_clients_module | 分割测试变量 创建一个适合于A / B测试 | 参考:https://cloud.tencent.com/developer/section/1259654 | 不启用 |
| --without-stream_return_module | 允许发送一个指定的值给客户端,然后关闭连接 | server { listen 12345; return $time_iso8601; } |
不启用 |
| --without-stream_upstream_hash_module | 允许使服务器定期健康检查在一组。服务器组必须驻留在共享内存中, 如果健康检查失败,服务器将被视为不健康。如果为同一组服务器定义了多个运行状况检查,则任何检查的单个故障都会导致相应的服务器被认为不健康。客户端连接不会以“检查”状态传递给不健康的服务器和服务器。 |
参考:https://cloud.tencent.com/developer/section/1259680 | 不启用 |
| --without-stream_upstream_least_conn_module | 指定组应使用负载平衡方法,其中将连接传递到具有最少活动连接的服务器,同时考虑服务器的权重。如果有多个这样的服务器,则使用加权循环平衡方法依次尝试它们 | 参考:http://nginx.org/en/docs/stream/ngx_stream_upstream_module.html?&_ga=2.182164519.1037785303.1522656538-1142065036.1522656538#least_conn | 不启用 |
| --without-stream_upstream_random_module | 指定组应使用负载平衡方法,其中将连接传递给随机选择的服务器,同时考虑服务器的权重。 | 参考:http://nginx.im/ngx/stream/ngx_stream_upstream_module.html#random | 不启用 |
| --with-google_perftools_module | 该模块专供nginx开发人员使用 | https://cloud.tencent.com/developer/section/1258973 | 不启用 |
| --add-module=PATH | 安装第三方模块 | –add-module=/第三方模块目录 | 不启用 |
| --add-dynamic-module=PATH | 需要增加第三方模块,使用参数--add-dynamic-module=即可 | 参考:http://www.ttlsa.com/nginx/nginx-dynamic-modules/ | 不启用 |
| --with-cc=PATH | 设置C编译器路径 | 设置C编译器路径 | 不启用 |
| --with-cpp=PATH | 设置C预处理器路径名 | 设置C预处理器路径名 | 不启用 |
| --with-cc-opt=OPTIONS | 设置额外的C编译器选项 | 设置额外的C编译器选项 | 不启用 |
| --with-ld-opt=OPTIONS | 设置其他链接器选项 | 设置其他链接器选项 | 不启用 |
| --with-cpu-opt=CPU | 为指定的CPU生成有效的值 | 为特定的 CPU 编译,有效的值包括:pentium, pentiumpro, pentium3, pentium4, athlon, opteron, amd64, sparc32, sparc64, ppc64 要确定CPU类型,可以通过如下命令:: grep "model name" /proc/cpuinfo |
不启用 |
| --with-openssl=DIR | 设定OpenSSL库文件路径 | 不指定默认安装 | 不启用 |
| --with-openssl-opt=OPTIONS | 设置OpenSSL库源的路径 | 为OpenSSL构建设置其他选项 | 不启用 |
| --with-debug | 启用调试日志 | 启用调试日志 | 不启用 |
  --help                             print this message

  --prefix=PATH                      set installation prefix
  --sbin-path=PATH                   set nginx binary pathname
  --modules-path=PATH                set modules path
  --conf-path=PATH                   set nginx.conf pathname
  --error-log-path=PATH              set error log pathname
  --pid-path=PATH                    set nginx.pid pathname
  --lock-path=PATH                   set nginx.lock pathname

  --user=USER                        set non-privileged user for
                                     worker processes
  --group=GROUP                      set non-privileged group for
                                     worker processes

  --build=NAME                       set build name
  --builddir=DIR                     set build directory

  --with-select_module               enable select module
  --without-select_module            disable select module
  --with-poll_module                 enable poll module
  --without-poll_module              disable poll module

  --with-threads                     enable thread pool support

  --with-file-aio                    enable file AIO support

  --with-http_ssl_module             enable ngx_http_ssl_module
  --with-http_v2_module              enable ngx_http_v2_module
  --with-http_realip_module          enable ngx_http_realip_module
  --with-http_addition_module        enable ngx_http_addition_module
  --with-http_xslt_module            enable ngx_http_xslt_module
  --with-http_xslt_module=dynamic    enable dynamic ngx_http_xslt_module
  --with-http_image_filter_module    enable ngx_http_image_filter_module
  --with-http_image_filter_module=dynamic
                                     enable dynamic ngx_http_image_filter_module
  --with-http_geoip_module           enable ngx_http_geoip_module
  --with-http_geoip_module=dynamic   enable dynamic ngx_http_geoip_module
  --with-http_sub_module             enable ngx_http_sub_module
  --with-http_dav_module             enable ngx_http_dav_module
  --with-http_flv_module             enable ngx_http_flv_module
  --with-http_mp4_module             enable ngx_http_mp4_module
  --with-http_gunzip_module          enable ngx_http_gunzip_module
  --with-http_gzip_static_module     enable ngx_http_gzip_static_module
  --with-http_auth_request_module    enable ngx_http_auth_request_module
  --with-http_random_index_module    enable ngx_http_random_index_module
  --with-http_secure_link_module     enable ngx_http_secure_link_module
  --with-http_degradation_module     enable ngx_http_degradation_module
  --with-http_slice_module           enable ngx_http_slice_module
  --with-http_stub_status_module     enable ngx_http_stub_status_module

  --without-http_charset_module      disable ngx_http_charset_module
  --without-http_gzip_module         disable ngx_http_gzip_module
  --without-http_ssi_module          disable ngx_http_ssi_module
  --without-http_userid_module       disable ngx_http_userid_module
  --without-http_access_module       disable ngx_http_access_module
  --without-http_auth_basic_module   disable ngx_http_auth_basic_module
  --without-http_mirror_module       disable ngx_http_mirror_module
  --without-http_autoindex_module    disable ngx_http_autoindex_module
  --without-http_geo_module          disable ngx_http_geo_module
  --without-http_map_module          disable ngx_http_map_module
  --without-http_split_clients_module disable ngx_http_split_clients_module
  --without-http_referer_module      disable ngx_http_referer_module
  --without-http_rewrite_module      disable ngx_http_rewrite_module
  --without-http_proxy_module        disable ngx_http_proxy_module
  --without-http_fastcgi_module      disable ngx_http_fastcgi_module
  --without-http_uwsgi_module        disable ngx_http_uwsgi_module
  --without-http_scgi_module         disable ngx_http_scgi_module
  --without-http_grpc_module         disable ngx_http_grpc_module
  --without-http_memcached_module    disable ngx_http_memcached_module
  --without-http_limit_conn_module   disable ngx_http_limit_conn_module
  --without-http_limit_req_module    disable ngx_http_limit_req_module
  --without-http_empty_gif_module    disable ngx_http_empty_gif_module
  --without-http_browser_module      disable ngx_http_browser_module
  --without-http_upstream_hash_module
                                     disable ngx_http_upstream_hash_module
  --without-http_upstream_ip_hash_module
                                     disable ngx_http_upstream_ip_hash_module
  --without-http_upstream_least_conn_module
                                     disable ngx_http_upstream_least_conn_module
  --without-http_upstream_random_module
                                     disable ngx_http_upstream_random_module
  --without-http_upstream_keepalive_module
                                     disable ngx_http_upstream_keepalive_module
  --without-http_upstream_zone_module
                                     disable ngx_http_upstream_zone_module

  --with-http_perl_module            enable ngx_http_perl_module
  --with-http_perl_module=dynamic    enable dynamic ngx_http_perl_module
  --with-perl_modules_path=PATH      set Perl modules path
  --with-perl=PATH                   set perl binary pathname

  --http-log-path=PATH               set http access log pathname
  --http-client-body-temp-path=PATH  set path to store
                                     http client request body temporary files
  --http-proxy-temp-path=PATH        set path to store
                                     http proxy temporary files
  --http-fastcgi-temp-path=PATH      set path to store
                                     http fastcgi temporary files
  --http-uwsgi-temp-path=PATH        set path to store
                                     http uwsgi temporary files
  --http-scgi-temp-path=PATH         set path to store
                                     http scgi temporary files

  --without-http                     disable HTTP server
  --without-http-cache               disable HTTP cache

  --with-mail                        enable POP3/IMAP4/SMTP proxy module
  --with-mail=dynamic                enable dynamic POP3/IMAP4/SMTP proxy module
  --with-mail_ssl_module             enable ngx_mail_ssl_module
  --without-mail_pop3_module         disable ngx_mail_pop3_module
  --without-mail_imap_module         disable ngx_mail_imap_module
  --without-mail_smtp_module         disable ngx_mail_smtp_module

  --with-stream                      enable TCP/UDP proxy module
  --with-stream=dynamic              enable dynamic TCP/UDP proxy module
  --with-stream_ssl_module           enable ngx_stream_ssl_module
  --with-stream_realip_module        enable ngx_stream_realip_module
  --with-stream_geoip_module         enable ngx_stream_geoip_module
  --with-stream_geoip_module=dynamic enable dynamic ngx_stream_geoip_module
  --with-stream_ssl_preread_module   enable ngx_stream_ssl_preread_module
  --without-stream_limit_conn_module disable ngx_stream_limit_conn_module
  --without-stream_access_module     disable ngx_stream_access_module
  --without-stream_geo_module        disable ngx_stream_geo_module
  --without-stream_map_module        disable ngx_stream_map_module
  --without-stream_split_clients_module
                                     disable ngx_stream_split_clients_module
  --without-stream_return_module     disable ngx_stream_return_module
  --without-stream_upstream_hash_module
                                     disable ngx_stream_upstream_hash_module
  --without-stream_upstream_least_conn_module
                                     disable ngx_stream_upstream_least_conn_module
  --without-stream_upstream_random_module
                                     disable ngx_stream_upstream_random_module
  --without-stream_upstream_zone_module
                                     disable ngx_stream_upstream_zone_module

  --with-google_perftools_module     enable ngx_google_perftools_module
  --with-cpp_test_module             enable ngx_cpp_test_module

  --add-module=PATH                  enable external module
  --add-dynamic-module=PATH          enable dynamic external module

  --with-compat                      dynamic modules compatibility

  --with-cc=PATH                     set C compiler pathname
  --with-cpp=PATH                    set C preprocessor pathname
  --with-cc-opt=OPTIONS              set additional C compiler options
  --with-ld-opt=OPTIONS              set additional linker options
  --with-cpu-opt=CPU                 build for the specified CPU, valid values:
                                     pentium, pentiumpro, pentium3, pentium4,
                                     athlon, opteron, sparc32, sparc64, ppc64

  --without-pcre                     disable PCRE library usage
  --with-pcre                        force PCRE library usage
  --with-pcre=DIR                    set path to PCRE library sources
  --with-pcre-opt=OPTIONS            set additional build options for PCRE
  --with-pcre-jit                    build PCRE with JIT compilation support

  --with-zlib=DIR                    set path to zlib library sources
  --with-zlib-opt=OPTIONS            set additional build options for zlib
  --with-zlib-asm=CPU                use zlib assembler sources optimized
                                     for the specified CPU, valid values:
                                     pentium, pentiumpro

  --with-libatomic                   force libatomic_ops library usage
  --with-libatomic=DIR               set path to libatomic_ops library sources

  --with-openssl=DIR                 set path to OpenSSL library sources
  --with-openssl-opt=OPTIONS         set additional build options for OpenSSL

  --with-debug                       enable debug logging
编译参数:
./configure --prefix=/application/nginx-1.16 --user=www --group=www --with-http_image_filter_module --with-http_ssl_module --with-http_v2_module --with-http_stub_status_module
编译错误列表:
./configure: error: the HTTP rewrite module requires the PCRE library.
You can either disable the module by using --without-http_rewrite_module
option, or install the PCRE library into the system, or build the PCRE library
statically from the source with nginx by using --with-pcre=
需要安装pcre包
yum install -y pcre pcre-devel openssl openssl-devel
/configure: error: the HTTP image filter module requires the GD library.
You can either do not enable the module or install the libraries.
因为添加了图片处理模块,还需要安装相关支持
yum -y install gd-devel
访问测试:
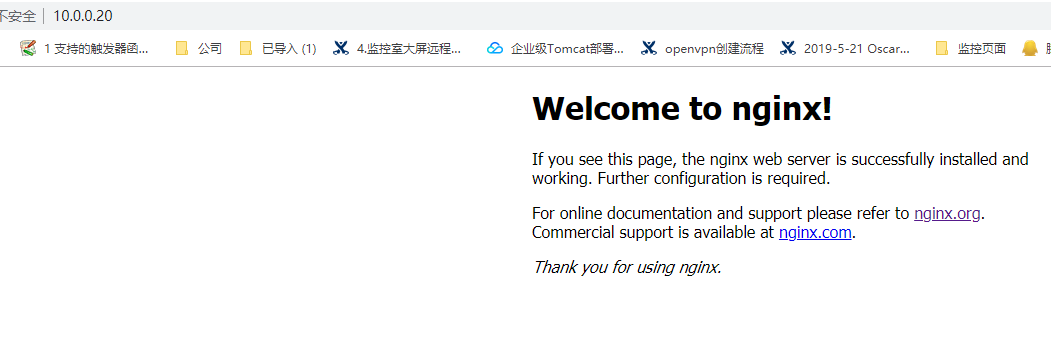
nginx语法检查启动与重载
nginx语法检查
nginx -t
nginx: the configuration file /application/nginx-1.16/conf/nginx.conf syntax is ok
nginx: configuration file /application/nginx-1.16/conf/nginx.conf test is successful
出现上面两行代表成功
其他结果均为错误或者警告
nginx 停止与启动
nginx -s stop 停止nginx
nginx 启动nginx
nginx -s reload 重载配置文件
Nginx文件精简化启动
在面对多站点的配置的时候,每个站点配置都在 nginx.conf 文件中,这样会导致nginx文件拥挤,配置站点时出错概率增大,在删除配置的时候容易产生误删其他站点的可能性,为了避免这个情况,我们可以使用多站点配置文件,每个站点都是一个独立的配置文件,这样更方便管理,同时提升安全性
nginx默认配置文件名为 nginx.conf.default
过滤出默认配置 egrep -v "#|^\(" /application/nginx/conf/nginx.conf.default 我将 过滤出来的新配置追加到了nginx.conf中 egrep -v "#|^\)" /application/nginx/conf/nginx.conf.default >/application/nginx/conf/nginx.conf
worker_processes  1;		    #------- main 核心区块
error_log logs/error.log;           #------- 定义错误日志
pid		 logs/nginx.pid;    #------- 定义进程pid文件

events {
    worker_connections  1024;       #------- 核心功能模块
    use epoll;                      #------- 使用epoll事件处理模型
}


http {								# http 模块开始
    include       mime.types;		# 定义支持的媒体类型文件,如果这个文件中没有某类型文件,则不支持
    default_type  application/octet-stream;   # 默认类型
    sendfile        on;             # sendfile文件系统优化
    keepalive_timeout  65;          # 响应超时时间

    server {     --------------------------------------|------# server 区块开始
        listen       80;                               |
        server_name  localhost;                        |
        location / {                                   |
            root   html;                               |
            index  index.html index.htm;               |
        }                                              |
        error_page   500 502 503 504  /50x.html;       |
        location = /50x.html {                         |
            root   html;                               |
           }                                           |
            }    --------------------------------------|------# server 区块结束
}                                   # http模块结束
创建新站点
在 http 模块下添加新配置文件
如何添加新配置文件?
新的配置文件可以通过nginx.conf.default文件过滤出来,取出server块 由于末尾还会少一个 } 符号,还得继续添加 } 新配置文件正常可用
## 查看取出内容:
[root@leilei conf]# egrep -v "#|^$" /application/nginx/conf/nginx.conf.default | sed -n '10,16p'
server {
listen 80;
server_name localhost;
location / {
root html;
index index.html index.htm;
}
这里可以明显看处取出的文件中缺少一个 } 我们等会儿添加,现在我们讲这个配置文件追加为新站点配置文件
如:www.conf
为了确保我们新站点配置文件统一,所以在创建新的配置文件前,需要创建一个新的文件夹,用于存放站点配置文件
## 创建站点配置文件目录
mkdir /application/nginx/conf/extra -p
## 取出站点配置文件 追加到新的站点名 配置文件中, 如 新站点名叫 www.leilei.net
[root@leilei conf]# egrep -v "#|^$" /application/nginx/conf/nginx.conf.default | sed -n '10,16p' >/application/nginx/conf/extra/www.chenleilei.net.conf
## 查看一下我们新增的配置文件
[root@leilei conf]# cat /application/nginx/conf/extra/www.chenleilei.net.conf
server {
listen 80;
server_name localhost;
location / {
root html;
index index.html index.htm;
}
#因为这里还缺少 一个 } 符号 现在我们必须追加进去,否则等下会报错
## 追加缺少的 } 到配置文件
[root@leilei conf]# echo "}" >>/application/nginx/conf/extra/www.chenleilei.net.conf
[root@leilei conf]# cat /application/nginx/conf/extra/www.chenleilei.net.conf
server {
listen 80;
server_name localhost;
location / {
root html;
index index.html index.htm;
}
}
# 现在站点目录已经完成配置,我们现在只需要在主配置文件中添加我们的新站点配置文件即可
# 同时
新增语句: include /application/nginx/conf/extra/www.chenleilei.net.conf;
新的 nginx.conf内容:
worker_processes 1;
events {
worker_connections 1024;
}
http {
include mime.types;
default_type application/octet-stream;
sendfile on;
keepalive_timeout 65;
include /application/nginx/conf/extra/www.chenleilei.net.conf;
}
#配置完成后,我们去看看新的站点文件,是否还缺少配置
[root@leilei extra]# vim www.chenleilei.net.conf
server {
listen 80;
server_name localhost;
location / {
root html; ## 这里是我们的网站根目录设置,我们也可以创建个目录设置为网站目录
index index.html index.htm;
}
}
#创建网站目录
[root@leilei]# cd /application/nginx/html/
[root@leilei html]# mkdir www.chenleilei.net
#创建一个文件用于我们待会儿的测试页
[root@leilei html]# cd www.chenleilei.net/
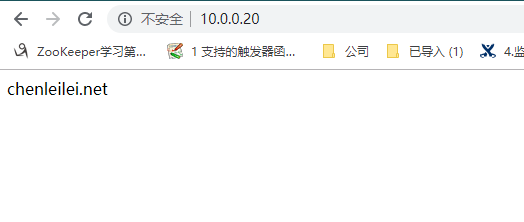
[root@leilei www.chenleilei.net]# echo "chenleilei.net" >./index.html
#配置完成后 进行语法检查: nginx -t
nginx: the configuration file /application/nginx-1.16/conf/nginx.conf syntax is ok
nginx: configuration file /application/nginx-1.16/conf/nginx.conf test is successful
看到出现 is ok successful 就正确配置了
# 别忘了,在新网站配置文件中指定网站目录
[root@leilei conf]# vim extra/www.chenleilei.net.conf
server {
listen 80;
server_name 10.0.0.20; #指定域名,如果测试环境请写IP地址
location / {
root html/www.chenleilei.net; #指定网站目录
index index.html index.htm;
}
error_page /50x.html; #错误页面的优雅显示
}
#配置完成重载配置文件,进行页面访问测试
使用: nginx 或 nginx -s reload 重载配置
测试访问

 微信赞赏
微信赞赏

 支付宝赞赏
支付宝赞赏


 浙公网安备 33010602011771号