mybatis-plus 连接 msyql 数据库 多表关联查询 2
1. 在 pom.xml 中 添加maven 依赖
1         <dependency>
2             <groupId>com.baomidou</groupId>
3             <artifactId>mybatis-plus-boot-starter</artifactId>
4             <version>3.0.5</version>
5         </dependency>
6         <dependency>
7             <groupId>mysql</groupId>
8             <artifactId>mysql-connector-java</artifactId>
9         </dependency>
2.配置application.yml文件
1 spring:
2   datasource:
3     driver-class-name: com.mysql.cj.jdbc.Driver
4     username: root
5     password: root
6     url: jdbc:mysql://localhost:3306/mybatis_plustest?useSSL=false&useUnicode=true&characterEncoding=utf-8&servertimeZone=GMT%2B8
3.新建 pojo包 新建 tuser和 course 类 ,因为是多表 关联 ,此处为省事 直接让 tuser 继承了 Course 类 ,否则还需要 单独 建 tUser-Course类
 1 package com.example.springboot01.pojo;
 2
 3
 4 import com.baomidou.mybatisplus.annotation.IdType;
 5 import com.baomidou.mybatisplus.annotation.TableId;
 6 import com.baomidou.mybatisplus.annotation.TableName;
 7 import lombok.Getter;
 8 import lombok.Setter;
 9
10 import java.util.Date;
11
12 @TableName("tUser")  //将数据库表格 tuser 与 实体类  tUser 做关联
13 @Getter
14 @Setter
15 public class tUser  extends Course  {
16     public int getId() {
17         return id;
18     }
19
20     public void setId(int id) {
21         this.id = id;
22     }
23
24     public String getName() {
25         return name;
26     }
27
28     public void setName(String name) {
29         this.name = name;
30     }
31
32     public int getAge() {
33         return age;
34     }
35
36     public void setAge(int age) {
37         this.age = age;
38     }
39
40     public Date getBirthday() {
41         return birthday;
42     }
43
44     public void setBirthday(Date birthday) {
45         this.birthday = birthday;
46     }
47
48     @TableId(type=IdType.AUTO)
49     private int id;
50     private String name;
51     private int age;
52     private Date birthday;
53
54     public tUser(int id, String name, int age, Date birthday) {
55         this.id = id;
56         this.name = name;
57         this.age = age;
58         this.birthday = birthday;
59     }
60
61     public tUser() {
62     }
63
64
65
66 }
 1 package com.example.springboot01.pojo;
 2
 3 import lombok.Data;
 4
 5 @Data
 6 public class Course   {
 7     private  int courseID;
 8     private   String courseName;
 9     private  int uid;
10     private   float score;
11
12     public Course() {
13     }
14
15     public Course(int courseID, String courseName, int uid, float score) {
16         this.courseID = courseID;
17         this.courseName = courseName;
18         this.uid = uid;
19         this.score = score;
20     }
21
22     public int getCourseID() {
23         return courseID;
24     }
25
26     public void setCourseID(int courseID) {
27         this.courseID = courseID;
28     }
29
30     public String getCourseName() {
31         return courseName;
32     }
33
34     public void setCourseName(String courseName) {
35         this.courseName = courseName;
36     }
37
38     public int getUid() {
39         return uid;
40     }
41
42     public void setUid(int uid) {
43         this.uid = uid;
44     }
45
46     public float getScore() {
47         return score;
48     }
49
50     public void setScore(float score) {
51         this.score = score;
52     }
53 }
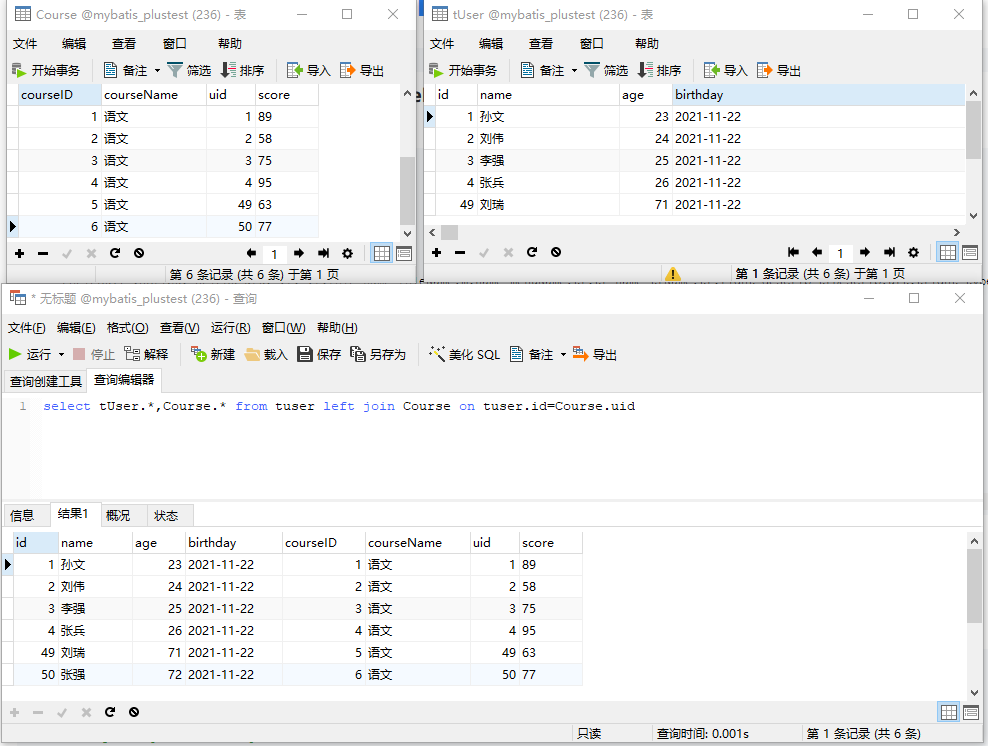
4.在 mysql中新建数据 mybatisplustest ,并 建立 tuser表 和course 表 如下图:
 1 DROP TABLE IF EXISTS `tuser`;
 2 CREATE TABLE `tuser` (
 3   `id` int(11) NOT NULL AUTO_INCREMENT,
 4   `name` varchar(255) DEFAULT NULL,
 5   `age` int(11) NOT NULL,
 6   `birthday` date DEFAULT NULL,
 7   PRIMARY KEY (`id`)
 8 ) ENGINE=InnoDB AUTO_INCREMENT=51 DEFAULT CHARSET=utf8;
 9
10 -- ----------------------------
11 -- Records of tuser
12 -- ----------------------------
13 INSERT INTO `tuser` VALUES ('1', '孙文', '23', '2021-11-22');
14 INSERT INTO `tuser` VALUES ('2', '刘伟', '24', '2021-11-22');
15 INSERT INTO `tuser` VALUES ('3', '李强', '25', '2021-11-22');
16 INSERT INTO `tuser` VALUES ('4', '张兵', '26', '2021-11-22');
17 INSERT INTO `tuser` VALUES ('49', '刘瑞', '71', '2021-11-22');
18 INSERT INTO `tuser` VALUES ('50', '张强', '72', '2021-11-22');
 1 DROP TABLE IF EXISTS `course`;
 2 CREATE TABLE `course` (
 3   `courseID` int(11) NOT NULL AUTO_INCREMENT,
 4   `courseName` varchar(255) NOT NULL,
 5   `uid` int(11) NOT NULL,
 6   `score` float(255,0) NOT NULL,
 7   PRIMARY KEY (`courseID`)
 8 ) ENGINE=InnoDB AUTO_INCREMENT=7 DEFAULT CHARSET=utf8;
 9
10 -- ----------------------------
11 -- Records of course
12 -- ----------------------------
13 INSERT INTO `course` VALUES ('1', '语文', '1', '89');
14 INSERT INTO `course` VALUES ('2', '语文', '2', '58');
15 INSERT INTO `course` VALUES ('3', '语文', '3', '75');
16 INSERT INTO `course` VALUES ('4', '语文', '4', '95');
17 INSERT INTO `course` VALUES ('5', '语文', '49', '63');
18 INSERT INTO `course` VALUES ('6', '语文', '50', '77');
5.在项目根目录新建mapper 包,目录结构如下图:
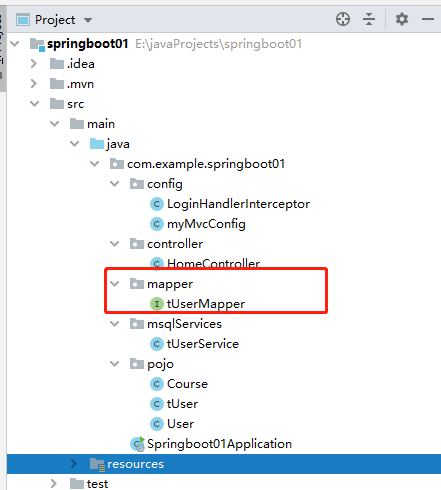
新建 tUserMapper 类 ,集成BaseMapper<T> 代码如下:
 1 package com.example.springboot01.mapper;
 2
 3 import com.baomidou.mybatisplus.core.conditions.Wrapper;
 4 import com.baomidou.mybatisplus.core.conditions.query.QueryWrapper;
 5 import com.baomidou.mybatisplus.core.mapper.BaseMapper;
 6 import com.baomidou.mybatisplus.core.metadata.IPage;
 7 import com.example.springboot01.pojo.tUser;
 8 import org.apache.ibatis.annotations.Mapper;
 9 import org.apache.ibatis.annotations.Param;
10 import org.apache.ibatis.annotations.Select;
11 import org.springframework.context.annotation.Bean;
12 import org.springframework.stereotype.Component;
13 import org.springframework.stereotype.Repository;
14
15 import java.io.Serializable;
16 import java.util.ArrayList;
17 import java.util.Collection;
18 import java.util.List;
19 import java.util.Map;
20
21  @Repository
22 public interface tUserMapper extends BaseMapper<tUser>    //此处必须继承 BaseMapper接口, 该接口已提供 写好的常用操作表方法

 {
23
24   @Select("select tUser.*,Course.* from tuser left join Course on tuser.id=Course.uid where id>#{id}")  //多表关联 查询 用户信息 和用户成绩表       传参数 格式  #{ 参数名称}
25   ArrayList<tUser > getA(@Param("id") int id);  // 通过 @Param("id")  绑定参数映射
26
27 }
5. 新建 mysqlServices 包 ,专门存放 所有 关于mysql数据访问层 ,新建 tUserService 代码如下:
 1 package com.example.springboot01.msqlServices;
 2 import com.example.springboot01.mapper.tUserMapper;
 3 import com.example.springboot01.pojo.tUser;
 4 import org.springframework.beans.factory.annotation.Autowired;
 5 import org.springframework.stereotype.Component;
 6 import java.util.ArrayList;
 7 import java.util.List;
 8 @Component  //必须添加 此注释
 9 public class tUserService {
10     @Autowired
11     tUserMapper tum;
12     public List<tUser> getAll()
13     {
14         return  tum.selectList(null);
15     }
16      public ArrayList<tUser > getA( int id)
17      {
18           return  tum.getA(id);
19      }
20 }
6.在控制器中调用 tUserservice ,HomeController 代码如下:
 1 package com.example.springboot01.controller;
 2
 3 import com.baomidou.mybatisplus.core.conditions.query.QueryWrapper;
 4
 5 import com.example.springboot01.mapper.tUserMapper;
 6 import com.example.springboot01.msqlServices.tUserService;
 7 import com.example.springboot01.pojo.User;
 8 import com.example.springboot01.pojo.tUser;
 9 import com.mysql.cj.x.protobuf.MysqlxDatatypes;
10 import org.springframework.beans.factory.annotation.Autowired;
11 import org.springframework.stereotype.Controller;
12 import org.springframework.ui.Model;
13 import org.springframework.util.StringUtils;
14 import org.springframework.web.bind.annotation.RequestMapping;
15 import org.springframework.web.bind.annotation.RequestParam;
16 import javax.servlet.http.HttpServletRequest;
17 import javax.servlet.http.HttpServletRequest;
18 import javax.servlet.http.HttpSession;
19
20
21 import java.util.*;
22
23 @Controller
24 public class HomeController {
25             @Autowired   //自动注入 request
26            HttpServletRequest request;
27           @Autowired
28           tUserService tm;   //属性注入  tuserService
29 @Autowired //自动注入 session
30   HttpSession   session=null;
31 @RequestMapping("/hello")
32     public  String  hello()
33     {
34          request.setAttribute("hello"," !!!");
35          List<User> lists=new ArrayList<>() ;
36         User u=new User(1001,"葛洪");
37         User u1=new User(1002,"李四");
38         User u2=new User(1003,"张三");
39         lists.add(u);
40         lists.add(u1);
41         lists.add(u2);
42         request.setAttribute("lists",lists);
43         request.setAttribute("curUser", new User());
44         return "hello";
45     }
46
47     @RequestMapping("/login")
48     public String login(@RequestParam("username") String username,@RequestParam("password") String password , Model model)
49     {
50          if( StringUtils.isEmpty(username) ) {
51              model.addAttribute("msg","用户名不能为空!!"); return "login";
52          }
53         if(StringUtils.isEmpty(password))
54         {
55             model.addAttribute("msg","密码不能为空!!"); return "login";
56         }
57         if(username.equals("szk") && password.equals("123"))
58         {
59
60             session.setAttribute("username",username);
61             return "redirect:/main";
62         }else
63         {
64             model.addAttribute("msg","用户名或密码错误!!");
65
66             return "/login";
67         }
68     }
69
70     @RequestMapping("/main")
71     public String main(   Model model)
72     {
73         model.addAttribute("tm",tm.getA(3 )); //调用getA( )  过滤 用户 id >3的 数据
74         return "main";
75     }
7.在main.html 视图中展示数据
 1  <table border="1">
 2         <tr> <td> 编号</td> <td> 姓名</td>   <td> 年龄</td>   <td> 出生日期</td>  <td> 学科</td> <td> 分数</td> </tr>
 3
 4     <tr th:each="it:${tm}">
 5     <td>
 6         [[${it.getId()}]]
 7     </td><td>
 8         [[${it.getName()}]]
 9     </td><td>
10         [[  ${it.getAge()}]]
11     </td><td>
12         [[${ #dates.format(  it.getBirthday(),"yyyy-MM-dd")}]]
13     </td>
14 <td>
15     [[  ${it.getCourseName()}]]
16 </td>
17         <td>
18             [[  ${it.getScore()}]]
19         </td>
20
21     </tr>
22     </table>
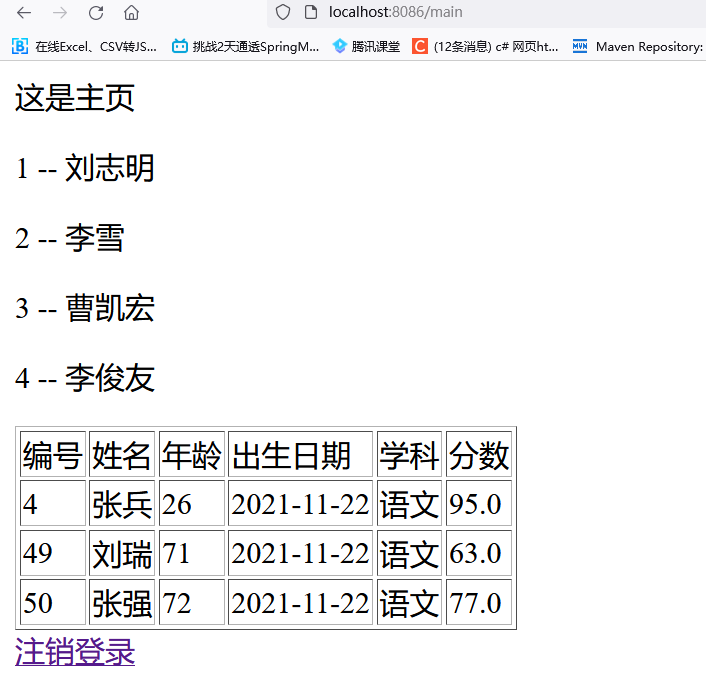
8.运行结果 如下图:

 浙公网安备 33010602011771号