
按照CSMN的层级写一个spring boot项目
0. 前言
这篇博客更强调思路(写代码的顺序),更详细的步骤可以看: https://www.cnblogs.com/sunshine233/p/18360207
1. 数据库内容

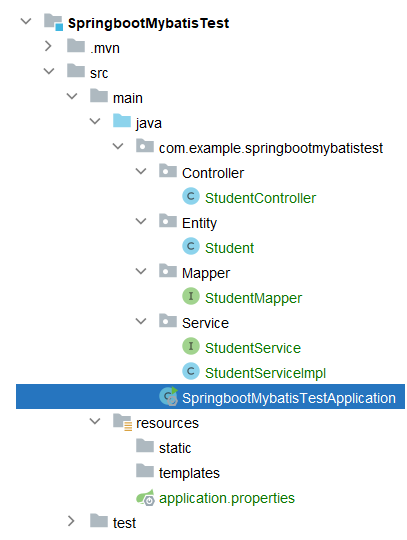
2. Spring boot项目结构
创建项目步骤看前言中的博客链接。
# 端口号默认8080,可以修改
#server.port=8081

# 驱动类名称
spring.datasource.driver-class-name: com.mysql.cj.jdbc.Driver
spring.datasource.url=jdbc:mysql://localhost:3306/student_test?useSSL=false&useUnicode=true&characterEncoding=utf-8
spring.datasource.username: root
spring.datasource.password: 1234

# 配置mybatis的日志,输出到控制台
# mybatis.configuration.log-impl=org.apache.ibatis.logging.stdout.StdOutImpl
# 开启mybatis的驼峰命名自动映射开关  a_column --> aCloumn 建议开启
 mybatis.configuration.map-underscore-to-camel-case=true
先在 SpringbootMybatisTestApplication.java 上加注解扫描mapper类
package com.example.springbootmybatistest;

import org.mybatis.spring.annotation.MapperScan;
import org.springframework.boot.SpringApplication;
import org.springframework.boot.autoconfigure.SpringBootApplication;

@SpringBootApplication
@MapperScan("com.example.springbootmybatistest.Mapper") // 🚩 注意这里要有注解
public class SpringbootMybatisTestApplication {

    public static void main(String[] args) {
        SpringApplication.run(SpringbootMybatisTestApplication.class, args);
    }

}
2.2 Spring boot项目从上到下分层,但写代码的时候从下往上写
mapper 和 dao 意思一样,但是在springboot项目中,与数据库交互的层叫 mapper 。
spring boot四层结构可以记忆为 CSMN(吃什么呢),如果是dao层,可以记忆为 CSDN :p
【CSMN:吃什么呢】
-
Controller:控制层,和前端交互
-
Service:业务逻辑层,处理具体业务逻辑
-
Mapper:与数据库交互
-
Entity:存放实体类,类的属性和数据库中表的属性对应(如有下划线,改为小驼峰)
package com.example.springbootmybatistest.Entity;

import lombok.Data;

@Data
public class Student {
    private int id;
    private  String name;
    private int age;
    private String sex;
    private int grade;
}
package com.example.springbootmybatistest.Mapper;

import com.example.springbootmybatistest.Entity.Student;
import org.apache.ibatis.annotations.Select;

import java.util.List;

public interface StudentMapper { //🚩 注意mapper是interface
    @Select("select * from student")
    List<Student> findAll();
}
如果代码复杂,可以把Service分成接口Service和实现ServiceImpl
如果代码不复杂,可以直接写一个StudentService
这里以 StudentService + StudentServiceImpl 为例
package com.example.springbootmybatistest.Service;

import com.example.springbootmybatistest.Entity.Student;

import java.util.List;

public interface StudentService {
    List<Student> findService();
}
注意两个注解 @Service 和 @Autowired
package com.example.springbootmybatistest.Service;

import com.example.springbootmybatistest.Entity.Student;
import com.example.springbootmybatistest.Mapper.StudentMapper;
import org.springframework.beans.factory.annotation.Autowired;
import org.springframework.stereotype.Service;

import java.util.List;

@Service // 🚩 注意这里要有注解
public class StudentServiceImpl implements StudentService {  // 🚩 继承StudentService
    @Autowired  // 🚩 注意这里也要有注解
    private StudentMapper studentMapper;

    @Override
    public List<Student> findService() {
       return studentMapper.findAll();
    }
}
先在 MydemoApplication.java 上加注解扫描mapper类 @MapperScan("com.example.mydemo.mapper")
package com.example.springbootmybatistest.Controller;

import com.example.springbootmybatistest.Entity.Student;
import com.example.springbootmybatistest.Service.StudentServiceImpl;
import lombok.RequiredArgsConstructor;
import org.springframework.web.bind.annotation.GetMapping;
import org.springframework.web.bind.annotation.RestController;

import java.util.List;

@RestController   // 🚩 注意这里要有注解
@RequiredArgsConstructor   // 🚩 注意这里要有注解
public class StudentController {
   private final StudentServiceImpl service;

    @GetMapping("/findAll")
    public List<Student> ss(){
        List<Student> service1 = service.findService();
        return service1;
    }
}
打开 SpringbootMybatisTestApplication.java 右键 Run
打开浏览器,输入 http://localhost:8080/findAll 出现下图,运行成功。


 浙公网安备 33010602011771号