


21-dock 企业级Harbor仓库部署
基于角色的访问控制,RBAC,这个是k8s 1.6以后才加入的功能,harbor在设计的开始就考虑进去,用户分为三种角色:项目管理员(MDRWS)、开发人员(RWS)和访客(RS),当然还有一个最高管理员权限admin系统管理员。 M:管理、D:删除、R:读取、W:写入、S:查询,非常细致的权限管理体系。当然一个用户可以在不同的项目里面扮演不同角色,这个和现实的用户管理体系非常吻合
1.安装Harbor需要docker-compose支持
wget -O /etc/yum.repos.d/epel.repo http://mirrors.aliyun.com/repo/epel-7.repo
yum install python-pip -y
pip install docker-compose
pip install --upgrade pip


# 如果pip install docker-compose安装报错,执行
报错信息:ERROR: Cannot uninstall 'requests'. It is a distutils installed project and thus we cannot accuratel

# 执行
pip install docker-compose --ignore-installed requests
2.验证安装
[root@docker01 ~]# docker-compose version
docker-compose version 1.20.1, build 5d8c71b
docker-py version: 3.1.4
CPython version: 2.7.5
OpenSSL version: OpenSSL 1.0.1e-fips 11 Feb 2013
3.下载harbor源码进行安装,下载地址:http://harbor.orientsoft.cn/ , github地址:https://github.com/vmware/harbor
cd /usr/local/src/
wget http://harbor.orientsoft.cn/harbor-v1.4.0/harbor-offline-installer-v1.4.0.tgz
tar -zxvf harbor-offline-installer-v1.4.0.tgz
cd harbor

# 修改配置文件
[root@docker01 harbor]# vim harbor.cfg
......
hostname = 192.168.1.23
......
harbor_admin_password = admin123
4.初始化harbor
[root@docker01 harbor]# ./install.sh
......
[Step 3]: checking existing instance of Harbor ...


[Step 4]: starting Harbor ...
Creating network "harbor_harbor" with the default driver
Creating harbor-log ... done
Creating registry           ... done
Creating harbor-adminserver ... done
Creating harbor-db          ... done
Creating harbor-ui          ... done
Creating nginx              ... done
Creating harbor-jobservice  ... done

✔ ----Harbor has been installed and started successfully.----

Now you should be able to visit the admin portal at http://192.168.1.23.
For more details, please visit https://github.com/vmware/harbor .
5.安装完成就访问

6.推送镜像到本地私有仓库
# 方法一
# 编辑docker启动文件,加入--insecure-registry
[root@docker01 harbor]# vim /usr/lib/systemd/system/docker.service
......
# for containers run by docker
ExecStart=/usr/bin/dockerd --insecure-registry=192.168.1.23
......

# 方法二加入insecure-registry
[root@docker01 docker]# cat /etc/docker/daemon.json
{
  "registry-mirrors": ["https://tdimi5ql.mirror.aliyuncs.com"],
  "insecure-registries": ["http://192.168.1.23:5000"]
}


# 重启docker,也要重启barbor
[root@docker01 harbor]# systemctl daemon-reload
[root@docker01 harbor]# systemctl restart dock
[root@docker01 harbor]# ./install.sh

# 镜像打tag及上传到仓库
[root@docker01 harbor]# docker tag 7f70b30f2cc6 library/nginx:v2
[root@docker01 harbor]# docker push 192.168.1.23/library/nginx:v2
[root@docker01 harbor]# docker login 192.168.1.23
Username: admin
Password:
Login Succeeded
The push refers to repository [192.168.1.23/library/nginx]
8e5e010ce6ad: Pushed
974dc1373097: Pushed
3358360aedad: Pushed
v2: digest: sha256:22650ea37ad4ccf8472330f141de0712c14fbad2b6792b6aba1687d3d2fa9aa5 size: 948

7. harbor架构图及高可用方案
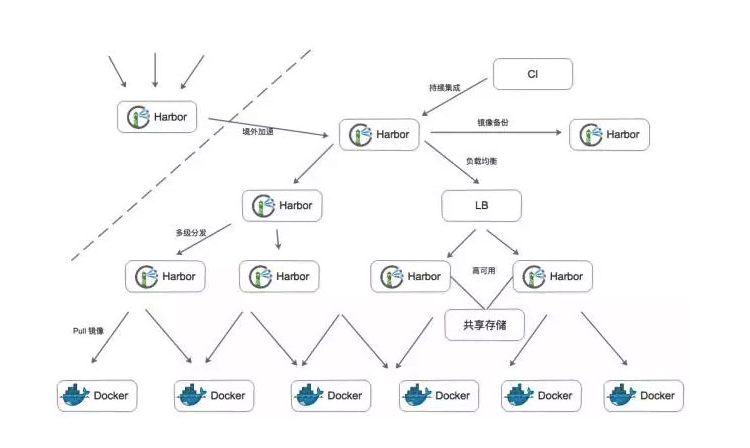
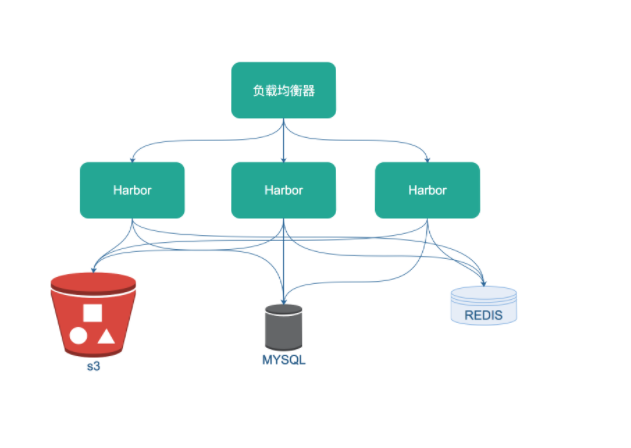
https://blog.csdn.net/aixiaoyang168/article/details/78909038


 浙公网安备 33010602011771号