archery 安装使用教程
一、archery介绍
archery是一款开源的数据库工单审核、查询平台,类似于阿里云的dms,支持mysql、pg、oracle、mongodb等关系型数据库和Nosql数据库,支持的功能如下所示: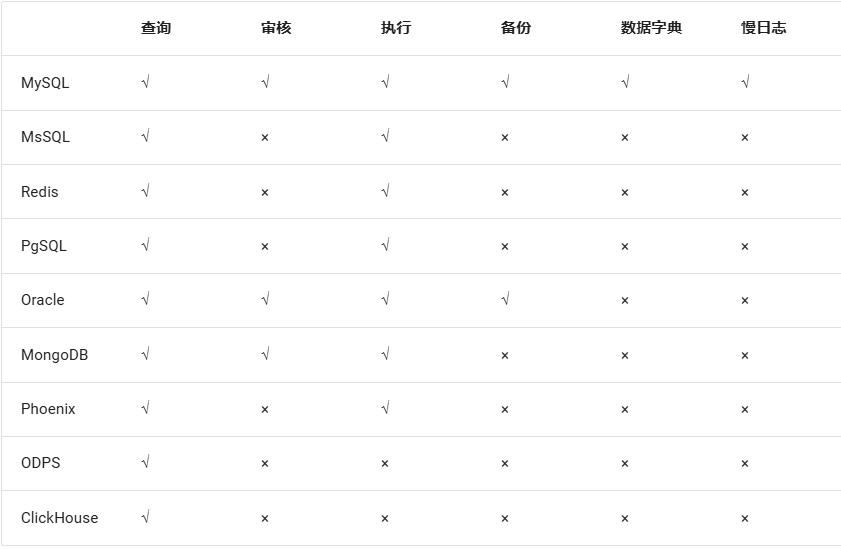
我们常用的就是查询平台和工单审核功能。审核那一列是指自动审核,对于不支持自动审核的可以手动审核。
二、部署archery
archery官网:https://archerydms.com/github地址:https://github.com/hhyo/Archery
2.1、安装python环境
archery是基于python写的,所以需要依赖python环境,先安装python 注意:从archery1.9.0版本开始,将不再支持python3.7及以下版本,本安装文档使用python3.9版本,archery使用1.11.3版本详细的python下载安装教程请见我另一篇博客:https://www.cnblogs.com/sunjiwei/articles/18066608
下面是简单的安装步骤,也可以使用
# 安装依赖
yum install libffi-devel wget gcc make zlib-devel openssl openssl-devel ncurses-devel openldap-devel gettext bzip2-devel xz-devel

wget "https://www.python.org/ftp/python/3.9.10/Python-3.9.10.tar.xz"

tar -xvJf Python-3.9.10.tar.xz

# 编译
cd Python-3.9.10
./configure prefix=/usr/local/python3
make && make install


# 创建python虚拟环境
python3 -m venv /data/python_venv/venv_archery

# 激活虚拟环境
source /data/python_venv/venv_archery/bin/activate

激活后有如下显示则说明激活成功,前面有个括号,括号里是虚拟环境的名称
(venv_archery) [root@iZuf6c0ayfwv04hf5r4wa8Z venv_archery]#
2.2、安装archery
# 下载archery安装包
wget "https://github.com/hhyo/archery/archive/v1.11.3.tar.gz"
注意:如果网络不通就到github里或者gitee里下载然后上传到linux服务器


tar -xzvf v1.11.3.tar.gz

# 安装系统依赖
yum -y install gcc gcc-c++ python-devel mysql-devel openldap-devel unixODBC-devel gettext

# 安装依赖库
cd archery-1.11.3
pip3 install -r requirements.txt -i https://mirrors.ustc.edu.cn/pypi/web/simple/

注意:在这一步安装mysqlclient库时,可能会遇到报错,自行研究解决,或者如果懂django,也可以换成pymysql


# 如果使用yum安装的python3,安装mysqlclient可能提示提示缺少Python.h,可安装
yum -y install python36-devel
2.3、安装mysql和redis
archery需要使用mysql来存储元数据,使用Redis提供任务队列和缓存功能,所以还需要安装一个mysql(5.7以上版本)和redis给archery使用mysql安装见我另一篇博客:https://www.cnblogs.com/sunjiwei/articles/18359401
redis安装见我另一篇博客:https://www.cnblogs.com/sunjiwei/p/18397893
2.4、修改archery配置文件
配置文件在你下载的archery安装包解压后的目录中, vim /opt/soft/Archery-1.11.3/settings.py# 1、基础配置
# 修改SECRET_KEY
SECRET_KEY 是一个非常重要的设置项,它用于提供加密签名的基础。这个密钥应该保持秘密,并且只在你的服务器环境和配置文件中使用,如果只是学习测试用就不用改了
你可以使用一些生成随机字符串的工具或者使用过python自己生成一个随机字符串作为SECRET_KEY,类似函数如下:
import random
import string
def generate_secret_key(length=50):
chars = string.ascii_letters + string.digits + '!@#$%^&*(-_=+)'
return ''.join(random.SystemRandom().choice(chars) for _ in range(length))
print(generate_secret_key())
# 关闭debug模式
DEBUG = False
# 设置ALLOWED_HOSTS,建议限制内网访问
ALLOWED_HOSTS = [
'.example.com', # Allow domain and subdomains
'.example.com.', # Also allow FQDN and subdomains
]
# 请求大小限制,如果提交SQL语句过大可以修改该值
DATA_UPLOAD_MAX_MEMORY_SIZE = 15728640
# 密码校验,用户注册和添加密码校验规则,保持原配置文件不变即可
AUTH_PASSWORD_VALIDATORS = [
{
'NAME': 'django.contrib.auth.password_validation.UserAttributeSimilarityValidator',
},
{
'NAME': 'django.contrib.auth.password_validation.MinimumLengthValidator',
'OPTIONS': {
'min_length': 9,
}
},
{
'NAME': 'django.contrib.auth.password_validation.CommonPasswordValidator',
},
{
'NAME': 'django.contrib.auth.password_validation.NumericPasswordValidator',
},
]
# 2、mysql数据库配置
DATABASES = {
'default': {
'ENGINE': 'django.db.backends.mysql',
'NAME': 'archery', # 数据库名称
'USER': 'root', # 数据库用户
'PASSWORD': '', # 数据库密码
'HOST': '127.0.0.1', # 数据库HOST,如果是docker启动并且关联,可以使用容器名连接
'PORT': '3306', # 数据库端口
'OPTIONS': {
'init_command': "SET sql_mode='STRICT_TRANS_TABLES'", # SQL_MODE,为了兼容select * group by,可以按需调整
'charset': 'utf8mb4'
},
'TEST': {
'NAME': 'test_archery',
'CHARSET': 'utf8mb4',
},
}
}
# 3、Django-Q配置,默认配置即可,不用修改
Q_CLUSTER = {
'name': 'archery',
'workers': 4,
'recycle': 500,
'timeout': 60,
'compress': True,
'cpu_affinity': 1,
'save_limit': 0,
'queue_limit': 50,
'label': 'Django Q',
'django_redis': 'default',
'sync': False # 本地调试可以修改为True,使用同步模式
}
# 4、缓存配置,archery使用的是redis
CACHES = {
"default": {
"BACKEND": "django_redis.cache.RedisCache",
"LOCATION": "redis://127.0.0.1:6379/0", # redis://host:port/db
"OPTIONS": {
"CLIENT_CLASS": "django_redis.client.DefaultClient",
"PASSWORD": "" # redis的密码
}
}
}
2.5、安装数据库驱动
部署好archery后,如果想在archery里配置哪种数据库,还要安装对应的数据库驱动,具体如下:mysql的需要安装Inception(MySQL审核、查询校验和数据脱敏要使用)
项目地址:https://github.com/hanchuanchuan/goInception
安装过程如下:
# 1、下载goinception二进制安装包
https://github.com/hanchuanchuan/goInception/releases

# 2、安装go语言环境
如果服务器上没有go语言环境,需要先安装go,go版本v1.12及以上
yum  install -y go

# 3、启动goinception
解压二进制安装包会得到一个goinception文件和一个config目录
./goInception -config=config/config.toml.default &

# 查看启动是否成功
[root@iZuf6c0ayfwv04hf5r4wa8Z goinception]# ps -ef |grep go
root     21034  9212  0 11:31 pts/2    00:00:00 ./goInception -config=config/config.toml.default
root     21055  9212  0 11:31 pts/2    00:00:00 grep --color=auto go
安装MongoDB驱动(需要使用MongoDB的按需安装)
wget -c https://fastdl.mongodb.org/linux/mongodb-linux-x86_64-rhel70-3.6.20.tgz
tar -xvf mongodb-linux-x86_64-rhel70-3.6.20.tgz
\cp -f mongodb-linux-x86_64-rhel70-3.6.20/bin/mongo /usr/bin/
3、启动archery
3.1、启动准备
cd /opt/soft/Archery-1.11.3

# 数据库初始化
python3 manage.py makemigrations sql
python3 manage.py migrate

# 数据初始化
python3 manage.py dbshell < sql/fixtures/auth_group.sql
python3 manage.py dbshell < src/init_sql/mysql_slow_query_review.sql

注意:如果这里执行报错可以直接把sql拿到数据库执行即可

# 创建管理用户
python3 manage.py createsuperuser
3.2、启动archery
# 1、runserver启动(仅作为本地测试)

# 启动虚拟环境

source /data/python_venv/venv_archery/bin/activate

# 启动Django-Q,需保持后台运行
python3 manage.py qcluster &

#启动服务
python3 manage.py runserver 0.0.0.0:9123  --insecure &


# 2、Gunicorn+Nginx启动(真正部署用起来得用这种方式)

# nginx配置示例
server{
        listen 9123; # 监听的端口
        server_name archery;
        client_max_body_size 20M; # 处理Request Entity Too Large
        proxy_read_timeout 600s;  # 超时时间与Gunicorn超时时间设置一致,主要用于在线查询

        location / {
          proxy_pass http://127.0.0.1:8888;
          proxy_set_header Host $host:9123; # 解决重定向404的问题,和listen端口保持一致,如果是docker则和宿主机映射端口保持一致
          proxy_set_header X-Real-IP $remote_addr;
          proxy_set_header X-Forwarded-For $proxy_add_x_forwarded_for;
          proxy_set_header X-Forwarded-Proto $scheme;
        }

        location /static {
          alias /opt/soft/Archery-1.11.3/common/static; # 此处指向settings.py配置项STATIC_ROOT目录的绝对路径,用于nginx收集静态资源
        }

        error_page 404 /404.html;
            location = /40x.html {
        }

        error_page 500 502 503 504 /50x.html;
            location = /50x.html {
        }
    }

# 启动
source /opt/venv4archery/bin/activate
bash startup.sh

 浙公网安备 33010602011771号