IdentityServer4(8)- 使用密码认证方式控制API访问(资源所有者密码授权模式)
一.前言
本文已经更新到 .NET Core 2.2
OAuth 2.0 资源所有者密码模式允许客户端向令牌服务发送用户名和密码,并获取代表该用户的访问令牌。
除了通过无法浏览器进行交互的应用程序之外,通常建议不要使用资源所有者密码模式。 一般来说,当您要对用户进行身份验证并请求访问令牌时,使用其中一个交互式 OpenID Connect 流程通常要好得多。
在这里使用这种模式是为了学习如何快速在 IdentityServer 中使用它,
二.添加用户
就像API资源(也称为 Scope)、客户端一样,用户也有一个基于内存存储(In-Memory)的实现。
有关如何正确存储(持久化存储)和管理用户帐户的详细信息,请查看基于 ASP.NET Identity的快速入门。
TestUser 类代表测试用户及其身份信息单元(Claim)。 让我们通过在 config 类中添加以下代码来创建几个用户:
首先添加以下语句 到Config.cs文件中:
using IdentityServer4.Test;

public static List<TestUser> GetUsers()
{
    return new List<TestUser>
    {
        new TestUser
        {
            SubjectId = "1",
            Username = "alice",
            Password = "password"
        },
        new TestUser
        {
            SubjectId = "2",
            Username = "bob",
            Password = "password"
        }
    };
}
然后将测试用户注册到 IdentityServer:
public void ConfigureServices(IServiceCollection services)
{
    // configure identity server with in-memory stores, keys, clients and scopes
    services.AddIdentityServer()
        .AddInMemoryApiResources(Config.GetApiResources())
        .AddInMemoryClients(Config.GetClients())
        .AddTestUsers(Config.GetUsers());
}
AddTestUsers 方法帮我们做了以下几件事:
- 为资源所有者密码授权添加支持
- 添加对用户相关服务的支持,这服务通常为登录 UI 所使用(我们将在下一个快速入门中用到登录 UI)
- 为基于测试用户的身份信息服务添加支持(你将在下一个快速入门中学习更多与之相关的东西)
四.为资源所有者密码授权添加一个客户端定义
你可以通过修改 ·AllowedGrantTypes· 属性简单地添加对已有客户端授权类型的支持。
通常你会想要为资源所有者用例创建独立的客户端,添加以下代码到你配置中的客户端定义中:
public static IEnumerable<Client> GetClients()
{
    return new List<Client>
    {
        // other clients omitted...

        // resource owner password grant client
        new Client
        {
            ClientId = "ro.client",
            AllowedGrantTypes = GrantTypes.ResourceOwnerPassword,

            ClientSecrets =
            {
                new Secret("secret".Sha256())
            },
            AllowedScopes = { "api1" }
        }
    };
}
使用密码授权请求一个令牌
创建一个 ResourceOwnerPassword 控制台项目,通过Nuget添加 IdentityModel 包
通过如下代码获取Token
// request token
var tokenResponse = await client.RequestPasswordTokenAsync(new PasswordTokenRequest
{
    Address = disco.TokenEndpoint,
    ClientId = "ro.client",
    ClientSecret = "secret",

    UserName = "alice",
    Password = "password",
    Scope = "api1"
});

if (tokenResponse.IsError)
{
    Console.WriteLine(tokenResponse.Error);
    return;
}

Console.WriteLine(tokenResponse.Json);
当您将令牌发送到身份API终结点时,您会注意到与客户端模式相比有一个小但重要的区别。 访问令牌现在将包含唯一标识用户的sub claim。 通过在调用API之后检查内容变量可以看到这个“sub”,并且控制器应用程序也会在屏幕上显示该claim。
sub claim的存在(或不存在)允许API区分代表客户端的调用和代表用户的调用。
下面这张图,是理解的客户端请求流程,
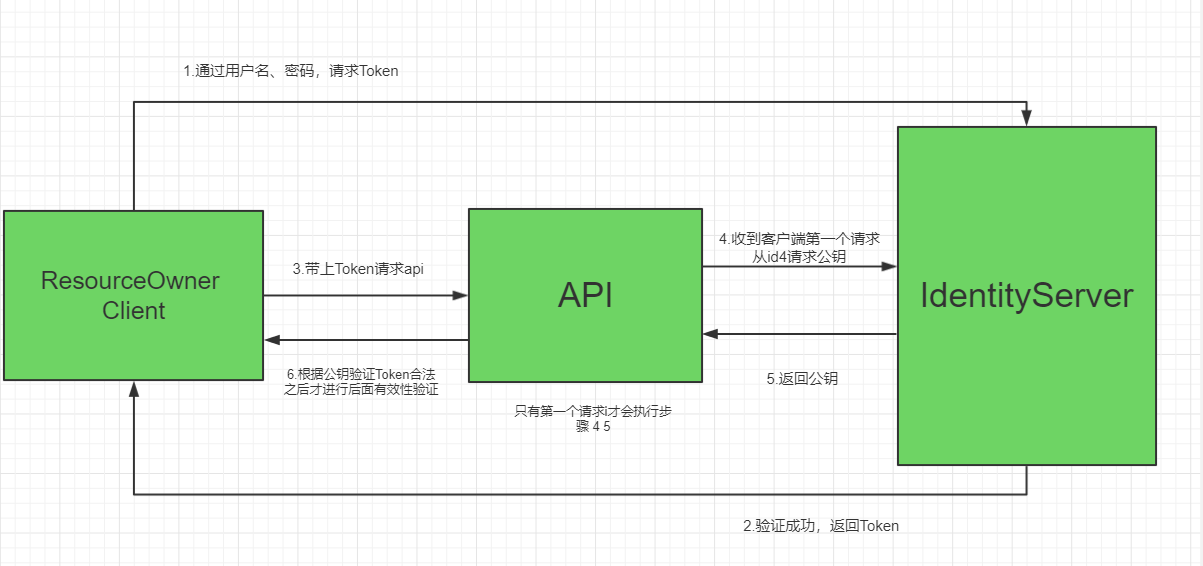
关于上图的补充说明,这里讲一下。api资源收到第一个请求之后,会去id4服务器公钥,然后用公钥验证token是否合法,如果合法进行后面后面的有效性验证。有且只有第一个请求才会去id4服务器请求公钥,后面的请求都会用第一次请求的公钥来验证,这也是jwt去中心化验证的思想。
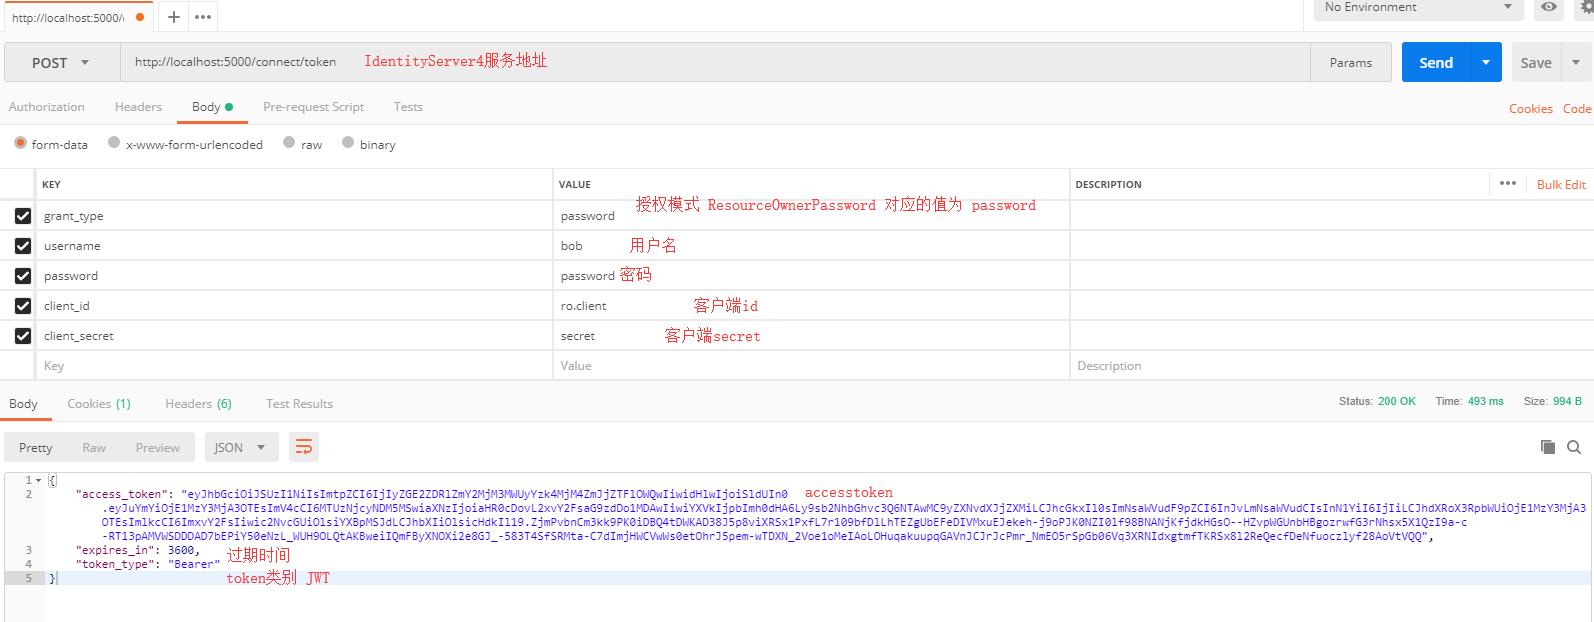
五.使用Postman调试
使用postman调用生成token接口需要配置如下参数:
最后github地址:https://github.com/stulzq/IdentityServer4.Samples/tree/master/Quickstarts/2_ResourceOwnerPasswords 如果你觉得对你有用,欢迎star
目前学习.NET Core 最好的教程 .NET Core 官方教程 ASP.NET Core 官方教程

 浙公网安备 33010602011771号