使用两级缓存框架 J2Cache
J2Cache 是 OSChina 目前正在使用的两级缓存框架(要求至少 Java 8)。
第一级缓存使用内存,同时支持 Ehcache 2.x、Ehcache 3.x 和 Caffeine(推荐)。
第二级缓存使用 Redis(推荐)/Memcached 。
由于大量的缓存读取会导致 L2 的网络成为整个系统的瓶颈,因此 L1 的目标是降低对 L2 的读取次数。
该缓存框架主要用于集群环境中。单机也可使用,用于避免应用重启导致的缓存冷启动后对后端业务的冲击。
源代码的官网托管地址:https://gitee.com/ld/J2Cache
本篇博客做一个小 demo,用于介绍 J2Cache 的使用方式,在博客的最后会提供源代码下载。
一、搭建工程
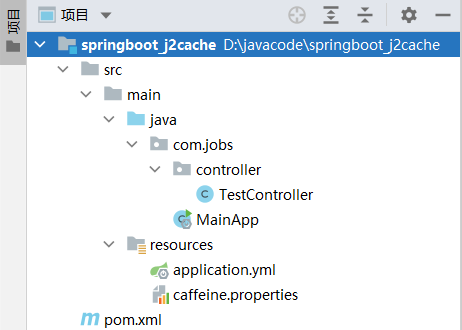
新创建一个 springboot 工程,名称为 springboot_j2cache,结构如下图所示:
首先看一下 pom 文件中引入的依赖包:
<?xml version="1.0" encoding="UTF-8"?>
<project xmlns="http://maven.apache.org/POM/4.0.0"
         xmlns:xsi="http://www.w3.org/2001/XMLSchema-instance"
         xsi:schemaLocation="http://maven.apache.org/POM/4.0.0 http://maven.apache.org/xsd/maven-4.0.0.xsd">
    <modelVersion>4.0.0</modelVersion>

    <groupId>com.jobs</groupId>
    <artifactId>springboot_j2cache</artifactId>
    <version>1.0</version>

    <parent>
        <groupId>org.springframework.boot</groupId>
        <artifactId>spring-boot-starter-parent</artifactId>
        <version>2.4.5</version>
    </parent>

    <properties>
        <maven.compiler.source>8</maven.compiler.source>
        <maven.compiler.target>8</maven.compiler.target>
    </properties>

    <dependencies>
        <dependency>
            <groupId>org.springframework.boot</groupId>
            <artifactId>spring-boot-starter-web</artifactId>
        </dependency>
        <!--引入 j2cache 的依赖包-->
        <dependency>
            <groupId>net.oschina.j2cache</groupId>
            <artifactId>j2cache-spring-boot2-starter</artifactId>
            <version>2.8.0-release</version>
        </dependency>
        <!--引入 j2cache core 的依赖包-->
        <dependency>
            <groupId>net.oschina.j2cache</groupId>
            <artifactId>j2cache-core</artifactId>
            <version>2.8.5-release</version>
            <!--排除掉以下两个依赖包,是为了解决项目启动时有关多个 Slf4j 绑定的警告信息-->
            <exclusions>
                <exclusion>
                    <groupId>org.slf4j</groupId>
                    <artifactId>slf4j-simple</artifactId>
                </exclusion>
                <exclusion>
                    <groupId>org.slf4j</groupId>
                    <artifactId>slf4j-api</artifactId>
                </exclusion>
            </exclusions>
        </dependency>
        <dependency>
            <groupId>org.projectlombok</groupId>
            <artifactId>lombok</artifactId>
        </dependency>
    </dependencies>

    <build>
        <plugins>
            <plugin>
                <groupId>org.springframework.boot</groupId>
                <artifactId>spring-boot-maven-plugin</artifactId>
                <version>2.4.5</version>
            </plugin>
        </plugins>
    </build>
</project>
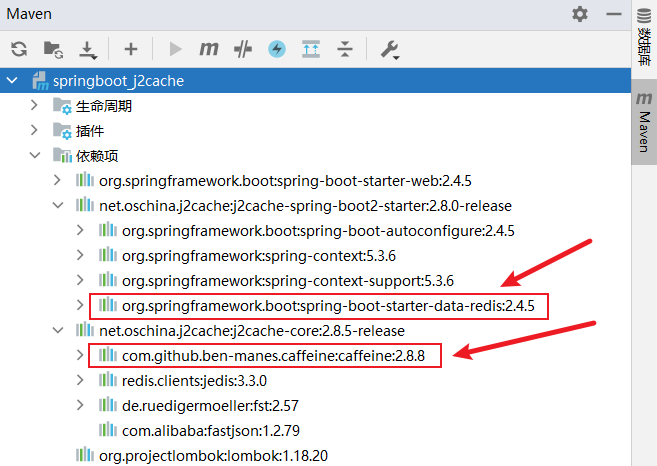
主要引入 2 个依赖包:j2cache-spring-boot2-starter 和 j2cache-core,我这里使用的是本篇博客发布时最新的版本。
有关这两个依赖包最新的版本,可以从 https://mvnrepository.com 网站上进行查找
需要注意的是:在 j2cache-core 依赖包中,需要排除掉 slf4j-simple 和 slf4j-api 这两个包,否则启动时会有如下警告信息:

从引入的这两个依赖包,可以发现:
- 引入 j2cache-spring-boot2-starter 也就是自动引入了 spring-data-redis
- 引入 j2cache-core 也就自动引入了 caffeine 的依赖包
其实对于 J2Cache 这个框架来说,其默认的一级缓存就是 Caffeine,默认的二级缓存就是 Redis
有关 Caffeine 进程内缓存的使用,可以参考我之前的博客:https://www.cnblogs.com/studyjobs/p/17937539.html
下面我们再看一下 application.yml 的配置文件内容:
server:
  port: 9000

# spring-data-redis 的相关配置信息
spring:
  redis:
    host: 192.168.136.128
    password: root
    port: 6379
    database: 0

# j2cache 的相关配置信息
j2cache:
  # 指定 redis 客户端底层使用 lettuce(强烈推荐),因为适用于各种 redis 模式(single、sentinel、cluster)
  redis-client: lettuce
  # 开启二级缓存
  l2-cache-open: true
  # 缓存事件通知,推荐使用 reids 的订阅发布模式,主要用于同时清除一级缓存和二级缓存
  broadcast: net.oschina.j2cache.cache.support.redis.SpringRedisPubSubPolicy
  # 一级缓存,默认使用 caffeine
  L1:
    provider_class: caffeine
  # 二级缓存,默认使用 redis
  L2:
    provider_class: net.oschina.j2cache.cache.support.redis.SpringRedisProvider
    # 指定在 lettuce 的配置节中,读取连接 redis 的配置信息
    config_section: lettuce
  # redis 中缓存的数据具有过期时间,如果为 false 表示永远不会过期
  # 注意:当 redis 的 sotrage 配置为 hash 时,不支持 sync_ttl_to_redis 配置项特性
  sync_ttl_to_redis: true
  # 默认情况下,是否缓存 null 值
  default_cache_null_object: false
  # 数据在缓存中的序列化格式,推荐使用 fst,因为其序列化后占用的空间体积较小
  serialization: json
caffeine:
  properties: caffeine.properties
lettuce:
  # 部署的 redis 为单机模式
  mode: single
  storage: generic
  channel: j2cache
  scheme: redis
  hosts: ${spring.redis.host}:${spring.redis.port}
  password: ${spring.redis.password}
  database: ${spring.redis.database}
  maxTotal: 100
  maxIdle: 10
  minIdle: 10
  timeout: 10000
我自己搭建了 redis,具体搭建过程,这里就不介绍了,可以参考我的博客:https://www.cnblogs.com/studyjobs/p/17909443.html
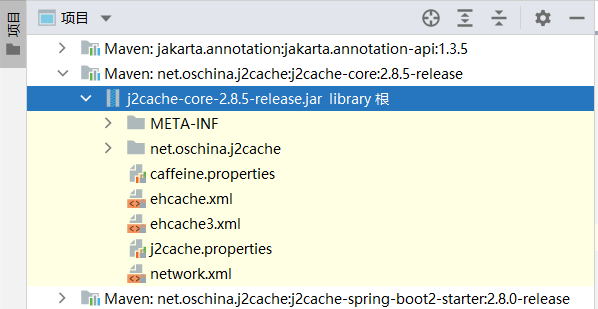
在 IDEA 中连续按三次 Shift 键,输入 j2cache-core ,就能够找到 j2cache-core-xxx-release.jar 的依赖包,在其下面就能够看到有关 caffeine、ehcache、j2cache 的 properties 配置文件内容,具体有哪些配置项,可以从这些文件中找到。
本篇博客的 demo 中,没有使用 properties 文件格式,而是将 properties 中的内容,转换使用 yml 的配置文件格式。
另外对于 Caffeine 的配置,使用了 caffeine.properties 的配置文件,内容如下:
#########################################
# Caffeine configuration
# [name] = size, xxxx[s|m|h|d]
#########################################
# 默认情况下,caffine 缓存条数为 1000,有效期为 30 分钟
# s 表示秒,m 表示分钟,h 表示小时,d 表示天
default = 1000, 30m

# 缓存的区域名称 = 最大缓存条数, 有效期
jobstest = 2000, 10m
缓存区域,可以理解为独立的缓存库,用于隔离不同用途或功能的缓存数据。
比如本篇博客的 demo 使用 jobstest 这个缓存库,里面最多容纳 2000 条缓存,每条缓存数据的有效期为 10 分钟。
二、代码细节
本篇博客的 Demo 代码非常简单,编写一个 TestController 提供一些接口,用于测试。
package com.jobs.controller;

import net.oschina.j2cache.CacheChannel;
import net.oschina.j2cache.CacheObject;
import org.springframework.beans.factory.annotation.Autowired;
import org.springframework.web.bind.annotation.GetMapping;
import org.springframework.web.bind.annotation.RequestMapping;
import org.springframework.web.bind.annotation.RestController;

import java.util.ArrayList;
import java.util.List;

@RestController
@RequestMapping("/test")
public class TestController {

    @Autowired
    private CacheChannel cacheChannel;

    /**
     * 运行流程:
     * 首次从缓存中获取数据,没有获取到
     * 从数据库中获取数据,调用 CacheChannel 的 set 方法时,底层将数据存储到二级缓存(Redis)中
     * 再次请求相同数据时,CacheChannel 的 get 方法,从二级缓存(Redis)中获取到数据,存储到一级缓存(caffeine)中
     * 再次请求相同数据是,CacheChannel 的 get 方法,直接从一级缓存(caffeine)中获取
     */
    @GetMapping("/getlist")
    public List<String> getList() {
        CacheObject cacheObject = cacheChannel.get("jobstest", "employee");
        //CacheObject 本身不会为 null,如果缓存不存在的话,其属性 getValue() 获取的值为 null
        if (cacheObject.getValue() == null) {
            //从数据库中获取信息,然后存入缓存中。
            //这里的 demo 就直接写死个数据作为演示。
            List<String> emlist = new ArrayList<>();
            emlist.add("任肥肥");
            emlist.add("侯胖胖");
            emlist.add("蔺赞赞");
            emlist.add("乔豆豆");
            emlist.add("李墩墩");
            cacheChannel.set("jobstest", "employee", emlist);
            return emlist;
        }

        return (List<String>) cacheObject.getValue();
    }

    //删除【指定区域】中的【指定key】的缓存数据,会把【一级缓存】和【二级缓存】都删除掉
    @GetMapping("/delete")
    public String evictCacheData() {
        cacheChannel.evict("jobstest", "employee");
        return "delete success";
    }

    //删除【指定区域】中的所有缓存数据,会把【一级缓存】和【二级缓存】都删除掉
    @GetMapping("/clear")
    public String clearCache() {
        cacheChannel.clear("jobstest");
        return "clear success";
    }

    //判断【指定区域】中的【指定key】的数据是否存在
    @GetMapping("/exist")
    public String existCache() {
        boolean exists = cacheChannel.exists("jobstest", "employee");
        return exists ? "存在" : "不存在";
    }

    //判断缓存数据,是几级缓存,
    //如果是一级缓冲,则返回 1,
    //如果是二级缓存,则返回 2,
    //没有缓存数据,则返回 0
    @GetMapping("/check")
    public String checkCache() {
        int check = cacheChannel.check("jobstest", "employee");
        return String.valueOf(check);
    }
}
可以采用 debug 断点跟踪调试 getList 接口,查看每次调用该接口时,cacheObject 的 level 属性。
也可以不使用 debug,直接启动项目,每次调用 getList 接口后,调用一下 check 接口,查看一下缓存的级别。
首次调用 getList 接口时,无法从缓存中获取数据,然后从“数据库”中获取数据库,先是存储到了二级缓存 Redis 中。
第二次调用 getList 接口时,是从二级缓存 Redis 中获取的数据,同时底层会把数据存储到一级缓存 Caffeine 中。
后续调用 getList 接口时,都是直接从一级缓存 Caffeine 中获取数据。
当项目重启后,一级缓存 Caffeine 消失,此时调用 getList 接口时,从二级缓存 Redis 中获取的数据,同时底层会把数据存储到一级缓存 Caffeine 中。
J2Cache 的目的就是两个:
- 避免大量的缓存读取会导致 L2 的网络成为整个系统的瓶颈,因此 L1 的目标是降低对 L2 的读取次数。
- 避免项目或应用服务重启,导致的缓存冷启动后,对后端数据库或业务造成冲击,此时由 L2 缓存起到了防护作用。
本篇博客的源代码下载地址为:https://files.cnblogs.com/files/blogs/699532/springboot_j2cache.zip

 浙公网安备 33010602011771号