LNMP部署
LNMP 一组开源软件简称,它们通常安装在一起以使服务器能够托管动态网站和 Web 应用程序。这个简写实际上是一个首字母缩写词,它代表Linux 操作系统,带有Nginx Web 服务器(它取代了 LAMP 堆栈的 Apache 组件),站点数据存储在基于mysql的数据库中,动态内容由PHP处理。
前提条件
你应该在服务器上设置一个单独的非 root 用户帐户。
第一步:安装nginx
要添加 CentOS 7 EPEL 存储库,请运行以下命令:
[root@web-03 ~]# yum install epel-release
现在 EPEL 存储库已安装在服务器上,请使用以下yum命令安装 Nginx
[root@web-03 ~]# yum install nginx
安装完成后,使用以下命令启动 Nginx 服务:
[root@web-03 ~]# systemctl start nginx
打开浏览器访问http://ip
设置nginx开机自启动:
[root@web-03 ~]# systemctl enable nginx
第二步:安装MariaDB
MariaDB是一个 MySQL 的替代品。MariaDB 是 MySQL 关系数据库管理系统的社区开发分支。
[root@web-03 ~]# yum install mariadb-server mariadb -y
安装完成后,我们需要使用以下命令启动 MariaDB:
[root@web-03 ~]# systemctl start mariadb
现在 MariaDB 数据库正在运行,我们要运行一个安全脚本,该脚本将删除一些危险的默认值并锁定对我们数据库的访问。通过运行以下命令启动交互式脚本:
[root@web-03 ~]# mysql_secure_installation
提示符会询问你当前的MariaDB root密码。因为你刚刚安装了MariaDB,所以你很可能没有MariaDB,所以按回车键将其留空。然后提示符会询问你是否要设置根密码。继续输入Y,并按照说明操作:
Enter current password for root (enter for none):
OK, successfully used password, moving on...

Setting the root password ensures that nobody can log into the MariaDB
root user without the proper authorisation.

Set root password? [Y/n] y
New password:
Re-enter new password:
Password updated successfully!
Reloading privilege tables..
 ... Success!
开机启动 MariaDB:
[root@web-03 ~]# systemctl enable mariadb
第三步:安装PHP
CentOS 7 服务器中默认可用的 PHP 版本已过时,因此,我们需要安装第三方软件包存储库才能获取 PHP 7+ 并将其安装在你的 CentOS 7 服务器上。Remi是一个流行的软件包存储库,为 CentOS 服务器提供最新的 PHP 版本。
CentOS 7 安装 Remi 存储库
[root@web-03 ~]# wget --no-check-certificate https://dl.fedoraproject.org/pub/epel/epel-release-latest-7.noarch.rpm

[root@web-03 ~]# wget --no-check-certificate https://rpms.remirepo.net/enterprise/remi-release-7.rpm

[root@web-03 ~]# rpm -Uvh remi-release-7.rpm epel-release-latest-7.noarch.rpm
安装完成后,运行一个命令来启用包含首选 PHP 版本的存储库。要检查 Remi 存储库中可用的 PHP 7+ 版本:
[root@web-03 ~]# yum --disablerepo="*" --enablerepo="remi-safe" list php[7-9][0-9].x86_64
Loaded plugins: fastestmirror
Loading mirror speeds from cached hostfile
 * remi-safe: mirrors.tuna.tsinghua.edu.cn
remi-safe                                            | 3.0 kB     00:00
remi-safe/primary_db                                   | 2.1 MB   00:03
Available Packages
php70.x86_64                    2.0-1.el7.remi                     remi-safe
php71.x86_64                    2.0-1.el7.remi                     remi-safe
php72.x86_64                    2.0-1.el7.remi                     remi-safe
php73.x86_64                    2.0-1.el7.remi                     remi-safe
php74.x86_64                    1.0-3.el7.remi                     remi-safe
php80.x86_64                    1.0-3.el7.remi                     remi-safe
php81.x86_64                    8.1-1.el7.remi                     remi-safe
我们将安装 PHP 7.4。要启用正确的 Remi 包以安装 PHP 7.4:
# 先安装yum-utils,不然yum-config-manager命令不能用
[root@web-03 ~]# yum -y install yum-utils

[root@web-03 ~]# yum-config-manager --enable remi-php74
现在我们可以继续yum像往常一样安装PHP了。以下命令将安装在 Nginx 中设置 PHP 7.4 所需的所有软件包,并允许它连接到基于 MySQL 的数据库:
[root@web-03 ~]# yum install php php-mysqlnd php-fpm
查看PHP版本
[root@web-03 ~]# php --version
PHP 7.4.25 (cli) (built: Oct 19 2021 15:18:10) ( NTS )
Copyright (c) The PHP Group
Zend Engine v3.4.0, Copyright (c) Zend Technologies
PHP 现在已成功安装到你的系统上。接下来,我们需要对默认配置进行一些调整。
现在查找user和group指令。
[root@web-03 ~]# vi /etc/php-fpm.d/www.conf

; Unix user/group of processes
; Note: The user is mandatory. If the group is not set, the default user's group
;       will be used.
; RPM: apache user chosen to provide access to the same directories as httpd
user = apache
; RPM: Keep a group allowed to write in log dir.
group = apache

; The address on which to accept FastCGI requests.
; Valid syntaxes are:
;   'ip.add.re.ss:port'    - to listen on a TCP socket to a specific IPv4 address on
你会注意到user和group变量都设置为apache。我们需要将这些更改为nginx:
; Unix user/group of processes
; Note: The user is mandatory. If the group is not set, the default user's group
;       will be used.
; RPM: apache user chosen to provide access to the same directories as httpd
user = nginx
; RPM: Keep a group allowed to write in log dir.
group = nginx
接下来找到listen指令。默认情况下php-fpm将通过 TCP 监听主机端口。改成使其侦听本地套接字文件,这会提高服务器的整体性能。
> vim /etc/php-fpm.d/www.conf
listen = /var/run/php-fpm/php-fpm.sock;
最后,我们需要更改我们刚刚在listen指令中定义的套接字文件的所有者和组设置。找到listen.owner,listen.group和listen.mode指令。这些行默认被注释掉。通过删除;行开头的前置符号来取消注释。然后,将所有者和组更改为nginx:
> vim /etc/php-fpm.d/www.conf
listen.owner = nginx
listen.group = nginx
listen.mode = 0660
启用并启动php-fpm服务
[root@web-03 ~]# systemctl start php-fpm
你的 PHP 环境现已准备就绪。接下来,我
们将配置 Nginx,以便它发送对 PHP 脚本的所有请求以供php-fpm.
第四步:配置 Nginx 处理 PHP
首先,在/etc/nginx/conf.d目录中打开一个新文件:
[root@web-03 ~]# vi /etc/nginx/conf.d/default.conf
将以下 PHP 服务器定义块复制到你的配置文件中,不要忘记修改该server_name指令,使其指向你服务器的域名或 IP 地址:
[root@web-03 ~]# cat /etc/nginx/conf.d/default.conf
server {
    listen       80;
    server_name  server_domain_or_IP;
    root   /usr/share/nginx/html;
    index index.php index.html index.htm;
    location / {
        try_files $uri $uri/ =404;
    }
    error_page 404 /4html;
    error_page 500 502 503 504 /50x.html;
    location = /50x.html {
        root /usr/share/nginx/html;
    }
    location ~ \.php$ {
        try_files $uri =404;
        fastcgi_pass unix:/var/run/php-fpm/php-fpm.sock;
        fastcgi_index index.php;
        fastcgi_param SCRIPT_FILENAME $document_root$fastcgi_script_name;
        include fastcgi_params;
    }
}
重新启动 Nginx:
[root@web-03 ~]# systemctl restart nginx
第五步:测试PHP环境
现在我们的 Web 服务器已设置好,我们可以创建一个测试 PHP 脚本
我们现在将创建一个测试 PHP 页面
在/usr/share/nginx/html目录中创建一个名为rumenz.php的 PHP 文件:
[root@web-03 ~]# vi /usr/share/nginx/html/rumenz.php
以下 PHP 代码将显示有关当前在服务器上运行的 PHP 环境的信息:
[root@web-03 ~]# vi /usr/share/nginx/html/rumenz.php

<?php
phpinfo();
现在我们可以测试我们的 Web 服务器是否可以正确显示由 PHP 脚本生成的内容。转到你的浏览器并访问你的服务器主机名或 IP 地址,然后是/rumenz.php:
http://ip/rumenz.php
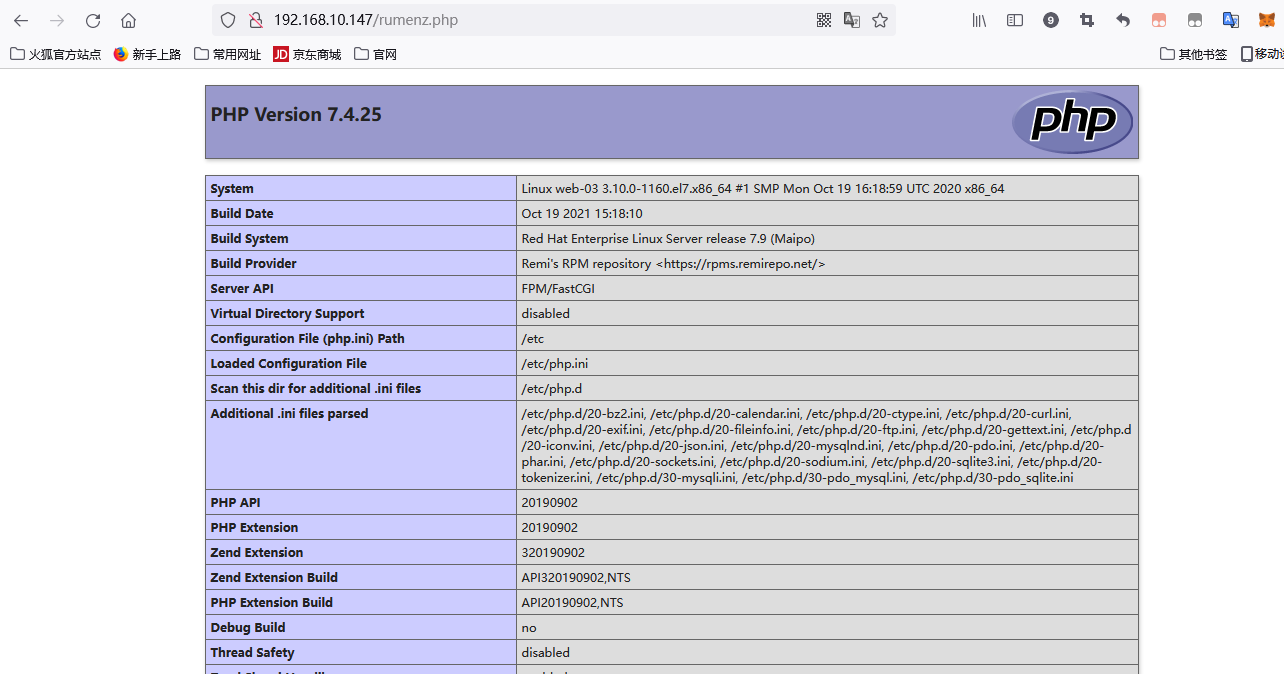
至此,就表示LNMP已经安装成功

 浙公网安备 33010602011771号