


RabbitMQ知识(3)
RabbitMQ队列详解
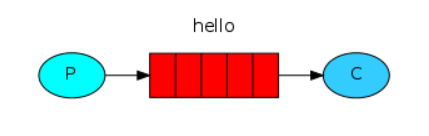
一、简单队列
一个生产者,对应一个消费者。生产者将消息发送到"hello"队列中,消费者从队列中获取消息。
pom.xml文件的配置
 1     <dependencies>
 2         <!-- https://mvnrepository.com/artifact/org.apache.commons/commons-lang3 -->
 3         <dependency>
 4             <groupId>org.apache.commons</groupId>
 5             <artifactId>commons-lang3</artifactId>
 6             <version>3.11</version>
 7         </dependency>
 8         <dependency>
 9             <groupId>org.springframework.boot</groupId>
10             <artifactId>spring-boot-starter-amqp</artifactId>
11         </dependency>
12         <dependency>
13             <groupId>org.springframework.boot</groupId>
14             <artifactId>spring-boot-starter-test</artifactId>
15         </dependency>
16     </dependencies>
生产者(Producer):
 1 //1、创建链接工厂
 2         ConnectionFactory factory = new ConnectionFactory();
 3         //2、设置参数
 4         factory.setHost("192.168.0.110");
 5         factory.setPort(5672);
 6         factory.setUsername("/xiaoming");
 7         factory.setPassword("xiaoming");
 8         factory.setVirtualHost("/xiaoming");
 9
10         //3、创建链接Connection
11         Connection connection = factory.newConnection();
12         //4、创建Channel
13         Channel channel = connection.createChannel();
14         //5、创建队列Queue
15         /**
16          * Author: tom
17          * Date: 2021/7/3 22:37
18          * Describe:
19          * @param String queue, boolean durable, boolean exclusive, boolean autoDelete, Map<String, Object> arguments
20          * 参数注解:queue        队列名称
21          *         durable      是否持久化,当mq重启后,消息还在
22          *         exclusive    是否独占:只能有一个消费者监听这个队列;当connection关闭的时候,是否删除队列
23          *         autoDelete   是否自动删除,当没有consumer时,自动删除
24          *         arguments    参数
25          * @return void
26          *
27          * 如果没有一个名字为hello_word的队列创建一个,有就不创建
28         */
29         channel.queueDeclare("hello_word",true,false,false,null);
30         /**
31          * Author: tom
32          * Date: 2021/7/3 22:48
33          * Describe:
34          * @param args
35          * @return void
36          *  basicPublish(String exchange, String routingKey, BasicProperties props, byte[] body)
37          *  参数:exchange        交换机名称。简单模式下交换机会使用默认的“”
38          *       routingKey      路由名称
39          *       props           配置信息
40          *       body            发送的消息数据
41         */
42         String str ="test mq ~~~~";
43         //6、发送消息
44         channel.basicPublish("","hello_word",null,str.getBytes());
45
46         //7、释放资源
47         channel.close();
48         connection.close();
消费者:
 1 //1、创建链接工厂
 2         ConnectionFactory factory = new ConnectionFactory();
 3         //2、设置参数
 4         factory.setHost("192.168.0.110");
 5         factory.setPort(5672);
 6         factory.setUsername("/xiaoming");
 7         factory.setPassword("xiaoming");
 8         factory.setVirtualHost("/xiaoming");
 9
10         //3、创建链接Connection
11         Connection connection = factory.newConnection();
12         //4、创建Channel
13         Channel channel = connection.createChannel();
14         //5、创建队列Queue
15         /**
16          * Author: tom
17          * Date: 2021/7/3 22:37
18          * Describe:
19          * @param String queue, boolean durable, boolean exclusive, boolean autoDelete, Map<String, Object> arguments
20          * 参数注解:queue        队列名称
21          *         durable      是否持久化,当mq重启后,消息还在
22          *         exclusive    是否独占:只能有一个消费者监听这个队列;当connection关闭的时候,是否删除队列
23          *         autoDelete   是否自动删除,当没有consumer时,自动删除
24          *         arguments    参数
25          * @return void
26          *
27          * 如果没有一个名字为hello_word的队列创建一个,有就不创建
28          */
29         channel.queueDeclare("hello_word",true,false,false,null);
30
31         /**
32          * Author: tom
33          * Date: 2021/7/3 23:12
34          * Describe:
35          * @param args
36          * @return void
37          * basicConsume(String queue, boolean autoAck, Consumer callback)
38          * 参数:
39          *     queue      队列名称
40          *     autoAck    消息确认
41          *     callback   回调对象
42         */
43         Consumer  consumer = new DefaultConsumer(channel){
44
45             /**
46              * Author: tom
47              * Date: 2021/7/3 23:18
48              * Describe:
49              * @param consumerTag
50              * @param envelope
51              * @param properties
52              * @param body
53              * @return void
54              * 参数:
55              *    consumerTag     标识
56              *    envelope        获取一些消息,交换机,路由key·····
57              *    properties      配置信息
58              *    body            数据
59             */
60             @Override
61             public void handleDelivery(String consumerTag, Envelope envelope, AMQP.BasicProperties properties, byte[] body) throws IOException {
62                 System.out.println("consumerTag" +  consumerTag);
63                 System.out.println("Exchange" +  envelope.getExchange());
64                 System.out.println("RoutingKey" +  envelope.getRoutingKey());
65                 System.out.println("properties" +  properties);
66                 System.out.println("body" +  new String(body));
67
68             }
69         };
70         //6、接收消息
71         channel.basicConsume("hello_word",true,consumer);
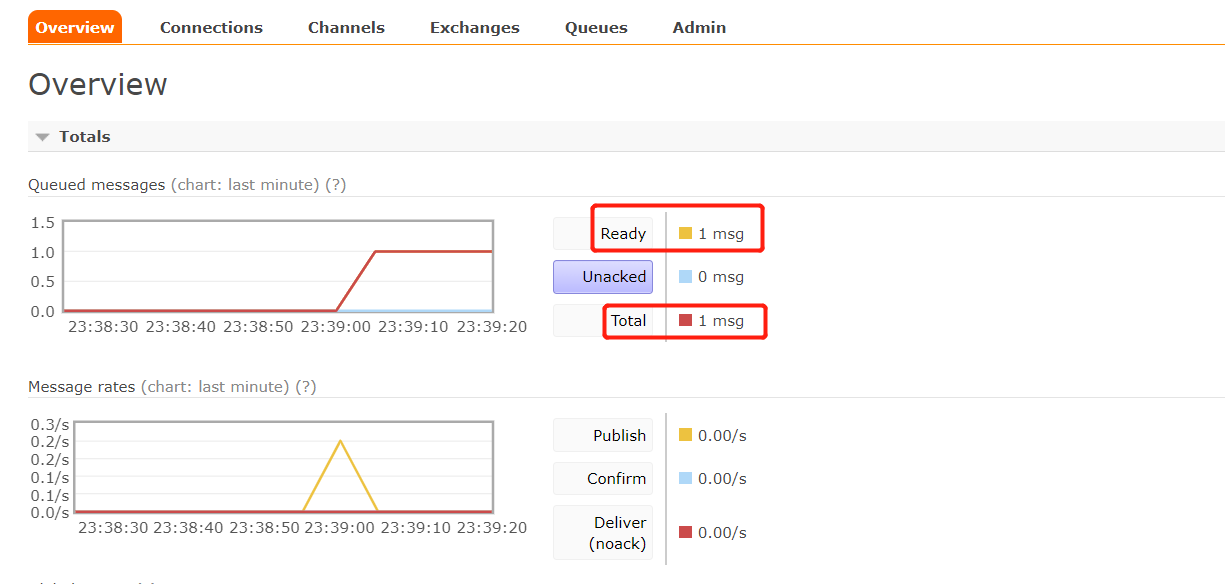
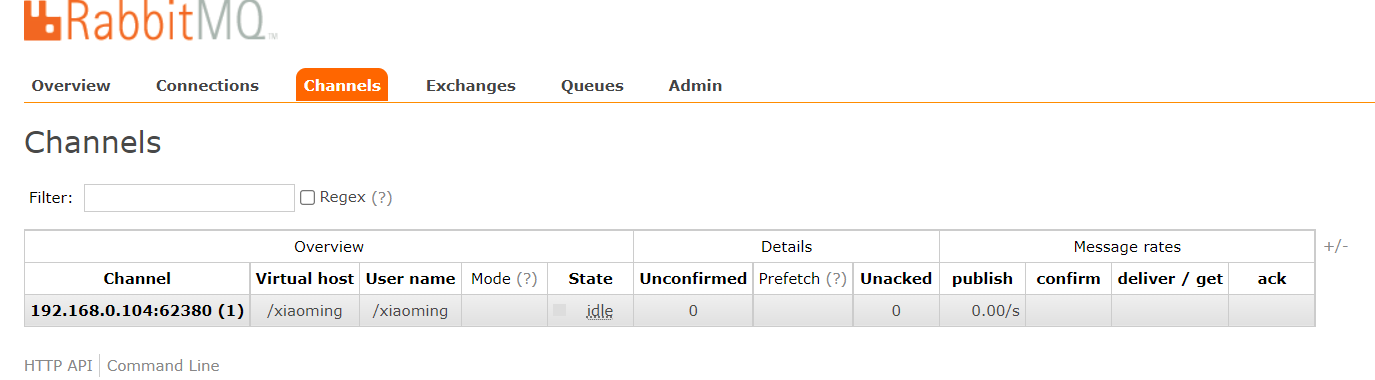
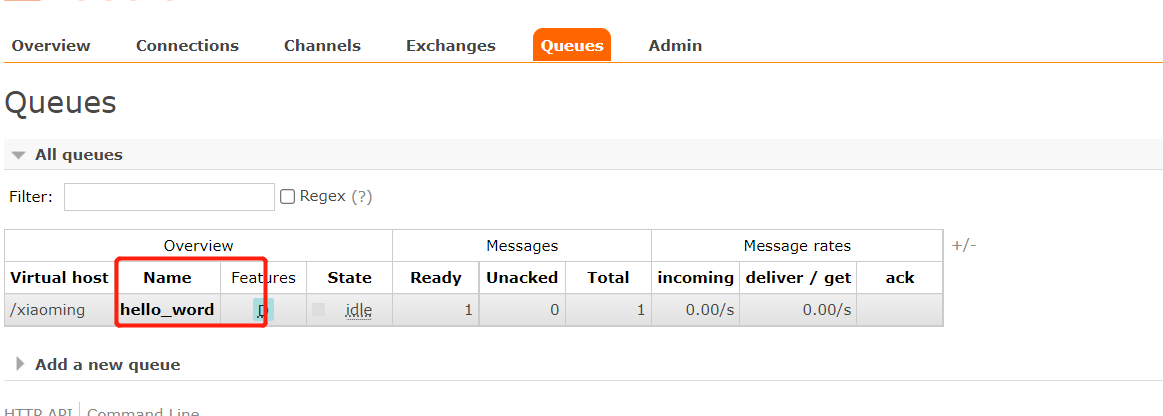
执行效果:当不关闭链接的时候,可以发现在mq服务其中消息一直存在,启动消费者的时候消息被消费

二、work 模式
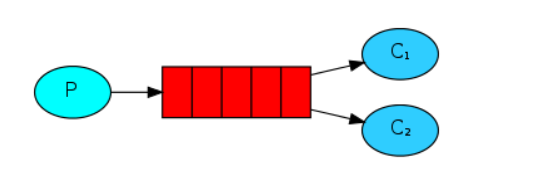
与简单模式相比,工作模式多了一个或者一些消费者,多个消费者消费同一个队列中的消息,只有一个消费者可以获取消息,竞争者消费者模式。
应用场景:对于任务较重或者任务较多的情况使用工作队列可以提高任务处理的速度。
生产者:
 1         //1、创建链接工厂
 2         ConnectionFactory factory = new ConnectionFactory();
 3         //2、设置参数
 4         factory.setHost("192.168.0.110");
 5         factory.setPort(5672);
 6         factory.setUsername("/xiaoming");
 7         factory.setPassword("xiaoming");
 8         factory.setVirtualHost("/xiaoming");
10         //3、创建链接Connection
11         Connection connection = factory.newConnection();
12         //4、创建Channel
13         Channel channel = connection.createChannel();
14         //5、创建队列Queue
29         channel.queueDeclare("work_queues",true,false,false,null);
42         for (int i = 1;i < 10 ;i++ ) {
43             String str = i + "test mq ~~~~";
44             //6、发送消息
45             channel.basicPublish("","work_queues",null,str.getBytes());
46         }
50         //7、释放资源
51         channel.close();
52         connection.close();
消费者1:
 1         //1、创建链接工厂
 2         ConnectionFactory factory = new ConnectionFactory();
 3         //2、设置参数
 4         factory.setHost("192.168.0.110");
 5         factory.setPort(5672);
 6         factory.setUsername("/xiaoming");
 7         factory.setPassword("xiaoming");
 8         factory.setVirtualHost("/xiaoming");
10         //3、创建链接Connection
11         Connection connection = factory.newConnection();
12         //4、创建Channel
13         Channel channel = connection.createChannel();
15         //同一时刻服务器只会发送一条消息给消费者
16         channel.basicQos(1);
18         //5、创建队列Queue
19         channel.queueDeclare("work_queues",true,false,false,null);
21         Consumer consumer = new DefaultConsumer(channel){
22             @Override
23             public void handleDelivery(String consumerTag, Envelope envelope, AMQP.BasicProperties properties, byte[] body) throws IOException {
24                 System.out.println("body" +  new String(body));
26             }
27         };
28         //6、接收消息
29         channel.basicConsume("work_queues",true,consumer);
消费者2:
 1 //1、创建链接工厂
 2         ConnectionFactory factory = new ConnectionFactory();
 3         //2、设置参数
 4         factory.setHost("192.168.0.110");
 5         factory.setPort(5672);
 6         factory.setUsername("/xiaoming");
 7         factory.setPassword("xiaoming");
 8         factory.setVirtualHost("/xiaoming");
10         //3、创建链接Connection
11         Connection connection = factory.newConnection();
12         //4、创建Channel
13         Channel channel = connection.createChannel();
15          //同一时刻服务器只会发送一条消息给消费者
16          //channel.basicQos(1);
17         //5、创建队列Queue
18         channel.queueDeclare("work_queues",true,false,false,null);
20         Consumer consumer = new DefaultConsumer(channel){
21             @Override
22             public void handleDelivery(String consumerTag, Envelope envelope, AMQP.BasicProperties properties, byte[] body) throws IOException {
23                 System.out.println("body" +  new String(body));
24                 try {
25                     Thread.sleep(10);
26                 } catch (InterruptedException e) {
27                     e.printStackTrace();
28                 }
30             }
31         };
32         //6、接收消息
33         channel.basicConsume("work_queues",true,consumer);
结果:再不做人户处理的情况下,消费者1与消费者2获取的消息一样,当channel.basicQos(1)进行设置的时候,可以看到两边的消失消费数量不一样。
三、发布/订阅模式
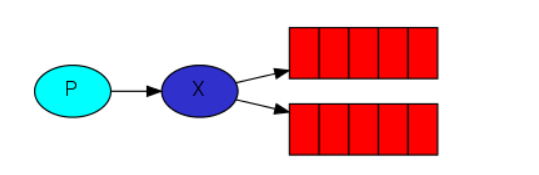
在订阅模式中,相较于工作模式,曾加了Exchange,在消息发送消费过程有所改变:
p:生产者,也就是要发送消息的程序,但是不在发送到对列中,而是发送到交互机;
c:消费者,消息的接收者,会一直等待消息到来
Queue:消息队列,接收消息、缓存消息
Exchange:交换机,一方面,接收生产者发送的消息,另一方面,消息发送到那个队列、将消息丢弃,取决于交换机的类型。Exchange有3中模型:
Fanout:广播,将消息交给所有绑定到交换机的队列。
Direct:定向,把消息发送给符合指定routing key的队列。
Topic:通配符,把消息交给符合routing pattern(路由模式)的队列。
Exchange(交换机)只负责转发消息,不具备存储消息的能力,如果没有任何队列跟Exchange绑定,或者没有符合路由规则的队列,那么消息会丢失。
生产者:
 1 //1、创建链接工厂
 2         ConnectionFactory factory = new ConnectionFactory();
 3         //2、设置参数
 4         factory.setHost("192.168.0.110");
 5         factory.setPort(5672);
 6         factory.setUsername("/xiaoming");
 7         factory.setPassword("xiaoming");
 8         factory.setVirtualHost("/xiaoming");
 9
10         //3、创建链接Connection
11         Connection connection = factory.newConnection();
12         //4、创建Channel
13         Channel channel = connection.createChannel();
14         /**
15          * Author: tom
16          * Date: 2021/7/4 22:50
17          * Describe:
18          * @param args
19          * @return void
20          * exchangeDeclare(String exchange, BuiltinExchangeType type, boolean durable, boolean autoDelete, boolean internal, Map<String, Object> arguments)
21          *    参数:
22          *      exchange  交换机名称
23          *      type      交换机类型
24          *              DIRECT("direct"):定向
25          *              FANOUT("fanout"):广播,发送消息到每个与之绑定的队列
26          *              TOPIC("topic"): 通配符方式
27          *              HEADERS("headers"):参数匹配
28          *      durable  是否持久化
29          *      autoDelete 自动删除
30          *      internal    内部使用。一般false
31          *      arguments   参数
32         */
33         String exchangeName ="test_fanout";
34         //5、创建交换机
35         channel.exchangeDeclare(exchangeName, BuiltinExchangeType.FANOUT,true,false,false,null);
36         String queueName1 ="test_fanout_queue1";
37         String queueName2 ="test_fanout_queue2";
38         //6、创建队列
39         channel.queueDeclare(queueName1, true,false,false, null);
40         channel.queueDeclare(queueName2, true,false,false, null);
41         /**
42          * Author: tom
43          * Date: 2021/7/4 23:02
44          * Describe:
45          * @param args
46          * @return void
47          *queueBind(String queue, String exchange, String routingKey)
48          *  参数:
49          *      queue         队列名称
50          *      exchange      交换机名称
51          *      routingKey    路由键,绑定规则
52          *              如果交换机的类型为fanout,routingKey为“”;
53         */
54         //7、绑定队列和交换机
55         channel.queueBind(queueName1,exchangeName,"");
56         channel.queueBind(queueName2,exchangeName,"");
57         //8、发送消息
58         String body ="日志信息:张三调用了findAll方法....日志的级别为:info.......";
59         channel.basicPublish(exchangeName,"",null,body.getBytes());
60         //9、释放资源
61         channel.close();
62         connection.close();
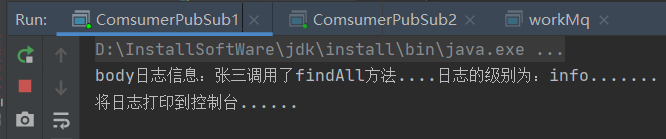
消费者1:
 1  //1、创建链接工厂
 2         ConnectionFactory factory = new ConnectionFactory();
 3         //2、设置参数
 4         factory.setHost("192.168.0.110");
 5         factory.setPort(5672);
 6         factory.setUsername("/xiaoming");
 7         factory.setPassword("xiaoming");
 8         factory.setVirtualHost("/xiaoming");
 9
10         //3、创建链接Connection
11         Connection connection = factory.newConnection();
12         //4、创建Channel
13         Channel channel = connection.createChannel();
14
15         String queueName1 ="test_fanout_queue1";
16         String queueName2 ="test_fanout_queue2";
17
18         Consumer  consumer = new DefaultConsumer(channel){
19             @Override
20             public void handleDelivery(String consumerTag, Envelope envelope, AMQP.BasicProperties properties, byte[] body) throws IOException {
21                 System.out.println("body" +  new String(body));
22                 System.out.println("将日志打印到控制台......" );
23             }
24         };
25         //6、接收消息
26         channel.basicConsume(queueName1,true,consumer);
消费者2:
 1        //1、创建链接工厂
 2         ConnectionFactory factory = new ConnectionFactory();
 3         //2、设置参数
 4         factory.setHost("192.168.0.110");
 5         factory.setPort(5672);
 6         factory.setUsername("/xiaoming");
 7         factory.setPassword("xiaoming");
 8         factory.setVirtualHost("/xiaoming");
 9
10         //3、创建链接Connection
11         Connection connection = factory.newConnection();
12         //4、创建Channel
13         Channel channel = connection.createChannel();
14
15         String queueName1 ="test_fanout_queue1";
16         String queueName2 ="test_fanout_queue2";
17
18         Consumer  consumer = new DefaultConsumer(channel){
19             @Override
20             public void handleDelivery(String consumerTag, Envelope envelope, AMQP.BasicProperties properties, byte[] body) throws IOException {
21                 System.out.println("body" +  new String(body));
22                 System.out.println("将日志保存在数据库......" );
23             }
24         };
25         //6、接收消息
26         channel.basicConsume(queueName2,true,consumer);
结果如下图:


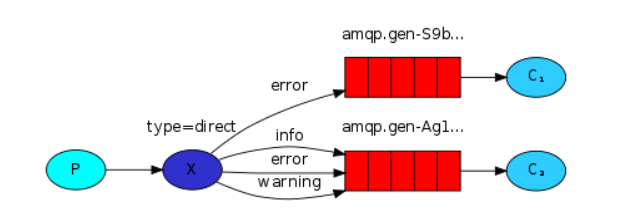
四、Routing路由模式
模式说明:
队列与交换机的绑定,不能是任意绑定了,而是指定一个RoutingKey(路由key)
消息的发送方在向Exchange发送消息时,也必须指定消息的RoutingKey
Exchange不在把消息交给每一个绑定的队列,而是根据消息的Routing key进行判断,只有队列的Routing key与消息的Ruting key 完全一致, 才会接收到消息
生产者:
 1  //1、创建链接工厂
 2         ConnectionFactory factory = new ConnectionFactory();
 3         //2、设置参数
 4         factory.setHost("192.168.0.110");
 5         factory.setPort(5672);
 6         factory.setUsername("/xiaoming");
 7         factory.setPassword("xiaoming");
 8         factory.setVirtualHost("/xiaoming");
 9
10         //3、创建链接Connection
11         Connection connection = factory.newConnection();
12         //4、创建Channel
13         Channel channel = connection.createChannel();
14
15         String exchangeName ="test_direct";
16         //5、创建交换机
17         channel.exchangeDeclare(exchangeName, BuiltinExchangeType.DIRECT,true,false,false,null);
18         String queueName1 ="test_direct_queue1";
19         String queueName2 ="test_direct_queue2";
20         //6、创建队列
21         channel.queueDeclare(queueName1, true,false,false, null);
22         channel.queueDeclare(queueName2, true,false,false, null);
23
24         //7、绑定队列和交换机
25         channel.queueBind(queueName1,exchangeName,"error");
26         channel.queueBind(queueName2,exchangeName,"info");
27         channel.queueBind(queueName2,exchangeName,"error");
28         channel.queueBind(queueName2,exchangeName,"warning");
29         //8、发送消息
30         String body ="日志信息:张三调用了findAll方法....日志的级别为:info.......";
31         channel.basicPublish(exchangeName,"error",null,body.getBytes());
32         //9、释放资源
33         channel.close();
34         connection.close();
消费者1:
 1  //1、创建链接工厂
 2         ConnectionFactory factory = new ConnectionFactory();
 3         //2、设置参数
 4         factory.setHost("192.168.0.110");
 5         factory.setPort(5672);
 6         factory.setUsername("/xiaoming");
 7         factory.setPassword("xiaoming");
 8         factory.setVirtualHost("/xiaoming");
 9
10         //3、创建链接Connection
11         Connection connection = factory.newConnection();
12         //4、创建Channel
13         Channel channel = connection.createChannel();
14
15         String queueName1 ="test_direct_queue1";
16         String queueName2 ="test_fanout_queue2";
17
18         Consumer  consumer = new DefaultConsumer(channel){
19             @Override
20             public void handleDelivery(String consumerTag, Envelope envelope, AMQP.BasicProperties properties, byte[] body) throws IOException {
21                 System.out.println("body" +  new String(body));
22                 System.out.println("将日志打印到控制台......" );
23             }
24         };
25         //6、接收消息
26         channel.basicConsume(queueName1,true,consumer);
消费者2:
 1        //1、创建链接工厂
 2         ConnectionFactory factory = new ConnectionFactory();
 3         //2、设置参数
 4         factory.setHost("192.168.0.110");
 5         factory.setPort(5672);
 6         factory.setUsername("/xiaoming");
 7         factory.setPassword("xiaoming");
 8         factory.setVirtualHost("/xiaoming");
 9
10         //3、创建链接Connection
11         Connection connection = factory.newConnection();
12         //4、创建Channel
13         Channel channel = connection.createChannel();
14
15         String queueName1 ="test_fanout_queue1";
16         String queueName2 ="test_direct_queue2";
17
18         Consumer  consumer = new DefaultConsumer(channel){
19             @Override
20             public void handleDelivery(String consumerTag, Envelope envelope, AMQP.BasicProperties properties, byte[] body) throws IOException {
21                 System.out.println("body" +  new String(body));
22                 System.out.println("将日志存储到数据库......" );
23             }
24         };
25         //6、接收消息
26         channel.basicConsume(queueName2,true,consumer);
五、Topics通配符模式


说明:
创建Exchange。指定名称和类型。topic类型允许模糊匹配。
生产者发送给topic类型的Exchange消息时,routing_key一般是句点分割的多个单词,这些单词一般会是描述某种事物的关联词语。最多不超过256个字节。
绑定键也是一样的格式。它支持两种特殊格式:* 表示一个单词,# 代表任意多个单词。
如果不使用这两类符号,则Exchange的表现与类型driect一致。单独使用 # 时,会接收所有的消息,这与类型 fanout一致。
生产者:
 1         //1、创建链接工厂
 2         ConnectionFactory factory = new ConnectionFactory();
 3         //2、设置参数
 4         factory.setHost("192.168.0.110");
 5         factory.setPort(5672);
 6         factory.setUsername("/xiaoming");
 7         factory.setPassword("xiaoming");
 8         factory.setVirtualHost("/xiaoming");
 9
10         //3、创建链接Connection
11         Connection connection = factory.newConnection();
12         //4、创建Channel
13         Channel channel = connection.createChannel();
14
15         String exchangeName ="test_topics";
16         //5、创建交换机
17         channel.exchangeDeclare(exchangeName, BuiltinExchangeType.TOPIC,true,false,false,null);
18         String queueName1 ="test_topics_queue1";
19         String queueName2 ="test_topics_queue2";
20         //6、创建队列
21         channel.queueDeclare(queueName1, true,false,false, null);
22         channel.queueDeclare(queueName2, true,false,false, null);
23
24         //7、绑定队列和交换机
25         channel.queueBind(queueName1,exchangeName,"#.error");
26         channel.queueBind(queueName1,exchangeName,"order.*");
27         channel.queueBind(queueName2,exchangeName,"*.*");
28
29         //8、发送消息
30         String body ="日志信息:张三调用了findAll方法....日志的级别为:info.......";
31         channel.basicPublish(exchangeName,"goods.info",null,body.getBytes());
32         //9、释放资源
33         channel.close();
34         connection.close();
消费者1:
 1        //1、创建链接工厂
 2         ConnectionFactory factory = new ConnectionFactory();
 3         //2、设置参数
 4         factory.setHost("192.168.0.110");
 5         factory.setPort(5672);
 6         factory.setUsername("/xiaoming");
 7         factory.setPassword("xiaoming");
 8         factory.setVirtualHost("/xiaoming");
 9
10         //3、创建链接Connection
11         Connection connection = factory.newConnection();
12         //4、创建Channel
13         Channel channel = connection.createChannel();
14
15         String queueName1 ="test_topics_queue1";
16         String queueName2 ="test_topics_queue2";
17
18         Consumer  consumer = new DefaultConsumer(channel){
19             @Override
20             public void handleDelivery(String consumerTag, Envelope envelope, AMQP.BasicProperties properties, byte[] body) throws IOException {
21                 System.out.println("body" +  new String(body));
22                 System.out.println("将日志打印到控制台......" );
23             }
24         };
25         //6、接收消息
26         channel.basicConsume(queueName1,true,consumer);
消费者2:
 1        //1、创建链接工厂
 2         ConnectionFactory factory = new ConnectionFactory();
 3         //2、设置参数
 4         factory.setHost("192.168.0.110");
 5         factory.setPort(5672);
 6         factory.setUsername("/xiaoming");
 7         factory.setPassword("xiaoming");
 8         factory.setVirtualHost("/xiaoming");
 9
10         //3、创建链接Connection
11         Connection connection = factory.newConnection();
12         //4、创建Channel
13         Channel channel = connection.createChannel();
14
15         String queueName1 ="test_topics_queue1";
16         String queueName2 ="test_topics_queue2";
17
18         Consumer  consumer = new DefaultConsumer(channel){
19             @Override
20             public void handleDelivery(String consumerTag, Envelope envelope, AMQP.BasicProperties properties, byte[] body) throws IOException {
21                 System.out.println("body" +  new String(body));
22                 System.out.println("将日志存储到数据库......" );
23             }
24         };
25         //6、接收消息
26         channel.basicConsume(queueName2,true,consumer);
使用方式一:Springboot整合Mq
生产者服务的配置:
1、配置
1         <dependency>
2             <groupId>org.springframework.boot</groupId>
3             <artifactId>spring-boot-starter-amqp</artifactId>
4         </dependency>
2、配置类
 1 package cn.test.rabbitmq.config;
 2
 3 import com.sun.org.apache.regexp.internal.RE;
 4 import org.springframework.amqp.core.*;
 5 import org.springframework.beans.factory.annotation.Qualifier;
 6 import org.springframework.context.annotation.Bean;
 7 import org.springframework.context.annotation.Configuration;
 8
 9 /**
10  * @author tom
11  * @version 1.0
12  * @description
13  * @date 2021/7/5 23:33
14  */
15 @Configuration
16 public class RabbitMQConfig {
17
18     public static final String  EXCHANGE_NAME = "boot_topic_exchange";
19     public static final String  QUEUE_NAME = "boot_queue";
20
21     //1、交换机
22     @Bean("bootExchange")
23     public Exchange bootExchange(){
24         return ExchangeBuilder.topicExchange(EXCHANGE_NAME).durable(true).build();
25     }
26
27     //2、Queue队列
28     @Bean("bootQueue")
29     public Queue bootQueue(){
30         return QueueBuilder.durable(QUEUE_NAME).build();
31     }
32
33     /**
34      * Author: tom
35      * Date: 2021/7/5 23:49
36      * Describe:
37      * @param
38      * @return
39      * 3、队列与交换机绑定关系
40      *      知道那个队列
41      *      知道那个交换机
42      *      routing key
43     */
44     @Bean
45     public Binding bindingQueueExchange(@Qualifier("bootQueue") Queue queue, @Qualifier("bootExchange") Exchange exchange){
46         return BindingBuilder.bind(queue).to(exchange).with("boot.#").noargs();
47     }
48
49 }
3、测试启动
 1 import cn.test.rabbitmq.ProducerApplication;
 2 import cn.test.rabbitmq.config.RabbitMQConfig;
 3 import org.junit.Test;
 4 import org.junit.runner.RunWith;
 5 import org.springframework.amqp.rabbit.core.RabbitTemplate;
 6 import org.springframework.beans.factory.annotation.Autowired;
 7 import org.springframework.boot.test.context.SpringBootTest;
 8 import org.springframework.test.context.junit4.SpringRunner;
 9
10 import javax.annotation.Resource;
11
12 /**
13  * @author tom
14  * @version 1.0
15  * @description
16  * @date 2021/7/5 23:58
17  */
18 @SpringBootTest(classes = ProducerApplication.class, webEnvironment = SpringBootTest.WebEnvironment.RANDOM_PORT)
19 @RunWith(SpringRunner.class)
20 public class ProducerTest {
21
22     //1、注入RabbitTemplate
23
24     @Resource
25     private RabbitTemplate rabbitTemplate;
26
27     @Test
28     public void sendTest(){
29         rabbitTemplate.convertAndSend(RabbitMQConfig.EXCHANGE_NAME,"boot.haha","boot mq hello ~~~~~");
30     }
31
32 }
消费者:
配置rabbitMq一样,以来一样,监听者,启动启动类
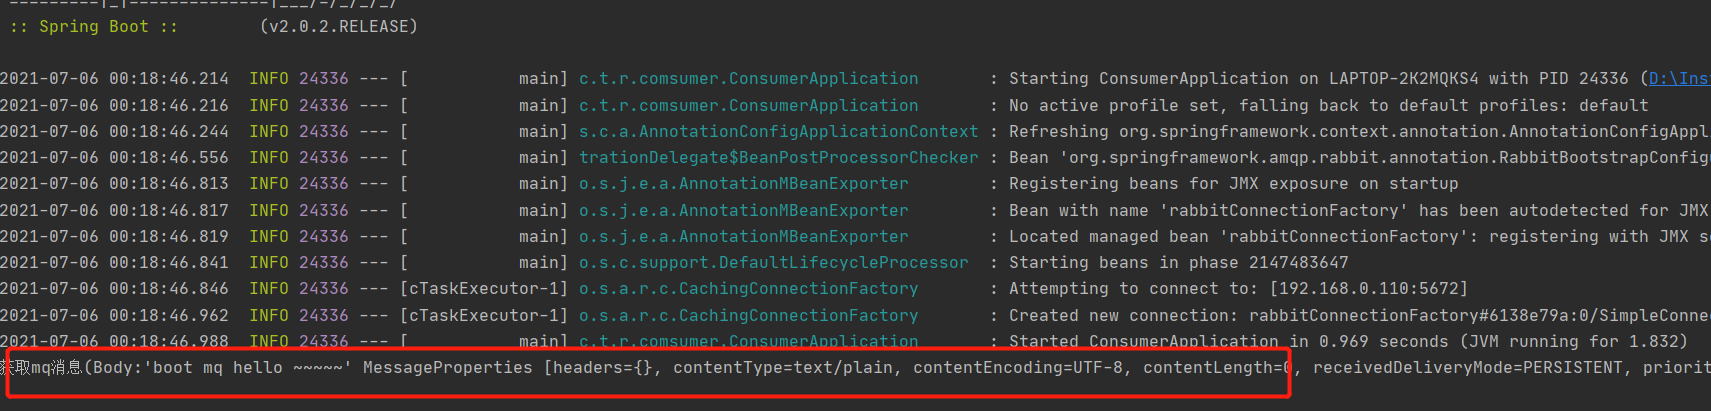
 1 package cn.test.rabbitmq.comsumer.config;
 2
 3 import org.springframework.amqp.core.Message;
 4 import org.springframework.amqp.rabbit.annotation.RabbitHandler;
 5 import org.springframework.amqp.rabbit.annotation.RabbitListener;
 6 import org.springframework.context.annotation.Configuration;
 7
 8 /**
 9  * @author tom
10  * @version 1.0
11  * @description
12  * @date 2021/7/6 0:14
13  */
14 @Configuration
15 public class RabbitMQListener {
16
17     @RabbitListener(queues = "boot_queue")
18     public void ListenerQueue(Message message){
19         System.out.println("获取mq消息" + message);
20     }
21 }
结果:

 浙公网安备 33010602011771号