Django 项目部署(从0到1)
以下步骤基于 window + CentOS 7.6(云服务器)+ gitee
主要流程
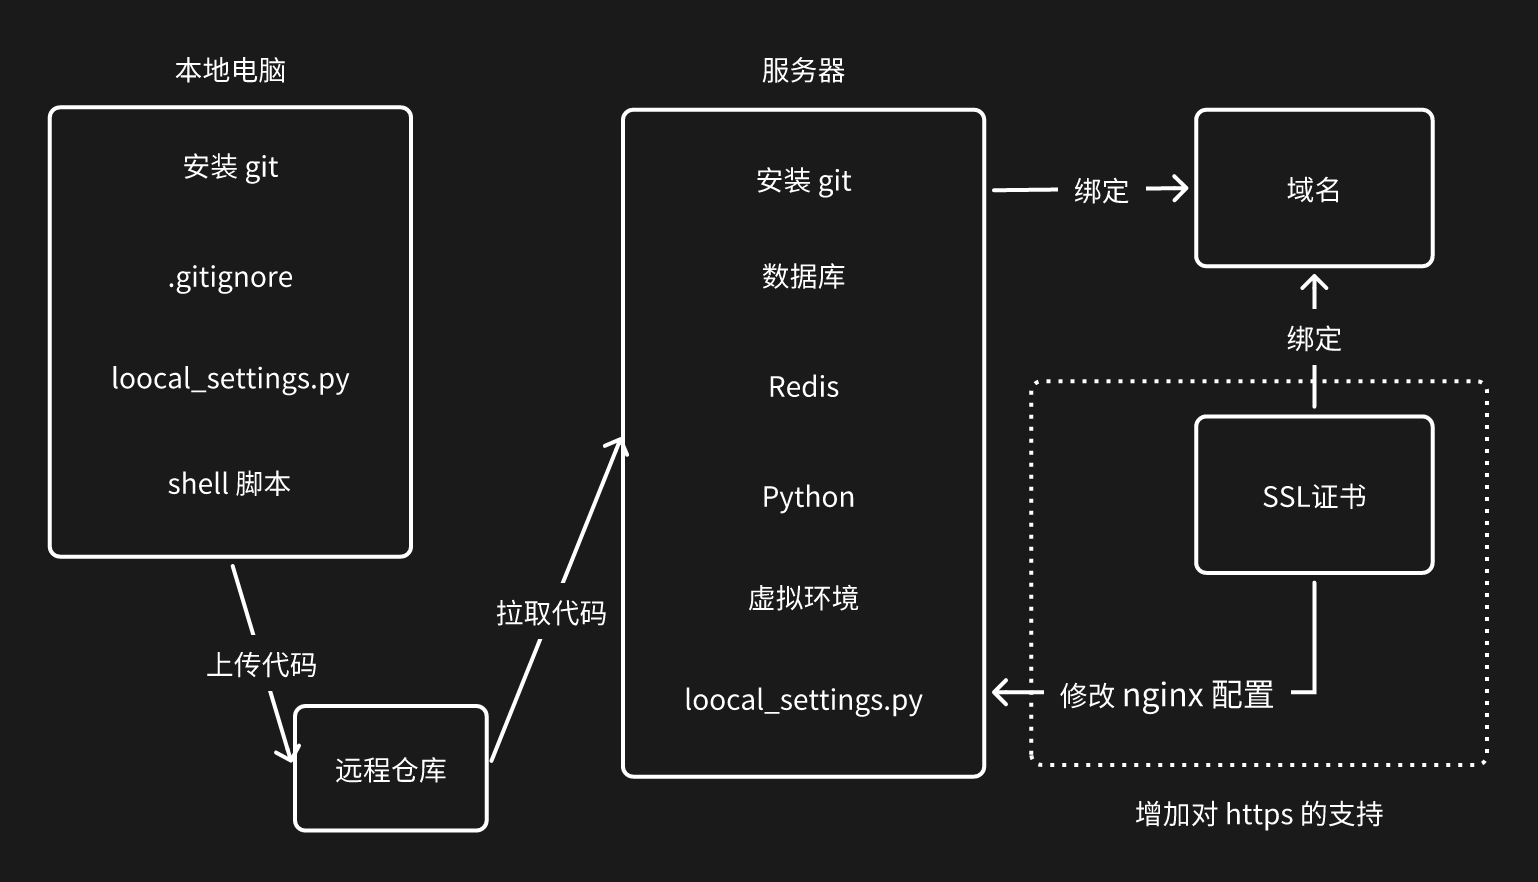
将项目部署到服务器上的大致流程:
- 将代码从 本地 上传到 服务器
- 在服务器上 安装服务、配置环境、获取代码
- 启动服务
上传代码的方式有很多种,例如:FTP工具、scp命令、rsync服务、svn等,不过目前公司主流的都是使用 git + 代码托管平台
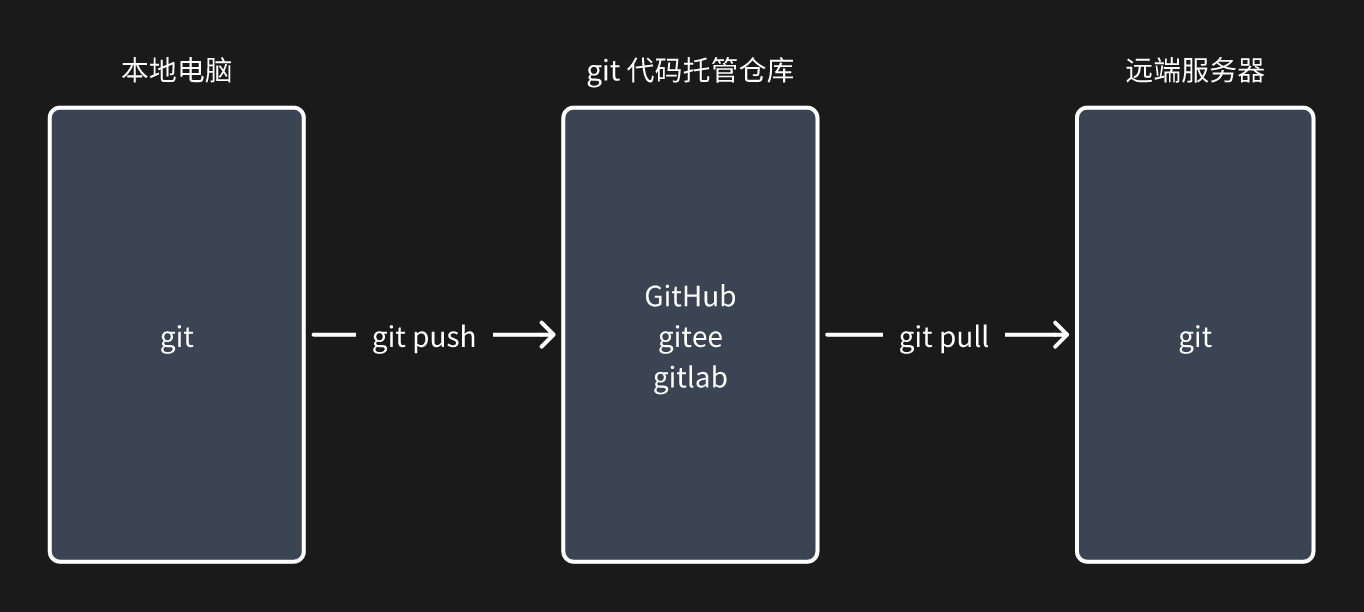
- 本地电脑,安装git + git命令 上传代码
- git 代码托管仓库,创建仓库
- 远端服务器,安装git + git命令 获取代码
代码管理
-
代码结构
# 服务器(部分) /data/project/<project_name>/ └── <project_name> └── settings.py └── local_settings.py └── wsgi.py └── shell └── <project_name>_uwsgi.ini └── reboot.sh └── stop.sh .gitignore manage.py requirements.txt -
代码托管仓库
-
本地电脑
-
安装 git
-
本地git配置 - 全局
git config --global user.name "xxx" git config --global user.email "xxx@xxx.com" -
gitignore
.gitignore文件,写入文件名或文件夹,可以git忽略一些文件,不进行版本控制GitHub 的
.gitignore文件模板集合:https://github.com/github/gitignorepython 中需要忽略的
# Byte-compiled / optimized / DLL files __pycache__/ *.py[codz] *$py.class # C extensions *.so # Distribution / packaging .Python build/ develop-eggs/ dist/ downloads/ eggs/ .eggs/ lib/ lib64/ parts/ sdist/ var/ wheels/ share/python-wheels/ *.egg-info/ .installed.cfg *.egg MANIFEST # PyInstaller # Usually these files are written by a python script from a template # before PyInstaller builds the exe, so as to inject date/other infos into it. *.manifest *.spec # Installer logs pip-log.txt pip-delete-this-directory.txt # Unit test / coverage reports htmlcov/ .tox/ .nox/ .coverage .coverage.* .cache nosetests.xml coverage.xml *.cover *.py.cover .hypothesis/ .pytest_cache/ cover/ # Translations *.mo *.pot # Django stuff: *.log local_settings.py db.sqlite3 db.sqlite3-journal # Flask stuff: instance/ .webassets-cache # Scrapy stuff: .scrapy # Sphinx documentation docs/_build/ # PyBuilder .pybuilder/ target/ # Jupyter Notebook .ipynb_checkpoints # IPython profile_default/ ipython_config.py # pyenv # For a library or package, you might want to ignore these files since the code is # intended to run in multiple environments; otherwise, check them in: # .python-version # pipenv # According to pypa/pipenv#598, it is recommended to include Pipfile.lock in version control. # However, in case of collaboration, if having platform-specific dependencies or dependencies # having no cross-platform support, pipenv may install dependencies that don't work, or not # install all needed dependencies. # Pipfile.lock # UV # Similar to Pipfile.lock, it is generally recommended to include uv.lock in version control. # This is especially recommended for binary packages to ensure reproducibility, and is more # commonly ignored for libraries. # uv.lock # poetry # Similar to Pipfile.lock, it is generally recommended to include poetry.lock in version control. # This is especially recommended for binary packages to ensure reproducibility, and is more # commonly ignored for libraries. # https://python-poetry.org/docs/basic-usage/#commit-your-poetrylock-file-to-version-control # poetry.lock # poetry.toml # pdm # Similar to Pipfile.lock, it is generally recommended to include pdm.lock in version control. # pdm recommends including project-wide configuration in pdm.toml, but excluding .pdm-python. # https://pdm-project.org/en/latest/usage/project/#working-with-version-control # pdm.lock # pdm.toml .pdm-python .pdm-build/ # pixi # Similar to Pipfile.lock, it is generally recommended to include pixi.lock in version control. # pixi.lock # Pixi creates a virtual environment in the .pixi directory, just like venv module creates one # in the .venv directory. It is recommended not to include this directory in version control. .pixi # PEP 582; used by e.g. github.com/David-OConnor/pyflow and github.com/pdm-project/pdm __pypackages__/ # Celery stuff celerybeat-schedule celerybeat.pid # Redis *.rdb *.aof *.pid # RabbitMQ mnesia/ rabbitmq/ rabbitmq-data/ # ActiveMQ activemq-data/ # SageMath parsed files *.sage.py # Environments .env .envrc .venv env/ venv/ ENV/ env.bak/ venv.bak/ # Spyder project settings .spyderproject .spyproject # Rope project settings .ropeproject # mkdocs documentation /site # mypy .mypy_cache/ .dmypy.json dmypy.json # Pyre type checker .pyre/ # pytype static type analyzer .pytype/ # Cython debug symbols cython_debug/ # PyCharm # JetBrains specific template is maintained in a separate JetBrains.gitignore that can # be found at https://github.com/github/gitignore/blob/main/Global/JetBrains.gitignore # and can be added to the global gitignore or merged into this file. For a more nuclear # option (not recommended) you can uncomment the following to ignore the entire idea folder. # .idea/ # Abstra # Abstra is an AI-powered process automation framework. # Ignore directories containing user credentials, local state, and settings. # Learn more at https://abstra.io/docs .abstra/ # Visual Studio Code # Visual Studio Code specific template is maintained in a separate VisualStudioCode.gitignore # that can be found at https://github.com/github/gitignore/blob/main/Global/VisualStudioCode.gitignore # and can be added to the global gitignore or merged into this file. However, if you prefer, # you could uncomment the following to ignore the entire vscode folder # .vscode/ # Ruff stuff: .ruff_cache/ # PyPI configuration file .pypirc # Marimo marimo/_static/ marimo/_lsp/ __marimo__/ # Streamlit .streamlit/secrets.toml -
local_settings
本地:
local_settings.py编写本地特有配置线上:
local_settings.py编写线上特有配置(代码上传后需要自行创建)在
.gitignore中 Django 项目的local_settings.py会被忽略# Django stuff: *.log local_settings.py db.sqlite3 db.sqlite3-journal# settings.py 编写共同的配置 try: from .local_settings import * except Exception: pass # local_settings.py 编写特有的配置(数据库、redis。。。) -
代码上传
git remote add origin git@github.com:用户名/仓库名.git  # 添加仓库
输入密码

# 将密码写入 remote
git remote remove origin  # 删除原来的 remote
git remote add origin https://用户名:密码@github.com/xxx/project.git
git add. git commit -m "commit message" git push origin master
-
-
服务器
# 安装 git yum install git mkdir -p /data/project # 新建目录 cd /data/project # 进入存放项目的位置 # 克隆代码(首次) git clone https://gitee.com/用户名/仓库名.git git clone git@gitee.com:用户名/仓库名.git # 需要SSH密钥 # 更新代码 git pull origin master -
代码版本(补充)
在本地的 git 每次执行
commit命令时,都会生成一个提交记录,如果执行git push也会将记录提交到代码仓库。各个版本之间进行切换:
git log 	# 查看目前的提交记录(当前的提交链)
git reflog 	# 查看所有分支的提交记录(包括分支切换、提交、合并、重置等操作)
git reset --hard xxx  # 跳转至指定版本
【注】此命令可以在本地、线上执行
密钥
为省去每次 push/pull 代码 都要输入密码,我们将通过密钥简化操作流程,同时为方便操作服务器通过 ssh 工具 + 秘钥 连接服务器
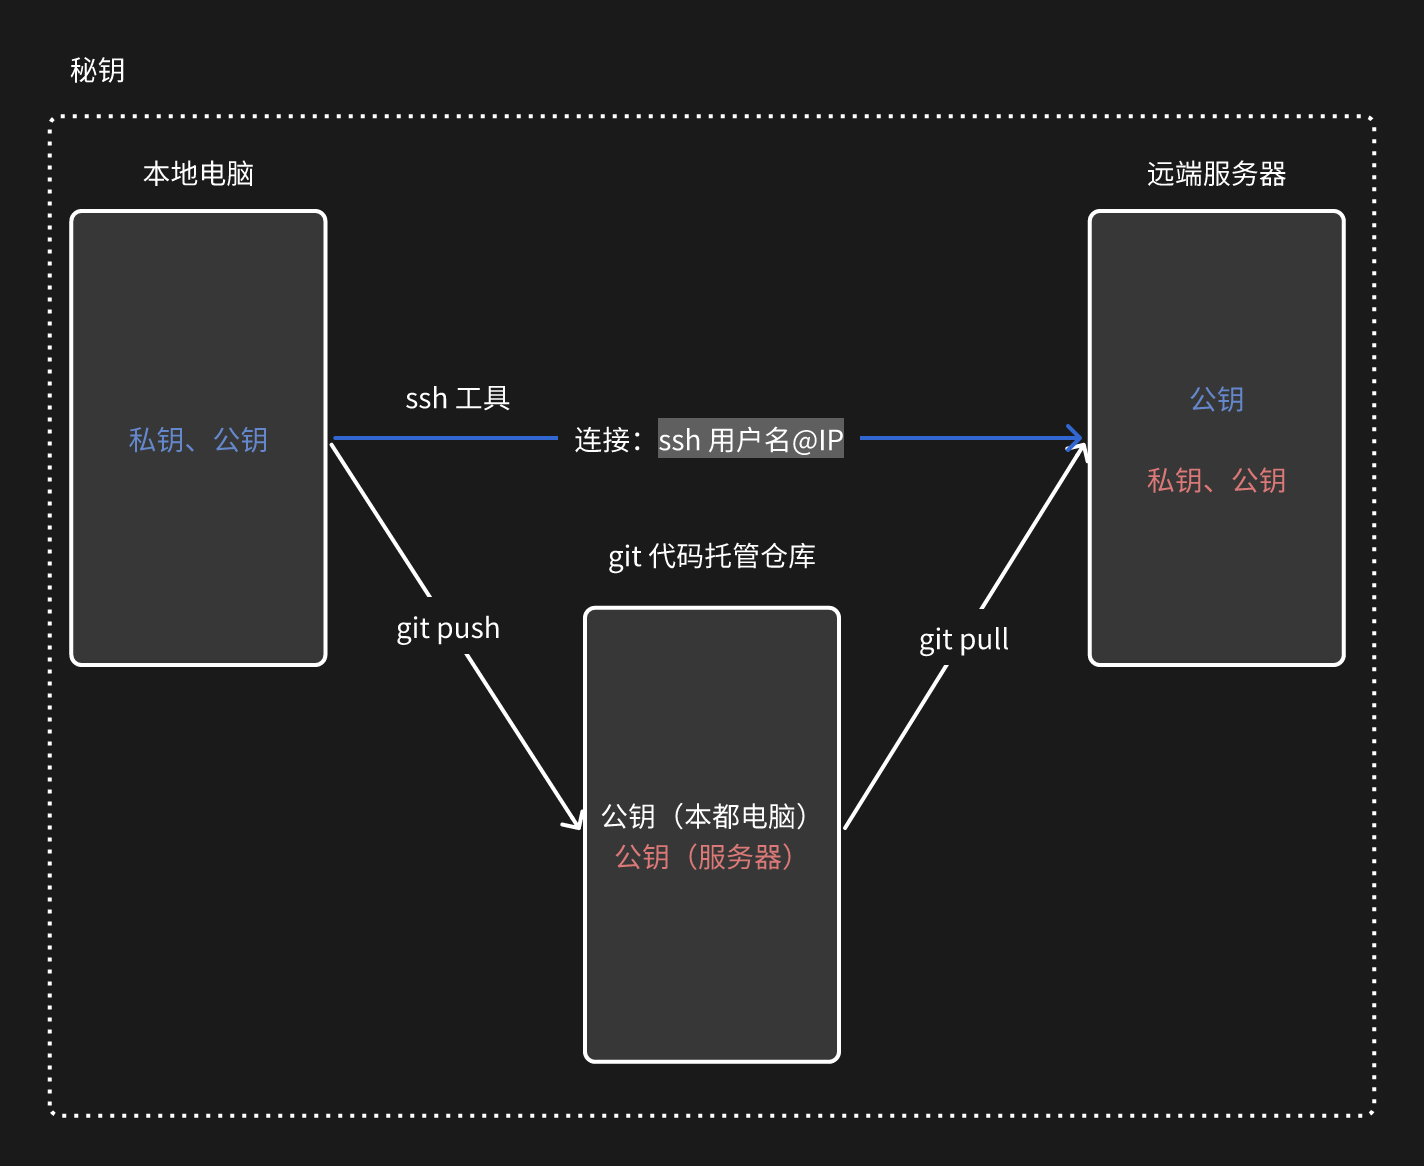
在本地电脑上利用 SSH + 密钥 连接到远程服务器
ssh 工具
- mac,自带SSH、iTerm2
- win,git集成的ssh、xshell、SecureCRT、FinalShell
-
本地电脑
# ssh 工具(Git Bash)
ssh-keygen -t rsa # 一直按回车直到出现密钥
cat ~/.ssh/id_rsa.pub # 读取公钥(检验是否已生成)
ssh-copy-id -i ~/.ssh/id_rsa.pub 用户名@ID # 服务器:用户名@ID
输入密码登录服务器
# ssh 工具 >>> ssh 用户名@IP >>> 无需密码登录 # 使用如 FinalShell 等ssh工具,在配置好后不需要输入命令也能直接进行登录 -
服务器
ssh-keygen -t rsa cat ~/.ssh/id_rsa.pub -
代码托管平台
设置 -> SSH 公钥
settings -> SSH and GPG key
将本地电脑和服务器的公钥分别拷贝进去
配置服务器
MySQL
-
安装服务端 和 客户端
MariaDB 与 MySQL 同源,但是在云服务上 mysql 可能不好安装上
yum install mariadb-server -y yum install mariadb -y # 安装 mariadb-server 时,mariadb 被作为依赖安装 -
配置 数据库
systemctl start mariadb # 启动 systemctl stop mariadb # 停止 systemctl enable mariadb # 开机启动 -
账号初始化
-
登录 root
mysql -u root -p -
root 设置密码(可不设置)
UPDATE USER SET password=password('123456') WHERE USER='root'; flush privileges; -
创建用户
若想要在外部访问服务器,则需要在服务器平台防火墙(安全组),添加
3306端口的外部访问权限-- 创建用户 CREATE USER 'stars'@'localhost' IDENTIFIED BY '123456'; -- 只能被本机访问 CREATE USER 'stars'@'100.100.%' IDENTIFIED BY '123456'; -- 可被外部访问 flush privileges; -- 更新授权表( INSERT / UPDATE / DELETE ) -
创建数据库
CREATE DATABASE 数据库名 DEFAULT CHARSET utf8 COLLATE utf8_general_ci; SHOW DATABASES; -- 列出当前用户有权限看到的所有数据库 -
为用户授权
GRANT ALL PRIVILEGES ON 数据库.* TO stars@'localhost'; GRANT SELECT, SHOW VIEW ON 数据库.* TO 'read'@'10.0.0.100'; --低权用户 GRANT CREATE ON *.* TO 'user'@'localhost'; -- 全局级,想建任何库都行 flush privileges; -
【补充】
-- 登录新创建的用户
mysql -u stars -p -- 默认登录的是 localhost,推荐重新创建一个 'stars'@'localhost'
mysql -u stars -p -h 127.0.0.1 -- 强制使用 TCP/IP

-- 更新密码
UPDATE user SET password=password('123456') WHERE user='stars';
flush privileges;

-- 查看所有用户
select user,host,password from mysql.user;
+-------+----------------+-------------------------------------------+
| user  | host           | password                                  |
+-------+----------------+-------------------------------------------+
| root  | localhost      |                                           |
| root  | vm-0-11-centos |                                           |
| root  | 127.0.0.1      |                                           |
| root  | ::1            |                                           |
|       | localhost      |                                           |
|       | vm-0-11-centos |                                           |
| stars | 127.0.0.1      | *6BB4837EB74329105EE4568DDA7DC67ED2CA2AD9 |
+-------+----------------+-------------------------------------------+
/*
mysql 默认配置,在本机中可直接登录数据库无需账户和密码
若不想数据库可被任意账号登录,则删除匿名用户
*/

-- 删除匿名用户
DROP USER ''@'localhost';
DROP USER ''@'vm-0-11-centos';
flush privileges;
-
Redis
-
安装
yum install redis -y -
配置
# 打开配置文件
vim /etc/redis.conf
# ?查找内容  --  查找
?requirepass
# 'n' --  下一个
# 'i' --  编辑
requirepass 123456 # 修改密码
# 'Esc' -- 退出编辑状态
# ':wq' -- 保存并退出
目前只能在本机连接,若要外部也能进行连接(MySQL 同理)
配置文件 -> bind 0.0.0.0 云服务器 -> 安全组配置 -> 6378端口 -
启动
systemctl start redis   # 启动
systemctl restart redis # 重启
systemctl enable redis	# 开机启动
Python3
-
安装 gcc,用于后续安装Python时编译源码
yum install gcc -y yum groupinstall -y "Development Tools" -
安装Python3相关依赖
yum install zlib zlib-devel -y yum install bzip2 bzip2-devel -y yum install ncurses ncurses-devel -y yum install readline readline-devel -y yum install openssl openssl-devel -y yum install xz lzma xz-devel -y yum install sqlite sqlite-devel -y yum install gdbm gdbm-devel -y yum install tk tk-devel -y yum install mysql-devel -y yum install mariadb-devel -y yum install python39-devel -y yum install libffi-devel -y -
下载Python源码,https://www.python.org/ftp/python/
cd /data/
wget https://www.python.org/ftp/python/3.9.23/Python-3.9.23.tgz
【注】如果没有wget,则先安装
yum install wget【注】直接在官网下载可能会很慢,此时可以选择切换成其它源
-
编译安装
-
解压
tar -xvf Python-3.9.23.tgz -
进入目录并编译安装
cd Python-3.9.23 ./configure make all make install -
测试
python3 --version

/usr/local/bin/python3
/usr/local/bin/pip3
/usr/local/bin/pip3.9
-
虚拟环境
-
安装虚拟环境工具
virtualenv(Python官方社区的工具)pip3.9 install virtualenv -
创建虚拟环境目录 & 创建虚拟环境
cd /root mkdir /envs virtualenv /envs/<>env_name> --python=python3.9 -
安装项目依赖的 pip包
pip freeze > requirements.txt  # 创建项目依赖文件
git clone https://gitee.com/用户名/仓库.git  # 克隆代码
source /envs/env_name/bin/activate # 激活虚拟环境 deactivate # 退出虚拟环境 rm -rf /envs/env_name # 删除虚拟环境 cd 仓库 pip install -r requirements.txt # 安装相关的第三方包
local_settings 设置线上配置
-
创建
local_settingscd /data/project/<project_name>/<project_name> vim local_settings.py -
local_settings.py# 指定收集静态文件的位置 import os from pathlib import Path BASE_DIR = Path(__file__).resolve().parent.parent STATIC_ROOT = os.path.join(BASE_DIR, "allstatic") DEBUG = False ALLOWED_HOSTS = ['*'] DATABASES = { 'default': { 'ENGINE': 'django.db.backends.mysql', 'NAME': 'db', # 数据库名字 'USER': 'stars', 'PASSWORD': '123456', # * 'HOST': '127.0.0.1', # ip 'PORT': 3306, } } CACHES = { "default": { "BACKEND": "django_redis.cache.RedisCache", "LOCATION": "redis://127.0.0.1:6379", "OPTIONS": { "CLIENT_CLASS": "django_redis.client.DefaultClient", "CONNECTION_POOL_KWARGS": {"max_connections": 100}, "PASSWORD": "123456", # * } } } # Esc -> :wq -
收集静态文件
python manage.py collectstatic --noinput【注】若静态文件有变动,则需要重新收集
Nginx + uWSGI
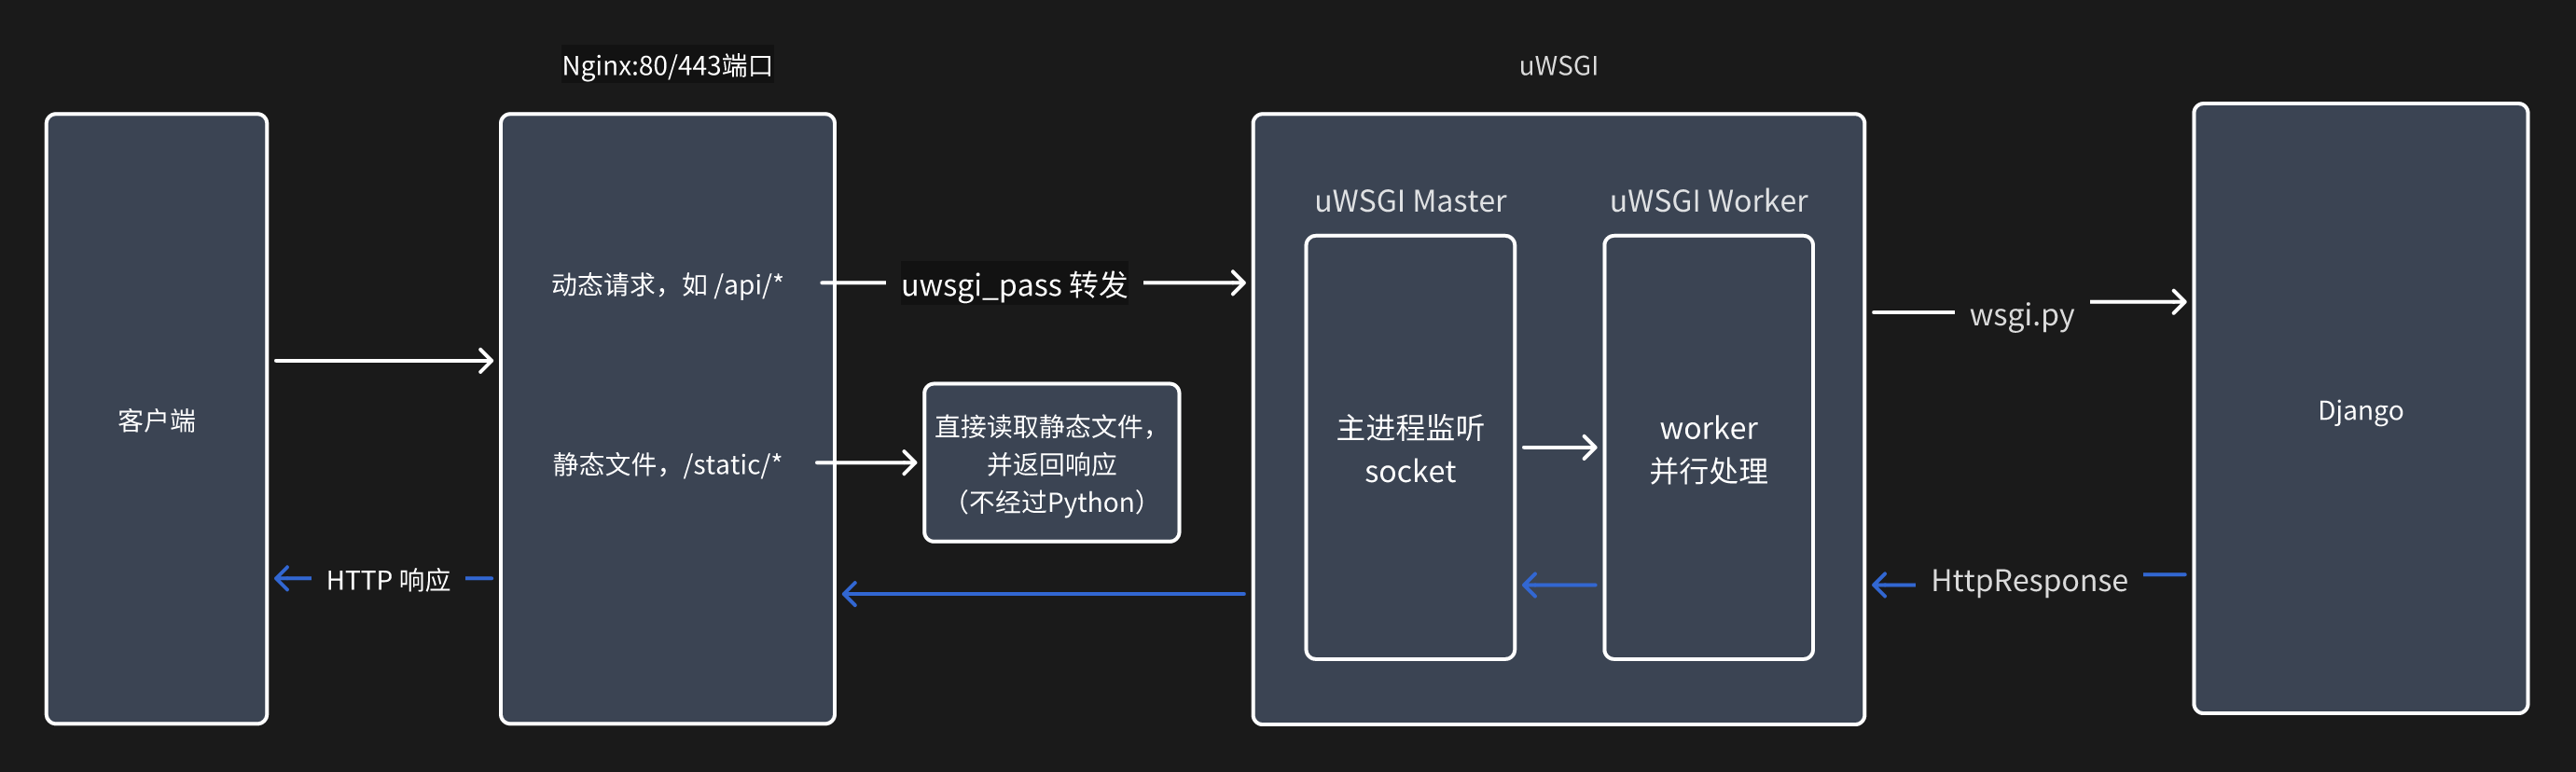
为实现 高性能、高并发、稳定部署 的Web服务架构,使用 Nginx + uWSGI
- Nginx 作为反向代理服务器,负责处理静态资源、负载均衡和SSL终端,提升响应速度和安全性;
- uWSGI 作为应用服务器,负责运行Python Web应用(如Django、Flask),与Nginx配合实现动态请求的高效处理。
# 激活虚拟环境并安装 uwsgi + nginx
source /envs/<env_name>/bin/activate
yum install uwsgi -y
yum install nginx -y
shell 脚本
# 先本地操作,之后再上传代码,便于代码管理
/data/project/<project_name>/shell
	└── reboot.sh
	└── stop.sh
	└── django_project<project_name>_uwsgi.ini
uWSGI
-
命令参数
# 测试是否可运行,若没问题 ctrl-c 关闭 uwsgi --http :80 --chdir /data/project/<project_name> --wsgi-file <project_name>/wsgi.py --master --processes 4 --static-map /static=/data/project/<project_name>/allstatic -
文件参数
# django_project<project_name>_uwsgi.ini [uwsgi] socket = 127.0.0.1:8001 # Nginx + uWSGI 在同一台服务器 chdir = /data/project/<project_name> home = /envs/<env_name>/ module = <project_name>.wsgi:application master = true processes = 4 chmod-socket = 666 vacuum = true enable-threads = true static-map = /static=/data/project/<project_name>/allstatic -
reboot.sh#!/usr/bin/env bash echo -e "\033[34m--------------------wsgi process--------------------\033[0m" ps -ef|grep <project_name>_uwsgi.ini | grep -v grep sleep 0.5 echo -e '\n--------------------going to close--------------------' ps -ef |grep <project_name>_uwsgi.ini | grep -v grep | awk '{print $2}' | xargs kill -9 sleep 0.5 echo -e '\n----------check if the kill action is correct----------' /envs/<env_name>/bin/uwsgi --ini <project_name>_uwsgi.ini & >/dev/null echo -e '\n\033[42;1m----------------------started...----------------------\033[0m' sleep 1 ps -ef |grep <project_name>_uwsgi.ini | grep -v grep -
stop.sh#!/usr/bin/env bash echo -e "\033[34m--------------------wsgi process--------------------\033[0m" ps -ef |grep <project_name>_uwsgi.ini | grep -v grep sleep 0.5 echo -e '\n--------------------going to close--------------------' ps -ef |grep <project_name>_uwsgi.ini | grep -v grep | awk '{print $2}' | xargs kill -9 sleep 0.5 -
代码管理
# 本地 git add. git commit -m "commit message" git push origin master # 服务器 cd /data/project/<project_name> git pull origin master -
添加权限(在服务器中执行)
chmod 755 reboot.sh stop.sh
source /envs/<env_name>/bin/activate
./reboot.sh
nginx
cd /etc/nginx/
mv nginx.conf nginx.conf.bak  # 备份原本的配置文件
vim nginx.conf
user nginx;
worker_processes auto;
error_log /var/log/nginx/error.log;
pid /run/nginx.pid;

# Load dynamic modules. See /usr/share/doc/nginx/README.dynamic.
include /usr/share/nginx/modules/*.conf;

events {
    worker_connections 1024;
}

http {
    log_format  main  '$remote_addr - $remote_user [$time_local] "$request" '
                      '$status $body_bytes_sent "$http_referer" '
                      '"$http_user_agent" "$http_x_forwarded_for"';

    access_log  /var/log/nginx/access.log  main;

    sendfile            on;
    tcp_nopush          on;
    tcp_nodelay         on;
    keepalive_timeout   65;
    types_hash_max_size 4096;

    include             /etc/nginx/mime.types;
    default_type        application/octet-stream;

    # Load modular configuration files from the /etc/nginx/conf.d directory.
    # See http://nginx.org/en/docs/ngx_core_module.html#include
    # for more information.
    # include /etc/nginx/conf.d/*.conf;

	# 反向代理本机端口
    upstream django {
        server 127.0.0.1:8001;  # *
    }

    server {
        listen       80;
        listen       [::]:80;
        server_name  _; # 域名(server_name.com;)

        # Load configuration files for the default server block.
        # include /etc/nginx/default.d/*.conf;

		# 静态文件
		location /static {
            alias  /data/project/<project_name>/allstatic/; # *
        }

		# 动态请求
        location / {
            uwsgi_pass  django;
            include     uwsgi_params;
        }

    }
}
systemctl start nginx  # 启动
systemctl enable nginx # 开机启动
域名和解析
- 申请域名 -> 备案
- 解析:将域名与服务器 ip 绑定
https
-
SSL证书 -> 免费证书 -> 创建证书
-
填写申请:绑定域名、验证 。。。
-
添加 DNS解析记录
-
下载证书文件 - Nginx
域名_nginx └── 域名_bundle.pem # 证书文件 └── 域名.key # 私钥文件 -
将证书上传到服务器
/data/ssl -
修改 nginx 配置(增加对https的支持)
cd /etc/nginx/
mv nginx.conf nginx.conf.http.bak  # 备份原本的配置文件
vim nginx.conf
user nginx; worker_processes auto; error_log /var/log/nginx/error.log; pid /run/nginx.pid; # Load dynamic modules. See /usr/share/doc/nginx/README.dynamic. include /usr/share/nginx/modules/*.conf; events { worker_connections 1024; } http { log_format main '$remote_addr - $remote_user [$time_local] "$request" ' '$status $body_bytes_sent "$http_referer" ' '"$http_user_agent" "$http_x_forwarded_for"'; access_log /var/log/nginx/access.log main; sendfile on; tcp_nopush on; tcp_nodelay on; keepalive_timeout 65; types_hash_max_size 4096; include /etc/nginx/mime.types; default_type application/octet-stream; # Load modular configuration files from the /etc/nginx/conf.d directory. # See http://nginx.org/en/docs/ngx_core_module.html#include # for more information. # include /etc/nginx/conf.d/*.conf; # 反向代理本机端口 upstream django { server 127.0.0.1:8001; } server { listen 80; listen [::]:80; server_name <域名>; # 域名 rewrite ^(.*) https://$server_name$1 redirect; } server { listen 443 ssl; server_name <域名>; # 域名 ssl_certificate /data/ssl/<域名>_bundle.pem; # 证书文件 ssl_certificate_key /data/ssl/<域名>.key; # 私钥文件 ssl_session_cache shared:SSL:1m; ssl_session_timeout 5m; ssl_ciphers ECDHE-RSA-AES128-GCM-SHA256:ECDHE:ECDH:AES:HIGH:!NULL:!aNULL:!MD5:!ADH:!RC4; ssl_protocols TLSv1 TLSv1.1 TLSv1.2; ssl_prefer_server_ciphers on; # 静态文件 location /static { alias /data/project/<project_name>/allstatic/; } # 动态请求 location / { uwsgi_pass django; include uwsgi_params; } } } -
重启
systemctl restart nginx
cd /data/project/django-lufei/shell
./reboot.sh
遇到的问题
-
安装
mysqlclient包时出现的问题已安装了相关的依赖但是仍无法安装成功
解决办法:使用
PyMySQL作为替代pip install PyMySQL# init.py (与 settings.py 同级) import pymysql pymysql.install_as_MySQLdb() -
运行
uWSGI出现报错:ImportError: urllib3 v2 only supports OpenSSL 1.1.1+, currently the 'ssl' module is compiled with 'OpenSSL 1.0.2k-fips'urllib3版本太高,不兼容系统的OpenSSL 1.0.2解决办法:降级
urllib3source /envs/Django-LuFei<env_name>/bin/activate pip install "urllib3<2" pkill -9 uwsgi uwsgi --ini django_project<project_name>_uwsgi.ini &

 浙公网安备 33010602011771号