

14. 动画
一、动画元素
我们可以在终端中使用 pip 安装 PySide6 模块。默认是从国外的主站上下载,因此,我们可能会遇到网络不好的情况导致下载失败。我们可以在 pip 指令后通过 -i 指定国内镜像源下载。
pip install pyside6 -i https://mirrors.aliyun.com/pypi/simple
国内常用的 pip 下载源列表:
- 阿里云 https://mirrors.aliyun.com/pypi/simple
- 清华大学 https://pypi.tuna.tsinghua.edu.cn/simple
- 中国科学技术大学 http://pypi.mirrors.ustc.edu.cn/simple
Qt Quick 针对不同的应用场景,提供了几个 基本的动画对象:
PropertyAnimation                                                               // 可以改变各种类型的property来产生动画效果

// PropertyAnimation的派生类,专门改变数字类型的property来产生动画,效率相比PropertyAnimation更好
NumberAnimation

// PropertyAnimation的派生类,专门改变color类型的property来产生动画,效率相比PropertyAnimation更好
ColorAnimation

// PropertyAnimation的派生类,专门改变rotation值,效率相比PropertyAnimation更好,另外还提供旋转方向等附加特性
RotationAnimation

Vector3dAnimation                                                               // PropertyAnimation的派生类,在一个Vector3d值发生变化时使用
PathAnimation                                                                   // 让对象沿一个给定的路径运动
SmoothedAnimation                                                               // 允许一个property跟踪一个值,产生平滑动画
SpringAnimation                                                                 // 允许一个property跟踪一个值,动画效果类似于弹簧运动
Qt Quick 还提供了用于 组合多个动画对象的分组动画对象:
SequentialAnimation                                                             // 顺序执行一系列动画
ParallelAnimation                                                               // 并行执行一系列动画
还有一些对象虽然本身不是直接的动画元素,但却是有些 QML Item 能够动起来的基础,称之为 动画搭档。
// Item的状态,不同状态对应不同的界面效果和业务逻辑,可以将动画应用于不同状态间的迁移过程
State

Transition                                                                      // 过渡,衔接Item的状态和动画,使状态变化过程平滑
还有一些动画元素,需要与其他动画对象结合才能产生较好的效果,称之为 协同动画元素。
Behavior                                                                        // 为Item的property变化绑定一个默认的动画对象

// 在改变一个Item的parent时使用,使得该Item从旧parent移动到新parent的过程更平滑,通常与Transition、State、ParentChange联合使用
ParentAnimation

// 在改变一个Item的anchor时使用,平滑变化过程,通常与Transition、State、AnchorChange联合使用
AnchorAnimation

PauseAnimation                                                                  // 在动画过程中插入它,可以将动画过程暂停一段时间
PropertyAction                                                                  // 在动画执行过程中立即改变某个属性
ScriptAction                                                                    // 在动画执行过程中运行一段ECMAScript脚本
二、基本动画元素
2.1、Animation
基本动画元素,都可以直接应用于 Item 来产生动画效果。Animation 是 Qt Quick 中所有动画类的基类。它具有下列属性:
// 布尔值,指示动画是否在运行。默认值是false。设置为true会启动动画,为false会停止动画。
running

// 动画的执行次数,默认值是1;给它赋值Animation.Infinite会导致动画循环执行永不停歇
loops

// 布尔值,指示动画是否被暂停,默认不暂停。调用pause()方法会置其为true,stop()方法会置其为false
paused

// 布尔值,默认值为false。它指示在显式地通知动画停止时是否把动画过程执行完。
// 如果设置为true,那么即便你调用stop()或者置running为false,动画都会自顾自地执行完。
alwaysRunToEnd
Animation 有下列方法:
start()                                                                         // 启动一个动画
stop()                                                                          // 终止一个动画
restart()                                                                       // 重新启动一个动画,等同于先调用stop()再调用start()
pause()                                                                         // 暂停一个动画
resume()                                                                        // 让一个动画继续执行
complete()                                                                      // 完成一个动画
Animation 有下列信号:
started()                                                                       // 动画开始时触发
stopped()                                                                       // 动画(手动或自动执行完毕)进入停止状态时触发
只有单独的顶层动画对象才会触发
started()信号和stopped()信号,如果一个动画对象处于某个动画分组中、在一个Behavior中或者在一个Transition中,都不会触发这个信号。
2.2、PropertyAnimation
PropertyAnimation 是 Animation 的派生类,它通过改变对象的 property 来实现动画。像 NumberAnimation、ColorAnimation、RotationAnimation、Vector3dAnimation 等都是它的子类。它的常用属性如下:
target : QtObject                                                               // 要操作的目标对象
targets : list<QtObject>                                                        // 要操作的目标对象列表

property : string                                                               // 要操作的属性
properties : string                                                             // 要操作的多个属性

from : variant                                                                  // 起始值
to : variant                                                                    // 目标值
duration : int                                                                  // 动画持续时间

easing                                                                          // 动画曲线
我们在定义 PropertyAnimation 对象时,首先使用 target 属性 指定要操作的目标对象,然后使用 property 属性 指明要改变目标对象的哪个属性,再使用 to 属性 指定目标属性的目标值,最后使用 duration 属性 设置动画持续时间。PropertyAnimation 还有 from 属性,指明动画启动时要改变的目标属性的初始值。如果你不指定,动画对象会使用动画开始时目标对象的目标属性的当前值。
如果你想 同时改变多个属性,则可以使用 PropertyAnimation 的 properties 属性来指定,属性名之间用英文逗号分隔,而这些属性共用 to 指定的目标值,所以呢,目标属性最好是同一个类型的 property。如果想同时改变多个目标对象,则可以设置 targets 属性,它是一个列表,不同元素 ID 之间使用英文逗号分隔。
我们还可以通过 easing 属性 指定动画的松弛曲线。它是一个属性组,常用的属性如下:
easing.type : enumeration                                                       // 缓动函数类型
easing.period : real                                                            // 缓动函数的周期
easing.amplitude : real                                                         // 缓动函数的振幅
easing.bezierCurve : list<real>                                                 // 贝塞尔曲线控制点
easing.overshoot : real                                                         // 过冲值
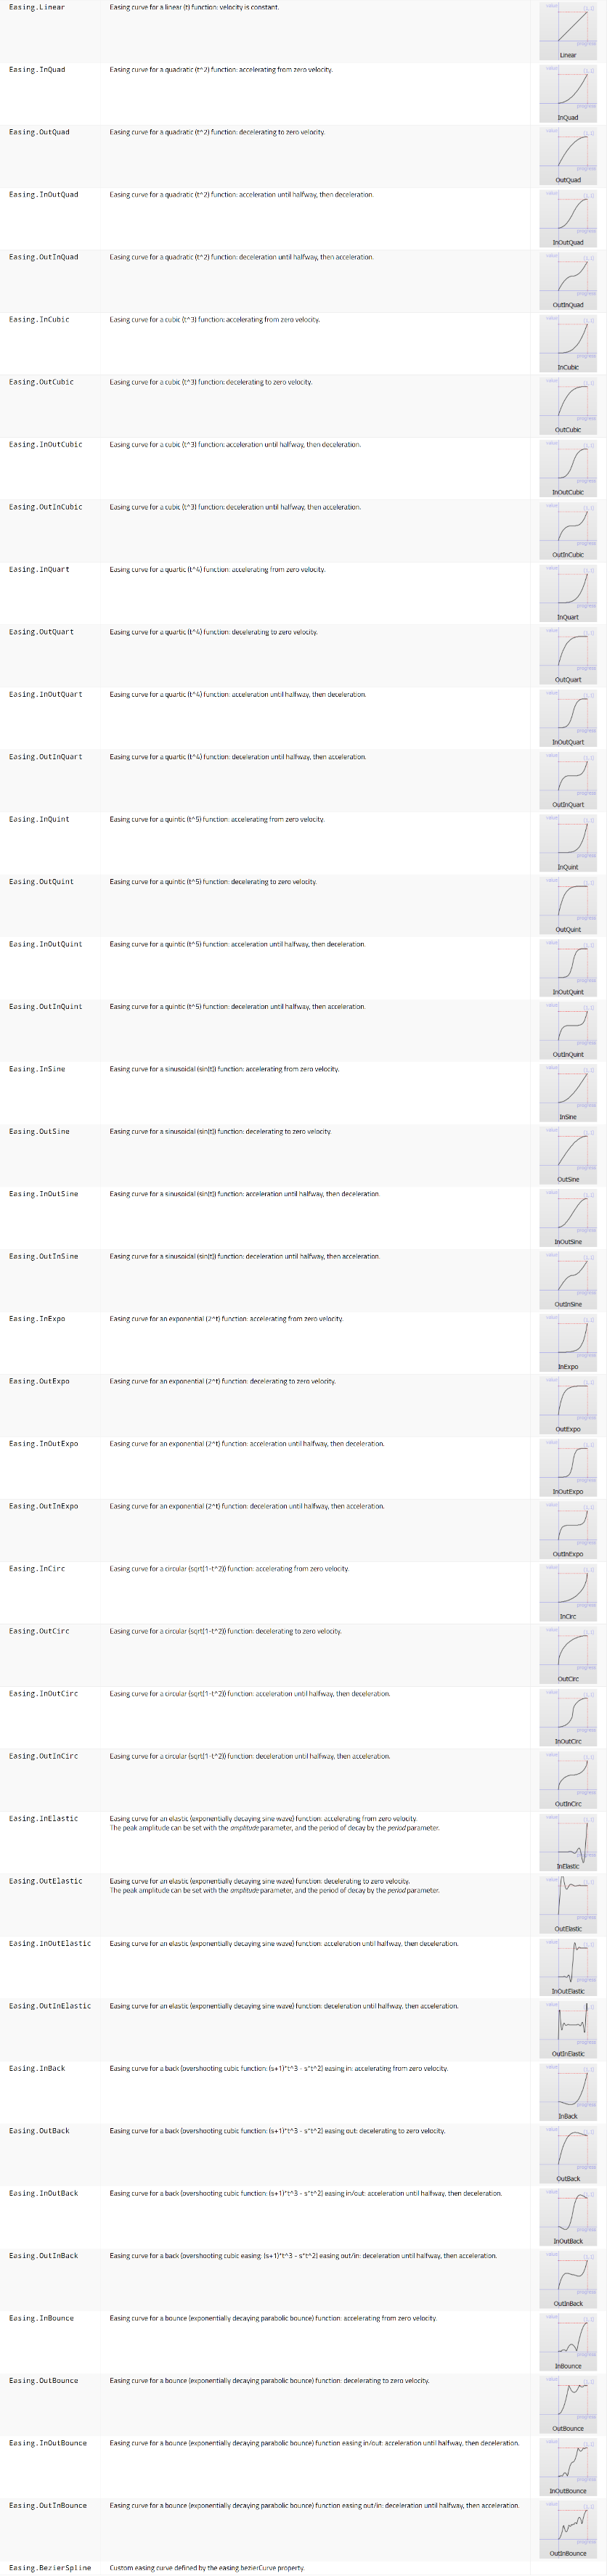
我们可以使用 easing.type 属性 指定缓动函数类型,常用的缓动函数类型如下:
新建一个 template.py 文件。
import sys

from PySide6.QtWidgets import QApplication
from PySide6.QtQml import QQmlApplicationEngine

if __name__ == "__main__":
    app = QApplication(sys.argv)                                                # 1.创建一个QApplication类的实例
    engine = QQmlApplicationEngine()                                            # 2.创建QML引擎对象
    engine.load("template.qml")                                                 # 3.加载QML文件
    sys.exit(app.exec())                                                        # 4.进入程序的主循环并通过exit()函数确保主循环安全结束
新建一个 template.qml 文件。
import QtQuick.Window
import QtQuick.Controls

// Window控件表示一个顶级窗口
// 在QML中,元素是通过大括号{}内的属性来配置的。
Window {
    width: 800                                                                  // 窗口的宽度
    height: 600                                                                 // 窗口的高度
    visible: true                                                               // 显示窗口
    color: "lightgray"                                                          // 窗口的背景颜色

    Rectangle {
        id: rectangleId
        width: 100
        height: 100
        anchors.centerIn: parent
        color: "#99CCFF"

        MouseArea {
            anchors.fill: parent

            onClicked: function(mouse) {
                if (mouse.button == Qt.LeftButton) {
                    animationId.start()                                         // 启动动画
                }
            }
        }
    }

    PropertyAnimation {
        id: animationId                                                         // 动画的id标识符
        target: rectangleId                                                     // 目标对象
        properties: "width, height"                                             // 目标属性
        from: 100                                                               // 起始值
        to: 200                                                                 // 目标值
        duration: 1000                                                          // 动画持续时间
        easing.type: Easing.InOutQuad                                           // 缓动函数类型
    }
}
我们还可以在一个元素的内部使用 Animation on 属性 的种语法将一个 PropertyAnimation 与一个属性关联起来。此时,我们不需要再设定 target 属性和 property 属性。使用这种方式定义的动画对象在默认情况下,在加载完 Item 之后立即执行。如果我们不想立即执行,可以将动画对象的 running 属性设置为 false。
修改 template.qml 文件的内容。
import QtQuick.Window
import QtQuick.Controls

// Window控件表示一个顶级窗口
// 在QML中,元素是通过大括号{}内的属性来配置的。
Window {
    id: windowId                                                                // 窗口的id标识符
    width: 800                                                                  // 窗口的宽度
    height: 600                                                                 // 窗口的高度
    visible: true                                                               // 显示窗口
    color: "lightgray"                                                          // 窗口的背景颜色

    Rectangle {
        id: rectangleId
        width: 100
        height: 100
        anchors.verticalCenter: parent.verticalCenter
        color: "#99CCFF"

        PropertyAnimation on x {
            id: animationId                                                     // 动画的id标识符
            from: 0                                                             // 起始值
            to: windowId.width - rectangleId.width                              // 目标值
            duration: 1000                                                      // 动画持续时间
            easing.type: Easing.InOutQuad                                       // 缓动函数类型
            running: false                                                      // 动画是否正在运行
        }
    }

    MouseArea {
        anchors.fill: parent

        onClicked: function(mouse) {
            if (mouse.button == Qt.LeftButton) {
                animationId.start()                                             // 启动动画
            }
        }
    }
}
2.3、NumberAnimation
NumberAnimation 是 PropertyAnimation 的派生类,专门处理 数字类型 的 property ,它重写了 from 和 to 两个属性,将其类型设置为 real。
修改 template.qml 文件的内容。
import QtQuick.Window
import QtQuick.Controls

// Window控件表示一个顶级窗口
// 在QML中,元素是通过大括号{}内的属性来配置的。
Window {
    id: windowId                                                                // 窗口的id标识符
    width: 800                                                                  // 窗口的宽度
    height: 600                                                                 // 窗口的高度
    visible: true                                                               // 显示窗口
    color: "lightgray"                                                          // 窗口的背景颜色

    Rectangle {
        id: rectangleId
        width: 100
        height: 100
        anchors.verticalCenter: parent.verticalCenter
        color: "#99CCFF"

        NumberAnimation on x {
            id: animationId                                                     // 动画的id标识符
            from: 0                                                             // 起始值
            to: windowId.width - rectangleId.width                              // 目标值
            duration: 1000                                                      // 动画持续时间
            easing.type: Easing.InOutQuad                                       // 缓动函数类型
            running: false                                                      // 动画是否正在运行
        }
    }

    MouseArea {
        anchors.fill: parent

        onClicked: function(mouse) {
            if (mouse.button == Qt.LeftButton) {
                animationId.start()                                             // 启动动画
            }
        }
    }
}
2.4、ColorAnimation
ColorAnimation 是 PropertyAnimation 的派生类,专门处理 color 类型的 property,它重写了 from 和 to 两个属性,将其类型设置为 color。
修改 template.qml 文件的内容。
import QtQuick.Window
import QtQuick.Controls

// Window控件表示一个顶级窗口
// 在QML中,元素是通过大括号{}内的属性来配置的。
Window {
    width: 800                                                                  // 窗口的宽度
    height: 600                                                                 // 窗口的高度
    visible: true                                                               // 显示窗口
    color: "lightgray"                                                          // 窗口的背景颜色

    Rectangle {
        id: rectangleId
        width: 100
        height: 100
        anchors.centerIn: parent
        color: "#99CCFF"

        MouseArea {
            anchors.fill: parent

            onClicked: function(mouse) {
                if (mouse.button == Qt.LeftButton) {
                    animationId.start()                                         // 启动动画
                }
            }
        }

        ColorAnimation on color {
            id: animationId                                                     // 动画的id标识符
            from: "#99CCFF"                                                     // 起始值
            to: "#FF6666"                                                       // 目标值
            duration: 5000                                                      // 动画持续时间
            easing.type: Easing.InOutQuad                                       // 缓动函数类型
            running: false                                                      // 动画是否正在运行
        }
    }
}
2.5、RotationAnimation
RotationAnimation 是 PropertyAnimation 的派生类,专门处理 rotation 和 angle 两个属性,它重写了 from 和 to 属性,定义其类型为 real。
RotationAnimation 新增了一个 direction 属性,可以取下列值:
RotationAnimation.Numerical                                                     // 默认值,在from和to两个角度之间做线性插值进行旋转
RotationAnimation.Clockwise                                                     // 在两个角度之间顺时针旋转
RotationAnimation.Counterclockwise                                              // 在两个角度之间逆时针旋转
RotationAnimation.Shortest                                                      // 选取两个角度之间的最短路径进行旋转
RotationAnimation 在旋转一个 Item 时以 Item 的 transformOrigin 属性指定的点为中心,这个属性为枚举类型,可以取值如下:
Item.Center                                                                     // 默认值
Item.Top
Item.TopRight
Item.Right
Item.BottomRight
Item.Bottom
Item.BottomLeft
Item.Left
Item.TopLeft
修改 template.qml 文件的内容。
import QtQuick.Window
import QtQuick.Controls

// Window控件表示一个顶级窗口
// 在QML中,元素是通过大括号{}内的属性来配置的。
Window {
    width: 800                                                                  // 窗口的宽度
    height: 600                                                                 // 窗口的高度
    visible: true                                                               // 显示窗口
    color: "lightgray"                                                          // 窗口的背景颜色

    Rectangle {
        id: rectangleId
        width: 100
        height: 100
        anchors.centerIn: parent
        color: "#99CCFF"

        MouseArea {
            anchors.fill: parent

            onClicked: function(mouse) {
                if (mouse.button == Qt.LeftButton) {
                    animationId.start()                                         // 启动动画
                }
            }
        }

        RotationAnimation on rotation {
            id: animationId                                                     // 动画的id标识符
            from: 0                                                             // 起始值
            to: 360                                                             // 目标值
            duration: 1000                                                      // 动画持续时间
            easing.type: Easing.InOutQuad                                       // 缓动函数类型
            running: false                                                      // 动画是否正在运行
        }
    }
}
2.6、PathAnimation
PathAnimation 是从 Animation 继承而来的,它让目标对象沿着一个既定的路径运动。它也有一个 easing 属性 用来指定缓动函数。它的常用属性如下:
target : Item                                                                   // 目标项
path : Path                                                                     // 路径
anchorPoint : point                                                             // 目标对象的哪个点锚定在路径上

orientation : enumeration                                                       // 控制目标对象沿着路径运动时的旋转策略
orientationEntryDuration : real                                                 // 从当前方向转换成目标方向的持续时间

endRotation : real                                                              // 目标对象在路径末端时的旋转角度
orientationExitDuration : real                                                  // 从目标方向转换成末端方向的持续时间
我们可以使用 path 属性 指定路径,它是一个 Path 类型,它的常用属性如下:
startX : real                                                                   // 动画的起始x坐标
startY : real                                                                   // 动画的起始y坐标
pathElements : list<PathElement>                                                // 路径元素列表
Path 的 pathElements 属性是一个列表,里面的元素都是路径元素,常见的路径如下:
PathLine                                                                        // 到指定位置的直线
PathPolyline                                                                    // 以坐标列表指定的多段线
PathMultiline                                                                   // 以坐标列表的形式指定的多段线列表
PathQuad                                                                        // 使用一个控制点将二次贝塞尔曲线定位到指定位置
PathCubic                                                                       // 使用两个控制点将三次贝塞尔曲线定位到指定位置
PathArc                                                                         // 以给定半径延伸至指定位置的弧线
PathAngleArc                                                                    // 由中心点、半径和角度共同确定的弧线
PathSvg                                                                         // 以SVG路径数据字符串形式指定的路径
PathRectangle                                                                   // 具有给定位置和大小的矩形
PathCurve                                                                       // Catmull-Rom曲线上的一个点
PathAttribute                                                                   // 路径中给定位置的属性
PathPercent                                                                     // 一种沿路径的各个段分布项目的方法
orientation 属性 控制目标对象沿着路径运动时的旋转策略,它是一个枚举值,可以取值如下:
PathAnimation.Fixed                                                             // 默认值,在运动过程中保持物体方位不旋转
PathAnimation.TopFirst                                                          // 旋转目标对象时努力使目标对象的顶部贴合路径
PathAnimation.RightFirst                                                        // 旋转目标对象时努力使目标对象的右侧贴合路径
PathAnimation.BottomFirst                                                       // 旋转目标对象时努力使目标对象的底部贴合路径
PathAnimation.LeftFirst                                                         // 旋转目标对象时努力使目标对象的左侧贴合路径
如果你指定了 orientation 属性,一开始时目标对象的方向和设定值不符合,PathAnimation 就会 旋转目标对象以便指定的边贴合路径,而 orientationEntryDuration 属性用于 设定完成这个旋转的时间周期。
如果你指定了 orientation 属性,而目标对象在到达路径末端时的旋转角度和你期望的不符,则可以设置 endRotation 属性来 指定一个角度,那么当目标对象抵达路径末端时会自动调整旋转角度为指定的 endRotation。此时如果你设置了 orientationExitDuration 属性,旋转过程就会以动画的形式完成,否则就会发生一个跳变。
修改 template.qml 文件的内容。
import QtQuick.Window
import QtQuick.Controls

// Window控件表示一个顶级窗口
// 在QML中,元素是通过大括号{}内的属性来配置的。
Window {
    id: windowId                                                                // 窗口的id标识符
    width: 800                                                                  // 窗口的宽度
    height: 600                                                                 // 窗口的高度
    visible: true                                                               // 显示窗口
    color: "lightgray"                                                          // 窗口的背景颜色

    Rectangle {
        id: rectangleId
        x: parent.width / 2 - width / 2
        y: parent.height - 50 - height / 2
        width: 100
        height: 100
        color: "#99CCFF"

        MouseArea {
            anchors.fill: parent
            onClicked: function(mouse) {
                if (mouse.button == Qt.LeftButton) {
                    animationId.start()                                         // 启动动画
                }
            }
        }
    }

    PathAnimation {
        id: animationId                                                         // 动画的id标识符

        target: rectangleId                                                     // 目标对象
        duration: 6000                                                          // 动画持续时间
        anchorPoint: Qt.point(rectangleId.width / 2, rectangleId.height / 2)    // 锚点,用于旋转和缩放动画目标对象的哪个点锚定在路径上

        orientation: PathAnimation.TopFirst                                     // 控制目标对象沿着路径运动时的旋转策略
        orientationEntryDuration: 1000                                          // 从当前方向转换成目标方向的持续时间
        endRotation: 0                                                          // 动画结束时的旋转角度
        orientationExitDuration: 1000                                           // 从目标方向转换成末端方向的持续时间

        running: false                                                          // 动画是否正在运行

        path: Path {
            startX: windowId.width / 2                                          // 路径的起始点x坐标
            startY: windowId.height - 50                                        // 路径的起始点y坐标

            PathCubic {
                x: 50                                                           // 路径的结束点x坐标
                y: windowId.height / 2                                          // 路径的结束点y坐标

                control1X: windowId.width / 2 - windowId.width / 8              // 第一个控制点的x坐标
                control1Y: windowId.height                                      // 第一个控制点的y坐标
                control2X: 0                                                    // 第二个控制点的x坐标
                control2Y: windowId.height / 2 + windowId.height / 8            // 第二个控制点的y坐标
            }

            PathCubic {
                x: windowId.width / 2
                y: 50

                control1X: 0
                control1Y: windowId.height / 2 - windowId.height / 8
                control2X: windowId.width / 2 - windowId.width / 8
                control2Y: 0
            }

            PathCubic {
                x: windowId.width - 50
                y: windowId.height / 2

                control1X: windowId.width / 2 + windowId.width / 8
                control1Y: 0
                control2X: windowId.width
                control2Y: windowId.height / 2 - windowId.height / 8
            }

            PathCubic {
                x: windowId.width / 2
                y: windowId.height - 50

                control1X: windowId.width
                control1Y: windowId.height / 2 + windowId.height / 8
                control2X: windowId.width / 2 + windowId.width / 8
                control2Y: windowId.height
            }
        }
    }
}
2.7、SmoothedAnimation
SmoothedAnimation 是 NumberAnimation 的派生类,它默认将 easing.type 设置为 Easing.InOutQuad,在 from 和 to 之间产生平滑的动画效果。SmoothedAnimation 的常用属性如下:
duration : int                                                                  // 动画周期,单位是毫秒。默认值是-1
velocity : real                                                                 // 设置速率,默认速率是 200units/秒
maximumEasingTime : int                                                         // 在跟随过程中任何缓动操作所应花费的最长时间(单位为毫秒),默认值是-1
reversingMode : enumeration                                                     // 在动画方向反转时平滑动画应如何表现
如果 from 和 to 的距离很短,SmoothedAnimation 会自行调整 velocity 来适应。当 duration 和 velocity 同时设置时,SmoothedAnimation 会根据 from、to 之间的距离和速率计算出按照速率完成动画所需的时间,拿这个时间与 duration 比较,如果 duration 短就使用 duration,否则使用 velocity。
修改 template.qml 文件的内容。
import QtQuick.Window
import QtQuick.Controls

// Window控件表示一个顶级窗口
// 在QML中,元素是通过大括号{}内的属性来配置的。
Window {
    width: 800                                                                  // 窗口的宽度
    height: 600                                                                 // 窗口的高度
    visible: true                                                               // 显示窗口
    color: "lightgray"                                                          // 窗口的背景颜色

    Rectangle {
        id: rectangleId
        width: 100
        height: 100
        anchors.verticalCenter: parent.verticalCenter
        color: "#99CCFF"

        SmoothedAnimation on x {
            id: animationId                                                     // 动画的id标识符

            duration: 2000                                                      // 动画持续时间
            running: false                                                      // 动画是否正在运行
        }
    }

    MouseArea {
        anchors.fill: parent

        onClicked: function(mouse) {
            if (mouse.button == Qt.LeftButton) {
                animationId.from = rectangleId.x                                // 动画起始值
                animationId.to = mouse.x                                        // 动画目标值
                animationId.start()                                             // 启动动画
            }
        }
    }
}
2.8、SpringAnimation
SpringAnimation 模仿弹簧的振荡行为。它的常用属性如下:
spring : real                                                                   // 控制动画的加速度,范围0~5.0,默认值为0
damping : real                                                                  // 衰减系数,其值越大振荡会越快平复,范围0到1,默认值为0
velocity : real                                                                 // 动画的最大速率,默认值为0,没有限制
// 允许你设定一个最接近0的阈值来代表0,如果是基于像素位置的动画,0.25是一个比较合适的值
// 如果是基于scale的动画,那可能0.005比较合适。默认值是0.01
// 调整epsilon可能会带来一定的性能提升
epsilon : real
修改 template.qml 文件的内容。
import QtQuick.Window
import QtQuick.Controls

// Window控件表示一个顶级窗口
// 在QML中,元素是通过大括号{}内的属性来配置的。
Window {
    width: 800                                                                  // 窗口的宽度
    height: 600                                                                 // 窗口的高度
    visible: true                                                               // 显示窗口
    color: "lightgray"                                                          // 窗口的背景颜色

    Rectangle {
        id: rectangleId
        width: 100
        height: 100
        anchors.verticalCenter: parent.verticalCenter
        color: "#99CCFF"

        SpringAnimation on x {
            id: animationId                                                     // 动画的id标识符
            spring: 5.0                                                         // 控制动画的加速度,范围0~5.0,默认值为0
            damping: 0.2                                                        // 衰减系数,其值越大振荡会越快平复,范围0到1,默认值为0
            duration: 2000                                                      // 动画持续时间
            running: false                                                      // 动画是否正在运行
        }
    }

    MouseArea {
        anchors.fill: parent

        onClicked: function(mouse) {
            if (mouse.button == Qt.LeftButton) {
                animationId.stop()                                              // 停止动画
                animationId.from = rectangleId.x                                // 动画起始值
                animationId.to = mouse.x                                        // 动画目标值
                animationId.start()                                             // 启动动画
            }
        }
    }
}
三、组合动画
ParallelAnimation 和 SequentialAnimation 允许我们把多个动画元素组合在一起来执行。ParallelAnimation 中定义的多个动画对象会 并行执行,而 SequentialAnimation 中定义的多个动画对象会一个个 顺序执行。
3.1、ParallelAnimation
ParallelAnimation 从 Animation 继承而来,没有添加额外的属性,它本身单独使用没有意义,不产生动画效果。你只需要在声明 ParallelAnimation 对象时在其中定义多个子动画对象,ParallelAnimation 开始运行时就会 并行执行 它们。
修改 template.qml 文件的内容。
import QtQuick.Window
import QtQuick.Controls

// Window控件表示一个顶级窗口
// 在QML中,元素是通过大括号{}内的属性来配置的。
Window {
    id: windowId                                                                // 窗口的id标识符
    width: 800                                                                  // 窗口的宽度
    height: 600                                                                 // 窗口的高度
    visible: true                                                               // 显示窗口
    color: "lightgray"                                                          // 窗口的背景颜色

    Rectangle {
        id: rectangleId
        width: 100
        height: 100
        anchors.verticalCenter: parent.verticalCenter
        color: "#99CCFF"
    }

    ParallelAnimation {
        id: animationId

        NumberAnimation {
            target: rectangleId
            property: "x"
            from: 0
            to: windowId.width - rectangleId.width
            duration: 3000
        }

        RotationAnimation {
            target: rectangleId
            property: "rotation"
            from: 0
            to: 360
            duration: 3000
        }
    }

    MouseArea {
        anchors.fill: parent

        onClicked: function(mouse) {
            if (mouse.button == Qt.LeftButton) {
                animationId.start()                                             // 启动动画
            }
        }
    }
}
3.2、SequentialAnimation
SequentialAnimation 与 ParallelAnimation 类似,不同之处是它的子动画对象是一个个 顺次执行 的。动画对象的定义方法和 PropertyAnimation 元素类似。
修改 template.qml 文件的内容。
import QtQuick.Window
import QtQuick.Controls

// Window控件表示一个顶级窗口
// 在QML中,元素是通过大括号{}内的属性来配置的。
Window {
    id: windowId                                                                // 窗口的id标识符
    width: 800                                                                  // 窗口的宽度
    height: 600                                                                 // 窗口的高度
    visible: true                                                               // 显示窗口
    color: "lightgray"                                                          // 窗口的背景颜色

    Rectangle {
        id: rectangleId
        width: 100
        height: 100
        color: "#99CCFF"
    }

    SequentialAnimation {
        id: animationId

        NumberAnimation {
            target: rectangleId
            property: "x"
            from: 0
            to: windowId.width - rectangleId.width
            duration: 3000
        }

        NumberAnimation {
            target: rectangleId
            property: "y"
            to: windowId.height - rectangleId.height
            duration: 3000
        }

        NumberAnimation {
            target: rectangleId
            property: "x"
            to: 0
            duration: 3000
        }

        NumberAnimation {
            target: rectangleId
            property: "y"
            to: 0
            duration: 3000
        }
    }

    MouseArea {
        anchors.fill: parent

        onClicked: function(mouse) {
            if (mouse.button == Qt.LeftButton) {
                animationId.start()                                         // 启动动画
            }
        }
    }
}
四、State
在 QML 中,状态是定义在 State 类型中的一系列属性配置。不同的配置可能有不同的作用:
Item 有一个 state 属性,是字符串类型,它保存 Item 的当前状态的名字,如果你没有设置过 Item 的状态,它默认就是个空串。你可以设置 state 的值来改变 Item 的状态,如果给它一个空串,Item 就会返回默认状态。
Item 还有一个 states 属性,保存为这个 Item 定义的所有状态,它的类型是 list<State>。可以看到,它是一个列表,列表中的每个 State 对象代表一种状态。
State 类型对应的类型是 QQuickState,它有这么几个属性:
name : string                                                                   // 状态的名字
when : bool                                                                     // 状态在什么时候应用
extend : string                                                                 // 当前状态的基态的名字
changes : list<Change>                                                          // 保存应用于这种状态的所有变化
State 的 changes 属性保存 Change 对象的列表,当进入一种状态后,这个列表中的 Change 对象会顺次执行。Qt Quick 提供了多种 Change 对象。State 对象必须与它的拍档 Change 对象一起使用才有实际意义。Qt Quick 提供了下面几种可用于 State 的 Change 对象:
PropertyChanges:用来改变一个对象的属性,对应的类为QQuickPropertyChanges,是QQuickStateOperation的派生类。ParentChange:用来改变一个对象的父对象,对应的类为QQuickParentChange,是QQuickStateOperation的派生类。AnchorChanges:用来改变一个对象的锚布局参数,对应的类为QQuickAnchorChanges,是QQuickStateOperation的派生类。StateChangeScript:用来执行一个 ECMAScript 脚本,对应的类为 `QQuickStateChangeScript,是QQuickStateOperation的派生类。
4.1、PropertyChanges
PropertyChanges 对象有一个 target 属性,指向要改变的目标对象。PropertyChanges 的 restoreEntryValues 属性也是个布尔值,用于 指定离开本状态时是否将本状态改变的那些属性的值重置为进入本状态之前的值。默认值为 true,假如你设置这个属性为 false,那么这种状态对目标对象的改变将是持久的。
PropertyChanges 设定目标对象的属性时,可以使用静态的值,也可以使用表达式。如果使用表达式,则默认会将表达式和属性绑定。我们可以使用 explicit 属性修改这种行为,它的默认值是 false,如果你把它置为 true,那么任何可能的表达式绑定都将被视作一次性的赋值行为。
修改 template.qml 文件的内容。
import QtQuick.Window
import QtQuick.Controls

// Window控件表示一个顶级窗口
// 在QML中,元素是通过大括号{}内的属性来配置的。
Window {
    width: 800                                                                  // 窗口的宽度
    height: 600                                                                 // 窗口的高度
    visible: true                                                               // 显示窗口
    color: "lightgray"                                                          // 窗口的背景颜色

    Rectangle {
        id: rectangleId
        width: 100
        height: 100
        anchors.centerIn: parent
        color: "#99CCFF"

        states: [
            State {
                name: "resetWidthState"                                         // 状态的名字
                when: mouseArea.pressed                                         // 状态在什么时候应用

                changes: [
                    PropertyChanges {
                        target: rectangleId                                     // 目标对象
                        color: "#FF6666"
                        width: parent.width
                    }
                ]
            }
        ]

        MouseArea {
            id: mouseArea
            anchors.fill: parent
        }
    }
}
4.2、ParentChange
ParentChange 用来改变一个对象的 parent。它具有下列属性:
target                                                                          // 指定要操作的目标对象

parent                                                                          // 指定目标对象的新parent
x                                                                               // 指定目标对象相对于新parent的x位置
y                                                                               // 指定目标对象相对于新parent的y位置

width                                                                           // 指定目标对象的宽度
height                                                                          // 指定目标对象的高度
rotation                                                                        // 指定目标对象的旋转角度
scale                                                                           // 指定目标对象的放大系数
修改 template.qml 文件的内容。
import QtQuick.Window
import QtQuick.Controls

// Window控件表示一个顶级窗口
// 在QML中,元素是通过大括号{}内的属性来配置的。
Window {
    width: 800                                                                  // 窗口的宽度
    height: 600                                                                 // 窗口的高度
    visible: true                                                               // 显示窗口
    color: "lightgray"                                                          // 窗口的背景颜色

    Rectangle {
        id: rectangle1Id
        width: 200
        height: 200
        anchors.centerIn: parent
        color: "#99CCFF"
    }

    Rectangle {
        id: rectangle2Id
        x: rectangle1Id.x + rectangle1Id.width
        y: rectangle1Id.y + (rectangle1Id.height - rectangle2Id.height) / 2
        width: 50
        height: 50
        color: "#FF6666"

        states: State {
            name: "reparentedState"                                             // 状态的名字

            ParentChange {
                target: rectangle2Id                                            // 目标对象
                parent: rectangle1Id                                            // 新的父对象

                x: (rectangle1Id.width - rectangle2Id.width) / 2                // 相较于父对象新的x坐标
                y: (rectangle1Id.height - rectangle2Id.height) / 2              // 相较于父对象新的y坐标
                width: 100                                                      // 新的宽度
                height: 100                                                     // 新的高度
            }
        }

        MouseArea {
            anchors.fill: parent

            onClicked: {
                rectangle2Id.state = "reparentedState"
            }
        }
    }
}
4.3、AnchorChanges
AnchorChanges 用来改变一个 Item 的锚布局属性。AnchorsChanges 不能改变一个 Item 的锚布局的间距,不过你可以使用 PropertyChanges 来改变它们。
修改 template.qml 文件的内容。
import QtQuick.Window
import QtQuick.Controls

// Window控件表示一个顶级窗口
// 在QML中,元素是通过大括号{}内的属性来配置的。
Window {
    id: windowId                                                                // 窗口的id标识符
    width: 800                                                                  // 窗口的宽度
    height: 600                                                                 // 窗口的高度
    visible: true                                                               // 显示窗口
    color: "lightgray"                                                          // 窗口的背景颜色

    Rectangle {
        id: outerRectangleId
        width: 300
        height: 300
        anchors.centerIn: parent
        color: "#99CCFF"

        Rectangle {
            id: innerRectangleId
            width: 50
            height: 50
            color: "#FF6666"
        }

        states: State {
            name: "reanchoredState"                                             // 状态的名字

            AnchorChanges {
                target: innerRectangleId                                        // 目标对象
                anchors.top: outerRectangleId.top                               // 新的顶部锚点
                anchors.bottom: outerRectangleId.bottom                          // 新的底部锚点
            }

            PropertyChanges {
                target: innerRectangleId                                        // 目标对象
                anchors.topMargin: 10                                           // 新的顶部边距
                anchors.bottomMargin: 10                                        // 新的底部边距
            }
        }

        MouseArea {
            anchors.fill: parent

            onClicked: {
                outerRectangleId.state = "reanchoredState"
            }
        }
    }
}
4.4、StateChangeScript
StateChangeScript 允许你在状态变化时执行 ECMAScript 脚本。它有两个属性,一个是 name,表示 脚本的名字,这个名字可以被 ScriptAction 对象引用,以便复用这里的脚本代码;一个是 script 属性,代表 实际的脚本代码。
新建一个 template.js 文件。
function changeColor(obj){
    obj.color = Qt.rgba(Math.random(), Math.random(), Math.random(), 1.0)
}
修改 template.qml 文件的内容。
import QtQuick.Window
import QtQuick.Controls

import "template.js" as Template

// Window控件表示一个顶级窗口
// 在QML中,元素是通过大括号{}内的属性来配置的。
Window {
    id: windowId                                                                // 窗口的id标识符
    width: 800                                                                  // 窗口的宽度
    height: 600                                                                 // 窗口的高度
    visible: true                                                               // 显示窗口
    color: "lightgray"                                                          // 窗口的背景颜色

    Rectangle {
        id: outerRectangleId
        width: 100
        height: 100
        anchors.centerIn: parent
        color: "#99CCFF"

        states: State {
            name: "changeColorState"                                            // 状态的名字
            when: mouseAreaId.pressed                                           // 状态在什么时候应用

            StateChangeScript {
                name: "templateScript"                                          // 脚本的名字
                script: Template.changeColor(outerRectangleId)                  // 实际的脚本代码
            }
        }

        MouseArea {
            id: mouseAreaId
            anchors.fill: parent
        }
    }
}
五、Transition
当一个 Item 从一个 State 切换到另一个 State 时,Transition 定义的动画会自动在两个 State 之间运行,从而消除状态间的突变,使得状态迁移更加平滑。Item 的 transitions 属性是个列表,保存为这个 Item 定义的所有 Transition。
enabled : bool                                                                  // 是否使能,默认值为true
from : string                                                                   // 触发过渡的状态的名字,其默认值为"*",匹配所有状态
to : string                                                                     // 过渡的目标状态的名字,默认值为"*",匹配所有状态
running : bool                                                                  // 只读属性,是否正在运行
animations : list<Animation>                                                    // 此次转换所要运行的动画列表
reversible : bool                                                               // 触发转换的条件发改变时该转换是否自动逆转
如果你不设置 from 和 to 属性,那么 Transition 就会匹配所有的状态变化,不管 Item 的状态从哪个变到哪个,只要 Transition 的 enabled 为 true,Transition 就会执行。
当你为一个 Transition 定义动画时,不需要为 Animation 指定 from 和 to 属性。from 属性默认会被设置为 Item 对应属性的当前值,而 to 属性则会被设置为目标状态内为该属性设定的目标值。当然,要是你愿意的话,也可以手动设置它们来覆盖默认值。target 属性也不用指定。
reversible 属性 指定触发转换的条件发改变时该转换是否自动逆转,默认值是 false。如果你没有指定 Transition 的 from 和 to 属性,那么多个转换是并发执行的,而且会应用到所有状态变化路径上。在这种情况下,此转换被撤销时(Item 的 State 的转换反转),转换会自动应用,而无需设置此属性来反转转换。
修改 template.qml 文件的内容。
import QtQuick.Window
import QtQuick.Controls

// Window控件表示一个顶级窗口
// 在QML中,元素是通过大括号{}内的属性来配置的。
Window {
    width: 800                                                                  // 窗口的宽度
    height: 600                                                                 // 窗口的高度
    visible: true                                                               // 显示窗口
    color: "lightgray"                                                          // 窗口的背景颜色

    Rectangle {
        id: rectangleId
        width: 100
        height: 100
        anchors.centerIn: parent
        color: "#99CCFF"

        states: State {
            name: "mousePressedState"                                           // 状态的名字
            when: mouseAreaId.pressed                                           // 状态在什么时候应用

            PropertyChanges {
                target: rectangleId
                color: "#FF9999"
                scale: 2.0
            }
        }

        transitions: Transition {
            NumberAnimation {
                property: "scale"
                easing.type: Easing.InOutQuad
                duration: 1000
            }

            ColorAnimation {
                property: "color"
                duration: 1000
            }
        }

        MouseArea {
            id: mouseAreaId
            anchors.fill: parent
        }
    }
}
但是如果你设置了 Transition 的 from 和 to 属性,那么在那些状态被撤销时,就需要设置此属性来逆转过滤效果,否则会马上跳变成触发过渡时的状态。
修改 template.qml 文件的内容。
import QtQuick.Window
import QtQuick.Controls

// Window控件表示一个顶级窗口
// 在QML中,元素是通过大括号{}内的属性来配置的。
Window {
    width: 800                                                                  // 窗口的宽度
    height: 600                                                                 // 窗口的高度
    visible: true                                                               // 显示窗口
    color: "lightgray"                                                          // 窗口的背景颜色

    Rectangle {
        id: rectangleId
        width: 100
        height: 100
        anchors.centerIn: parent
        color: "#99CCFF"


        states: [
            State {
                name: "pressedState"                                            // 状态的名字
                when: mouseAreaId.pressed                                       // 状态在什么时候应用

                PropertyChanges {
                    target: rectangleId
                    color: "#FF9999"
                    scale: 2.0
                }
            }
        ]

        transitions: Transition {
            to: "pressedState"                                                  // 过渡的目标状态的名字
            reversible: true                                                    // 过渡是否可反转

            SequentialAnimation {
                NumberAnimation {
                    property: "scale"
                    easing.type: Easing.InOutQuad
                    duration: 1000
                }

                ColorAnimation {
                    property: "color"
                    duration: 1000
                }
            }
        }

        MouseArea {
            id: mouseAreaId
            anchors.fill: parent
        }
    }
}
六、协同动画元素
除了基本的动画元素和分组动画元素,还有一些需要和其它的动画辅助类(如 Behavior、Transition)或者动画类结合使用才更有实际意义的动画元素,我们可以称为 协同动画元素。
6.1、Behavior
Behavior 用来给一个 property 定义默认动画,当该 property 变化时执行该动画。一个 property 只能绑定一个 Behavior,一个 Behavior 内只能有一个顶层动画(因为其 animation 属性的类型是 Animation,而非 list<Animation>),如果你想在一个 property 变化时执行多个动画,则可以使用 ParallelAnimation 或 SequentialAnimation。
如果你给 Item 定义了 State,而 State 变化时触发了 Transition,Transition 要改变的 property 上绑定了 Behavior,那么 Transition 会覆盖 Behavior。
修改 template.qml 文件的内容。
import QtQuick.Window
import QtQuick.Controls

// Window控件表示一个顶级窗口
// 在QML中,元素是通过大括号{}内的属性来配置的。
Window {
    id: windowId                                                                // 窗口的ID
    width: 800                                                                  // 窗口的宽度
    height: 600                                                                 // 窗口的高度
    visible: true                                                               // 显示窗口
    color: "lightgray"                                                          // 窗口的背景颜色

    Rectangle {
        id: rectangleId
        width: 100
        height: 100
        anchors.centerIn: parent
        color: "#99CCFF"

        Behavior on width {
            NumberAnimation {
                duration: 1000
            }
        }

        MouseArea {
            anchors.fill: parent

            onClicked: {
                rectangleId.width = Math.random() * windowId.width
            }
        }
    }
}
6.2、ParentAnimation
ParentAnimation 在改变一个 Item 的 parent 时使用,使得该 Item 从旧 parent 移动到新 parent 的过程更平滑。它是Animation 的派生类,其常用属性如下:
target                                                                          // 目标对象
newParent                                                                       // 目标对象的新parent
via                                                                             // 动画过程中参考的其他对象
via 属性 指定动画过程中参考的其它对象。比如要改变 parent 的 Item,其旧父、新父都可能被别的 Item 遮住,此时移动过程可能是不可见的,而给 via 设置一个 z序最大、处于顶层的 Item,就可以确保动画过程可见。
修改 template.qml 文件的内容。
import QtQuick.Window
import QtQuick.Controls

// Window控件表示一个顶级窗口
// 在QML中,元素是通过大括号{}内的属性来配置的。
Window {
    id: windowId                                                                // 窗口的ID
    width: 800                                                                  // 窗口的宽度
    height: 600                                                                 // 窗口的高度
    visible: true                                                               // 显示窗口
    color: "lightgray"                                                          // 窗口的背景颜色

    Rectangle {
        id: rectangle1Id
        width: 200
        height: 200
        anchors.centerIn: parent
        color: "#99CCFF"
    }

    Rectangle {
        id: rectangle2Id

        x: rectangle1Id.x + rectangle1Id.width
        y: rectangle1Id.y
        width: 50
        height: 50
        color: "#FF6666"

        states: State {
            name: "reparentedState"

            ParentChange {
                target: rectangle2Id                                            // 目标对象
                parent: rectangle1Id                                            // 新父对象

                x: (rectangle1Id.width - rectangle2Id.width) / 2                // 相较于父对象新的x坐标
                y: (rectangle1Id.height - rectangle2Id.height) / 2              // 相较于父对象新的y坐标
                width: 100                                                      // 新的宽度
                height: 100                                                     // 新的高度
            }
        }

        transitions: Transition {
            ParentAnimation {
                NumberAnimation {
                    properties: "x, y, width, height"
                    duration: 1000
                }
            }
        }

        MouseArea {
            anchors.fill: parent

            onClicked: {
                rectangle2Id.state = "reparentedState"
            }
        }
    }
}
6.3、AnchorAnimation
AnchorAnimation 只能与 Transition、AnchorChanges 联合使用,不能在 Behavior 或其他的动画元素中使用。
修改 template.qml 文件的内容。
import QtQuick.Window
import QtQuick.Controls

// Window控件表示一个顶级窗口
// 在QML中,元素是通过大括号{}内的属性来配置的。
Window {
    id: windowId                                                                // 窗口的id标识符
    width: 800                                                                  // 窗口的宽度
    height: 600                                                                 // 窗口的高度
    visible: true                                                               // 显示窗口
    color: "lightgray"                                                          // 窗口的背景颜色

    Rectangle {
        id: outerRectangleId
        width: 300
        height: 300
        anchors.centerIn: parent
        color: "#99CCFF"

        Rectangle {
            id: innerRectangleId
            width: 50
            height: 50
            color: "#FF6666"
        }

        states: State {
            name: "reanchoredState"                                             // 状态的名字

            AnchorChanges {
                target: innerRectangleId                                        // 目标对象
                anchors.top: outerRectangleId.top                               // 新的顶部锚点
                anchors.bottom: outerRectangleId.bottom                          // 新的底部锚点
            }

            PropertyChanges {
                target: innerRectangleId                                        // 目标对象
                anchors.topMargin: 10                                           // 新的顶部边距
                anchors.bottomMargin: 10                                        // 新的底部边距
            }
        }

        transitions: Transition {
            AnchorAnimation {
                duration: 1000
            }
        }

        MouseArea {
            anchors.fill: parent

            onClicked: {
                outerRectangleId.state = "reanchoredState"
            }
        }
    }
}

 浙公网安备 33010602011771号