
11. 主窗口
一、主窗口
为了方便实现主窗口程序,我们可以使用 Window 的子类型 ApplicationWindow,该类型在 Window 的基础上增加了菜单栏menuBar、头部 header、脚部 footer 这 3 个属性,可以指定自定义的项目。
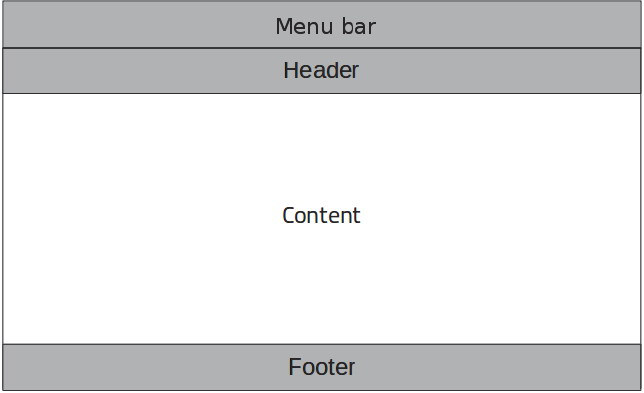
在 QML 中,ApplicationWindow 提供了一组附加属性,可以从无法直接访问窗口的位置访问窗口及其组成部分,而不需要指定窗口的 ID。这些附加属性包括 ApplicationWindow.window、ApplicationWindow.menuBar、ApplicationWindow.header、ApplicationWindow.footer、ApplicationWindow.contentItem、ApplicationWindow. activeFocusControl 等。
我们可以在终端中使用 pip 安装 PySide6 模块。默认是从国外的主站上下载,因此,我们可能会遇到网络不好的情况导致下载失败。我们可以在 pip 指令后通过 -i 指定国内镜像源下载。
pip install pyside6 -i https://mirrors.aliyun.com/pypi/simple
国内常用的 pip 下载源列表:
- 阿里云 https://mirrors.aliyun.com/pypi/simple
- 清华大学 https://pypi.tuna.tsinghua.edu.cn/simple
- 中国科学技术大学 http://pypi.mirrors.ustc.edu.cn/simple
二、菜单栏
菜单栏 由 MenuBar 类型指定,该类型还提供了addMenu()、removeMenu() 等方法来 动态添加或移除菜单。菜单 由 Menu 类型指定,除了添加到菜单栏,还可以单独使用作为上下文菜单,只需调用 open() 方法打开即可。可以通过 title 属性 指定菜单标题,使用 addItem()、removeItem() 等方法 添加、删除菜单项。
如果要创建子菜单,直接嵌套使用 Menu 类型即可。菜单项 由 MenuItem 类型指定,通过 text 属性 指定名称,可以使用 icon.source 属性来 设置图标。如果需要菜单项可被选中,可以通过设置其 checkable 属性为 true 来实现,然后通过 checked 属性或者 toggle() 方法来 切换选中状态。菜单项之间的分隔符 可以通过 MenuSeparator 类型实现。
我们新建一个 template.py 文件。
import sys

from PySide6.QtWidgets import QApplication
from PySide6.QtQml import QQmlApplicationEngine

if __name__ == "__main__":
    app = QApplication(sys.argv)                                                # 1.创建一个QApplication类的实例
    engine = QQmlApplicationEngine()                                            # 2.创建QML引擎对象
    engine.load("template.qml")                                                 # 3.加载QML文件
    sys.exit(app.exec())                                                        # 4.进入程序的主循环并通过exit()函数确保主循环安全结束
我们新建一个 template.qml 文件。
import QtQuick.Window
import QtQuick.Controls

// ApplicationWindow控件表示一个主窗口
// 在QML中,元素是通过大括号{}内的属性来配置的。
ApplicationWindow {
    width: 800                                                                  // 窗口的宽度
    height: 600                                                                 // 窗口的高度
    visible: true                                                               // 显示窗口
    color: "lightgray"                                                          // 窗口的背景颜色

    // 菜单栏
    menuBar: MenuBar {
        // 菜单栏中添加菜单
        Menu {
            title: "文件"                                                       // 菜单标题

            // 添加Action充当菜单项
            Action {
                text: "打开文件"                                                // 菜单项的文本
                icon.source: "assets/images/openFileIcon.png"                   // 菜单项的图标
                shortcut: StandardKey.Open                                      // 菜单项的快捷键

                onTriggered: {
                    textId.text = "打开文件"
                }
            }

            Action {
                text: "新建文件"
                icon.source: "assets/images/newFileIcon.png"
                shortcut: "Ctrl+N"

                onTriggered: {
                    textId.text = "新建文件"
                }
            }

            Action {
                id: saveFileActionId
                text: "保存文件"
                icon.source: "assets/images/saveFileIcon.png"
                shortcut: Shortcut {
                    sequence: "Ctrl+S"                                          // 快捷键

                    // 按下快捷键时触发
                    onActivated: {
                        saveFileActionId.trigger()                               // 调用保存文件菜单的触发函数
                    }
                }

                onTriggered: {
                    textId.text = "保存文件"
                }
            }

            Action {
                text: "文件另存为"
                icon.source: "assets/images/saveFileAsIcon.png"
                shortcut: StandardKey.SaveAs

                onTriggered: {
                    textId.text = "文件另存为"
                }
            }

            // 添加菜单项分隔符
            MenuSeparator {}

            // 菜单中添加子菜单
            Menu {
                title: "最近打开的文件"

                // 添加子菜单项
                MenuItem {
                    text: "最近打开的文件1"

                    onTriggered: {
                        textId.text = "最近打开的文件1"
                    }
                }

                MenuItem {
                    text: "最近打开的文件2"

                    onTriggered: {
                        textId.text = "最近打开的文件2"
                    }
                }
            }

            MenuSeparator {}

            Action {
                id: exitActionId
                text: "退出"
                icon.source: "assets/images/exitIcon.png"

                shortcut: Shortcut {
                    sequences: ["Ctrl+Q", "Esc"]                                // 快捷键序列,按Ctrl+Q或者Esc都会触发

                    // 按下快捷键序列中的任意一个快捷键时触发
                    onActivated: {
                        exitActionId.trigger()                                  // 调用退出菜单的触发函数
                    }
                }

                onTriggered: {
                    Qt.quit()
                }
            }
        }

        Menu {
            title: "编辑"

            Action {
                text: "撤销"
                icon.source: "assets/images/undoIcon.png"
                shortcut: StandardKey.Undo

                onTriggered: {
                    textId.text = "撤销"
                }
            }

            Action {
                text: "恢复"
                icon.source: "assets/images/redoIcon.png"
                shortcut: StandardKey.Redo

                onTriggered: {
                    textId.text = "恢复"
                }
            }

            MenuSeparator {}

            Action {
                text: "剪切"
                icon.source: "assets/images/cutIcon.png"
                shortcut: StandardKey.Cut

                onTriggered: {
                    textId.text = "剪切"
                }
            }

            Action {
                text: "复制"
                icon.source: "assets/images/copyIcon.png"
                shortcut: StandardKey.Copy

                onTriggered: {
                    textId.text = "复制"
                }
            }

            Action {
                text: "粘贴"
                icon.source: "assets/images/pasteIcon.png"
                shortcut: StandardKey.Paste

                onTriggered: {
                    textId.text = "粘贴"
                }
            }

            MenuSeparator {}

            Action {
                text: "查找"
                icon.source: "assets/images/findIcon.png"
                shortcut: StandardKey.Find

                onTriggered: {
                    textId.text = "查找"
                }
            }

            Action {
                text: "替换"
                icon.source: "assets/images/replaceIcon.png"
                shortcut: StandardKey.Replace

                onTriggered: {
                    textId.text = "替换"
                }
            }
        }
    }

    Text {
        id: textId
        anchors.centerIn: parent
        font.family: "楷体"
        font.pointSize: 32
    }
}
我们可以从阿里巴巴矢量图标库下载图标:https://www.iconfont.cn/
MenuItem与Action都可以充当菜单项,但当前版本中MenuItem没有shortcut快捷键属性,也许后续版本会加上这个属性。这里,我们使用
MenuItem是QtQuick.Controls模块中,这个模块中的MenuItem没有shortcut属性。但在 Qt 中还提供了一个Qt.labs.platform模块,该模块中是 Qt 5.8 中引入的实验性模块。在该模块中同样有MenuItem,在这个MenuItem中有shortcut属性。但这个模块不是Item的子类,但ApplicationWindow中的menuBar属性要求是Item的子类才行。因此,这里不推荐使用Qt.labs.platform模块,并且该模块的内容并不保证在后续版本中仍能保持兼容性。
三、工具栏
我们可以使用 ToolBar 类型来实现一个工具栏,ToolBar 一般放到 ApplicationWindow 的头部 header。工具栏中的控件可以使用一个 Row 或 RowLayout 来进行布局。工具栏上面的按钮一般使用 ToolButton 来创建,ToolButton 继承自 Button 控件,提供了一个更加适合工具栏的外观另外,可以使用 ToolSeparator 在工具栏进行项目分隔。
修改 template.qml 文件的内容。
import QtQuick.Window
import QtQuick.Controls

// ApplicationWindow控件表示一个主窗口
// 在QML中,元素是通过大括号{}内的属性来配置的。
ApplicationWindow {
    width: 800                                                                  // 窗口的宽度
    height: 600                                                                 // 窗口的高度
    visible: true                                                               // 显示窗口
    color: "lightgray"                                                          // 窗口的背景颜色

    // 菜单栏
    menuBar: MenuBar {
        Menu {
            title: "文件"                                                       // 菜单标题

            // 添加Action充当菜单项
            Action {
                id: openFileActionId
                text: "打开文件"                                                // 菜单项的文本
                icon.name: "document-open"                                      // 菜单项的图标
                shortcut: StandardKey.Open                                      // 菜单项的快捷键

                onTriggered: {
                    textId.text = "打开文件"
                }
            }

            Action {
                id: newFileActionId
                text: "新建文件"
                icon.name: "document-new"
                shortcut: StandardKey.New

                onTriggered: {
                    textId.text = "新建文件"
                }
            }

            Action {
                id: saveFileActionId
                text: "保存文件"
                icon.name: "document-save"
                shortcut: StandardKey.Save

                onTriggered: {
                    textId.text = "保存文件"
                }
            }

            Action {
                id: saveAsFileActionId
                text: "文件另存为"
                icon.name: "document-save-as"
                shortcut: StandardKey.SaveAs

                onTriggered: {
                    textId.text = "文件另存为"
                }
            }

            MenuSeparator {}

            Action {
                id: exitActionId
                text: "退出"
                icon.name: "application-exit"

                shortcut: Shortcut {
                    sequences: ["Ctrl+Q", "Esc"]                                // 快捷键序列,按Ctrl+Q或者Esc都会触发

                    // 按下快捷键序列中的任意一个快捷键时触发
                    onActivated: {
                        exitActionId.trigger()                                  // 调用退出菜单的触发函数
                    }
                }

                onTriggered: {
                    Qt.quit()
                }
            }
        }
    }

    // 页眉添加工具栏
    header: ToolBar {
        Row {
            anchors.fill: parent

            // 添加工具栏按钮
            ToolButton {
                action: openFileActionId
            }

            ToolButton {
                action: newFileActionId
            }

            ToolButton {
                action: saveFileActionId
            }

            ToolButton {
                action: saveAsFileActionId
            }

            // 添加工具栏分隔符
            ToolSeparator {}

            ToolButton {
                action: exitActionId
            }
        }
    }

    Text {
        id: textId
        anchors.centerIn: parent
        font.family: "楷体"
        font.pointSize: 32
    }
}
四、状态栏
我们可以定义一个 Item 放入 ApplicationWindow 的底部 footer 充当状态栏。
修改 template.qml 文件的内容。
import QtQuick.Window
import QtQuick.Controls

// ApplicationWindow控件表示一个主窗口
// 在QML中,元素是通过大括号{}内的属性来配置的。
ApplicationWindow {
    id: windowId
    width: 800                                                                  // 窗口的宽度
    height: 600                                                                 // 窗口的高度
    visible: true                                                               // 显示窗口
    color: "lightgray"                                                          // 窗口的背景颜色

    property int count: 3                                                       // 选项卡的数量

    // 创建页脚,一般用于显示状态信息
    footer: TabBar {
        id: tabBarId

        currentIndex: swipeViewId.currentIndex                                  // 当前选中的选项卡索引

        // Repeater是一个用于根据模型(通常是列表或数组)动态生成一组子元素的有用工具
        Repeater {
            // 定义了数据源,通常是一个列表或数组。
            model: windowId.count                                               // 设置重复的次数

            // 定义了如何显示模型中的每个项目,它是一个包含要实例化的 QML 元素的组件。
            // 创建一个选项卡按钮
            delegate: TabButton {
                // TabBar中的附加属性index保存了TabBar中每个子条目的索引
                text: "页面 " + index
                font.pointSize: 14
            }
        }
    }

    SwipeView {
        id: swipeViewId
        anchors.fill: parent

        currentIndex: tabBarId.currentIndex                                     // 当前显示的页面索引

        // Repeater是一个用于根据模型(通常是列表或数组)动态生成一组子元素的有用工具
        Repeater {
            // 定义了数据源,通常是一个列表或数组。
            model: windowId.count                                               // 设置重复的次数

            // 定义了如何显示模型中的每个项目,它是一个包含要实例化的 QML 元素的组件。
            delegate: Page {
                Label {
                    // SwipeView中的附加属性index保存了SwipeView中每个子条目的索引
                    text: "页面 " + index
                    font.pointSize: 32
                    anchors.centerIn: parent
                }
            }
        }
    }
}

 浙公网安备 33010602011771号