
前言:
Docker是1种小型虚拟主机,那么Docker和KVM虚拟机主机之间有什么区别和联系?Docker的应用场景是什么呢?
Docker实现依赖以下3种技术
- Linux内核的Namespace实现了环境隔离
- Cgroup实现了系统资源限制
- UnionFS联合文件的写时复制特性系统实现了镜像分层
Docker比虚拟机:更加轻量级、秒级即可启动、只要操作系统支持LXC技术,有doker服务,就可以跨主机到处运行。
Docker镜像的分层设计思想,给我感觉就是非常灵活,非常适用于To B的产品的部署;
一、Docker VS VM
Docker是什么以及和KVM的区别?
1.Docker概念

Docker基于Linux内核的2大特性实现
- Namespace:隔离进程的UTS、IPC、PID、Network、Mount、User系统资源。
- Cgroup:ControlGroups把进程放到组里面,通过对组设置权限,进而限制进程对系统资源的使用。
2.Docker的设计理念
快速地构建(build)、运输(ship)、运行(running)系统环境
1个容器=1个在前台运行的进程。如果我就想在同1个容器里运行多个进程呢?那就让1个supervisor管理N个进程。
3.Docker的架构
Docker是C/S 架构 Docker server 是服务端,我们执行的Docker命令就是操作客户端;


[root@localhost zhanggen]# docker images
REPOSITORY          TAG                 IMAGE ID            CREATED             SIZE

-----------------------------------------------------------
[root@localhost zhanggen]# systemctl status docker
● docker.service - Docker Application Container Engine
   Loaded: loaded (/usr/lib/systemd/system/docker.service; disabled; vendor preset: disabled)
   Active: active (running) since Wed 2019-03-20 15:19:16 CST; 6min ago
     Docs: https://docs.docker.com
 Main PID: 55180 (dockerd)
   Memory: 75.6M
   CGroup: /system.slice/docker.service
           └─55180 /usr/bin/dockerd -H fd:// --containerd=/run/containerd/containerd.sock
 f
f
4.论Docker and kvm
Docker Server 挂了所有的Docker容器都会挂掉 (kvm的管理软件 和libvirtd完全隔离)
kvm是在内核级别完全虚拟化出来的虚拟机 虚拟机之间完全隔离
Docker 容器是在操作系统层面进行的资源的隔离
Docker和KVM都可以进行状态的回滚


5.Docker的优势和应用场景
简化了系统配置、减少了代码和系统环境间的依赖性(运行别人的代码还要部署别人的运行环境)
代码流水线管理 代码开发---->代码测试----》代码到生产 一个Docker容器搞定
减少开发部署系统环境工作,提高开发效率。
Docker容器和虚拟机相比可以快速得运行起来
面向产品:把自己的系统运行环境+代码打包进Docker容器,直接完产品交付;
面向开发:做为一个python开发我再也不用去装什么Python3、pip、Nginx了,我只关心我的代码怎么写?
面向测试:测试的时候不用搭建多套系统环境了
面向运行:环境一致性,系统环境可以回滚
面向架构:自动化扩容
{
"registry-mirrors": ["https://pee6w651.mirror.aliyuncs.com"]
}
查看Docker日志
这个很关键,遇到报错一定不要心浮气躁,也不要直接去百度搜索报错内容, 科学的做法是:看日志-----》锁定问题-----》解决问题
[root@localhost zhanggen]# journalctl -xe
Mar 20 14:28:31 localhost.localdomain polkitd[582]: Registered Authentication Agent for unix-process:55506:719734 (system bus name :1.510 [/
Mar 20 14:28:31 localhost.localdomain systemd[1]: Starting Docker Storage Setup...
-- Subject: Unit docker-storage-setup.service has begun start-up
-- Defined-By: systemd
-- Support: http://lists.freedesktop.org/mailman/listinfo/systemd-devel
--
-- Unit docker-storage-setup.service has begun starting up.
Mar 20 14:28:31 localhost.localdomain container-storage-setup[55512]: INFO: Volume group backing root filesystem could not be determined
Mar 20 14:28:31 localhost.localdomain systemd[1]: Started Docker Storage Setup.
-- Subject: Unit docker-storage-setup.service has finished start-up
-- Defined-By: systemd
-- Support: http://lists.freedesktop.org/mailman/listinfo/systemd-devel
--
-- Unit docker-storage-setup.service has finished starting up.
--
-- The start-up result is done.
Mar 20 14:28:31 localhost.localdomain systemd[1]: Starting Docker Application Container Engine...
-- Subject: Unit docker.service has begun start-up
-- Defined-By: systemd
-- Support: http://lists.freedesktop.org/mailman/listinfo/systemd-devel
--
-- Unit docker.service has begun starting up.
Mar 20 14:28:31 localhost.localdomain dockerd-current[55557]: unable to configure the Docker daemon with file /etc/docker/daemon.json: inval
Mar 20 14:28:31 localhost.localdomain systemd[1]: docker.service: main process exited, code=exited, status=1/FAILURE
Mar 20 14:28:31 localhost.localdomain systemd[1]: Failed to start Docker Application Container Engine.
-- Subject: Unit docker.service has failed
-- Defined-By: systemd
-- Support: http://lists.freedesktop.org/mailman/listinfo/systemd-devel
--
-- Unit docker.service has failed.
--
-- The result is failed.
Mar 20 14:28:31 localhost.localdomain systemd[1]: Unit docker.service entered failed state.
Mar 20 14:28:31 localhost.localdomain systemd[1]: docker.service failed.
Mar 20 14:28:31 localhost.localdomain polkitd[582]: Unregistered Authentication Agent for unix-process:55506:719734 (system bus name :1.510,
查看Docker版本
[root@localhost zhanggen]# docker version
Client:
 Version:         1.13.1
 API version:     1.26
 Package version:
Cannot connect to the Docker daemon at unix:///var/run/docker.sock. Is the docker daemon running?
源码安装
#!/bin/bash
project_volume=/mingde_project
image_name="modelsystem:2.0"
container_name="modelsystem"

read -r -p "Are you sure that docker have not been installed? [Yes/No] " confirmation1

echo $confirmation1
if [[ "$confirmation1" != "Yes" ]];then
echo "Bye Bye.."
exit 0
fi
\cp -rf ../plugins/docker/* /usr/bin/
\cp -rf ../plugins/docker.service /usr/lib/systemd/system/
mkdir -p $project_volume && \cp -rf ../project/* $project_volume
systemctl daemon-reload
systemctl start docker
echo "Docker have installed successfully"

for i in ../images/*;do docker load < $i;done
#docker/docker load < ../images/modelsystem.tar
check_conflict=$(docker ps -a -q --filter ancestor=$image_name)
if [[ $check_conflict != "" ]]
then
docker rm -f $(docker ps -a -q --filter ancestor=$image_name)
fi
docker run -d -p 8099:8099 -v $project_volume:/mingde --name $container_name $image_name
卸载Docker
#!/bin/sh
/usr/bin/systemctl daemon-reload
echo '关闭docker服务....'
echo '删除docker.service...'
echo '删除docker文件...'
rm -rf /mingde_project
rm -rf /usr/lib/systemd/system/docker.service
for file in ../plugins/docker/*
do rm -rf /usr/bin/${file##*/}
done
#rm -rf /usr/lib/systemd/system/docker.service
#rm -rf /usr/bin/containerd
#rm -rf /usr/bin/containerd-shim
#rm -rf /usr/bin/ctr
#rm -rf /usr/bin/docker
#rm -rf /usr/bin/dockerd
#rm -rf /usr/bin/docker-init
#rm -rf /usr/bin/docker-proxy
#rm -rf /usr/bin/runc
echo '删除docker文件...'
echo '重新加载配置文件'
/usr/bin/systemctl daemon-reload
echo '卸载成功...'
7.离线二进制安装Docker
目前我们主要开展To B业务,客户环境大多都是在内网,那么离线安装Docker就成了我需要解决的问题;
我的要求:最大限度地保持客户环境安装目录的整洁和规范,把Dockerd做成系统服务,可通过systemctl 进行启停管理并开机自启动。
以下是我的部署方案:
- 把Docker二进制包都放在了自定义的目录下(/mingde/Docker)而不是/usr/bin,
- 在/etc/profile.d目录下新增系统环境变量配置;
- 在systemd的Docker.service中新增Environment=PATH=$PATH:/mingde/Docker配置,以便让sysytemd启动Dockerd前,可以加载到我在步骤2设置的系统环境变量。
/etc/profile.d/Docker.sh
export PATH=$PATH:/mingde/Docker
export PATH
/etc/systemd/system/Docker.service
[Unit]
Description=Docker Application Container Engine
Documentation=https://docs.Docker.com
After=network-online.target firewalld.service
Wants=network-online.target

[Service]
Type=notify
# the default is not to use systemd for cgroups because the delegate issues still
# exists and systemd currently does not support the cgroup feature set required
# for containers run by Docker
Environment=PATH=$PATH:/mingde/Docker
ExecStart=/mingde/Docker/Dockerd --selinux-enabled=false --iptables=false
ExecReload=/bin/kill -s HUP $MAINPID
# Having non-zero Limit*s causes performance problems due to accounting overhead
# in the kernel. We recommend using cgroups to do container-local accounting.
LimitNOFILE=infinity
LimitNPROC=infinity
LimitCORE=infinity
# Uncomment TasksMax if your systemd version supports it.
# Only systemd 226 and above support this version.
#TasksMax=infinity
TimeoutStartSec=0
# set delegate yes so that systemd does not reset the cgroups of Docker containers
Delegate=yes
# kill only the Docker process, not all processes in the cgroup
KillMode=process
# restart the Docker process if it exits prematurely
Restart=on-failure
StartLimitBurst=3
StartLimitInterval=60s

[Install]
WantedBy=multi-user.target
最后重新加载systemd,然后把Dockerd服务变成系统服务。
[root@localhost Docker]# ls
containerd  containerd-shim  ctr  Docker  Dockerd  Docker-init  Docker-proxy  runc
[root@localhost Docker]# pwd
/mingde/Docker
[root@localhost Docker]# systemctl daemon-reload
[root@localhost Docker]# systemctl start Docker
[root@localhost Docker]# systemctl enable Docker
Created symlink from /etc/systemd/system/multi-user.target.wants/Docker.service to /etc/systemd/system/Docker.service.
[root@localhost Docker]# reboot
把redis也做成可以被systemct启动的进程
/etc/systemd/system/redis.service
[Unit]
Description=redis
After=network.target

[Service]
PIDFile=/var/run/redis_6379.pid
ExecStart=/mingde/redis-4.0.10/src/redis-server  /mingde/redis-4.0.10/redis.conf
ExecReload=/bin/kill -s HUP $MAINPID
ExecStop=/bin/kill -s QUIT $MAINPID
PrivateTmp=true

[Install]
WantedBy=multi-user.target
8.Docker的组件
Docker的组件分为:镜像image、容器container 、仓库(repository)
镜像:所有的Docker容器都是由镜像启动构建的
仓库:集中存放镜像,用户同网络访问仓库获得想要镜像 DockerHub,就是GitHub一样;
容器:就是由镜像创建的实例(简化版的Linux环境)
9.加速镜像源访问
"https://ustc-edu-cn.mirror.aliyuncs.com",
"http://hub-mirror.c.163.com",
"https://registry.aliyuncs.com"
二、Docker快速入门
从Docker的三大组件开始快速入门Docker;
1.Docker镜像管理
docker search可以去Docker Hub官网搜素镜像,当然也可以通过网页进行搜索;
[root@localhost zhanggen]# docker search centos
NAME                               DESCRIPTION                                     STARS               OFFICIAL            AUTOMATED
centos                             The official build of CentOS.                   5261                [OK]
ansible/centos7-ansible            Ansible on Centos7                              121                                     [OK]
jdeathe/centos-ssh                 CentOS-6 6.10 x86_64 / CentOS-7 7.5.1804 x86…   109                                     [OK]
consol/centos-xfce-vnc             Centos container with "headless" VNC session…   83                                      [OK]
imagine10255/centos6-lnmp-php56    centos6-lnmp-php56                              52                                      [OK]
centos/mysql-57-centos7            MySQL 5.7 SQL database server                   49
tutum/centos                       Simple CentOS docker image with SSH access      44
gluster/gluster-centos             Official GlusterFS Image [ CentOS-7 +  Glust…   40                                      [OK]
openshift/base-centos7             A Centos7 derived base image for Source-To-I…   39
centos/postgresql-96-centos7       PostgreSQL is an advanced Object-Relational …   37
kinogmt/centos-ssh                 CentOS with SSH                                 26                                      [OK]
centos/httpd-24-centos7            Platform for running Apache httpd 2.4 or bui…   22
openshift/jenkins-2-centos7        A Centos7 based Jenkins v2.x image for use w…   20
centos/php-56-centos7              Platform for building and running PHP 5.6 ap…   20
pivotaldata/centos-gpdb-dev        CentOS image for GPDB development. Tag names…   10
openshift/wildfly-101-centos7      A Centos7 based WildFly v10.1 image for use …   6
openshift/jenkins-1-centos7        DEPRECATED: A Centos7 based Jenkins v1.x ima…   4
darksheer/centos                   Base Centos Image -- Updated hourly             3                                       [OK]
pivotaldata/centos-mingw           Using the mingw toolchain to cross-compile t…   2
pivotaldata/centos                 Base centos, freshened up a little with a Do…   2
pivotaldata/centos-gcc-toolchain   CentOS with a toolchain, but unaffiliated wi…   1
blacklabelops/centos               CentOS Base Image! Built and Updates Daily!     1                                       [OK]
openshift/wildfly-81-centos7       A Centos7 based WildFly v8.1 image for use w…   1
smartentry/centos                  centos with smartentry                          0                                       [OK]
jameseckersall/sonarr-centos       Sonarr on CentOS 7
去Docker hub上下载镜像
[root@localhost zhanggen]# docker pull centos
Using default tag: latest
latest: Pulling from library/centos
8ba884070f61: Pull complete
Digest: sha256:8d487d68857f5bc9595793279b33d082b03713341ddec91054382641d14db861
Status: Downloaded newer image for centos:latest
[root@localhost zhanggen]# docker images
REPOSITORY          TAG                 IMAGE ID            CREATED             SIZE
centos              latest              9f38484d220f        6 days ago          2
Docker镜像保存为文件(镜像导出)
[root@localhost zhanggen]# docker save -o Centos.tart centos
[root@localhost zhanggen]# ls
Centos.tart  Desktop  Documents  Downloads  Music  Pictures  Public  Templates  Videos
文件还原为Docker镜像(镜像导入)
[root@localhost zhanggen]# docker load --input Centos.tar
Loaded image: centos:latest
[root@localhost zhanggen]#
删除Docker镜像
[root@localhost zhanggen]# docker rmi -f centos
Untagged: centos:latest
Untagged: centos@sha256:8d487d68857f5bc9595793279b33d082b03713341ddec91054382641d14db861
[root@localhost zhanggen]# docker images
REPOSITORY          TAG                 IMAGE ID            CREATED             SIZE
<none>              <none>              9f38484d220f        6 days ago          202MB
[root@localhost zhanggen]# docker pull centos
Using default tag: latest
latest: Pulling from library/centos
Digest: sha256:8d487d68857f5bc9595793279b33d082b03713341ddec91054382641d14db861
Status: Downloaded newer image for centos:latest
[root@localhost zhanggen]# docker images
REPOSITORY          TAG                 IMAGE ID            CREATED             SIZE
centos              latest              9f38484d220f        6 days ago          202MB
[root@localhost zhanggen]#
2.Docker容器管理
镜像的管理就是这些,主要还是自己可以构建镜像。
Docker run -d -p 3306:3306 --privileged=true --name=MysqlServer --restart=always -e MYSQL_ROOT_PASSWORD=zhanggen@123 -v $PWD/logs:/var/log/Docker -v $PWD/data:/var/lib/mysql -v $PWD/my.cnf:/etc/mysql/my.cnf -v /etc/localtime:/etc/localtime:ro mysql:5.7
------------------------------------------------------
[root@localhost zhanggen]# Docker run centos /bin/echo 'Hellow World!'
WARNING: IPv4 forwarding is disabled. Networking will not work.
Hellow World!!
[root@localhost zhanggen]# Docker ps
CONTAINER ID        IMAGE               COMMAND             CREATED             STATUS              PORTS               NAMES
[root@localhost zhanggen]#
PS:为什么 我运行了一个 echo 程序 Docker容器就马上停止了?
因为Docker容器默认会在Docker容器的前台运行1个进程,这个进程结束Docker,容器也随之停止了;(也许这就是它的一次性设计理念吧。。)
是不是很纳闷 为什么Docker运行的进程退出,容器怎么就退出了? 这就是Docker的理念---不可变基础设施理念!
Docker就是给进程做隔离使用的,不同于虚拟机,虚拟机才是给操作系统做隔离使用的;
Docker只是个容器 不是虚拟机!
[root@261f12e2d6e4 /]# cat /proc/cpuinfo
processor    : 0
vendor_id    : GenuineIntel
cpu family    : 6
model        : 78
model name    : Intel(R) Core(TM) i7-6500U CPU @ 2.50GHz
stepping    : 3
microcode    : 0x88
cpu MHz        : 2591.294
cache size    : 4096 KB
physical id    : 0
siblings    : 1
core id        : 0
cpu cores    : 1
apicid        : 0
initial apicid    : 0
fpu        : yes
fpu_exception    : yes
cpuid level    : 22
wp        : yes
flags        : fpu vme de pse tsc msr pae mce cx8 apic sep mtrr pge mca cmov pat pse36 clflush mmx fxsr sse sse2 ss syscall nx pdpe1gb rdtscp lm constant_tsc arch_perfmon nopl xtopology tsc_reliable nonstop_tsc eagerfpu pni pclmulqdq ssse3 fma cx16 pcid sse4_1 sse4_2 x2apic movbe popcnt tsc_deadline_timer aes xsave avx f16c rdrand hypervisor lahf_lm abm 3dnowprefetch arat fsgsbase tsc_adjust bmi1 avx2 smep bmi2 invpcid mpx rdseed adx smap clflushopt xsaveopt xsavec
bogomips    : 5184.39
clflush size    : 64
cache_alignment    : 64
address sizes    : 43 bits physical, 48 bits virtual
power management:
运行新的Docker --name (容器名称) myDocker -t (terminal 打开一个终端) -i (std input 打开标准输入 )
[root@localhost zhanggen]# docker run  --name mydocker -t -i centos /bin/bash
WARNING: IPv4 forwarding is disabled. Networking will not work.
[root@261f12e2d6e4 /]#
启动一个关闭的Docker容器
[root@localhost zhanggen]# docker start mydocker
mydocker
[root@localhost zhanggen]# docker ps -a
CONTAINER ID        IMAGE               COMMAND                  CREATED             STATUS                         PORTS               NAMES
261f12e2d6e4        centos              "/bin/bash"              About an hour ago   Up 7 seconds                                       mydocker
d0dd5f7a79e8        centos              "/bin/echo 'hellow I…"   About an hour ago   Exited (0) About an hour ago                       sharp_chandrasekhar
进如正在运行的容器看看
[root@localhost zhanggen]# docker attach mydocker
[root@261f12e2d6e4 /]#
删除所有容器
[root@localhost zhanggen]# docker rm -f e627d59e818c
e627d59e818c
[root@localhost zhanggen]# docker rm -f d0dd5f7a79e8
d0dd5f7a79e8
[root@localhost zhanggen]# docker ps -a
CONTAINER ID        IMAGE               COMMAND             CREATED             STATUS              PORTS               NAMES
[root@localhost zhanggen]#
[root@localhost /]# docker rm $(docker ps -aq)
eecdba33cb61
b2da31fc0100
06afb1402c3e
[root@localhost /]# docker ps -a
CONTAINER ID        IMAGE               COMMAND             CREATED             STATUS              PORTS               NAMES
[root@localhost /]#
删除已经停止的容器和镜像
Docker rm `Docker ps -a|grep Exited|awk '{print $1}'`
Docker rmi `Docker images | grep "none" | awk '{print $3}'`
3.进入正在运行中Docker容器的2种最佳方式
查看正在运行容器的进程
[root@localhost zhanggen]# docker inspect -f "{{.State.Pid}}" mydocker
64721
通过进程ID反复进入Docker容器
[root@localhost zhanggen]# nsenter -t 64721 -m -u -i -n -p
-bash: __vte_prompt_command: command not found
[root@261f12e2d6e4 /]#
为什么通过 nsenter -t 64721 -m -u -i -n -p 进入Docker容器exit之后不退出?
其实就是多开了一个bash进程
[root@localhost zhanggen]# nsenter -t 64721 -m -u -i -n -p
-bash: __vte_prompt_command: command not found
[root@261f12e2d6e4 /]# ps -ef
UID         PID   PPID  C STIME TTY          TIME CMD
root          1      0  0 08:43 pts/0    00:00:00 /bin/bash
root         28      0  0 08:49 pts/0    00:00:00 -bash        #其实就是多开了1个bash进程
root         42     28  0 08:52 pts/0    00:00:00 ps -ef
-bash: __vte_prompt_command: command not found
[root@261f12e2d6e4 /]# exit
logout
[root@localhost zhanggen]# nsenter -t 64721 -m -u -i -p
-bash: __vte_prompt_command: command not found
[root@261f12e2d6e4 /]#
Docker exec 在不进入Docker容器前提下 执行1个命令(一个程序)
root@localhost zhanggen]# docker exec mydocker whoami
root
[root@localhost zhanggen]# docker exec mydocker pwd
/
[root@localhost zhanggen]# docker exec mydocker ls
anaconda-post.log
bin
dev
etc
比如我们使用了某个镜像启动了Docker容器,但是没有运行成功,需要额外安装一些依赖。
[root@VM-0-5-centos /]# Docker run -d -p 8092:8099 -v /modManagerProject:/mingde --name ModManagerProject modelsystem:2.0
0ddfa1ad08f8b210df4f60da96d2c35ec78cdf4ddc55de66cd20a6eea7dc5110
[root@VM-0-5-centos /]# Docker exec ModManagerProject pip install Flask-SQLAlchemy==2.5.1
[root@VM-0-5-centos /]# Docker exec ModManagerProject pip install flask_cors
[root@VM-0-5-centos /]# Docker exec ModManagerProject ps -ef
UID        PID  PPID  C STIME TTY          TIME CMD
root         1     0  0 07:37 ?        00:00:00 /bin/sh -c sh /root/scripts/run.sh
root         6     1  0 07:37 ?        00:00:00 sh /root/scripts/run.sh
root         7     6  0 07:37 ?        00:00:00 uwsgi --ini /mingde/uwsgi/uwsgi.ini
root         8     7  0 07:37 ?        00:00:00 uwsgi --ini /mingde/uwsgi/uwsgi.ini
root         9     7  0 07:37 ?        00:00:00 uwsgi --ini /mingde/uwsgi/uwsgi.ini
root        10     7  0 07:37 ?        00:00:00 uwsgi --ini /mingde/uwsgi/uwsgi.ini
root        11     7  0 07:37 ?        00:00:00 uwsgi --ini /mingde/uwsgi/uwsgi.ini
root        12     7  0 07:37 ?        00:00:00 uwsgi --ini /mingde/uwsgi/uwsgi.ini
root        13     7  0 07:37 ?        00:00:00 uwsgi --ini /mingde/uwsgi/uwsgi.ini
root        14     7  0 07:37 ?        00:00:00 uwsgi --ini /mingde/uwsgi/uwsgi.ini
root        15     7  0 07:37 ?        00:00:00 uwsgi --ini /mingde/uwsgi/uwsgi.ini
root        16     7  0 07:37 ?        00:00:00 uwsgi --ini /mingde/uwsgi/uwsgi.ini
root        35     0  0 07:39 ?        00:00:00 ps -ef
[root@VM-0-5-centos /]# Docker exec ModManagerProject uwsgi --reload /mingde/uwsgi/uwsgi.ini
[root@VM-0-5-centos /]# Docker stop  ModManagerProject
ModManagerProject
[root@VM-0-5-centos /]# Docker start ModManagerProject
ModManagerProject
通过dcker exec 打开bash程序之间进入Docker容器
[root@localhost zhanggen]# docker exec -it mydocker /bin/bash
[root@261f12e2d6e4 /]# exit
exit
[root@localhost zhanggen]# docker images
REPOSITORY          TAG                 IMAGE ID            CREATED             SIZE
centos              latest              9f38484d220f        6 days ago          202MB
[root@localhost zhanggen]#
在宿主机后台运行Docker容器
[root@localhost zhanggen]# docker run --name my_nginx -d nginx
WARNING: IPv4 forwarding is disabled. Networking will not work.
3aafe4fe15248ec4cd526a1873b6fc1e50b9c87926f6504755ebd021f76f5d61
[root@localhost zhanggen]# docker ps
CONTAINER ID        IMAGE               COMMAND                  CREATED             STATUS              PORTS               NAMES
3aafe4fe1524        nginx               "nginx -g 'daemon of…"   4 seconds ago       Up 3 seconds        80/tcp              my_nginx
[root@localhost zhanggen]#
4.DockerPortainer
Docker提供了图形化界面的方式来管理Docker容器;
Docker pull portainer/portainer
查看镜像的架构
docker inspect --format='{{.Architecture}}' imagename:tag
arm64
2.2 启动portainer
#创建文件存储文件
Docker volume create portainer_data
#创建并启动容器 --restart=always   开机自动启动`
Docker run -d -p 9000:9000 --name=portainer --restart=always -v /var/run/Docker.sock:/var/run/Docker.sock -v portainer_data:/data portainer/portainer

5.docker create命令
在CI/CD流水线中docker create命令可以使流水线多个阶段保持同1个容器环境;
每次docker start只执行1条命令,命令执行完,容器就变成 Exited状态,然后才能docker start继续复用容器。
Jenkins这么做的目的就是在流水线不同阶段复用这1个容器,保证数据不丢失;
具体执行流程如下
1️⃣ docker create
- 创建容器 但不启动
build-container现在是Created状态
2️⃣ 第一次 docker start -ai(Checkout 阶段)
git clone运行- 执行完后容器自动退出(Exited)
3️⃣ 第二次 docker start -ai(Build 阶段)
mvn package运行- 执行完后容器再次退出(Exited)
4️⃣ 第三次 docker start -ai(Test 阶段)
mvn test运行- 执行完后容器又退出(Exited)
5️⃣ docker rm(Cleanup 阶段)
- 删除
build-container
二、Docker网络
Docker的网络模式包括
- Bridge模式
- Host模式
- Container模式
- None模式
其中Bridge是Docker默认的且最常用的网络模式,本文将阐述其原理;
1.同宿主机内容器间通信
当Docker安装之后会在运行宿主机上自动创建1个名称为Docker0的虚拟网卡Docker网桥),就像出现了1个交换机;
[root@localhost zhanggen]# ifconfig
docker0: flags=4163<UP,BROADCAST,RUNNING,MULTICAST>  mtu 1500
        inet 172.17.0.1  netmask 255.255.0.0  broadcast 172.17.255.255
        inet6 fe80::42:b4ff:fe4c:7745  prefixlen 64  scopeid 0x20<link>
        ether 02:42:b4:4c:77:45  txqueuelen 0  (Ethernet)
        RX packets 0  bytes 0 (0.0 B)
        RX errors 0  dropped 0  overruns 0  frame 0
        TX packets 3  bytes 258 (258.0 B)
        TX errors 0  dropped 0 overruns 0  carrier 0  collisions
如下图Docker的Brige模式使用Docker网桥和veth-pair实现同宿主机中容器的互联;
2.Docker跨宿主机通信
默认情况下,容器内的应用访问外部网络是通过宿主机上的Docker网桥来实现的。
2.1.配置ipv4.ip_forward
当容器内的应用需要访问外部网络时,需要网桥将Docker流量通过ipv4-ip_forward转发至Docker宿主机的物理网卡。
执行以下指令可以确定宿主机的 Linux是否开启了IP 数据包转发功能。
配置centos7开启ipv4.ip_forward转发并重启网卡
net.ipv4.ip_forward=1
2.2.SNAT技术
Docker宿主机的网络栈接收到请求后,宿主机的网络配置设置了SNAT;
SNAT将容器内部的源IP地址转换为宿主机的IP地址,宿主机上的网络栈将根据自己的路由表和网络配置,将请求转发到外部网络,同时以便响应返回时能正确到达容器;
开启随机端口访问
[root@localhost zhanggen]# vim /usr/lib/sysctl.d/00-system.conf
[root@localhost zhanggen]# docker run -d -P nginx
06afb1402c3eb177dbae8b72cd94be90c63713ce73a1bac7ab8f85ecdae50caa
[root@localhost zhanggen]# docker ps
CONTAINER ID        IMAGE               COMMAND                  CREATED             STATUS              PORTS                   NAMES
06afb1402c3e        nginx               "nginx -g 'daemon of…"   11 seconds ago      Up 9 seconds        0.0.0.0:32769->80/tcp   zen_hellman
指定端口进行访问
[root@localhost zhanggen]# docker run --name mydocker -d -p 8001:80 nginx
b2da31fc010033f378e0930a2b77cec498ba6cbc1d288353562e3d0c6b23ae3c
[root@localhost zhanggen]#
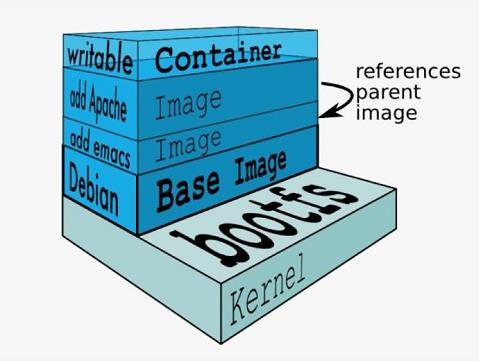
三、Docker镜像分层
说到Docker的数据管理,首先得清楚Docker镜像的分层存储结构?
Docker镜像是采用分层结构存储的;
- Docker镜像层是不可读+不可写的
- Docker容器层是可读+可写的

1个Docker镜像是由多层可读的镜像层组成;
运行的容器会在Docker的镜像上面多加1层可写的容器层,任何的对文件的更改都只存在此容器层。
对容器的任何操作均不会影响底层其他的到镜像;
联合文件系统
容器如何获取镜像层文件而又不影响到是镜像层的呢?
Docker是这样实现的?
如果需要获取某个文件,容器会从上到下,去下一层的镜像层去获取文件,如果该层文件不存在,那么就会继续往下一镜像层去寻找,直到最后一层。
对于用户而言,用户面向的是一个叠加后的文件系统。
优势
Docker镜像使用叠加文件系统分层构建实现了多容器间文件系统的隔离(Docker容器的数据隔离);
由于多个Docker容器通常共享1个基础镜像层,加速了Docke容器启动;
劣势
一旦底层的镜像层出现问题,将会影响多个上层镜像,进而影响多个Docker容器;
挂载卷
我们把宿主机中的一个目录mount 到Docker容器的一个目录里面,Docker容器运行中产生的数据写得宿主机的目录里;
[root@localhost zhanggen]# docker run -d --name nginx-volume -v /data nginx
70d688ad2c40e4490d05da0fa8bdbc0cc342315f1bbc61e7a63d4422832512c5
如果你想知道Docker容器的 /data目录到底挂载到宿主机的哪个目录上了?
[root@localhost zhanggen]# docker run -d --name nginx-volume -v /data nginx
70d688ad2c40e4490d05da0fa8bdbc0cc342315f1bbc61e7a63d4422832512c5
[root@localhost zhanggen]# docker inspect -f {{.Mounts}} nginx-volume
[{volume 4fbd49850452bcca0a867f09776f716b137c5f13f5a8b8a3a5e84e26496f9fcd /var/lib/docker/volumes/4fbd49850452bcca0a867f09776f716b137c5f13f5a8b8a3a5e84e26496f9fcd/_data /data local  true }]
[root@localhost zhanggen]# ls
Centos.tart  Desktop  Documents  Downloads  Music  Pictures  Public  Templates  Videos
[root@localhost zhanggen]# cd /var/lib/docker/volumes/4fbd49850452bcca0a867f09776f716b137c5f13f5a8b8a3a5e84e26496f9fcd/_data
[root@localhost _data]# pwd
/var/lib/docker/volumes/4fbd49850452bcca0a867f09776f716b137c5f13f5a8b8a3a5e84e26496f9fcd/_data
[root@localhost _data]# ls
[root@localhost _data]#
root@localhost _data]# docker inspect -f {{.Mounts}} nginx-volume
[{volume 4fbd49850452bcca0a867f09776f716b137c5f13f5a8b8a3a5e84e26496f9fcd /var/lib/docker/volumes/4fbd49850452bcca0a867f09776f716b137c5f13f5a8b8a3a5e84e26496f9fcd/_data /data local  true }]
[root@localhost _data]# pwd
/var/lib/docker/volumes/4fbd49850452bcca0a867f09776f716b137c5f13f5a8b8a3a5e84e26496f9fcd/_data
[root@localhost _data]# touch 草你妈王X聪
[root@localhost _data]# docker exec -it nginx-volume /bin/bash
root@70d688ad2c40:/# ls
bin  boot  data  dev  etc  home  lib  lib64  media  mnt  opt  proc  root  run  sbin  srv  sys  tmp  usr  var
root@70d688ad2c40:/# cd d
data/ dev/
root@70d688ad2c40:/# cd data/
root@70d688ad2c40:/data# ls
FUCK_WANGSICHONGTAMA  ??????????????????
root@70d688ad2c40:/data#
在生产环境我们一般会自己创建一个目录 在挂载到Docker目录里
[root@localhost _data]# docker run -d --name nginx-volume -v  /data/docker/volume-nginx/:/data nginx
09fc60548e01040805d6de92ace28062055a91eb832129b075e7e2605c149b45
[root@localhost _data]# docker exec -it nginx-volume /bin/bash
root@09fc60548e01:/# ls
bin  boot  data  dev  etc  home  lib  lib64  media  mnt  opt  proc  root  run  sbin  srv  sys  tmp  usr  var
root@09fc60548e01:/# cd data/
root@09fc60548e01:/data# ls
root@09fc60548e01:/data# echo 'sss' > Martin.txt
root@09fc60548e01:/data# ls
Martin.txt
root@09fc60548e01:/data# cat Martin.txt
sss
root@09fc60548e01:/data# exit
exit
[root@localhost _data]# pwd
/var/lib/docker/volumes/4fbd49850452bcca0a867f09776f716b137c5f13f5a8b8a3a5e84e26496f9fcd/_data
[root@localhost _data]# cd /data/docker/volume-nginx/
[root@localhost volume-nginx]# ls
Martin.txt
[root@localhost volume-nginx]# cat Martin.txt
sss
[root@localhost volume-nginx]#
挂载卷管理
无论容器是否运行、关闭的状态,容器之间都可以共享容器卷数据;(NFS)
使用--volumes-from 指定要和哪个容器共享容器卷
[root@localhost volume-nginx]# docker ps
CONTAINER ID        IMAGE               COMMAND                  CREATED             STATUS              PORTS               NAMES
09fc60548e01        nginx               "nginx -g 'daemon of…"   16 minutes ago      Up 16 minutes       80/tcp              nginx-volume
[root@localhost volume-nginx]# docker run -it --name volume-test --volumes-from nginx-volume centos /bin/bash
[root@c16407be0cf4 /]# ls data/
Martin.txt
[root@c16407be0cf4 /]# exit
exit
[root@localhost volume-nginx]# docker ps
CONTAINER ID        IMAGE               COMMAND                  CREATED             STATUS              PORTS               NAMES
09fc60548e01        nginx               "nginx -g 'daemon of…"   18 minutes ago      Up 18 minutes       80/tcp              nginx-volume
[root@localhost volume-nginx]# docker exec -it nginx-volume /bin/bash
root@09fc60548e01:/# ls data/
Martin.txt
root@09fc60548e01:/#
生成环境:一般都会起 1个专门的容器挂载到宿主机的1个目录上,以后其他容器都 通过 --volumes-from 该容器 的形式来达到容器卷数据共享的效果;
四、Docker镜像的构建
Docker镜像是Docker可以传播的介质,那么如何制作自己的Docker镜像?分为如下2种方式:
手动构建
自己在容器里面做操作,操作完毕之后,commit成自己的镜像,
Dockerfile构建
执行Docker中定义命令进行快速构建,自动化化分水平高,相比容器较为轻量,对镜像的定义比较透明,更易于传播;
最后还会谈谈我在生产环境中使用Dockerfile的经验。

1.Makefile+Dockerfile构建镜像
Dockerfile可以透明Docker镜像的构建过程,但是docker build时,传了哪些build-arg?指定了哪些tag?
注意:Makefile的换行要使用tab键,不是空格。
IMAGE_NAME=xxx.com/xxxx-docker/base/build/go-builder
LAST_TAG=201705231600
CURRENT_TAG=20180418150405
CURRENT_TAG_ART=$(CURRENT_TAG)-artifactory

default: build

build:
        docker build --build-arg LAST_IMAGE=$(IMAGE_NAME):$(LAST_TAG) -t $(IMAGE_NAME):$(CURRENT_TAG) .
        docker build --build-arg LAST_IMAGE=$(IMAGE_NAME):$(LAST_TAG) -t $(IMAGE_NAME):$(CURRENT_TAG_ART) .

push:
        docker push $(IMAGE_NAME):$(CURRENT_TAG)
        docker push $(IMAGE_NAME):$(CURRENT_TAG_ART)

run:
        docker run --rm -it $(IMAGE_NAME):$(CURRENT_TAG) bash
        docker run --rm -it $(IMAGE_NAME):$(CURRENT_TAG_ART) bash
docker build命令会逐行读取Dockerfile中定义的每1条内容,并将Dockerfile的内容发送给 Docker 引擎;
Docker 引擎会逐行解析Dockerfile中的每1条指令构建出需要的镜像。
第一步
docker build客户端会将构建上下文(context)中的文件打包传给Docker daemon服务端。
如果context中有.dockerignore文件则会从上传列表中删除满足.dockerignore规则的文件。
注意:如果上下文中有相当多的文件,可以明显感受到整个文件发送过程。
这里有个例外,如果.dockerignore文件中有.dockerignore或者Dockerfile,docker build命令在排除文件时会忽略掉这2个文件。
如果指定了镜像的tag还会对repository和tag 进行验证。
第二步
docker build命令向Docker server发送 HTTP 请求,请求 Docker server 构建镜像,请求体中包含了需要的context 信息。
第三步
- Docker server接收到构建请求之后,会执行以下流程来构建镜像:
- 创建1个临时目录,并将构建上下文中的文件解压到该目录下
- 读取并解析Dockerfile并遍历其中的指令,根据命令类型分发到不同的模块去执行。
- Docker 构建引擎会为每1条指令创建1个临时容器然后在临时容器中执行指令最后commit 容器生成1个新的镜像层。
- 最后将所有指令构建出的镜像层合并,形成build的最后结果。最后1次commit 会生成的镜像ID即最终的镜像 ID。
3.Docker build缓存
为了提高构建效率,docker build默认会缓存已有的镜像层。
如果构建镜像时发现某个镜像层已经被缓存,就会直接使用该缓存镜像,而不用重新构建。
如果不希望使用缓存的镜像,可以在执行docker build命令时,指定--no-cache=true参数。
Docker匹配缓存镜像的规则:
- 遍历缓存中的基础镜像及其子镜像,检查这些镜像的构建指令是否和当前指令完全一致,如果不一样,则说明缓存不匹配。
- 对于ADD、COPY指令,还会根据文件的校验和 (checksum)来判断添加到镜像中的文件是否相同,如果不相同,则说明缓存不匹配。
- 这里要注意,缓存匹配检查不会检查容器中的文件。比如,当使用RUN apt-get -y update命令更新了容器中的文件时,缓存策略并不会检查这些文件,来判断缓存是否匹配。
可以通过docker history命令来查看镜像的构建历史
4.Multi-stage多阶段构建
在1个Dockerfile中可以使用多个FROM指令;
比如FROM可以从CI镜像获取已经构建好的制品(二进制文件、JAR文件),然后COPY到运行镜像运行;
多阶段构建利用了docker的构建缓存,节省构建镜像的时间和镜像占用磁盘空间;
FROM golang:1.23
WORKDIR /src
COPY <<EOF ./main.go
package main

import "fmt"

func main() {
  fmt.Println("hello, world")
}
EOF
RUN go build -o /bin/hello ./main.go

FROM scratch
COPY --from=0 /bin/hello /bin/hello
CMD ["/bin/hello"]
5.Dockerfile使用ARG
在Dockerfile中FROM指令可以直接使用ARG;
但是在RUN指令或者其他指令中,使用ARG需要把该ARG放在FROM指令下面;
ARG LAST_IMAGE
FROM ${LAST_IMAGE}
ARG ART_SOURCE_URL  #放在FROM指令下面,RUN指令才能使用ART_SOURCE_URL变量

RUN echo "deb ${ART_SOURCE_URL}/debian/ bullseye main contrib non-free" > /etc/apt/sources.list; \
        echo "deb $ART_SOURCE_URL/debian/ bullseye-updates main contrib non-free" >> /etc/apt/sources.list; \
        echo "deb $ART_SOURCE_URL/debian/ bullseye-backports main contrib non-free" >> /etc/apt/sources.list; \
        echo "deb $ART_SOURCE_URL/debian-security bullseye-security main contrib non-free" >> /etc/apt/sources.list
五、Docker file生产实践
Docker file go live
1.目录环境准备
[root@localhost Docker_image]# ls
apps  runtime  system
[root@localhost Docker_image]# tree
.
├── apps
│   └── work_order_api
├── runtime
│   ├── java
│   ├── php
│   └── python
└── system
    ├── centos
    └── centos-ssh
在架构设计里面有个分层设计的理念,我们也可把生产环境分为:系统层、运行环境层、业务层,这也符合Docker镜像分层思想;
Linux系统: centos、Ubuntu....
运行环境: Java 、Python 、PHP.....
App:API、WebAPP、BackGroundManagement ...
FROM指令
Dockerfile最大的亮点在于FROM;
1.镜像功能灵活扩展
有了FROM就可以基于不同的基础镜像,衍生出多种自定义的镜像,就和搭积木类似,分好层 可以灵活组装就好。
除此之前FROM还可以减小镜像的大小
2.OS层Docker file
FROM python:${SDK_VERSION}

ENV TZ=Asia/Shanghai
RUN set -eux; \
    sed -i 's%https://dl-cdn.alpinelinux.org%https://artifactory.ep.xxx.com/artifactory%g' /etc/apk/repositories; \
    apk add --no-cache \
            ca-certificates \
            vim \
            bash \
            tzdata \
            bind-tools \
            iproute2 \
            iputils \
            curl \
            wget \
            lsof \
            net-tools \
            less \
            zip \
            busybox-extras \
            gzip \
            grep \
            jq \
            unzip\
            --allow-untrusted;\
    rm -rf /var/lib/apt/lists/*; \
    rm -rf /var/cache/apk/*; \
    ln -snf /usr/share/zoneinfo/$TZ /etc/localtime; \
    echo $TZ > /etc/timezone; \
    pip config set global.index-url https:xxxx/simple;

CMD ["python"]
Debian Linux使用apt-get下载安装包
3.开发环境层Docker file (Python3.6.1)
[root@localhost python]# pwd
/Docker_image/runtime/python
[root@localhost python]# ls
Dockerfile  Python-3.6.1.tgz
[root@localhost python]#
FROM zhanggen/centos:v1

MAINTAINER Gen.Zhang

RUN yum -y install zlib-devel bzip2-devel openssl-devel ncurses-devel sqlite-devel readline-devel tk-devel gdbm-devel gcc automake autoconf libtool make db4-devel libpcap-devel xz-devel

RUN yum clean all

ADD Python-3.6.1.tgz /python_packages/

RUN mkdir -p /zhanggen/python3.6.1

RUN cd /python_packages/Python-3.6.1 && ./configure --prefix=/zhanggen/python3.6.1 && make && make install

RUN echo -e "PATH=$PATH:$HOME/bin:/zhanggen/python3.6.1/bin \n export PATH" > /etc/profile.d/python3.6.1.sh && source /etc/profile.d/python3.6.1.sh
构建python开发环境镜像
[root@localhost runtime]# cd python/
[root@localhost python]# ls
Dockerfile  Python-3.6.1.tgz
[root@localhost python]# docker build -t zhanggen/python3.6.1:v1 .
Sending build context to Docker daemon  22.54MB
Step 1/8 : FROM zhanggen/centos:v1
 ---> 9c10a3b17a66
Step 2/8 : MAINTAINER Gen.Zhang
 ---> Using cache
 ---> 4c630636d1f9
Step 3/8 : RUN yum -y install zlib-devel bzip2-devel openssl-devel ncurses-devel sqlite-devel readline-devel tk-devel gdbm-devel gcc automake autoconf libtool make db4-devel libpcap-devel xz-devel
 ---> Using cache
 ---> ff12b7d7dbd3
Step 4/8 : RUN yum clean all
 ---> Using cache
 ---> 32c615445b0a
Step 5/8 : ADD Python-3.6.1.tgz /python_packages/
 ---> Using cache
 ---> ac70242e584b
Step 6/8 : RUN mkdir -p /zhanggen/python3.6.1
 ---> Using cache
 ---> 426627a6cb1f
Step 7/8 : RUN cd /python_packages/Python-3.6.1 && ./configure --prefix=/zhanggen/python3.6.1 && make && make install
 ---> Using cache
 ---> d15daa242a06
Step 8/8 : RUN echo -e "PATH=$PATH:$HOME/bin:/zhanggen/python3.6.1/bin \n export PATH" > /etc/profile.d/python3.6.1.sh && source /etc/profile.d/python3.6.1.sh
 ---> Using cache
 ---> 20e32f2fde08
Successfully built 20e32f2fde08
Successfully tagged zhanggen/python3.6.1:v1
[root@localhost python]# pwd
/docker_image/runtime/python
4.APP层 Docker file(Django web app)
Docker容器只允许在前台 运行1个进程,我们如何破解?
Supervisor是Python开发的进程管理工具,可以同时开启、重启、关闭多个进程,可以启动1个Supervisor进程使用Supercisor启动、管理N个进程;
我发现Supervisor不仅可以统一管理进程,还可以规范进程的日志路径,规范了日志路径之后,就可以很方便得找得这些日志,进行数据分析;
[root@localhost web_application]# pwd
/Docker_image/apps/web_application
[root@localhost web_application]# ls
django_app  Dockerfile  requirements.txt  supervisord.conf  supervisor.ini
[root@localhost web_application]#
构建web app镜像所需要的文件
APP项目---自己写
ADD django_app/ /root/django_app/
ADD requirements.txt /root/django_app/

ADD supervisord.conf /etc/supervisord.conf
ADD supervisor.ini  /etc/supervisord.d/
RUN  /zhanggen/python3.6.1/bin/pip3 install -r /root/django_app/requirements.txt -i http://pypi.douban.com/simple --trusted-host pypi.douban.com

EXPOSE 22 8008

CMD ["/usr/bin/supervisord","-c","/etc/supervisord.conf"]
Django==1.11.4
nodaemon=true ; (start in foreground if true;default false)
配置supervisor需要启动的启动的 程序
ps:一定记得让supervisord进程 在前台运行(修改配置中件 nodaemon=true)
[program:django_project]
command=/zhanggen/python3.6.1/bin/python3  /root/django_app/manage.py runserver 0.0.0.0:8008
process_name=%(program_name)s
autostart=true
user=root
stdout_logfile=/tmp/app.log
stderr_logfile=/tmp/app.error


[program:sshd]
command=/usr/sbin/sshd -D
process_name=%(program_name)s
autostart=true
user=root
stdout_logfile=/tmp/sshd.log
stderr_logfile=/tmp/sshd.error
构建 web app镜像
Successfully built 73fbd9076308
Successfully tagged zhanggen/django_app:v1
[root@localhost web_application]# pwd
/docker_image/apps/web_application
[root@localhost web_application]# docker build -t zhanggen/django_app:v1 .
启动web app
[root@localhost web_application]# docker run --name my_django_app -d -p 8008:8008 -p 8022:22 zhanggen/django_app:v1
185c311d6a951e33fa01d64a332127cf9ad6d45b0ee60d018ab25be68c0a86bf
[root@localhost web_application]# docker ps
CONTAINER ID        IMAGE                    COMMAND                  CREATED             STATUS              PORTS                                          NAMES
185c311d6a95        zhanggen/django_app:v1   "/usr/bin/supervisor…"   7 seconds ago       Up 5 seconds        0.0.0.0:8008->8008/tcp, 0.0.0.0:8022->22/tcp   my_django_app
[root@localhost web_application]#
最后的最后
[root@localhost web_application]# docker images
REPOSITORY             TAG                 IMAGE ID            CREATED             SIZE
zhanggen/django_app    v1                  a25dd5479dd9        8 minutes ago       905MB
zhanggen/python3.6.1   v1                  20e32f2fde08        19 hours ago        882MB
zhanggen/centos        v1                  9c10a3b17a66        20 hours ago        300MB
[root@localhost web_application]# docker run --name my_django_app -d -p 8008:8008 -p 8022:22 zhanggen/django_app:v1
5.Dockerfile中cmd和entrypoint指令联系和区别
每1个Dockerfile只能生效1条CMD指令。如果指定了多条CMD指令,只有最后1条生效。
如果用户启动容器(Docker run image)时候指定了运行的命令,则会覆盖掉CMD指定的命令。
每1个Dockerfile中只能生效一个ENTRYPOINT指令,当有多个ENTRYPOINT指令时,只有最后1条生效。
如果用户启动容器(Docker run image)时指定了运行的命令,不会被Docker run输入的命令参数覆盖。(追加效果:Docker run命令之后的参数,会被当做参数传递给ENTRYPOINT,之后形成新的命令组合)
六、Harbor镜像仓库
镜像仓库是用来存储、管理和分发Docker镜像的远程服务器,Harbor、JFrog Artifactory都可以实现;
值得一提的是JFrogArtifactory是企业通用二进制制品库,其通用性较强可以存储docker镜像、Maven、npm、pip等依赖的构建;
1.Harbor
Docker利用docker login命令来校验用户镜像仓库的登录凭证,实际并不是真正意义上的登录(Web Login),仅仅是1种登录凭证的试探校验;

如果用户名密码正确,Docker则会把用户名、密码以及仓库域名等信息进行base64编码保存在Docker的配置文件中;
在Linux中文件路径是 ~/.docker/config.json配置文件中,从而作为拉取私有镜像的凭证。
docker login a.b.com -u "username" -p "password"
1.2.docker-credential-helper
查看/root/.docker/config.json文件
[root@vm ~]# cat .docker/config.json{ "auths": { "https://index.docker.io/v1/": { "auth": "zZW46a2luluZ2ZzZW4xMDI2Z2Za2" }, "hub.test.company.com": { "auth": "0xVWYWRtaW46zzOKhkaOeVpaGJ3bz0YUmhjbmt0VFds=" } }, "HttpHeaders": { "User-Agent": "Docker-Client/18.09.2 (linux)" }}
base64解码
echo 'zZW46a2luluZ2ZzZW4xMDI2Z2Za2' | base64 --decode
Docker直接将仓库的用户名密码明文保存在配置文件中非常不安全,除非用户每次在与镜像仓库交互完成之后手动执行docker logout删除;
这种明文密码很容易被他人窃取, Docker也考虑到这一点;
针对不同的平台,Docker提供了不同的辅助工具将仓库的登录凭证保存到远端其他安全系数高的存储中(例如Conjur);
package utils

import (
    "encoding/base64"
    "encoding/json"
    "fmt"
    "github.com/cyberark/conjur-api-go/conjurapi"
    "github.com/zxbyoyoyo/credential-helper/pkg/config"
    "github.com/zxbyoyoyo/credential-helper/pkg/consts"
    "github.com/zxbyoyoyo/credential-helper/pkg/types"
    "net/url"
    "strings"
)

func FetchDockerCredentials(cfg *config.Config) (string, error) {
    config := conjurapi.Config{
        ApplianceURL: cfg.ConjurApplianceURL,
        Account:      cfg.ConjurAccount,
        SSLCert:      cfg.ConjurSSLCert,
    }

    client, err := conjurapi.NewClientFromTokenFile(config, cfg.ConjurAuthnTokenFile)
    if err != nil {
        return "", err
    }

    NpmCredentials, err := client.RetrieveSecret(cfg.CONJUR_NPM_VARIABLE_ID)
    if err != nil {
        return "", err
    }
    return string(NpmCredentials), nil
}

func ParseDockerCredentials(base64Input string) (map[string]types.Credentials, error) {
    decoded, err := base64.StdEncoding.DecodeString(base64Input)
    if err != nil {
        return nil, fmt.Errorf("error decoding base64: %v", err)
    }

    var dockerConfig types.DockerConfig
    err = json.Unmarshal(decoded, &dockerConfig)
    if err != nil {
        return nil, fmt.Errorf("error decoding JSON: %v", err)
    }

    credentialsMap := make(map[string]types.Credentials)
    for serverURL, auth := range dockerConfig.Auths {
        decodedAuth, err := base64.StdEncoding.DecodeString(auth.Auth)
        if err != nil {
            return nil, fmt.Errorf("error decoding auth: %v", err)
        }

        authParts := strings.SplitN(string(decodedAuth), ":", 2)
        if len(authParts) != 2 {
            return nil, fmt.Errorf("invalid auth format for server: %s", serverURL)
        }

        credentialsMap[serverURL] = types.Credentials{
            ServerURL: serverURL,
            Username:  authParts[0],
            Secret:    authParts[1],
        }
    }

    return credentialsMap, nil
}

func FetchGitCredentials(cfg *config.Config) (string, error) {
    config := conjurapi.Config{
        ApplianceURL: cfg.ConjurApplianceURL,
        Account:      cfg.ConjurAccount,
        SSLCert:      cfg.ConjurSSLCert,
    }

    client, err := conjurapi.NewClientFromTokenFile(config, cfg.ConjurAuthnTokenFile)
    if err != nil {
        return "", err
    }

    gitCredentials, err := client.RetrieveSecret(cfg.ConjurGITVariableID)
    if err != nil {
        return "", err
    }
    return string(gitCredentials), nil
}

func ParseGitURLs(gitConfigs string) (map[string]*types.GitCredentials, error) {
    urls := strings.Fields(gitConfigs)
    credentials := make(map[string]*types.GitCredentials)

    for _, url := range urls {
        credential, err := parseGitURL(url)
        if err != nil {
            return nil, err
        }
        credentials[credential.Host] = credential
    }

    return credentials, nil
}

func parseGitURL(gitURL string) (*types.GitCredentials, error) {
    // URI解码
    decodedURL, err := url.QueryUnescape(gitURL)
    if err != nil {
        return nil, err
    }

    // 解析URL
    u, err := url.Parse(decodedURL)
    if err != nil {
        return nil, err
    }

    // 获取用户名和密码
    userInfo := u.User
    username := ""
    password := ""
    if userInfo != nil {
        username = userInfo.Username()
        password, _ = userInfo.Password()
    }

    // 构建 GitCredentials 结构体
    creds := &types.GitCredentials{
        Protocol: u.Scheme,
        Host:     u.Host,
        Path:     u.Path,
        Username: username,
        Password: password,
    }

    return creds, nil
}

func GetRegistryURL(serverURL string) (*url.URL, error) {
    sURL, err := url.Parse(consts.SecureScheme + serverURL)
    if err != nil {
        return &url.URL{}, fmt.Errorf("failed to parse server URL - %w", err)
    }

    return sURL, nil
}

func FetchNpnCredentials(cfg *config.Config) (string, error) {
    config := conjurapi.Config{
        ApplianceURL: cfg.ConjurApplianceURL,
        Account:      cfg.ConjurAccount,
        SSLCert:      cfg.ConjurSSLCert,
    }

    client, err := conjurapi.NewClientFromTokenFile(config, cfg.ConjurAuthnTokenFile)
    if err != nil {
        return "", err
    }

    npmCredentials, err := client.RetrieveSecret(cfg.ConjurNPMVariableID)
    if err != nil {
        return "", err
    }
    return string(npmCredentials), nil
}
2.Docker 添加--insecure-registry信任关系
如果Harbor设置Insecure Registries,代表忽略https的证书校验,但优先尝试https连接,
ExecStart=/usr/bin/dockerd --insecure-registry=192.168.226.159:80
检查是否docker的Insecure Registries配置是否生效
[root@ZZCXCSGLY180128170 changsha]# docker info | grep -A 20 -i insecure
 Insecure Registries:
  repos.cloud.test
  repos.devops.cmft
  reposkf.cloud.cmft
  repos-xpq.devops.cmft
  artifactory.devops.test
  repos-yltest-mgmt.cloud.test
  repos-zz.devops.cmft
  repos.cloud.cmft
  repos.devops.pay
  reposc.cloud.cmft
  repos-yl.devops.cmft
  repos-yltest-test.cloud.test
  newharbor.devops.test
  127.0.0.0/8
 Live Restore Enabled: false
 Product License: Community Engine

[root@ZZCXCSGLY180128170 changsha]#
3.首次使用Harbor需要先登录做一下认证 (Authenticating)
[root@localhost /]# docker login 192.168.226.159:80
Authenticating with existing credentials...
WARNING! Your password will be stored unencrypted in /root/.docker/config.json.
Configure a credential helper to remove this warning. See
https://docs.docker.com/engine/reference/commandline/login/#credentials-store

Login Succeeded
4.在提交到Harbor之前 要先对本地镜像进行 Docker tag
docker tag可以给当前docker镜像打标签;
1个docker镜像可以打多个tag标签;
如果当前docker镜像的tag名称=仓库地址/镜像名称:版本,docker push 就可以通过当前镜像的当前tag名称,把该docker镜像push到1个镜像仓库;
[root@localhost /]# docker tag 192.168.226.159/zhanggen/django_app:v1 192.168.226.159:80/zhanggen/django_app:v1
[root@localhost /]# docker push 192.168.226.159:80/zhanggen/django_app:v1
The push refers to repository [192.168.226.159:80/zhanggen/django_app]
1adfc5932576: Pushed
f35015fe99dc: Pushed
130d88c10146: Pushed
af1537967ae6: Pushed
8bc7239a5750: Pushed
4044728999b8: Pushed
7393a01b80a0: Pushed
8682a21900da: Pushed
4b12cdc82a32: Pushed
325cddbb1805: Pushed
5e3f3498e333: Pushed
9b0549f1a2e2: Pushed
5d14ce4c4502: Pushed
d7180aa9852e: Pushed
d69483a6face: Mounted from zhanggen/mycentos
v1: digest: sha256:9b4aaeb6d37466a92d3705b68b20c5bf27db1a21ef75456dd2433822b0bf5b60 size: 3457
5.Docker push ---->Harbor仓库
[root@localhost harbor]# docker login http://192.168.226.159:80
Username: admin
Password:
WARNING! Your password will be stored unencrypted in /root/.docker/config.json.
Configure a credential helper to remove this warning. See
https://docs.docker.com/engine/reference/commandline/login/#credentials-store

Login Succeeded
[root@localhost harbor]# docker push 192.168.226.159:80/zhanggen/mycentos:v1
The push refers to repository [192.168.226.159:80/zhanggen/mycentos]
d69483a6face: Pushed
v1: digest: sha256:ca58fe458b8d94bc6e3072f1cfbd334855858e05e1fd633aa07cf7f82b048e66 size: 529
[root@localhost harbor]#
6.Docker pull 本地 <--------Harbor仓库
Docker pull 命令用于从registry拉取(下载)镜像。
6.1.docker pull原理
尤其使用了registry代理之后经常出现很多pull失败的问题;
了解docker pull的原理可以快速定位故障;
docker pull 过程基于以下几个步骤:
如果只提供了镜像名称,Docker 会默认使用 Docker Hub 作为注册中心。如果包括标签(如 image:tag),则解析这个标签
6.1.2.检查本地是否存在镜像
如果本地已经存在同样的镜像和标签,则不会进行下载
6.1.3.从注册中心请求镜像manifest 列表
Docker 客户端向 Docker 注册中心(registry)发送请求,请求所需镜像的 manifest 列表。
6.1.4.下载镜像层
注册中心返回manifest 列表后,Docker 客户端开始下载所需的镜像层。每一层都是一个操作系统层或者中间层,包含了构建镜像所需的指令和文件系统变化
6.1.5.校验数据完整性
下载每1层后,Docker会校验数据的完整性,确保下载的内容与注册中心上的内容一致。
原因是远程Docker注册中心(registry)存储的镜像损坏了或当前代理没有存储该镜像,代理只转发下载请求;
- docker save 导出镜像 tar 包;
- 把 tar 包拷贝到机器上,docker load 加载镜像;
- docker push 更新仓库里的镜像
以下是一个简单的 docker pull 命令的例子:
[root@localhost /]# docker rmi 192.168.226.159:80/zhanggen/mycentos:v1
Untagged: 192.168.226.159:80/zhanggen/mycentos:v1
Untagged: 192.168.226.159:80/zhanggen/mycentos@sha256:ca58fe458b8d94bc6e3072f1cfbd334855858e05e1fd633aa07cf7f82b048e66
[root@localhost /]# docker pull 192.168.226.159:80/zhanggen/mycentos:v1
v1: Pulling from zhanggen/mycentos
Digest: sha256:ca58fe458b8d94bc6e3072f1cfbd334855858e05e1fd633aa07cf7f82b048e66
Status: Downloaded newer image for 192.168.226.159:80/zhanggen/mycentos:v1
[root@localhost /]# docker images
REPOSITORY                               TAG                 IMAGE ID            CREATED             SIZE
192.168.226.159/zhanggen/django_app      v1                  a25dd5479dd9        29 hours ago        905MB
192.168.226.159:80/zhanggen/django_app   v1                  a25dd5479dd9        29 hours ago        905MB
zhanggen/django_app                      v1                  a25dd5479dd9        29 hours ago        905MB
zhanggen/python3.6.1                     v1                  20e32f2fde08        2 days ago          882MB
zhanggen/centos                          v1                  9c10a3b17a66        2 days ago          300MB
192.168.226.159/zhanggen/mycentos        v1                  9f38484d220f        13 days ago         202MB
192.168.226.159:80/zhanggen/mycentos     v1                  9f38484d220f        13 days ago         202MB
centos                                   latest              9f38484d220f        13 days ago         202MB
goharbor/chartmuseum-photon              v0.8.1-v1.7.4       7e2272c02339        3 weeks ago         113MB
goharbor/harbor-migrator                 v1.7.4              968c31d07d2f        3 weeks ago         678MB
goharbor/redis-photon                    v1.7.4              611d1ead0a28        3 weeks ago         99.7MB
goharbor/clair-photon                    v2.0.7-v1.7.4       01090529ab14        3 weeks ago         165MB
goharbor/notary-server-photon            v0.6.1-v1.7.4       737518b1b943        3 weeks ago         135MB
goharbor/notary-signer-photon            v0.6.1-v1.7.4       495dc3326120        3 weeks ago         132MB
goharbor/harbor-registryctl              v1.7.4              723aed7bbf8d        3 weeks ago         102MB
goharbor/registry-photon                 v2.6.2-v1.7.4       f4743bd7b0d9        3 weeks ago         86.7MB
goharbor/nginx-photon                    v1.7.4              dda34e6afafe        3 weeks ago         35.9MB
goharbor/harbor-log                      v1.7.4              bf4916eef530        3 weeks ago         81.4MB
goharbor/harbor-jobservice               v1.7.4              1b6a0445ae9c        3 weeks ago         84.1MB
goharbor/harbor-core                     v1.7.4              e603b8750d26        3 weeks ago         95.6MB
goharbor/harbor-portal                   v1.7.4              2ca1d845cafa        3 weeks ago         40.6MB
goharbor/harbor-adminserver              v1.7.4              5706c65d65dc        3 weeks ago         72.3MB
goharbor/harbor-db                       v1.7.4              08d163f732f3        3 weeks ago         136MB
[root@localhost /]#
7.Harbor的 后台管理页面
默认登录密码:Harbor12345
from hashlib import pbkdf2_hmac

salt = "J6Duybf2UcRhKchR06VbJWimv31xrlnN"
plain_text_password = "Harbor12345"

# plain_text_password "plain text password"
# salt "salt field in database"
# password "password field in database"
# hash_name "password_version field in database"
# iterations "fixed value 4096 in code"
# dklen "fixed value 16 in code"
# https://github.com/goharbor/harbor/blob/release-2.11.0/src/common/utils/encrypt.go#L49
hash = pbkdf2_hmac(
    hash_name="sha256",
    password=plain_text_password.encode("utf-8"),
    salt=salt.encode("utf-8"),
    iterations=4096,
    dklen=16,
)
print(f"update harbor_user set salt='{salt}', password='{hash.hex()}' where user_id = 1;")
8.Harbor间镜像数据复制策略
我们不仅可以使用Docker push把本地的镜像推送到Harbor这些镜像仓库。
在2个Harbor仓库之间也可以配置基于定时任务/ 事件/手动的复制策略,执行镜像复制任务。
复制模式
复制模式指数据复制的方向

Push-based:从本Harbor 推送镜像至目标Harbor
Pull-based:从目标Harbor 拉取镜像到本Harbor,不支持基于事件触发。
触发模式
策略执行的时机,有手动/定时/事件。
如果目标仓库已经存在源仓库中镜像,可以选择不覆盖加速镜像复制速度。

9.Harbor的Proxy-Cache功能
在Harbor创建项目时可以选择启用镜像代理 :
一旦镜像代理项目在下游Harbor创建成功
当客户端docker pull该项目下镜像时
下游Harbor就会充当代理功能就上游Harbor拉取镜像缓存到本地,供Harbor客户端pull。
issue
https://github.com/goharbor/harbor/issues/18193
下游Harbor proxy cache项目名 + 上游Harbor的项目名 + 镜像名:tag,3者组合成完整路径,才能成功拉取镜像。
docker pull newharbor.devops.test/proxy-devops/devops/golang:1.18.6
docker images | grep golang
newharbor.devops.test/proxy-devops/devops/golang       1.18.6              8316a46deced        2 years ago         820MB
10.老Harbor下线策略
1.Harbor设置为只读模式
docker客户端可以login/pull镜像数据但是container客户端无法登录
2.设置Harbor的项目定额=1MIB
container客户端无法向Harbor上传镜像数据
3.客户端流量过滤
nginx-ingress-controller对应loadblancer service设置
kind: Service
apiVersion: v1
metadata:
  name: kubesphere-router-open-software
  namespace: open-software
  creationTimestamp: '2025-06-19T01:21:01Z'
  labels:
    app.kubernetes.io/component: controller
    app.kubernetes.io/instance: kubesphere-router-open-software
    app.kubernetes.io/managed-by: Helm
    app.kubernetes.io/name: ingress-nginx
    app.kubernetes.io/part-of: ingress-nginx
    app.kubernetes.io/version: 1.12.1
    helm.sh/chart: ingress-nginx-4.12.1-ks
  annotations:
    meta.helm.sh/release-name: kubesphere-router-open-software
    meta.helm.sh/release-namespace: open-software
    service.beta.kubernetes.io/qingcloud-load-balancer-eip-ids: ''
    service.beta.kubernetes.io/qingcloud-load-balancer-type: '0'
spec:
  ports:
    - name: http
      protocol: TCP
      appProtocol: http
      port: 80
      targetPort: http
      nodePort: 32373
    - name: https
      protocol: TCP
      appProtocol: https
      port: 443
      targetPort: https
      nodePort: 32431
  selector:
    app.kubernetes.io/component: controller
    app.kubernetes.io/instance: kubesphere-router-open-software
    app.kubernetes.io/name: ingress-nginx
  clusterIP: 10.233.22.31
  clusterIPs:
    - 10.233.22.31
  type: LoadBalancer
  sessionAffinity: None
  externalTrafficPolicy: Cluster
  ipFamilies:
    - IPv4
  ipFamilyPolicy: SingleStack
  allocateLoadBalancerNodePorts: true
  internalTrafficPolicy: Cluster
在nginx-ingress-controller对应的cm配置如下
kind: ConfigMap
apiVersion: v1
metadata:
  name: kubesphere-router-open-software
  namespace: open-software
  creationTimestamp: '2025-06-19T01:21:01Z'
  labels:
    app.kubernetes.io/component: controller
    app.kubernetes.io/instance: kubesphere-router-open-software
    app.kubernetes.io/managed-by: Helm
    app.kubernetes.io/name: ingress-nginx
    app.kubernetes.io/part-of: ingress-nginx
    app.kubernetes.io/version: 1.12.1
    helm.sh/chart: ingress-nginx-4.12.1-ks
  annotations:
    meta.helm.sh/release-name: kubesphere-router-open-software
    meta.helm.sh/release-namespace: open-software
data:
  allow-snippet-annotations: 'true'
  annotations-risk-level: Critical
  compute-full-forwarded-for: 'true'
  enable-real-ip: 'true'
  http-snippet: |

    #10.178.202和10.180.129.131

    map "$remote_addr$request_method" $deny_request {
    default 0;
    # 拒绝非白名单IP的敏感方法
    ~^((?!10\.178\.202\.|10\.180\.129\.).*)(DELETE|PUT|POST) 1;
    }

    # map "$remote_addr$request_method" $deny_request {
    # default 0;
    # ~^((?!10\.178\.202\.).*)DELETE 1;
    # ~^((?!10\.178\.202\.).*)PUT    1;
    # ~^((?!10\.178\.202\.).*)POST   1;
    # ~^((?!10\.180\.129\.).*)POST   1;
    # }

    log_format main '$remote_addr "青云1----" $remote_user [$time_local]

    "$request" '
                    '$status $body_bytes_sent "$http_referer" "$http_user_agent" '
                    '$request_length $request_time [$proxy_upstream_name] '
                    '[$proxy_alternative_upstream_name] $upstream_addr '
                    '$upstream_response_length $upstream_response_time '
                    '$upstream_status $req_id';
  real-ip-header: X-Forwarded-For
  server-snippet: |

    if ($deny_request) {
    return 403;
    }

    access_log /var/log/nginx/access.log main;
  set-real-ip-from: 0.0.0.0/0
  use-forwarded-headers: 'true'
  worker-processes: '4'
七.Docker实践总结
虽然结果只是build了3个镜像,但是我发现Docker 的优势在于它可以通过镜像的方式 把Linux系统、开发环境、代码 进行了分层, 我们可以把这些镜像 想象成一个个的积木,有了这些小积木,我们就可以在 实体机、甚至虚拟机里面 灵活、搭建出 各式各样的房子,分给不同需求的人,而且构建速度 快,构建的房子还可以轻易的搬到其他地方;
Docker是1种可以 灵活、快速得 构建出 多种不同得 开发、测试 环境的容器技术,Buddy.... 如果你的公司需要构建大量、不同的系统环境用Docker 吧!
如果你的代码需要在很多地方快速运行起来用Docker吧!
Build-----> Ship---->Run
1.Python调用Docker的API
介绍1个可用于调用Docker引擎 API 的 Python 库,它允许您执行Docker命令所做的任何事情。
可以在 Python 应用程序中执行——打包镜像、管理镜像、运行容器、管理容器、管理 Swarm 等操作。
from public import RecordLoggre
from docker.errors import NotFound
import docker
import os


class DockerApi:

    def __init__(self, harbor_domain, username, password):
        # self.Client = docker.DockerClient(base_url='tcp://127.0.0.1:2375')
        self.Client = docker.from_env()
        self.username = username
        self.password = password
        self.registry_domain = harbor_domain
        self.registry_url = f'https://{self.registry_domain}'
        self.record_log = RecordLoggre()

        login_sigin = 0
        while True:
            try:
                self.Client.login(username=self.username, password=self.password,
                                  registry=self.registry_url)
            except Exception as Error:
                self.record_log.error(str(Error), exc_info=True)
                login_sigin += 1
                if login_sigin >= 3:
                    raise Exception('docker auth error')
            else:
                break

    def build_image(self, work_space, image_url):
        """构建镜像并上传镜像"""
        os.chdir(work_space)
        try:
            build_result = self.Client.images.build(path=work_space, dockerfile='Dockerfile',
                                                    tag=image_url, rm=True, nocache=True,
                                                    forcerm=True, use_config_proxy=True)
        except Exception:
            self.record_log.error('创建镜像失败')
            raise Exception('Build image error!')
        else:
            self.record_log.info('构建镜像成功' + str(build_result))

        self.push_image(image_url)
        self.remove_image(image_url)

    def get_image(self, image_url):
        """获取远端镜像"""
        image_data = None
        try:
            image_data = self.Client.images.get_registry_data(image_url)
        except NotFound:
            self.record_log.warning(f'获取镜像{image_url}失败')
        except Exception as Error:
            self.record_log.error(f'{Error}', exc_info=True)
        return image_data

    def remove_image(self, image_url):
        """删除本地镜像"""
        try:
            self.Client.images.remove(image_url)
        except Exception as Error:
            self.record_log.error(f'{str(Error)}删除本地镜像{image_url}失败')
        else:
            self.record_log.info(f'删除本地镜像{image_url}成功')

    def pull_image(self, image_url):
        """下载镜像"""
        pull_count = 1
        while True:
            try:
                self.Client.images.pull(image_url)
            except Exception as Error:
                self.record_log.error(f'{str(Error)},下载镜像失败,次数{pull_count}', exc_info=True)
                if pull_count >= 3:
                    raise Exception('Pull image error')
            else:
                self.record_log.info('下载镜像成功')
                break
            pull_count += 1

    def push_image(self, image_url):
        """推送镜像"""
        push_count = 1
        while True:
            try:
                self.Client.images.push(image_url)
            except Exception as Error:
                self.record_log.error(f'{str(Error)},推送镜像失败,次数{push_count}', exc_info=True)
                if push_count >= 3:
                    raise Exception('Push image error')
            else:
                self.record_log.info('推送镜像成功')
                break
            push_count += 1

    def rename(self, image_url, repository, tag):
        """更改存存储库"""
        retry_count = 1
        while True:
            try:
                image_obj = self.Client.images.get(image_url)
                image_obj.tag(repository, tag)
            except Exception as Error:
                self.record_log.error(f'{str(Error)},更改存储库失败,次数{retry_count}', exc_info=True)
                if retry_count >= 3:
                    raise Exception('更改存储库失败')
            else:
                self.record_log.info('更改存储库成功')
                break
            retry_count += 1


if __name__ == '__main__':
    pass
2.Python调用Harbor的API
from public import RecordLoggre
from public.DockerApi import DockerApi
from datetime import datetime
import requests


class HarborApi:

    def __init__(self, harbor_domain, username, password):
        self.harbor_domain = harbor_domain
        self.harbor_api = f'https://{harbor_domain}/api/v2.0'
        self.username = username
        self.password = password

        self.req = requests.Session()
        self.req.auth = (self.username, self.password)
        # 记录日志
        self.record_log = RecordLoggre()

    def requests(self, url, method, **kwargs):
        """处理具体请求,获取错误"""
        req_result = {}
        req_func = getattr(self.req, method, 'get')
        try:
            response = req_func(url, **kwargs)
            status_code = response.status_code
        except Exception as Error:
            self.record_log.error(f'{str(Error)},url:{url},method:{method},kwargs:{str(kwargs)}', exc_info=True)
        else:
            if 200 <= status_code < 300:
                if status_code == 204:
                    req_result = response.text
                else:
                    try:
                        req_result = response.json()
                    except Exception:
                        pass
            else:
                self.record_log.error(f'状态码:{status_code},url:{url},返回结果:{str(req_result)},请求参数:{str(kwargs)}')
                req_result = {}
        finally:
            return req_result

    @staticmethod
    def change_repo(repo):
        return repo.replace('/', '%252F')


class HarborApiV233(HarborApi):

    def __init__(self, harbor_domain, username, password):
        super(HarborApiV233, self).__init__(harbor_domain, username, password)

    def list_repos(self, project, repo):
        """列出存储库的所有tags"""
        repo = self.change_repo(repo)
        page, page_size = 1, 20
        while True:
            url = f'{self.harbor_api}/projects/{project}/repositories/{repo}/artifacts'
            req_result = self.requests(url, 'get', params={'page': page, 'page_size': page_size})
            if len(req_result) > 0:
                for item in req_result:
                    yield item
                page += 1
            else:
                break

    def get_tag_list(self, project, repo):
        """获取镜像的tag列表"""
        tags_list = []
        for item in self.list_repos(project, repo):
            for tag in item.get('tags', []):
                name = tag.get('name')
                push_time = tag.get('push_time')
                if name and push_time:
                    tags_list.append((name, datetime.strptime(push_time, '%Y-%m-%dT%H:%M:%S.%fZ').timestamp()))
        sorted_list = sorted(tags_list, key=lambda x: x[1])
        return sorted_list

    def get_repo_list(self, project, repo):
        """获取镜像的artifacts列表"""
        tags_list = []
        for item in self.list_repos(project, repo):
            digest = item.get('digest')
            push_time = item.get('push_time')
            tags_list.append((digest, datetime.strptime(push_time, '%Y-%m-%dT%H:%M:%S.%fZ').timestamp()))
        sorted_list = sorted(tags_list, key=lambda x: x[1])
        return sorted_list

    def tag_exist(self, project, repo, tag):
        """获取单个tag是否存在"""
        repo = self.change_repo(repo)
        url = f'{self.harbor_api}/projects/{project}/repositories/{repo}/artifacts/{tag}/tags'
        req_result = self.requests(url, 'get')
        if len(req_result) == 1:
            return True
        else:
            return False

    def find_last_tag(self, project, repo):
        """获取最新的tag"""
        sorted_list = self.get_tag_list(project, repo)

        if len(sorted_list) == 0:
            raise Exception(f'从{project}/{repo}没找到镜像')
        else:
            return sorted_list[-1]

    def del_repo_tags(self, project, repo, tag):
        """删除对应tag的镜像"""
        repo = self.change_repo(repo)
        url = f'{self.harbor_api}/projects/{project}/repositories/{repo}/artifacts/{tag}'
        self.requests(url, 'delete')

    def clear_image(self, project, repo):
        """清理镜像保留最新10个,接口调不通,使用harbor自带的清理策略"""
        # sorted_list = self.get_repo_list(project, repo)
        # for item in sorted_list[:-10]:
        #     self.del_repo_tags(project, repo, item[0])
        ...


class HarborApiV122(HarborApi):
    """接口文档:https://github.com/goharbor/harbor/blob/release-1.2.0/docs/swagger.yaml"""

    def __init__(self, harbor_domain, username, password):
        super(HarborApiV122, self).__init__(harbor_domain, username, password)

    def get_tag_list(self, project, repo):
        """获取镜像的tag列表"""
        url = f'{self.harbor_api}/repositories/{project}/{repo}/tags'
        req_result = self.requests(url, 'get')
        tags_list = []
        if req_result:
            for item in req_result:
                name = item.get('name')
                push_time = item.get('created')
                if name and push_time:
                    tags_list.append((name, datetime.strptime(push_time[:19], '%Y-%m-%dT%H:%M:%S').timestamp()))
        sorted_list = sorted(tags_list, key=lambda x: x[1])
        return sorted_list

    def tag_exist(self, project, repo, tag):
        """获取单个tag是否存在"""
        url = f'{self.harbor_api}/repositories/{project}/{repo}/tags/{tag}'
        req_result = self.requests(url, 'get')
        return True if req_result else False

    def find_last_tag(self, project, repo):
        """获取最新的tag"""
        sorted_list = self.get_tag_list(project, repo)

        if len(sorted_list) == 0:
            raise Exception(f'从{project}/{repo}没找到镜像')
        else:
            return sorted_list[-1]

    def del_repo_tags(self, project, repo, tag):
        """删除对应tag的镜像"""
        url = f'{self.harbor_api}/repositories/{project}/{repo}/tags/{tag}'
        self.requests(url, 'delete')

    def clear_image(self, project, repo):
        """清理镜像保留最新10个"""
        sorted_list = self.get_tag_list(project, repo)
        for item in sorted_list[:-10]:
            self.del_repo_tags(project, repo, item[0])


def local_harbor():
    """本地镜像仓库"""
    harbor_domain, username, password = 'qa-roc.apuscn.com', 'admin', 'Harbor12345'
    harbor_api = HarborApiV233(harbor_domain, username, password)
    docker_api = DockerApi(harbor_domain, username, password)
    return harbor_api, docker_api


def sg_harbor():
    """新加坡镜像仓库"""
    harbor_domain, username, password = 'roc.apuscn.com', 'admin', 'Harbor12345'
    harbor_api = HarborApiV122(harbor_domain, username, password)
    harbor_api.harbor_api = f'https://{harbor_domain}/api'
    docker_api = DockerApi(harbor_domain, username, password)
    return harbor_api, docker_api


if __name__ == "__main__":
    pass
3.Python调用Minio的API
from public import RecordLoggre
from minio.commonconfig import CopySource
from minio import Minio
from datetime import timedelta
import time
import os


class MinioApi:

    def __init__(self, minio_server, access_key, secret_key, bucket):
        self.minio_client = Minio(
            minio_server,
            access_key=access_key,
            secret_key=secret_key,
            secure=False
        )
        self.bucket = bucket
        self.record_log = RecordLoggre()

    def list_objects(self, prefix):
        """
            获取存储对象
        """
        retry_count, result, object_list = 1, False, None
        while True:
            try:
                objects = self.minio_client.list_objects(self.bucket, prefix=prefix, recursive=True)
            except Exception as error:
                self.record_log.error(error, exc_info=True)
            else:
                if objects:
                    result = True
                    object_list = objects
            finally:
                retry_count += 1
                if result or retry_count > 3:
                    break
        if object_list:
            return object_list
        else:
            raise Exception('获取Minio存储对象失败!')

    def object_exists(self, object_key):
        """检测对象是否存在"""
        object_list = [item for item in self.list_objects(object_key)]
        if object_list:
            return True
        else:
            return False

    def upload_object(self, local_file, object_key):
        """
            上传文件,并检查是否上传成功
        """
        retry_count, result = 1, False
        while True:
            try:
                with open(local_file, 'rb') as file_data:
                    file_stat = os.stat(local_file)
                    etag = self.minio_client.put_object(
                        bucket_name=self.bucket,
                        object_name=object_key,
                        data=file_data,
                        length=file_stat.st_size
                    )

            except Exception as error:
                self.record_log.error(error, exc_info=True)
            else:
                if etag:
                    self.record_log.info('{0} -> {1}/{2} 上传到本地minio对象存储成功'.format(local_file, self.bucket, object_key))
                    result = True
            finally:
                retry_count += 1
                if result or retry_count > 3:
                    break
        return result

    def download_object(self, object_key):
        """下载存储库对象"""
        if self.object_exists(object_key):
            try:
                data = self.minio_client.get_object(
                    bucket_name=self.bucket,
                    object_name=object_key
                )

                file_name = object_key.split('/')[-1]
                with open(file_name, 'wb') as file_data:
                    for d in data.stream(32 * 1024):
                        file_data.write(d)
            except Exception as Error:
                raise Exception(f'下载{object_key}文件出错,{Error}')
        else:
            raise Exception(f'下载{object_key}出错,存储对象不存在')

    def find_last_pack(self, app_path):
        """获取最新的包"""
        object_list = self.list_objects(app_path)
        pack_list = \
            [
                {
                    'upload_date': int(item.object_name.split('/')[-2]),
                    'object_key': item.object_name
                }
                for item in object_list
            ]
        last_pack = sorted(pack_list, key=lambda x: x['upload_date'])[-1]
        return last_pack

    def copy_pack(self, target_key, source_key):
        """拷贝包,对应包晋级动作"""
        copy_result = self.minio_client.copy_object(
            bucket_name=self.bucket,
            object_name=target_key,
            source=CopySource(self.bucket, source_key),
        )
        self.record_log.info(copy_result)

    def del_pack(self, object_key):
        """删除包"""
        try:
            self.minio_client.remove_object(
                bucket_name=self.bucket,
                object_name=object_key
            )
        except Exception as Error:
            self.record_log.error(f'{str(Error)}', exc_info=True)

    def clear_pack(self, object_key):
        """清理包,保留最新10个"""
        object_list = self.list_objects(object_key)
        key_list = []
        for item in object_list:
            key = item.object_name
            last_modified = item.last_modified
            timestamp = time.mktime(last_modified.timetuple())
            key_list.append((key, timestamp))
        sorted_list = sorted(key_list, key=lambda x: x[1])
        for item in sorted_list[:-10]:
            self.del_pack(item[0])

    def get_presigned_url(self, object_name):
        """获取临时下载url,1小时过期"""
        if self.object_exists(object_name):
            down_url = self.minio_client.presigned_get_object(self.bucket, object_name, expires=timedelta(hours=1))
            return down_url
        else:
            raise Exception(f'生成临时下载url失败,{object_name}不存在')


def zz_minio():
    """郑州本地monio"""
    minio_server, access_key, secret_key, bucket = 'minio-registry.internalapus.com:9000', \
                                                   'heimdall', '04919f7edbc4107b61fe6c2dfac6d7d6', 'publish-pack'
    return MinioApi(minio_server, access_key, secret_key, bucket)


def sg_minio():
    """新加坡本地monio"""
    minio_server, access_key, secret_key, bucket = '10.11.14.47:9000', 'heimdall', \
                                                   '04919f7edbc4107b61fe6c2dfac6d7d6', 'publish-pack'
    return MinioApi(minio_server, access_key, secret_key, bucket)


if __name__ == '__main__':
    sg_minio().del_pack('deploy_prod/common-service/libra_finance/v1.0.1_d554ff18.tgz')
4.Python调用S3的API
Amazon (aws S3) 是一个公开的对象存储服务;
Web 应用程序开发人员可以使用对象存储服务,存储数字资产,包括图片、视频、音乐和文档;
S3 提供一个 RESTful API 以编程方式实现与S3对象存储服务的交互;
#!/usr/bin/python3
# -*- coding: utf-8 -*-
# @file   : awss3.py
# @author : 基础网络-张根
# @date   : 2018/05/30
# @version: 1.0
# @desc   : Aws的S3对象存储服务API,依赖第三方包boto3==1.18.29
from boto3.session import Session
import boto3
import time, os, logging
from datetime import datetime, timedelta

aws_access_key_id = ""
aws_secret_access_key = ""
bucket_name = ""
log_path = "/var/log/awss3.log"
base_data_key = f"fab-browser/mobile-web"
base_data_dir = f"/home/changzhiwei/log/fab_web"


# Crontab每小时执行1次去志伟的目录下查找logfile上传到客户的s3上
class AwsS3API(object):

    def __init__(self):
        auth_dict = {
            'aws_access_key_id': aws_access_key_id,
            'aws_secret_access_key': aws_secret_access_key
        }
        session = Session(**auth_dict)
        self.s3 = session.resource('s3', **auth_dict)
        self.client = boto3.client('s3', **auth_dict)
        self.bucket_name = bucket_name
        self.log_path = log_path

    # 记录日志
    def record_log(self, level, message):
        print(message)
        # Creating and Configuring Logger
        log_format = "%(levelname)s %(asctime)s - %(message)s"
        logging.basicConfig(filename=self.log_path,
                            filemode="a",  # filemode有w和a,w就是写模式,a是追加模式
                            format=log_format,
                            level=getattr(logging, level))  # DEBUG  WARNING  ERROR
        logger = logging.getLogger()
        # Testing our Logger
        getattr(logger, level.lower())(message)

    # 列出查询到的所有对象存储
    def list_object(self, prefix):
        """
        :param prefix: s3对象的key名称开头
        :return:
        """
        retry_count, result, object_list = 1, False, None
        while True:
            try:
                object_list = [file for file in self.s3.Bucket(self.bucket_name).objects.filter(Prefix=prefix)]
            except Exception as error:
                self.record_log("ERROR", error.__str__())
            else:
                if object_list:
                    result = True
            finally:
                retry_count += 1
                if result or retry_count > 3:
                    break
        if object_list is None:
            self.record_log("ERROR", "获取aws s3存储对象失败")
            raise Exception('获取aws s3存储对象失败')
        else:
            return object_list

    # 检测对象是否存在
    def object_exists(self, object_key):
        if self.list_object(object_key):
            return True
        else:
            return False

    # 尝试3次上传文件,并检查是否上传成功
    def upload_object(self, local_file, object_key):
        retry_count, result = 1, False
        while True:
            try:
                self.s3.Object(self.bucket_name, object_key).upload_file(local_file,
                                                                         ExtraArgs={'ACL': 'bucket-owner-full-control'})
            except Exception as error:
                self.record_log("ERROR", "upload_object错误" + error.__str__())
            else:
                self.record_log("DEBUG", '{0} -> {1}/{2} 上传aws s3成功'.format(local_file, self.bucket_name, object_key))
                result = True
            finally:
                retry_count += 1
                if result or retry_count > 3:
                    break
        return result

    # 下载存储库对象
    def download_object(self, object_key):
        if self.object_exists(object_key):
            try:
                self.s3.meta.client.download_file(self.bucket_name, object_key, object_key.split('/')[-1])
            except Exception as Error:
                raise Exception(f'下载{object_key}文件出错,{Error}')
            else:
                self.record_log("DEBUG", f'下载{object_key}成功')
        else:
            raise Exception(f'下载{object_key}出错,存储对象不存在')

    # 删除包
    def del_pack(self, object_key):
        try:
            self.client.delete_object(
                Bucket=self.bucket_name,
                Key=object_key,
            )
        except Exception as Error:
            self.record_log("ERROR", f'删除包错误{str(Error)}')

    # 清理包,保留最新10个
    def clear_pack(self, object_key):
        object_list = self.list_object(object_key)
        key_list = []
        for item in object_list:
            key, last_modified = item.key, item.get().get('LastModified')
            last_stamp = time.mktime(last_modified.timetuple())
            key_list.append((key, last_stamp))
        sorted_list = sorted(key_list, key=lambda x: x[1])
        for item in sorted_list[:-10]:
            self.del_pack(item[0])

    # 上传browser_mobile的数据至客户的aws s3对象存
    def upload_browser_mobile_data(self):
        two_hour_ago = datetime.now() + timedelta(hours=-2)
        two_hour_ago_year, two_hour_ago_month, two_hour_ago_day, two_hour_ago_hour = (two_hour_ago.year,
                                                                                      two_hour_ago.month if two_hour_ago.month > 9 else f"0{two_hour_ago.month}",
                                                                                      two_hour_ago.day if two_hour_ago.day > 9 else f"0{two_hour_ago.day}",
                                                                                      two_hour_ago.hour if two_hour_ago.hour > 9 else f"0{two_hour_ago.hour}"
                                                                                      )
        time_flag = f"year={two_hour_ago_year}/month={two_hour_ago_month}/day={two_hour_ago_day}/hour={two_hour_ago_hour}"
        log_data_dir, log_data_key = f"{base_data_dir}/{time_flag}", f"{base_data_key}/{time_flag}"
        [self.upload_object(os.path.join(log_data_dir, lf), os.path.join(log_data_key, lf)) for lf in
         os.listdir(log_data_dir)] if os.listdir(log_data_dir) else self.record_log("ERROR",
                                                                                    f"{log_data_dir}目录下下不存在日志文件")


if __name__ == '__main__':
    s3_obj = AwsS3API()
    s3_obj.upload_browser_mobile_data()
Docker Compose
虽然可以通过Dockerfile文件很方便的定义1个单独的容器。
然而,在日常工作中我们的项目架构会设计MySQL、Nginx、Redis等各种组件搭配在一起工作。
这时我就是需要使用Docker Compose容器编排工具,对多个容器进行编排。
Docker compose和Docker swarm 都是Docker官方容器编排工具,
单不同的是Docker Compose是一个在单个服务器或主机上创建多个容器的工具。
Compose 项目是Docker官方开源的项目,负责实现对多个Docker 容器进行快速编排。
Docker Compose的使用简单基本上分为3个步骤:
- 使用Dockerfile定义单个容器的运行环境
- 使用Docker-compose.yml文件定义构建当前项目所依赖的容器,这样这些容器就可以在不同的隔离环境中被运行分别运行。=
Docker-compose up     开启一组容器
Docker-compose down 关闭一组容器
服务(service):一个应用的容器。服务可以存着多个。
项目(project):由一组相互之间关联的容器,组成的一个完整业务单元。 项目在Docker-compose.yml中进行定义。
[root@VM-0-5-centos ~]# curl -L https://get.daocloud.io/Docker/compose/releases/download/1.29.2/Docker-compose-`uname -s`-`uname -m` > /usr/local/bin/Docker-compose
  % Total    % Received % Xferd  Average Speed   Time    Time     Time  Current
                                 Dload  Upload   Total   Spent    Left  Speed
  0     0    0     0    0     0      0      0 --:--:--  0:00:06 --:--:--
[root@VM-0-5-centos ~]# ls -l /usr/local/bin/Docker-compose
-rw-r--r-- 1 root root 16168192 Jun  9 10:31 /usr/local/bin/Docker-compose
[root@VM-0-5-centos ~]# chmod +x /usr/local/bin/Docker-compose
[root@VM-0-5-centos ~]# Docker-
Docker-compose  Docker-init     Docker-proxy
[root@VM-0-5-centos ~]# Docker-
Docker-compose  Docker-init     Docker-proxy
[root@VM-0-5-centos ~]# Docker-compose -v
Docker-compose version 1.24.1, build 4667896b
[root@VM-0-5-centos ~]#
Docker-compose.yml
Docker-compose.yml是来定义当前项目的文件,它遵循一些语法格式。
version: "3.0" #Docker-compose的版本号
services: #一组相互之间有业务联系的服务组

  protainer:
    image: :portainer/portainer
    container_name: protainer_container
    volumes:
      - /var/run/Docker.sock:/var/run/Docker.sock
      - /protainer:protainer
    networks:
      - api
    ports:
      - "8000:8000"
      - "9000:9000"

  buget-api:
    build:  #直接把Dockerfile打包成镜像并运行
      context: ./  #指定Dockerfile所在的目录
      Dockerfile: Dockerfile  #Dockerfile的文件名称
    container_name: buget-apicontainer  #容器名称
    ports:
      - 8090:8090""
    networks:
      - apai-network
    depends_on:
      - nginx

  nginx:   #服务
    image: nginx   #使用的镜像
    ports:     #使用的端口
      - "80:80"
    volumes: #完成宿主机和容器目录卷的映射
      - zhanggen:/zhanggen  #宿主机的目录


volumes:
  zhanggen:
    external:
      flase
在Docker-compose.yml引用环境变量
[root@VM-0-5-centos Docker]# cat .env
nginx=nginx

[root@VM-0-5-centos Docker]# cat Docker-compose.yml
version: "3.0" #Docker-compose的版本号
services: #一组相互之间有业务联系的服务组
  nginx:   #服务
    image: ${nginx}   #使用的镜像
    ports:     #使用的端口
      - "80:80"
    volumes: #完成宿主机和容器目录卷的映射
      - zhanggen:/zhanggen  #宿主机的目录


volumes:
  zhanggen:
[root@VM-0-5-centos Docker]#
Docker-compose
我使用Dockerfile的mutistage-build语法定义了1个可以被多个web项目重复FROM的,web开发环境。
FROM python:3.7.6 AS pure_python_env
MAINTAINER franplk
LABEL version=1.0 description=HunanModelSystem

FROM pure_python_env AS python_site_package
WORKDIR /root
COPY requirements.txt  requirements.txt
RUN pip install -r requirements.txt -i https://pypi.tuna.tsinghua.edu.cn/simple


FROM python_site_package AS uwsgi_builder
WORKDIR /root
COPY uwsgi/uwsgi-2.0.19.1 uwsgi-2.0.19.1
RUN mv uwsgi-2.0.19.1 uwsgi
WORKDIR /root/uwsgi
RUN make && ln -s /root/uwsgi/uwsgi /usr/bin/uwsgi
EXPOSE 8099
WORKDIR /root
CMD uwsgi --ini /${PROJECT_NAME}/devops/Docker/uwsgi/uwsgi.ini
我使用Docker-compose定义了1个L+N+M+P(Python)的web运行环境。
version: "3.0" #Docker-compose的版本号
services: #一组相互之间有业务联系的服务组
  mysql: #MySQL服务
        environment:
            TZ: "Asia/Shanghai"
            MYSQL_ROOT_PASSWORD: "weike@2020"
            MYSQL_USER: 'zhanggen'
            MYSQL_PASS: 'weike@2020'
        image: mysql:5.7
        container_name: BudgetAPIMySQLContainer  #容器名称
        restart: always
        volumes:
              #MySQL数据存储目录
            - "./mysql/data:/var/lib/mysql"
             #MySQL配置文件
            - "./mysql/conf/my.cnf:/etc/my.cnf"
             #MySQL初始化执行
            - "./mysql/init:/Docker-entrypoint-initdb.d/"
        ports:
            - "3304:3303"
        networks:
            - budget_api


  nginx:   #nginx服务
    container_name: BudgetAPINginxContainer  #容器名称
    image: nginx:1.21.0   #使用的镜像
    environment:
      - TZ=Asia/Shanghai
    ports:     #使用的端口
      - "8088:8080"
      - "444:443"
    extra_hosts:
      - "uwsgi_host:115.159.55.242"

    volumes: #完成宿主机和容器目录卷的映射
      - ./nginx/config/nginx.conf:/etc/nginx/nginx.conf  #配置
      - ./nginx/log:/var/log/nginx #日志
      - ../../code/resources/static:/static #静态文件
    networks:
      - budget_api


  budget_api:  #flask进程
    build:  #直接把Dockerfile打包成镜像并运行
      context: "./"  #指定Dockerfile所在的目录
      Dockerfile: Dockerfile  #Dockerfile的文件名称
    image: budget_api:v1
    extra_hosts:
      - "mysql_host:115.159.55.242"

    container_name: BudgetAPIProjectContainer  #容器名称
    environment:                               #设置容器的运行模式
      - PROJECT_NAME=budget-api                  #Dockerfile中使用的环境变量
      - RUN_ENV=release                          #项目启动时选择的运行环境
    volumes:
      - ../../../budget-api:/budget-api/
      - /mingde/projects/models/model_similarity.bin:/root/model_similarity.bin
    ports:
      - "8091:8099"
    networks:
      - budget_api
    depends_on:
      - mysql
      - nginx


networks:
  budget_api:
      driver: bridge
Mysql在容器中的备份和恢复
[root@VM-0-5-centos backup]# pwd
/mingde/projects/HunanModel/devops/Docker/mysql/backup
[root@VM-0-5-centos backup]# Docker exec MySQLContainer /usr/bin/mysqldump -u root --password=Password db_hunan_model > ./db_hunan_model.sql
mysqldump: [Warning] Using a password on the command line interface can be insecure.
[root@VM-0-5-centos backup]# cat ./db_hunan_model.sql | Docker exec -i MySQLContainer /usr/bin/mysql -u root --password=Password db_hunan_model
mysql: [Warning] Using a password on the command line interface can be insecure.
[root@VM-0-5-centos backup]#
Docker问题汇总
1.宿主机无法访问Docker网络
增加sudo权限
vim /etc/sudoers
root    ALL=(ALL)       ALL
appuser ALL=(ALL)       NOPASSWD: ALL
先关闭Docker引擎
service Docker stop
关闭Docker0的网卡
ip link set dev Docker0 down
删除Docker0网桥
brctl delbr Docker0
重建Docker0网桥
brctl addbr Docker0
设置IP段
ip addr add 172.17.42.2/24 dev Docker0
启动Docker0网桥
ip link set dev Docker0 up
重启Docker引擎
service Docker start
测试
            "Networks": {
                "bridge": {
                    "IPAMConfig": null,
                    "Links": null,
                    "Aliases": null,
                    "NetworkID": "c2be63b76bb888ec4bcddfe9c7c7ff9267b721c31cd92c8f114beab390082b84",
                    "EndpointID": "8ae0707da7f4f5d575e60d0d2cd0be8a39334e1b68f83fbde1621317cc9d51f7",
                    "Gateway": "172.17.0.1",
                    "IPAddress": "172.17.0.2",
                    "IPPrefixLen": 16,
                    "IPv6Gateway": "",
                    "GlobalIPv6Address": "",
                    "GlobalIPv6PrefixLen": 0,
                    "MacAddress": "02:42:ac:11:00:02",
                    "DriverOpts": null
                }
            }
        }
    }
]
[root@zhanggen mingde]# ping 172.17.0.2
PING 172.17.0.2 (172.17.0.2) 56(84) bytes of data.
64 bytes from 172.17.0.2: icmp_seq=1 ttl=64 time=0.061 ms
64 bytes from 172.17.0.2: icmp_seq=2 ttl=64 time=0.058 ms
64 bytes from 172.17.0.2: icmp_seq=3 ttl=64 time=0.057 ms

 浙公网安备 33010602011771号