

mybatis介绍与开发
一 Mybatis简介
二 Mybatis使用方法与流程
1 使用前的准备
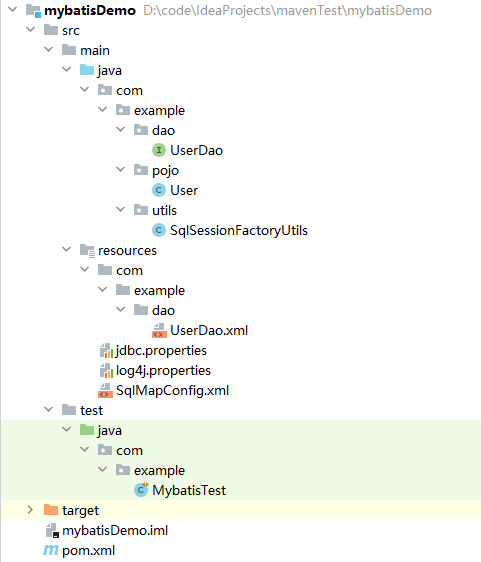
2 简易demo入门
1.创建maven工程,在Maven中导入必要的依赖
maven中导入坐标如下
<dependencies>
        <dependency>
            <groupId>junit</groupId>
            <artifactId>junit</artifactId>
            <version>4.12</version>
            <scope>test</scope>
        </dependency>
        <!--引入lombok的依赖-->
        <dependency>
            <groupId>org.projectlombok</groupId>
            <artifactId>lombok</artifactId>
            <version>1.18.10</version>
        </dependency>
        <!--mysql驱动-->
        <dependency>
            <groupId>mysql</groupId>
            <artifactId>mysql-connector-java</artifactId>
            <version>5.1.47</version>
        </dependency>
        <!--mybatis的依赖-->
        <dependency>
            <groupId>org.mybatis</groupId>
            <artifactId>mybatis</artifactId>
            <version>3.5.3</version>
        </dependency>

        <dependency>
            <groupId>log4j</groupId>
            <artifactId>log4j</artifactId>
            <version>1.2.12</version>
        </dependency>

        <dependency>
            <groupId>org.slf4j</groupId>
            <artifactId>slf4j-api</artifactId>
            <version>1.6.6</version>
        </dependency>

        <dependency>
            <groupId>org.slf4j</groupId>
            <artifactId>slf4j-log4j12</artifactId>
            <version>1.6.6</version>
        </dependency>
    </dependencies>
其中,mysql和mybatis是必须导入的,junit是为了测试,lombok是为了使用其注释,简化pojo中的代码编写,下面几个是为了和resource中的log4j文件一起输出mybatis的日志。
2.创建pojo类
上面三个注解可以生成各种需要的函数,getter,setter等等
@Data
@AllArgsConstructor
@NoArgsConstructor
public class User {
    private int uid;
    private String username;
    private String sex;
    private Date birthday;
    private String address;
}
3.创建dao接口
查找数据库表中的所有数据
public interface UserDao {
    public List<User> findAll();
}
4.创建dao的映射文件
<?xml version="1.0" encoding="UTF-8" ?>
<!DOCTYPE mapper PUBLIC "-//mybatis.org//DTD Mapper 3.0//EN" "http://mybatis.org/dtd/mybatis-3-mapper.dtd" >

<mapper namespace="com.example.dao.UserDao">

    <select id="findAll" resultType="com.example.pojo.User">
        select * from t_user
    </select>

</mapper>
5.创建mybatis的核心配置文件
<?xml version="1.0" encoding="UTF-8" ?>
<!DOCTYPE configuration
        PUBLIC "-//mybatis.org//DTD Config 3.0//EN"
        "http://mybatis.org/dtd/mybatis-3-config.dtd">
<configuration>

    <properties resource="jdbc.properties"></properties>

    <typeAliases>
        <package name="com.example.pojo"/>
    </typeAliases>

    <environments default="dev">
        <environment id="dev">
            <transactionManager type="JDBC"></transactionManager>
            <dataSource type="POOLED">
                <property name="username" value="${jdbc.username}"/>
                <property name="password" value="${jdbc.password}"/>
                <property name="url" value="${jdbc.url}"/>
                <property name="driver" value="${jdbc.driver}"/>
            </dataSource>
        </environment>
    </environments>

    <mappers>
        <package name="com.example.dao"/>
    </mappers>
</configuration>
6.测试
public class SqlSessionFactoryUtils {
    private static InputStream is;
    private static SqlSessionFactory sessionFactory;

    static {
        try {
            //1. 创建SqlSessionFactoryBuilder对象
            SqlSessionFactoryBuilder sqlSessionFactoryBuilder = new SqlSessionFactoryBuilder();
            //2. 读取核心配置文件,转换成字节输入流
            is = Resources.getResourceAsStream("SqlMapConfig.xml");
            //3. 创建SqlSessionFactory对象
            sessionFactory = sqlSessionFactoryBuilder.build(is);
        } catch (IOException e) {
            e.printStackTrace();
        }
    }

    /**
     * 获取SqlSession对象的方法
     * @return
     */
    public static SqlSession openSession(){
        SqlSession sqlSession = null;
        try {
            //4. 创建SqlSession对象
            sqlSession = sessionFactory.openSession();
            is.close();
        } catch (IOException e) {
            throw new RuntimeException(e.getMessage());
        }
        return sqlSession;
    }

    /**
     * 提交事务并且关闭资源
     * @param sqlSession
     */
    public static void commitAndClose(SqlSession sqlSession){
        sqlSession.commit();
        sqlSession.close();
    }

    /**
     * 回滚事务并且关闭资源
     * @param sqlSession
     */
    public static void rollbackAndClose(SqlSession sqlSession){
        sqlSession.rollback();
        sqlSession.close();
    }
}
public class MybatisTest {
    @Test
    public void test(){
        SqlSession sqlSession = SqlSessionFactoryUtils.openSession();
        UserDao userDao = sqlSession.getMapper(UserDao.class);

        List<User> userList = userDao.findAll();
        for (User user : userList) {
            System.out.println(user);
        }

        SqlSessionFactoryUtils.commitAndClose(sqlSession);
    }
}
此外,jdbc.properties这样写,
jdbc.username=root
jdbc.password=root
jdbc.url=jdbc:mysql://localhost:3306/mybatis?characterEncoding=utf-8
jdbc.driver=com.mysql.jdbc.Driver
3.代码解读
1.mybatis的核心配置文件
最上方是固定约束,<configuration>标签表示这是配置,
<environments>,配置连接环境,既数据库的驱动,数据库地址,用户名,密码,其中可以写多个<environment>标签,选用与id与default相同的。POOLED表示要池化,
<mapper>,配置mapper代理配置文件的位置,引入映射文件,此次使用package标签,直接扫描指定包内的所有daoxml文件。
<properties>,引入外部properties文件,数据源配置中的${jdbc.driver}就来源于此,也可以不使用<properties>,直接写入数据源,但这样耦合度太高,不方便使用修改。
Mapper接口开发需要遵循以下规范:
-
存储路径建议和对应的Dao接口保持一致
-
文件名建议和对应Dao接口的名字保持一致
-
配置文件的根标签的namespace属性必须和对应的Dao接口的全限定名保持一致
-
接口中的每一个方法,就对应映射配置文件中的一个标签:
-
查询方法,对应select标签
-
添加方法,对应insert标签
-
删除方法,对应delete标签
-
修改方法,对应update标签
-
-
映射配置文件中的标签的id属性,就必须和对应的方法的方法名保持一致
-
映射配置文件中的标签的parameterType属性,必须和对应的方法的参数类型(全限定名)保持一致
-
映射配置文件中的标签的resultType属性,必须和对应的方法的返回值类型(全限定名)保持一致,但是如果返回值是List则和其泛型保持一致
三 Mybatis的其他要掌握的知识
1 如何获取自增长的键值
insert时,要想获得自增长的键值,要在其中这样修改
 <!--parameterType属性: 参数的类型 ;  赋值的时候直接写对象里面的属性名-->
    <insert id="save" parameterType="com.itheima.bean.User">
        <!--resultType: 主键类型; keyProperty:pojo里面对应的id的属性名; order属性: 指定是在目标的sql语句之前还是之后执行 -->
        <selectKey resultType="int" keyProperty="uid" order="AFTER">
            SELECT LAST_INSERT_ID()
        </selectKey>
        INSERT INTO t_user(username,sex,birthday,address)VALUES(#{username},#{sex},#{birthday},#{address})
    </insert>
2 模糊查询
<select id="findByFirstName02" parameterType="string" resultType="User">
        <!--select * from t_user where username like "%"#{username}"%"-->
        <!--select * from t_user where username like concat("%",#{username},"%")-->
        select * from t_user where username like "%${username}%"
</select>
3 细节
1传递简单类型,如基本的类型,字符串,直接写`#{任意字符串}`或者`'${value}'`
#{}或者'${}'括号中的值为 pojo 属性名称或者Map的key。
3传递 pojo 包装对象类型
开发中通过 pojo 传递查询条件 ,查询条件是综合的查询条件,不仅包括用户查询条件还包括其它的查询条件(比如将用户购买商品信息也作为查询条件),这时可以使用包装对象传递输入参数。Pojo 类中包含 pojo。如#{user.username}
4
-
-
输出pojo对象 直接写
pojo类型名eg: User -
输出pojo列表类型 写
列表里面的泛型的类型eg: List<User>
5resultMap
resultType可以指定pojo将查询结果映射为pojo,但需要pojo的属性名和sql查询的列名一致方可映射成功。
    <select id="findByUid" parameterType="int" resultMap="findByUidMap">
        select uid uid_,username username_ ,birthday birthday_ ,sex sex_ ,address address_  from t_user where uid = #{id}
    </select>

    <resultMap id="findByUidMap" type="com.itheima.bean.User">
        <id property="uid" column="uid_"></id>
        <result property="username" column="username_"></result>
        <result property="birthday" column="birthday_"></result>
        <result property="sex" column="sex_"></result>
        <result property="address" column="address_"></result>
    </resultMap>
<!--
id:此属性表示查询结果集的唯一标识,非常重要。如果是多个字段为复合唯一约束则定义多个id。
type: 当前resultMap封装后返回的结果
property:表示 User 类的属性。
column:表示 sql 查询出来的字段名。(column 和 property 放在一块儿表示将 sql 查询出来的字段映射到指定的 pojo 类属性上。)
-->
<mapper namespace="com.itheima.dao.AccountDao">
    <!--
        使用resultMap标签自定义映射规则
    -->
    <resultMap id="accountUserMap" type="Account">
        <id column="aid" property="aid"></id>
        <result column="money" property="money"></result>
        <result column="uid" property="uid"></result>

        <!--
            要进行一对一的映射配置
            property表示要映射的pojo的属性名
            javaType表示要进行映射的POJO的属性的类型
        -->
        <association property="user" javaType="User">
            <result column="uid" property="uid"></result>
            <result column="username" property="username"></result>
            <result column="sex" property="sex"></result>
            <result column="birthday" property="birthday"></result>
            <result column="address" property="address"></result>
        </association>
    </resultMap>
    <select id="findAccountUserByAid" parameterType="int" resultMap="accountUserMap">
        select * from t_account a,t_user u where a.uid=u.uid and a.aid=#{aid}
    </select>
</mapper>
<mapper namespace="com.itheima.dao.UserDao">
    <!--
        使用resultMap标签,自定义映射规则
    -->
    <resultMap id="userAccountMap" type="User">
        <id column="uid" property="uid"></id>
        <result column="address" property="address"></result>
        <result column="username" property="username"></result>
        <result column="sex" property="sex"></result>
        <result column="birthday" property="birthday"></result>
        <!--
            使用collection标签进行一对多映射
        -->
        <collection property="accountList" ofType="Account">
            <result column="aid" property="aid"></result>
            <result column="money" property="money"></result>
            <result column="uid" property="uid"></result>
        </collection>
    </resultMap>
    <select id="findUserAccountByUid" parameterType="int" resultMap="userAccountMap">
        select * from t_user u,t_account a where a.uid=u.uid and u.uid=#{uid}
    </select>
</mapper>
6 延迟加载
就是在需要用到数据时才进行加载,不需要用到数据时就不加载数据。延迟加载也称懒加载.
坏处: 因为只有当需要用到数据时,才会进行数据库查询,这样在大批量数据查询时,因为查询工作也要消耗时间,所以可能造成用户等待时间变长,造成用户体验下降。
好处: 先从单表查询,需要时再从关联表去关联查询,大大提高数据库性能,因为查询单表要比关联查询多张表速度要快.
7
<select id="findByAddress" resultType="LinkMan" parameterType="string">
    select * from linkman
    <!--
    加入判断,使用if标签判断
    -->
    <if test="address != null and address.length > 0">
    where address=#{address}
    </if>
</select>
2 where
<select id="findByAddressAndSex" resultType="LinkMan" parameterType="LinkMan">
    select * from linkman
    <!--
            where标签的作用是,如果有if条件成立,则会在SQL语句中添加WHERE关键字
            而且还会自动去掉第一个条件的and
        -->
    <where>
        <!--
                判断,如果address不为空,则添加address的条件
                如果sex不为空,则添加sex的条件
            -->
        <if test="address != null and address.length > 0">
            and address=#{address}
        </if>
        <if test="sex != null and sex.length > 0">
            and sex=#{sex}
        </if>
    </where>
</select>
3foreach
<delete id="deleteByIds" parameterType="int">
    delete from linkman
    <!--
            使用foreach标签进行遍历
            collection属性就是要遍历的对象,如果要遍历的对象是一个集合,就写list
            item属性就是遍历出来的每一个元素
            index属性就是遍历出来的每一个元素的下标
            separator属性就是分隔符
            open属性 表示在遍历出来的第一个元素之前拼接字符串
            close属性 表示在遍历出来的最后一个元素之后拼接字符串
        -->
    <foreach open="where id in(" close=")" collection="list" item="id" index="i" separator=",">
        #{id}
    </foreach>
</delete>
4 include
<sql id="selectAll">
    select id,name,sex,age,qq,email,address from linkman
</sql>
<select id="findById" parameterType="int" resultType="LinkMan">
    <include refid="selectAll"></include>
    where id=#{id}
</select>
四 了解
1
3MyBatis注解开发
附:mybatis知识点总结图


 浙公网安备 33010602011771号