Redis 高可用之哨兵模式
参考 :
https://mp.weixin.qq.com/s/Z-PyNgiqYrm0ZYg0r6MVeQ
这篇文章有两个问题
1.虽然运行了3个sentinel容器,实际上只有一个sentinel运行 具体可以留意输出的最后一行

2.外部调试连接redis 获取到的monster地址是docker 的虚拟ip(172.17.0.2:6379)地址,外部不能访问,但是如果你把新建的springboot 项目和这些容器放到同一个主机的话是没有问题的
详细解决方案 查看
Redis 高可用之哨兵模式(二)
一、redis高可用解决方案
-
redis主从
优点:1、高可靠性,主从实时备份,有效解决单节点数据丢失问题。
2、可做读写分离,从库分担读操作,缓解主库压力
缺点:主库异常,需要手动主从切换
2.redis哨兵模式
优点:1、有效解决主从模式主库异常手动主从切换的问题
缺点:1、运维复杂,哨兵选举期间,不能对外提供服务
其他解决方案优缺点,可以查看 高可用 ,本篇主要介绍哨兵解决方案
二、具体实现
windows上安装redis新版本好像已经不支持了,本文采用的是docker快速实现redis高可用实例的创建
具体环境参数:
操作系统:centos7
docker:18.09.3
1、拉取镜像,采用docker官方镜像
docker pull docker.io/redis
2、创建redis配置文件
mkdir  /data/redis/conf
cd /data/redis/conf
touch redis.conf
vi redis.conf
其中配置内容如下
logfile "redis.log"
port 6379
dir /data
appendonly yes
appendfilename appendonly.aof
requirepass 123456
3、创建从库redis配置文件 文件名称命名为 redis_01.conf
其中内容如下:其中slaveof 的ip 是宿主的docker0网卡的ip 具体ip需要在主库容器运行起来后,通过 docker inspect redis-6379 命令来查看ip地址
logfile "redis.log"
port 6379
dir /data
appendonly yes
appendfilename appendonly.aof
slaveof 172.21.186.236 6379
masterauth 123456
requirepass 123456
4、运行容器
docker run --name redis-6379 -v /data/conf/redis.conf:/data/redis.conf -p 6379:6379  -d docker.io/redis redis-server /data/redis.conf

docker run --name redis-6380 -v /data/conf/redis_01.conf:/data/redis.conf -p 6380:6379  -d docker.io/redis redis-server /data/redis.conf

docker run --name redis-6381 -v /data/conf/redis_02.conf:/data/redis.conf -p 6381:6379  -d docker.io/redis redis-server /data/redis.conf
5、查看主库运行情况
[root@localhost conf]# docker exec -ti redis-6379 /bin/bash
root@9865d9442e67:/data# redis-cli
127.0.0.1:6379> info replication
# Replication
role:master
connected_slaves:2
slave0:ip=172.17.0.3,port=6379,state=online,offset=714,lag=1
slave1:ip=172.17.0.4,port=6379,state=online,offset=714,lag=1
master_replid:6baa315b071196f7530bf2c9fdfb132785deeadb
master_replid2:0000000000000000000000000000000000000000
master_repl_offset:714
second_repl_offset:-1
repl_backlog_active:1
repl_backlog_size:1048576
repl_backlog_first_byte_offset:1
repl_backlog_histlen:714
127.0.0.1:6379>
可以看到已经有两个从库
6、创建sentinel.conf
touch sentinel.conf
vi sentinel.conf
其中sentinel.conf内容如下
logfile "sentinel.log"
sentinel monitor mymaster 172.17.0.2 6379 1
7、创建sentinel容器
docker run --name redis-s-6379 -v /data/conf/sentinel.conf:/data/sentinel.conf -p 26379:26379 -d docker.io/redis redis-sentinel sentinel.conf
docker run --name redis-s-6380 -v /data/conf/sentinel.conf:/data/sentinel.conf -p 26380:26379 -d docker.io/redis redis-sentinel sentinel.conf
docker run --name redis-s-6381 -v /data/conf/sentinel.conf:/data/sentinel.conf -p 26381:26379 -d docker.io/redis redis-sentinel sentinel.conf
8、查看sentinel运行状态
[root@localhost conf]# docker exec -ti redis-s-6380 /bin/bash
root@430b54968068:/data# redis-cli -h 127.0.0.1 -p 26379
127.0.0.1:26379> info Sentinel
# Sentinel
sentinel_masters:1
sentinel_tilt:0
sentinel_running_scripts:0
sentinel_scripts_queue_length:0
sentinel_simulate_failure_flags:0
master0:name=mymaster,status=ok,address=172.17.0.2:6379,slaves=2,sentinels=1
127.0.0.1:26379>
9、停止主库
docker stop redis-6379
10、进入sentinel容器,查看日志
docker exec -ti redis-s-6379 /bin/bash
cat sentinel.log
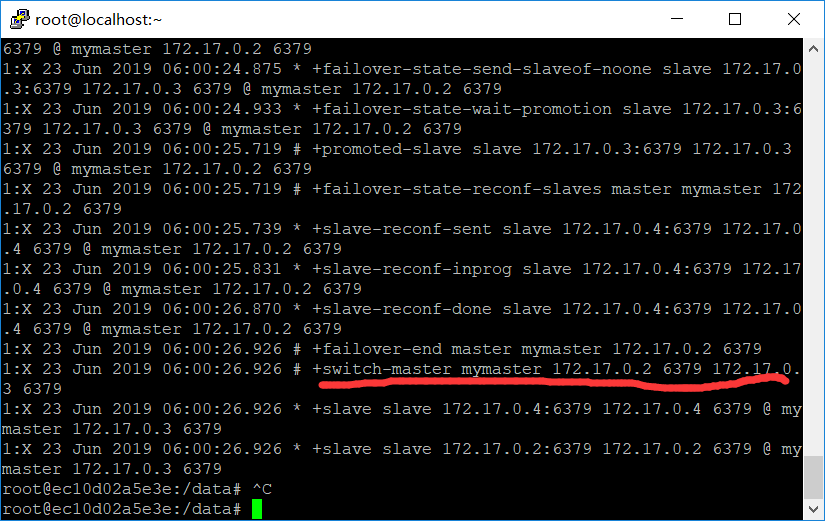
红色划线部分可以看到成功切换主从
11、重新启动redis-6379 容器
docker start redis-6379
12、进入容器内部查看redis运行情况
docker exec -ti redis-6379 /bin/bash

可以看到已经成为从库

 浙公网安备 33010602011771号