


Netty 入门
Netty是什么
Netty提供异步的、事件驱动的网络应用程序框架和工具,用以快速开发高性能、高可靠性的网络服务器和客户端程序
Netty的优势
- 并发高
- 传输快
- 封装好
创建项目
我们将创建一个抛弃服务器,这个服务器将打印接收的消息而不响应。
1.创建maven项目,引入jar包。这里我用的4.1.25版本。
    <dependencies>
        <dependency>
            <groupId>io.netty</groupId>
            <artifactId>netty-all</artifactId>
            <version>4.1.25.Final</version>
        </dependency>
    </dependencies>
2.创建自定义的处理器
package com.wxer.netty;

import io.netty.buffer.ByteBuf;
import io.netty.channel.ChannelHandlerContext;
import io.netty.channel.ChannelInboundHandlerAdapter;
import io.netty.util.ReferenceCountUtil;

/**
 * 创建自定义的处理器,处理服务端 channel.
 */
public class DiscardServerHandler extends ChannelInboundHandlerAdapter {

    //每当从客户端收到新的数据时,这个方法会在收到消息时被调用
    @Override
    public void channelRead(ChannelHandlerContext ctx, Object msg) {
        ByteBuf in = (ByteBuf) msg;
        try {
            //打印收到的数据
            System.out.print(in.toString(io.netty.util.CharsetUtil.US_ASCII));
        } finally {
            // 默默地丢弃收到的数据
            ReferenceCountUtil.release(msg);
        }
    }

  @Override
    public void exceptionCaught(ChannelHandlerContext ctx, Throwable cause) throws Exception {
        System.out.println("出现异常啦");
        cause.printStackTrace();
        ctx.close();
    }
}
3.创建初始化器
package com.wxer.netty;

import io.netty.channel.ChannelInitializer;
import io.netty.channel.ChannelPipeline;
import io.netty.channel.socket.SocketChannel;

/**
 * @Description: 初始化器,channel注册后,会执行里面的相应的初始化方法
 */
public class DiscardServerInitializer extends ChannelInitializer<SocketChannel> {

    @Override
    protected void initChannel(SocketChannel channel) throws Exception {
        // 通过SocketChannel去获得对应的管道
        ChannelPipeline pipeline = channel.pipeline();

        // 添加自定义的助手类,返回 "hello netty~"
        pipeline.addLast("customHandler", new DiscardServerHandler());
    }

}
4.创建启动类。这里我绑定了8087端口。
package com.wxer.netty;

import io.netty.bootstrap.ServerBootstrap;
import io.netty.channel.ChannelFuture;
import io.netty.channel.EventLoopGroup;
import io.netty.channel.nio.NioEventLoopGroup;
import io.netty.channel.socket.nio.NioServerSocketChannel;

/**
 * 丢弃任何进入的数据
 */
public class DiscardServer {

    private int port;

    public DiscardServer(int port) {
        this.port = port;
    }

    public void run() throws Exception {
        //NioEventLoopGroup 是用来处理I/O操作的多线程事件循环器
        //bossGroup用来接收连接
        //workerGroup用来处理已被接收的连接
        System.out.println("启动端口:" + port);
        EventLoopGroup bossGroup = new NioEventLoopGroup(); // (1)
        EventLoopGroup workerGroup = new NioEventLoopGroup();
        try {
            //ServerBootstrap 是一个启动 NIO 服务的辅助启动类。
            ServerBootstrap b = new ServerBootstrap();
            b.group(bossGroup, workerGroup)
                    .channel(NioServerSocketChannel.class) // 设置nio的双向通道
                    .childHandler(new DiscardServerInitializer());
            // 绑定端口,开始接收进来的连接
            ChannelFuture f = b.bind(port).sync(); // (7)

            // 等待服务器  socket 关闭 。
            // 在这个例子中,这不会发生,但你可以优雅地关闭你的服务器。
            f.channel().closeFuture().sync();
        } finally {
            workerGroup.shutdownGracefully();
            bossGroup.shutdownGracefully();
        }
    }

    public static void main(String[] args) throws Exception {
        new DiscardServer(8087).run();
    }
}
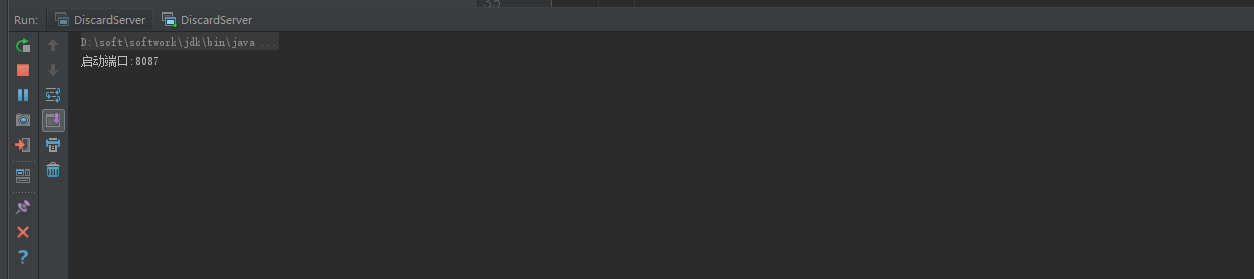
5.运行启动类,控制台会打印:启动端口:8087。这时,我们已经完成了第一个基于netty的服务端程序
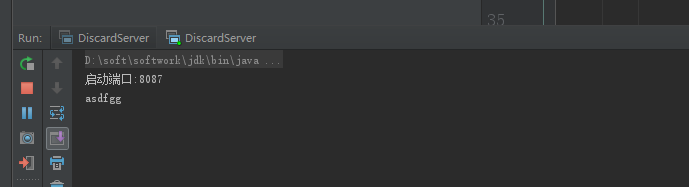
6.我们用telnet命令测试一下吧。我们在命令行上输入 :telnet localhost 8087,然后回车

7.随便敲打几个字符,观察控制台。

 浙公网安备 33010602011771号