使用Spring框架入门四:基于注解的方式的AOP的使用
一、简述
前面讲了基于XML配置的方式实现AOP,本文简单讲讲基于注解的方式实现。
基于注解的方式实现前,要先在xml配置中通过配置aop:aspectj-autoproxy来启用注解方式注入。
<?xml version="1.0" encoding="UTF-8"?>
<beans xmlns="http://www.springframework.org/schema/beans"
       xmlns:xsi="http://www.w3.org/2001/XMLSchema-instance"
       xmlns:aop="http://www.springframework.org/schema/aop"
       xsi:schemaLocation="
       http://www.springframework.org/schema/beans
       http://www.springframework.org/schema/beans/spring-beans-2.5.xsd
       http://www.springframework.org/schema/aop
       http://www.springframework.org/schema/aop/spring-aop-2.5.xsd">

        <aop:aspectj-autoproxy/>
/>
当然,这一步也可以通过注解来实现,来看代码吧。
二、步骤
1、引入依赖
和前面讲的一样,先引入Spring-Aop和AspectJ的依赖
        <!--测试1使用-->
        <dependency>
            <groupId>org.springframework</groupId>
            <artifactId>spring-context</artifactId>
            <version>5.0.5.RELEASE</version>
        </dependency>
        <!--测试2、3、4、5、6使用-->
        <dependency>
            <groupId>org.springframework</groupId>
            <artifactId>spring-aop</artifactId>
            <version>5.0.5.RELEASE</version>
        </dependency>
        <!--测试Aop使用-->
        <!-- https://mvnrepository.com/artifact/org.aspectj/aspectjweaver -->
        <dependency>
            <groupId>org.aspectj</groupId>
            <artifactId>aspectjweaver</artifactId>
            <version>1.9.1</version>
        </dependency>
2、在/src/test/java/aoptest2下建立下列类:
package aoptest2;

import org.aspectj.lang.annotation.Pointcut;
import org.springframework.context.annotation.ComponentScan;
import org.springframework.context.annotation.EnableAspectJAutoProxy;
import org.springframework.stereotype.Component;

@Component
public class MyTeacher {
   public void aopPointMethod1() {
        System.out.println("this is aopPointMethod1 executed.");
    }
}
package aoptest2;

import org.aspectj.lang.ProceedingJoinPoint;
import org.aspectj.lang.annotation.*;
import org.springframework.stereotype.Component;

@Aspect
@Component@EnableAspectJAutoProxy //需要启用注解方式的AOP
public class MyTeacherExtension {
    @Before("execution(* aoptest2.MyTeacher.aopPointMethod1(..))")
    public void aopInspectAtBefore() {
        System.out.println("this is aopInspectAtBefore method execute.");
    }

    @AfterReturning("execution(* aoptest2.MyTeacher.aopPointMethod1(..))")public void aopInspectAtAfterReturing() {
        System.out.println("this is aopInspectAtAfterReturing method execute.");
    }
    @After("execution(* aoptest2.MyTeacher.aopPointMethod1(..))")public void aopInspectAtAfter() {
        System.out.println("this is aopInspectAtAfter method execute.");
    }
    @Around("execution(* aoptest2.MyTeacher.aopPointMethod1(..))")public void aopAround(ProceedingJoinPoint proceedingJoinPoint) {
        try {
            System.out.println("aopAround1");
            Object obj = proceedingJoinPoint.proceed();
            System.out.println("aopAround2");
        } catch (Throwable throwable) {
            throwable.printStackTrace();
        }
    }


}
3、添加一个测试类:
import org.junit.Test;
import org.springframework.context.ApplicationContext;
import org.springframework.context.annotation.AnnotationConfigApplicationContext;
import org.springframework.context.support.ClassPathXmlApplicationContext;

public class AopTest {
      @Test
    public void aopTest2() {
        ApplicationContext context = new AnnotationConfigApplicationContext("aoptest2");
        aoptest2.MyTeacher mywoker = context.getBean(aoptest2.MyTeacher.class);
        mywoker.aopPointMethod1();
    }
}
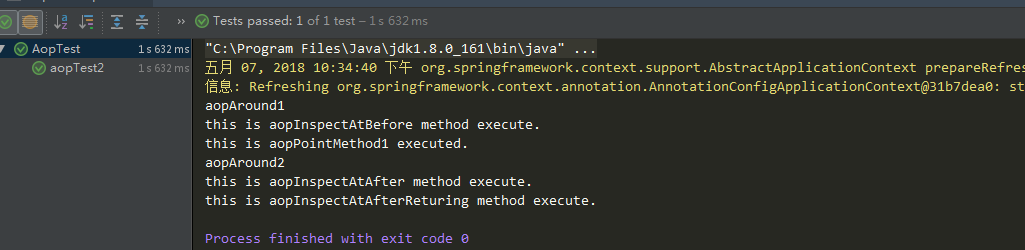
4、运行测试
aopAround1
this is aopInspectAtBefore method execute.
this is aopPointMethod1 executed.
aopAround2
this is aopInspectAtAfter method execute.
this is aopInspectAtAfterReturing method execute.
宋兴柱:转载内容,请标明出处,谢谢!源文来自 宝贝云知识分享:https://www.dearcloud.cn

 浙公网安备 33010602011771号