Appium从0开始
appium 是当前移动平台上主流的自动化测试工具之一。
appium 是一个合成词,分别由“application”的前三个字母和“Selenium”的后三个字母组成。application 为“应用”,我们一般把移动平台上的应用简称为 App。Selenium 是 当前主流的 Web UI 自动化测试工具。appium 与 Selenium 之间是有继承关系的。appium 的 寓意是:移动端的 Selenium 自动化测试工具。
appium 是一个开源自动化测试工具,支持 iOS 和 Android 平台上的原生应用、Web应用以及混合应用。
原生应用:是指那些用 iOS 或者 Android SDK 开发的应用(App)。
Web 应用:是指可以使用移动浏览器(如 iOS 上的 Safari 和 Android 上的 Chrome)访问的应用。
混合应用:是指用原生代码封装网页视图,原生代码和 Web 内容交互的应用。比如, 微信小程序,可以帮助开发者使用网页技术开发应用,然后用原生代码封装。 更重要的是,appium 是一个跨平台的测试工具,它允许测试人员在不同的平台(iOS、 Android)使用同一套 API 编写自动化测试脚本,这大大增加了 iOS 和 Android 测试套件之 间代码的复用性。
一、app自动化测试环境的搭建
1、手机或者模拟器(推荐雷电模拟器)
2、jdk java环境
3、sdk 安卓环境(ios也可)
4、pip install Appium-Python-Client -i https://pypi.tuna.tsinghua.edu.cn/simple
5、下载安装Appium可视化服务,我使用的是v1.20.2windows版本 连接:https://github.com/appium/appium-deskop/releases
二、开始搭建
1、下载雷电模拟器。
2、安装Appium可视化服务的时候,注意选择“仅为我安装”,不要选择“为所有用户安装”,否则在后续的使用过程中可能会出现不可预知的权限问题。
3、pip install Appium-Python-Client -i https://pypi.tuna.tsinghua.edu.cn/simple
4、安装JDK1.8环境,并配置JAVA_HOME和Path环境变量。
5、安装SDK安卓环境 https://www.androiddevtools.cn/ 选择ADT Bundle然后下载安装,并配置ANDROID_HOME(adt-bundle-windows-x86_64-20140702\sdk)和Path环境变量(%ANDROID_HOME%\platform-tools和%ANDROID_HOME%\tools)。
6、打开命令行窗口,输入adb,有信息输出,则配置Appium成功。
7、打开命令行窗口,输入adb devices,有如下输出,说明Appium识别到了雷电模拟器。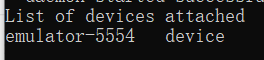
8、打开Appium可视化服务,说明整个过程搭建完成。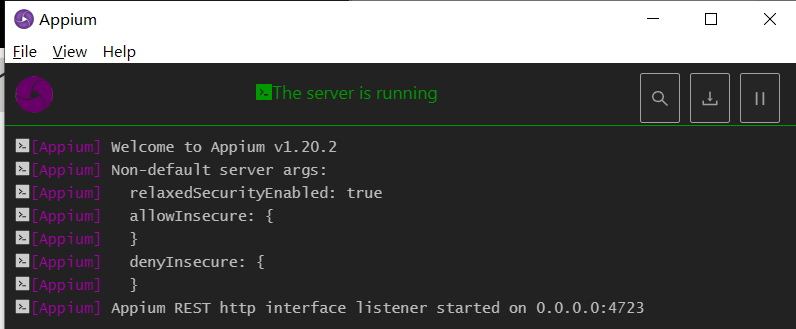
三、开始编码并踩坑
from appium.webdriver import Remote

# 连接Appium Server服务
# 设置platformName
# app表示需要控制的app的apk文件路径,避免中文
# newCommandTimeout用来避免appium打开app后,如果不去操作app,app会自动退出的问题
# deviceName用来区分设备(一般用不到,因为一般每次自动化测试的对象只是一个模拟器的一个app)
caps = {'platformName': 'Android',
        'app': r'D:\xxx.apk',
        'newCommandTimeout': 6000,
        'deviceName': 'emulator-5554'}
driver = Remote(desired_capabilities=caps,
                command_executor='http://127.0.0.1:4723/wd/hub')
运行如上代码后,你可能会得到缺失如下jar包的报错,下载地址:https://github.com/owner888/apktool-go/blob/main/Resources/apksigner.jar,下载后把该jar包放进platform-tools文件夹下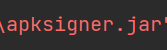
再次运行代码,appium服务显示如下,并且模拟器已经自动打开了app页面
这样,便成功完成了第一步:通过appium在模拟器中自动打开待测app,你可以类比成selenium自动打开了Chrome浏览器并跳转到了对应url页面。
appium中元素定位的方法和selenium是完全一致的,这里主要需要用到uiautomatorviewer来获取元素定位的表达式,比如id等。
注意:除了uiautomatorviewer之外,还可以使用appium inspector进行元素定位,下载地址:
https://github.com/appium/appium-inspector/releases
打开tools文件夹,双击uiautomatorviewer.bat,然后点击第二个按钮,即可定位元素,这里你有可能会有如下报错:Error while obtaining UI hierarchy XML file: com.android.ddmlib.SyncException
解决方案是:打开cmd窗口,依次输入如下命令:
adb kill-server
adb root
然后双击uiautomatorviewer.bat,此时点击第二个按钮,发现不报错,页面与模拟器页面相同,可以正常获取元素定位。
注意:模拟器中每到一个新页面,都要点击一下该按钮,然后uiautomatorviewer页面才会更新。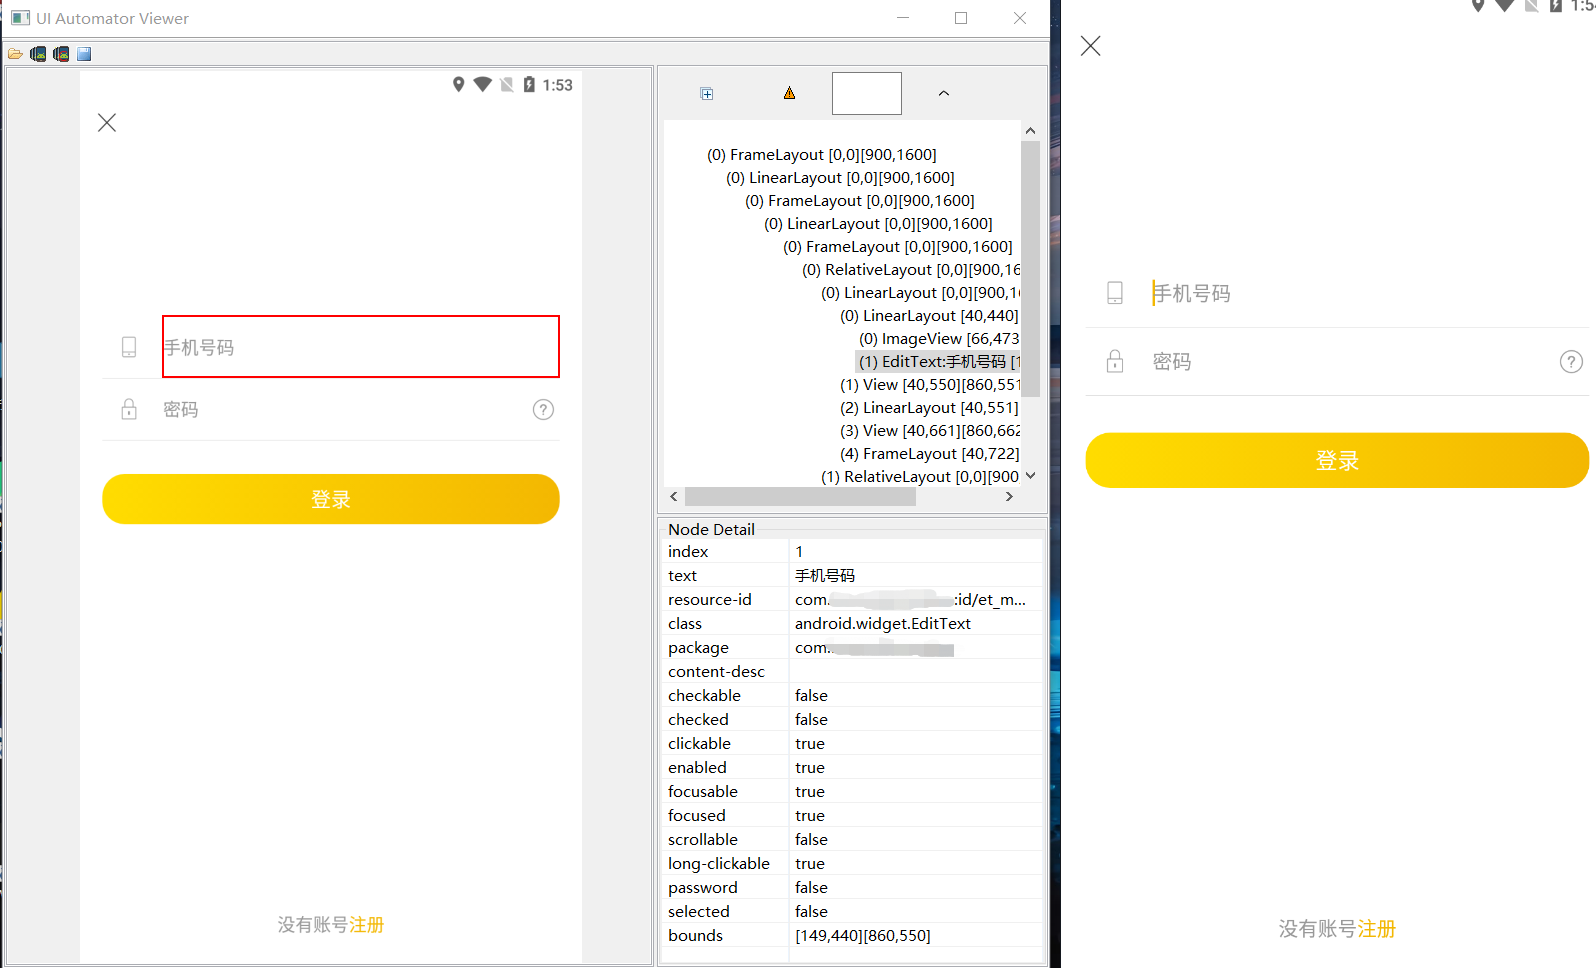
这里说一下安卓组件的标签名:
1、EditText 可编辑文本(类似于网页中的输入框)
2、android.widget.ImageButton 图片按钮
3、android.widget.ImageVieew 图片
4、android.widget.Button 按钮
5、android.widget.TextView 文本
6、android.widget.FrameLayout 布局
7、switch 开关
8、rating bar 评分条
元素定位的代码和selenium没有任何差别,所以PO模式等Selenium中的思想概念也可以用在Appium中。
import time

from appium.webdriver import Remote

# 连接Appium Server服务
# 设置platformName
# app表示需要控制的app的apk文件路径,避免中文
# newCommandTimeout用来解决appium打开app后,如果不去操作app,app会自动退出的问题
# deviceName用来区分设备(一般用不到,因为一般每次自动化测试的对象只是一个模拟器的一个app)
caps = {'platformName': 'Android',
        'app': r'D:\xxx.apk',
        'newCommandTimeout': 6000,
        'deviceName': 'emulator-5554'}
driver = Remote(desired_capabilities=caps,
                command_executor='http://127.0.0.1:4723/wd/hub')

# 设置隐形等待
driver.implicitly_wait(10)
# 查找元素
el = driver.find_element('id', 'el_id')
el.click()

# 定位点击头像登录
avator = driver.find_element('id', 'avator_id')
avator.click()

# 填写手机号
input_phone = driver.find_element('id', 'input_phone_id')
input_phone.send_keys('133')

# 填写密码
input_pwd = driver.find_element('id', 'input_pwd_id')
input_pwd.send_keys('331')

# 点击登录
login_btn = driver.find_element('id', 'login_btn_id')
login_btn.click()

time.sleep(3)
# 记得退出,同selenium
driver.quit()
至此,最基础的一个app自动登陆的appium脚本已经完成,下面专门说一说appium的api。
四、Appium的常用API
1、点击:el.click()
2、输入:el.send_keys('hello')
3、等待页面跳转成功
driver.wait_activity(页面的activity名称,超时等待时间)
查看页面activity名称可以通过在cmd窗口中输入如下命令来获取,可以得到在此之前模拟器中所有打开过的app页面的activity名称,一般用在没有查找定位元素,而是直接对页面进行操作的时候才会使用该方法,例如swipe滑动和放大缩小等
adb logcat | findStr -i displayed
红框中的即是app中每个页面的activity名称,例如: .activity.WelcomeActivity
4、快速进入指定页面
例如直接进入登录页面:无需点击头像等步骤,即可直接进入登陆页面
driver.start_activity(页面的activity的package名称,页面的activity名称)
上图中红框前面打马赛克的部分即为package名称
5、滑动
driver.wait_activity(页面的activity名称,超时等待时间) # 滑动操作必须和等待页面跳转成功连在一起使用
driver.swipe(start_x, start_y, end_x, end_y, duration)
模拟器,即手机的左上角作为(0, 0),左下角即为(0, height),右上角为(width, 0),右下角为(width, height)
代码:
driver.wait_activity(页面的activity名称,超时等待时间) # 滑动操作必须和等待页面跳转成功连在一起使用
size = driver.get_window_rect() # 获取模拟器,即手机的宽度和高度
width = size['width']
height = size['height']
# 从右滑到左
driver.swipe(start_x=width*0.9, start_y=height*0.5,
             end_x=width*0.1, end_y=height*0.5)
time.sleep(2)6、长按
这边我们需要自己封装一下长按的方法,自定义长按多久,这里默认长按一秒。
def long_click(driver, el, duration=1):
    action = ActionChains(driver)
    action.click_and_hold(el)
    action.pause(duration)# 按住不动
    action.release(el)
action.perform()7、放大缩小
from selenium.webdriver import ActionChains
from appium.webdriver import Remote
from selenium.webdriver.common.actions.mouse_button import MouseButton


def enlarge(driver: Remote, step=0.5, duration=None):
    actions = ActionChains(driver)
    actions.w3c_actions.devices = []
    # 初始化两个手指
    finger1 = actions.w3c_actions.add_pointer_input('touch', 'finger1')
    finger2 = actions.w3c_actions.add_pointer_input('touch', 'finger2')
    # 获取屏幕宽度高度
    width = driver.get_window_size()['width']
    height = driver.get_window_size()['height']
    # 两个手指都移动到屏幕的中间
    for finger in [finger1, finger2]:
        finger.create_pointer_move(x=width * 0.5, y=height * 0.5)
        finger.create_pointer_down()
        if duration:
            finger.create_pause(duration / 1000)
        else:
            finger.create_pause(0.1)
    # 两个手指往反方向移动
    finger1.create_pointer_move(x=width * 0.5, y=height * (0.5 + step / 2))
    finger2.create_pointer_move(x=width * 0.5, y=height * (0.5 - step / 2))
    # 两个手指都松开
    finger1.create_pointer_up(MouseButton.LEFT)
    finger2.create_pointer_up(MouseButton.LEFT)
    actions.perform()
driver.wait_activity('ActivityName', 10) # 放大缩小前务必先等待跳转该activity成功
enlarge(driver)8、按键操作
# 按下回车键
driver.press_keycode(66)

# 按下Home键
driver.press_keycode(3)具体的Appium的android按键对应的数字code参考如下链接:https://www.jianshu.com/p/f7ec856ff56f
9、获取toast弹框
Uiautomatorviewer是无法定位toast弹框的
el = driver.find_element('xpath', '//android.widget.Toast')
print(el.text)
五、结合Pytest实现基础的Appium自动化
conftest.py:
import pytest
from appium.webdriver import Remote


@pytest.fixture()
def browser():
    """前置条件,管理appium客户端"""
    # 连接Appium Server服务
    # 设置platformName
    # app表示需要控制的app的apk文件路径,避免中文
    # newCommandTimeout用来解决appium打开app后,如果不去操作app,app会自动退出的问题
    # deviceName用来区分设备(一般用不到,因为一般每次自动化测试的对象只是一个模拟器的一个app)
    caps = {'platformName': 'Android',
            'app': r'D:\xxx.apk',
            'newCommandTimeout': 6000,
            'deviceName': 'emulator-5554'}
    driver = Remote(desired_capabilities=caps,
                    command_executor='http://127.0.0.1:4723/wd/hub')
    driver.implicitly_wait(10)  # 隐形等待
    yield driver
driver.quit()test_login.py:(这边为方便讲解,没有使用PO模式,现实工作使用时,最好使用PO模式进行分层,和Selenium没有太大区别的,不过有个地方需要注意:web自动化中,一般每个网页页面(url),即每个PO页面对应一个类;而在app自动化中,经常把一个流程中的好几个逻辑功能简单的页面合在一起对应一个类,因为这些简单的页面只有一两个操作,没有必要单独封装成一个PO页面)
# 这边直接传入conftest.py中的browser夹具名,可以直接获得夹具中yield后的appium客户端,如果看不懂的可以去看我的其他关于Pytest详细的文章
def test_login_fail(browser):
    """登陆失败的测试用例,步骤:
    1、appium 前后置  fixture
    2、点击 我的                       通过uiautomatorviewer获取resource-id来定位元素: id1
    3、点击 头像 进行登录              通过uiautomatorviewer获取resource-id来定位元素: id2
    4、输入手机号码                    通过uiautomatorviewer获取resource-id来定位元素: id3
    5、输入密码                        通过uiautomatorviewer获取resource-id来定位元素: id4
    6、点击登录                        通过uiautomatorviewer获取resource-id来定位元素: id5
    7、toast弹框会提示登陆失败信息     xpath定位  //android.widget.Toast(固定方式来定位toast)
    8、获取toast弹框text文本和预期结果进行断言
    """
    expected = '手机号码格式错误'
    driver = browser
    # 点击 我的
    el = driver.find_element('id', 'id1')
    el.click()
    # 点击 头像 进行登录
    profile = driver.find_element('id', 'id2')
    profile.click()
    # 输入手机号码
    mobile = driver.find_element('id', 'id3')
    mobile.send_keys('177')
    # 输入密码
    pwd = driver.find_element('id', 'id4')
    pwd.send_keys('123')
    # 点击登录
    login_btn = driver.find_element('id', 'id5')
    login_btn.click()
    # 获取toast弹框
    toast_info = driver.find_element('xpath', '//android.widget.Toast')
    # 断言
    assert toast_info.text == expected
 浙公网安备 33010602011771号