Pytest+Allure(详细)
Allure是当今比较主流的开源的免费的自动化测试报告,支持Java,Python,我们来看看如何使用Pytest与Allure整合,输出漂亮的测试报告。
一、Pytest
1、什么是pytest
pytest是一款单元测试框架,在编程过程中,单元主要指的是代码中最小的组成部分,例如函数或类,在面向对象中,最小的单元就是类下面的方法。
当我们编写好一段程序后,会对这些函数和方法进行检测,是否出现程序错误,这种对程序的函数和方法进行测试的过程,就叫做单元测试。
pytest的测试框架类似于unittest框架相似,但pytest的测试框架比unittest更加简洁、高效。
2、pytest的优势
a、pytest能够兼容unittest,如果之前用例是unittest编写的,可以使用pytest直接进行使用
b、pytest的断言直接使用assert断言,并非使用self.assertEqual等语法语句以及其他各式各样的断言方式
c、pytest对于失败的测试用例会提供非常详细的错误信息
d、pytest可以自动发现并收集测试用例
e、pytest有非常灵活的fixture管理
f、pytest有mark标记机制,可以标记某些用例为冒烟测试用例
g、pytest提供了非常丰富的插件系统
h、pytest不需要写类,unittest是需要写类并继承的,这里pytest更加简洁
3、使用pytest
pip install pytestpytest编写测试用例的规则如下:
a、模块名称以test_开头
b、测试用例函数以test_开头
c、可以不定义测试用例类(非必须)
4、运行pytest
a、直接通过代码左侧的三角进行运行(pycharm)
b、命令行 例如
pytest --alluredir=reports -m smokec、创建run.py 内容为
pytest.main(['--alluredir=reports', '-m', 'smoke'])5、pytest高级特性
a、用例筛选
我们都做过冒烟测试,也知道冒烟测试用例,pytest支持用例筛选,你可以在想要的用例上进行标记,以此来表示这是一个冒烟测试用例
import pytest

# 格式为:@pytest.mark.自定义标记名
@pytest.mark.smoke
def test_True()
	assert True

@pytest.mark.smoke
def test_False()
	assert False
这样运行用例会有警告信息,通常为了方便分类管理测试用例,我们会对测试用例类型进行注册
新建一个pyproject.toml
[tool.pytest.ini_options]
markers = [
    "smoke: 冒烟测试用例",
    "serial",
]
可能你会疑惑:不是使用pytest.ini来管理吗?pytest.ini固然可以,但是无法输入中文,为了对各种测试用例进行清晰的分类说明,这里使用pyproject.toml。
注册完成后我们需要运行,在命令行输入pytest -m "smoke",这样就可以运行刚刚标记过的测试用例了,值得一提的是,如果这个标记是在函数上,那么就代表着函数属于标记的筛选用例,如果标记在类上,那么整个类下的所有函数都属于筛选用例。
如果运行多个标记那么可以继续在函数或类上再次进行新的标记,例如login标记,意味着我只想要执行登录模块的冒烟测试用例里,那么再次进行注册并运行即可,运行使用pytest -m "smoke and login",如果是冒烟测试用例和登录模块用例满足一个即可,那么就可以使用or即可,两者选其一,满足即可运行。
b、数据驱动
使用@pytest.mark.parametrize("case_info", cases_list),cases_list为测试用例的列表
@pytest.mark.smoke
@pytest.mark.login
@pytest.mark.parametrize("case_info", ["hello", "world"])
def test_add(case_info):
	assert case_info.startswith('h')
运行这个测试用例,结果如下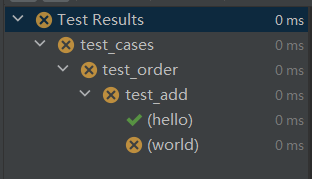
c、fixture夹具
fixture夹具可以说是pytest的灵魂所在,下面说说具体用法
我们知道在unittest中可以使用setUp/tearDown以及setUpClass/tearDownClass分别来表示函数级别和类级别的前后置,相对比较死板,在pytest中可以灵活设置fixture
首先我们将所有夹具都整理在conftest.py中,这样在编写测试用例函数的时候,无需导入,直接可以使用夹具
d、代码
conftest.py
这里我结合selenium的web自动化的浏览器前后置操作进行举例
import pytest
from selenium import webdriver
from selenium.webdriver.chrome.options import Options

@pytest.fixture(scope="function")
# scope定义该夹具的有效级别,可以理解成fixture的作用域,默认不写:function,还有class、module、package、session四个【常用】
def browser():
    """管理浏览器的启动和停止"""
    # 先设置一下浏览器的加载策略属性
    capabilities = Options().to_capabilities()
    capabilities["pageLoadStrategy"] = "eager"
    # 得到一个浏览器对象
    driver = webdriver.Chrome(desired_capabilities=capabilities)
    # 隐性等待
    driver.implicitly_wait(8)
    driver.maximize_window()
    yield driver  # yield上面的为前置操作,下面的为后置操作,yield后面的driver是返回值(对象),可以直接传入测试用例函数里
    driver.quit()
test_login.py
def test_login(browser):# 无需导入夹具browser,可直接当作参数传入
    url = 'http://xxxxxxxxx'
    username = '123'
    password = '321'
    expected = '登陆失败'

    driver = browser # 使用夹具名可以直接获得夹具browser返回的driver浏览器对象

    # 2、访问测试网页
    driver.get(url)

    # 3、点击登录按钮
    login_el = driver.find_element('xpath', "//a[text()='登录']")
    login_el.click()

    # 4、定位用户名输入框,并输入用户名
    username_el = driver.find_element('xpath', "//input[@placeholder='请输入手机号/用户名']")
    username_el.send_keys(username)

    # 5、定位密码输入框,并输入密码
    password_el = driver.find_element('xpath', "//input[@placeholder='请输入密码']")
    password_el.send_keys(password)

    # 6、点击登录
    login_btn = driver.find_element('xpath', "//a[@class='xxxx']")
    login_btn.click()

    # 7、断言
    actual = driver.find_element('xpath', "//div[@class='xxxxx']")
    assert expected == actual.text
run.py
import pytest
pytest.main()
ps:通过夹具返回浏览器对象是web自动化很实用的一个技巧
二、Allure
windows:下载,解压,并配置bin文件夹下allure.bat加入到Path环境变量:https://github.com/allure-framework/allure2/releases
mac:brew install allure
1、安装Python依赖
pip install allure-pytest这将安装Allure-pytest和Allure-python-commons包,以生成与Allure 2兼容的报告数据。
2、基本用法
Allure监听器在测试执行期间会收集结果,只需添加alluredir选项,并选择输出的文件路径即可。
run.py:
import pytest
pytest.main(['--alluredir=reports', '-m', 'smoke'])
运行后,reports文件包下会生成json格式文件,执行如下命令以生成allure测试报告
allure serve reports3、allure注解说明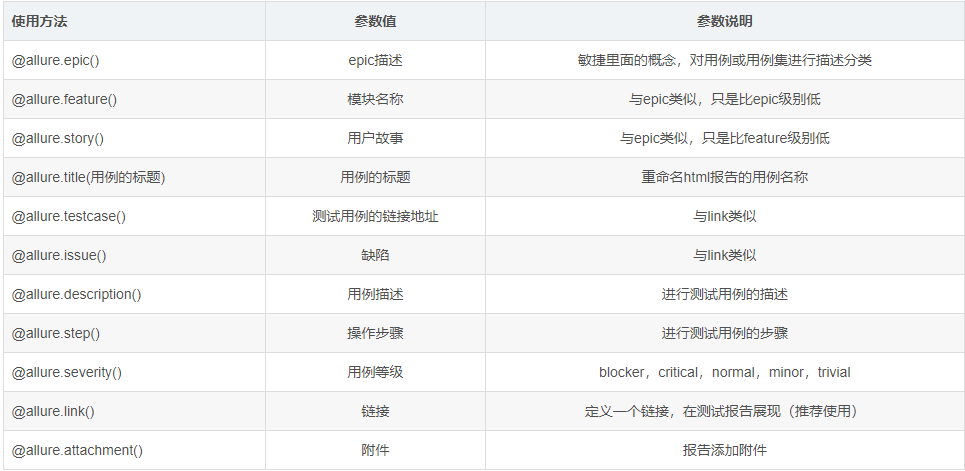
每种注解的具体用法在此就不一一赘述,重点说一下以下两点:
1、添加错误截图 allure.attach()
def save_error_screenshot(self, screenshot_name=f'{datetime.datetime.now().strftime("%Y-%m-%d %H:%M:%S")}.png'):
    """错误用例截图"""
    # 对当前页web页面进行截图
    f = self.driver.get_screenshot_as_png()
    # 将截图保存到allure报告中
    allure.attach(f, screenshot_name, allure.attachment_type.PNG)
2、 参数化的用例中动态设置测试用例名称 allure.dynamic.title
# 用例数据
casedatas = [
    {'title': '用例1','data':"xxx"},
    {'title': '用例2','data':"xxx"},
    {'title': '用例3','data':"xxx"}
]

class TestLogin:
    @pytest.mark.parametrize('item',casedatas)
    def test_demo(self, item):
    	# 动态设置报告中的用例名称
allure.dynamic.title(item['title'])4、allure的命令行参数
pytest.main(['--alluredir=reports', '-m', 'smoke'])中也可以使用allure的命令参数进行测试用例的指定和执行。
--allure-severities=SEVERITIES_SET
Comma-separated list of severity names. Tests only
with these severities will be run. Possible values
are: blocker, critical, normal, minor, trivial.
--allure-epics=EPICS_SET
Comma-separated list of epic names. Run tests that
have at least one of the specified feature labels.
--allure-features=FEATURES_SET
Comma-separated list of feature names. Run tests that
have at least one of the specified feature labels.
--allure-stories=STORIES_SET
Comma-separated list of story names. Run tests that
have at least one of the specified story labels.
--allure-link-pattern=LINK_TYPE:LINK_PATTERN
Url pattern for link type. Allows short links in test,
like 'issue-1'. Text will be formatted to full url
with python str.format().
比如:
pytest.main(['--alluredir=reports', '--allure-features=xxxfeature测试用例', '-sv'])
 浙公网安备 33010602011771号