SSL Host Headers in IIS 7
原文地址: http://www.sslshopper.com/article-ssl-host-headers-in-iis-7.html
SSL Host Headers in IIS 7
SSL Host Headers in IIS 7 allow you to use one SSL certificate for multiple IIS websites on the same IP address. Through the IIS Manager interface, IIS only allows you to bind one site on each IP address to port 443 using an SSL certificate. If you try to bind a second site on the IP address to the same certificate, IIS 7 will give you an error when starting the site up stating that there is a port conflict. In order to assign a certificate to be used by multiple IIS sites on the same IP address, you will need to set up SSL Host Headers by following the instructions below.
What Type of SSL Certificate Do You Need?
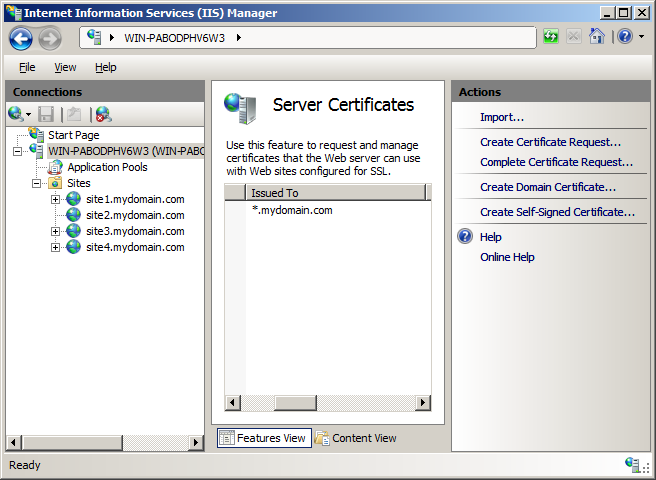
Because you can only use one certificate, that certificate needs to work with all the hostnames of the websites that you use it with (otherwise you will receive a name mismatch error). For example, if each of your IIS 7 websites uses a subdomain of a single common domain name (like in the example below), you can get a Wildcard Certificate for *.mydomain.com and it will secure site1.mydomain.com, site2.mydomain.com, etc.
If, on the other hand, your IIS 7 sites all use different domain names (mail.mydomain1.com, mail.mydomain2.com, etc.), you will need to get a Unified Communications Certificate (also called a SAN certificate).
Setting up SSL Host Headers on IIS 7
- Obtain an SSL certificate and install it into IIS 7. For step-by-step instructions on how to do this, see Installing an SSL Certificate in Windows Server 2008 (IIS 7.0).
- Once the certificate is installed into IIS, bind it to the first site on the IP address.

- Open the command prompt by clicking the start menu and typing "cmd" and hitting enter.
- Navigate to C:\Windows\System32\Inetsrv\ by typing "cd C:\Windows\System32\Inetsrv\" on the command line.
- In the Inetsrv folder, run the following command for each of the other websites on the IP address that need to use the certificate (copy both lines):
appcmd set site /site.name:"<IISSiteName>" /+bindings.[protocol='https',bindingInformation='*:443:<hostHeaderValue>']
Replace <IISSiteName> with the name of the IIS site and <hostHeaderValue> with the host header for that site (site1.mydomain.com)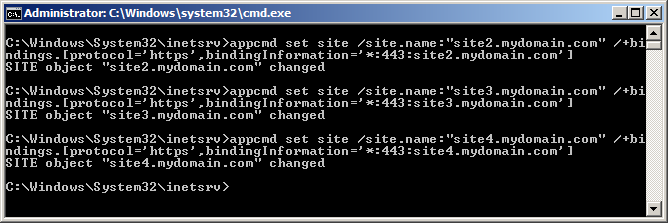
- Test each website in a browser. It should bring up the correct page and show the lock icon without any errors. If it brings up the web page of the first IIS site, then SSL Host Headers haven't been set up correctly.
If you need to set up multiple site to use a single SSL certificate on IIS 6 or Apache, see How To Configure SSL Host Headers in IIS 6. For more information about SSL Host Headers in IIS 7 see IIS 7.0: Add a Binding to a Site and SSL certificates on Sites with Host Headers.
for those that have their HostHeader Blocked for writing need to go to:
Launch the Microsoft Management Console (MMC)
Select Start –> Run
Type in "MMC" and hit enter
From the console, select File –> Add / Remove Snap-in
Select Certificates from the Add / Remove dialog
Select Computer Account when prompt for which certificates the snap-in will manager.
Select Local Computer when prompted
Click OK to add the Snap-in to the MMC
Locate your SSL certificate
For self-signed (SELFSSL), look in Personal
For installed / purchased, look in the appropriate folder the certificate was originally installed in
Right click on the certificate and select properties
Edit the Friendly Name field so the name starts with an *
everything else is ok on this tutorial, great job !!
but is important tha the friendly name starts with an * or else you won't me able to write your host header.
posted on 2011-10-23 23:17 smwikipedia 阅读(508) 评论(0) 收藏 举报


 浙公网安备 33010602011771号