
Day41 of learning python --web框架的本质及初识Django框架
1.web框架的本质
自己开发web框架必备的知识点
    --socket
    --http协议
    --HTML知识
    --数据库(pymysql,SQLALchemy)
HTTP:无状态,短连接
TCP:不断开
WEB应用(网站)的简单连接过程
    浏览器(socket客户端)
        2.在网站输入框输入:www.cnblogs.com
            sk.socket()
            sk.connect()
            sk.send('我想要xxx')
        5.收到
        6.连接断开

    博客园(socket服务端)
        1.监听IP和端口
        3.收到'我想要xxx'
        4.响应:'好',返回想要的内容
        7.断开,等待下一个连接
网站构成的基本原理:
a.socket服务器
b.根据URL不同返回不同的内容
    路由系统:
        URL  -> 函数
c.字符串返回给用户
    模板引擎渲染:
        HTML充当模板(特殊字符)
        自己创造任意数据
    返回字符串
web框架分类:
框架种类:
    -a,b,c                  --> Tornado
    -[第三方a],b,c       --> wsgiref     -> Django
    -[第三方a],b,[第三方c]     --> flask,bottle.
两个重要的例子:
静态网站:发送给浏览器端的内容不变的,根据输入不同的网站得到不同的页面展示,可以查看URL路由系统


import socket
import time
sock = socket.socket()
sock.bind(('127.0.0.1',8080))
sock.listen(5)

def func1(request):
    with open('information.html','rb') as f:
        data = f.read()
    return data

def func2(request):
    with open('login.html','rb') as f:
        data = f.read()
    return data

def func3(request):
    with open('active.html','r',encoding='utf-8') as f:
        data = f.read()
        active_time = time.ctime()
        current_data = data.replace('@time',active_time)
    return bytes(current_data,encoding='utf-8')
relation_list = [
    ('/information.html',func1),('/login.html',func2),('/active.html',func3)
    ]

def run():
    while 1:
        conn,addr = sock.accept()  # hang 住
        #有人来连接了
        #获取用户发送的数据
        data = conn.recv(8096)
        data = str(data,encoding='utf-8')
        headers,bodys = data.split('\r\n\r\n')
        temp_list = headers.split('\r\n')
        method,url,protocal = temp_list[0].split(' ')
        conn.send(b'HTTP/1.1 200 OK\r\n\r\n')    # 此句不能少,否则浏览器不能识别,因为html的识别需要依据http协议传输才行
        func_name = None   # 要先定义了,才能使用
        for item in relation_list:
            if url == item[0]:
                func_name = item[1]
                break
        if func_name:
            response = func_name(bodys)
        else:
            response = b'404'

        conn.send(response)
        conn.close()

if __name__ =='__main__':
    run()
<!DOCTYPE html>
<html lang="zh-CN">
<head>
    <meta charset="UTF-8">
    <title>active</title>
    <meta name="viewport" content="width=device-width, initial-scale=1, maximum-scale=1, user-scalable=no">
    <!--<link rel="stylesheet" href="bootstrap/css/bootstrap.min.css">-->
</head>
<body>
    <table border="1">
        <thead>
        <tr>
            <th>id</th>
            <th>name</th>
            <th>mail</th>
            <th>time</th>
        </tr>
        </thead>
        <tbody>
        <tr>
            <th>1</th>
            <th>alex</th>
            <th>123@qq.com</th>
            <th>@time</th>
        </tr>
        </tbody>
    </table>
<!--<script src="jQuery-3.3.1.js"></script>-->
<!--<script src="bootstrap/js/bootstrap.min.js"></script>-->
</body>
</html>
<!DOCTYPE html>
<html lang="zh-CN">
<head>
    <meta charset="UTF-8">
    <title>infomation</title>
    <meta name="viewport" content="width=device-width, initial-scale=1, maximum-scale=1, user-scalable=no">
    <!--<link rel="stylesheet" href="bootstrap/css/bootstrap.min.css">-->
</head>
<h3>基本信息</h3>
<body>
    <table border="1">
        <thead>
        <tr>
            <th>id</th>
            <th>name</th>
            <th>mail</th>
            <th>time</th>
        </tr>
        </thead>
        <tbody>
        <tr>
            <th>1</th>
            <th>alex</th>
            <th>123@qq.com</th>
            <th>2019.1.19</th>
        </tr>
        </tbody>
    </table>
<!--<script src="jQuery-3.3.1.js"></script>-->
<!--<script src="bootstrap/js/bootstrap.min.js"></script>-->
</body>
</html>
<!DOCTYPE html>
<html lang="zh-CN">
<head>
    <meta charset="UTF-8">
    <title>login</title>
    <meta name="viewport" content="width=device-width, initial-scale=1, maximum-scale=1, user-scalable=no">
    <!--<link rel="stylesheet" href="bootstrap/css/bootstrap.min.css">-->
</head>
<body>
<h3>Login</h3>
<form action="">
    <p>
        <label for="username">用户名:</label>
        <input type="text" id="username" name="username">
    </p>

    <p>
        <label for="password">密码:</label>
        <input type="password" id="password" name="password">
    </p>

</form>

<!--<script src="jQuery-3.3.1.js"></script>-->
<!--<script src="bootstrap/js/bootstrap.min.js"></script>-->
</body>
</html>
动态网站:从数据库中获取数据,把数据库的内容替换到html模板进行渲染,通过修改数据库的数据,从而页面展示不同的数据
import socket
import time
sock = socket.socket()
sock.bind(('127.0.0.1',8080))
sock.listen(5)

def func1(request):
    with open('information.html','rb') as f:
        data = f.read()
    return data

def func2(request):
    with open('login.html','rb') as f:
        data = f.read()
    return data

def func3(request):
    with open('active.html','r',encoding='utf-8') as f:
        data = f.read()
        active_time = time.ctime()
        current_data = data.replace('@time',active_time)
    return bytes(current_data,encoding='utf-8')


def func4(request):
    import pymysql

    # 创建连接
    conn = pymysql.connect(host='127.0.0.1', port=3306, user='root', passwd='baicells', db='school')
    # 创建游标
    cursor = conn.cursor(cursor=pymysql.cursors.DictCursor)

    # 执行SQL,并返回收影响行数
    effect_row = cursor.execute("select * from student ")
    user_list = cursor.fetchall()

    # 关闭游标
    cursor.close()
    # 关闭连接
    conn.close()
    print(user_list)
    """
    <tr>
        <td>%s</td>
        <td>%s</td>
        <td>%s</td>
        <td>%s</td>
    </tr>

    """
    content_list = []
    for row in user_list:
        tp = "<tr><td>%s</td><td>%s</td><td>%s</td><td>%s</td></tr>" %(row['sid'],row['sname'],row['gender'],row['class_id'])
        content_list.append(tp)
    content = "".join(content_list)
    with open('userlist.html', 'r', encoding='utf-8') as f:
        template = f.read()
        # 模板渲染(模板+数据)
        data = template.replace('@@content@@',content)
    return bytes(data,encoding='utf-8')


# 基于第三方工具实现模板渲染
def func5(request):
    import pymysql
    from jinja2 import Template

    # 创建连接
    conn = pymysql.connect(host='127.0.0.1', port=3306, user='root', passwd='baicells', db='school')
    # 创建游标
    cursor = conn.cursor(cursor=pymysql.cursors.DictCursor)

    # 执行SQL,并返回收影响行数
    effect_row = cursor.execute("select * from student ")
    host_list = cursor.fetchall()
    # 关闭游标
    cursor.close()
    # 关闭连接
    conn.close()
    print(host_list)

    with open('hostlist.html', 'r', encoding='utf-8') as f:
        data = f.read()
        # 模板渲染(模板+数据)
    template = Template(data)
    data = template.render(hostlist=host_list)
    return bytes(data,encoding='utf-8')


relation_list = [
    ('/information.html',func1),('/login.html',func2),('/active.html',func3),('/mysql.html',func4),('/hostlist.html',func5)
    ]

def run():
    while 1:
        conn,addr = sock.accept()  # hang 住
        #有人来连接了
        #获取用户发送的数据
        data = conn.recv(8096)
        data = str(data,encoding='utf-8')
        headers,bodys = data.split('\r\n\r\n')
        temp_list = headers.split('\r\n')
        method,url,protocal = temp_list[0].split(' ')
        conn.send(b'HTTP/1.1 200 OK\r\n\r\n')    # 此句不能少,否则浏览器不能识别,因为html的识别需要依据http协议传输才行
        func_name = None   # 要先定义了,才能使用
        for item in relation_list:
            if url == item[0]:
                func_name = item[1]
                break
        if func_name:
            response = func_name(bodys)
        else:
            response = b'404'

        conn.send(response)
        conn.close()

if __name__ =='__main__':
    run()
<!DOCTYPE html>
<html lang="zh-CN">
<head>
    <meta charset="UTF-8">
    <title>hostlist</title>
    <meta name="viewport" content="width=device-width, initial-scale=1, maximum-scale=1, user-scalable=no">
    <!--<link rel="stylesheet" href="bootstrap/css/bootstrap.min.css">-->
</head>
<body>
  <table border="1">
        <thead>
        <tr>
            <th>id</th>
            <th>name</th>
            <th>gender</th>
            <th>class_id</th>
        </tr>
        </thead>
        <tbody>
            {% for row in hostlist %}
                <tr>
                    <td>{{row.sid}}</td>
                    <td>{{row.sname}}</td>
                    <td>{{row.gender}}</td>
                    <td>{{row.class_id}}</td>
                </tr>
            {% endfor %}
        </tbody>
<!--<script src="jQuery-3.3.1.js"></script>-->
<!--<script src="bootstrap/js/bootstrap.min.js"></script>-->
</body>
</html>
2.Django框架(通过框架,主要实现业务)
1)安装,在CMD上输入:pip install django
2)创建一个Django项目:django-admin startproject mysite(可以在不同的盘内创建,例如:D:)
3)在CMD上切换到mysite目录下:cd mysite
4)启动服务器:Python manage.py runserver 127.0.0.1:8080

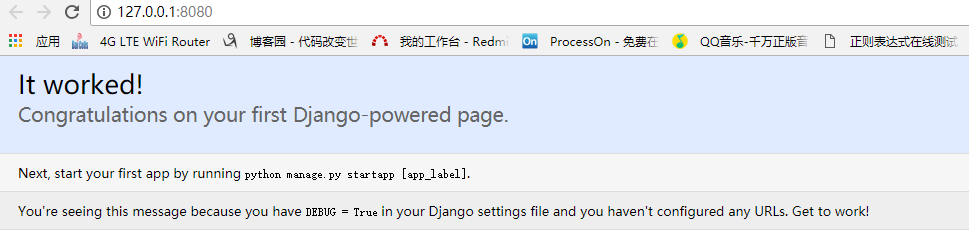
5)检查该简单的网站是否建立成功,打开浏览器,输入:127.0.0.1:8080,如果显示的是该页面,则已经检查成功了。
Django程序目录:
    mysite
        -settings.py         # Django配置文件
        -url.py                 # 路由系统:URL -> 函数
        -wsgi.py              #用于定义Django用的socket:wsgiref,uwsgi
        manage.py          #对当前Django程序所有操作可以基于Python manage.py   xxxx
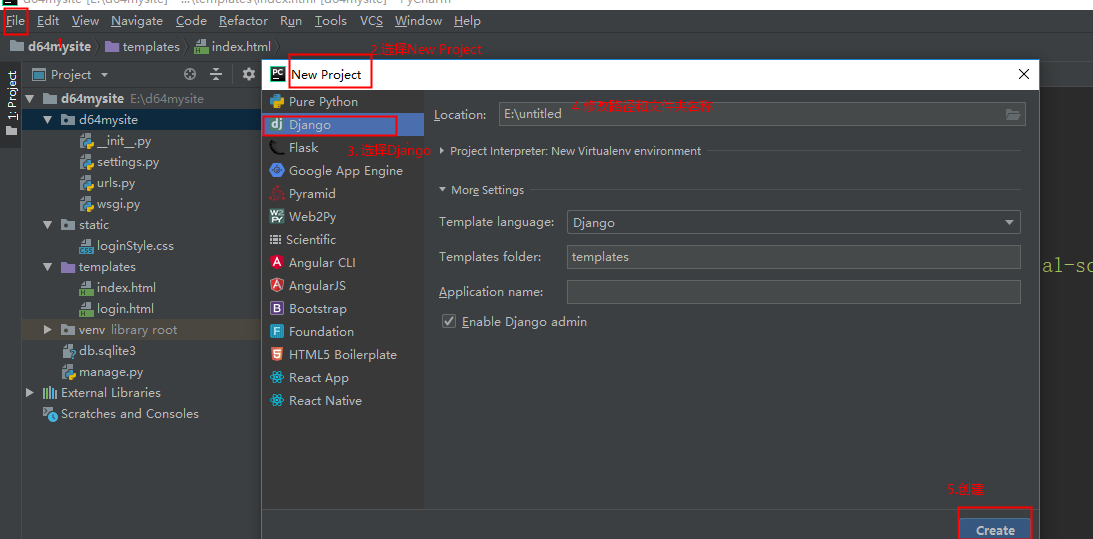
3.利用pycharm创建Django框架
1)创建Project
2.配置:
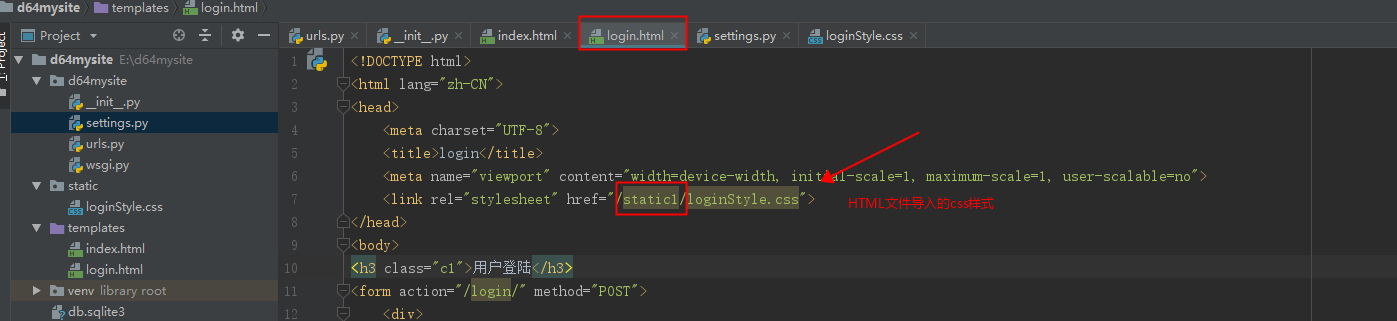
模板路径:template目录,用来存放html文件的(render显示)


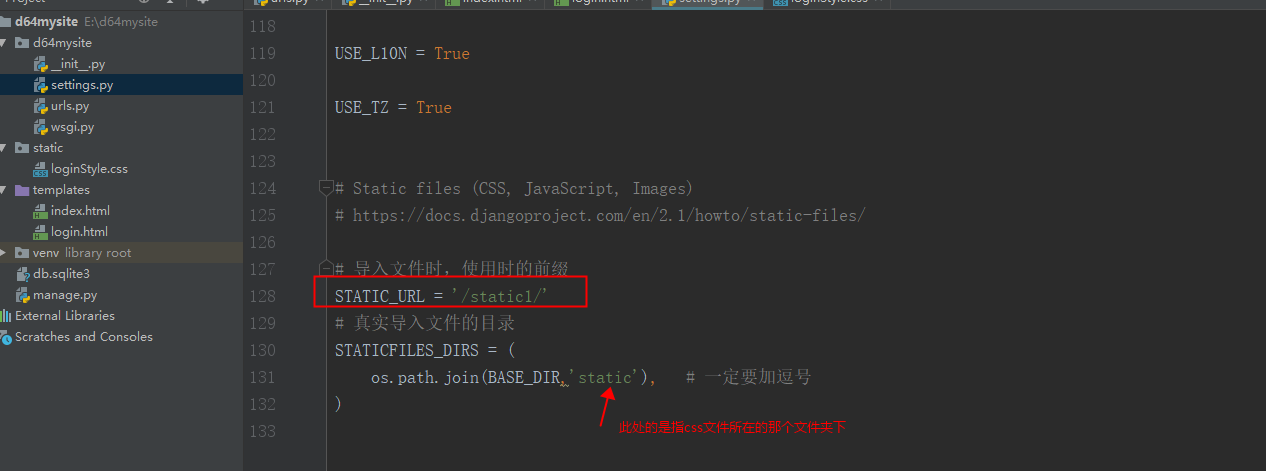
静态文件路径:static 用来导入css,js,等文件的。HTML文件导入的CSS/JS文件时的文件路径前缀/static1/要与settings.py文件的STATIC_URL = '/static1/'一致
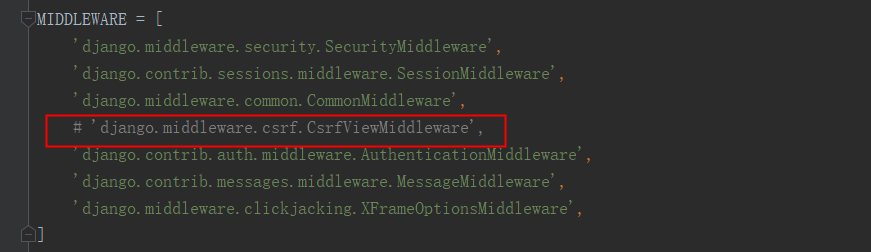
3.额外的配置
在setting文件中注释掉这个字符串
Django框架例子:
Django框架的相关语句和语句
    def login(request):    # request为请求体的内容参数
        request.method
        request.POST     -> 请求体
        request.GET      -> 请求头的url

       return  HttpResponse(..)
      return render(request,'login.html',{...}
      return redirect('网址')

GET请求   ->  request.GET
POST请求   -> request.GET(网址的?开始分割的数据)和request.POST
get方式提交的数据会放在url之后,以?分割url和传输数据,参数之间以&相连;post方式提交的数据会放在http包的请求体中,请求体和请求首部字段中间用一行空白相连。
get提交的数据大小有限制(因为浏览器对url的长度有限制),而post方法提交的数据没有限制
重点要学会:for循环和html结合起来,以及模板引擎中的特殊标记{{内容}}
例子:
url.py
from django.contrib import admin
from django.urls import path

from django.shortcuts import HttpResponse,render,redirect
def login(request):
    '''
    处理用户请求,并返回内容
    :param request: 用户请求相关的所有信息
    :return:
    '''
    # HttpResponse只能返回的是字符串类型的
    # return HttpResponse('login')
    # return HttpResponse('<input type="text" />')
    # 自动找到模板路径下的login.html文件,读取内容并返回给用户
    # 模板路径配置
    if request.method == "GET":
        return render(request,'login.html')
    else:
        # 用户POST 提交的数据
        # print(request.POST)
        u = request.POST.get('username')  # 不同于字典获取request.POST['username'],此不会报错
        p = request.POST.get('password')
        # 数据库连接
        import pymysql
        conn = pymysql.connect(host='127.0.0.1', port=3306, user='root', passwd='baicells', db='userinformation')
        cursor = conn.cursor(cursor=pymysql.cursors.DictCursor)
        effect_row = cursor.execute("select * from user")
        host_list = cursor.fetchall()    # 得到的是一个带有字典的列表
        cursor.close()
        conn.close()
        print(host_list)
        for item in host_list:
            if item['name'] == u and item['password'] == p:
                # 登陆成功
                # return redirect('http://www.cnblogs.com')     # 重定向到某个页面
                return redirect('/index/')
            else:
                # 登陆失败
                return render(request,'login.html',{'error':'用户名或密码错误'})

def index(request):
    return render(request,'index.html',{'name':'alex','users':['林聪','燕子'],'user_dict':{'k1':'v1','k2':'v2'},
                                        'user_list_dict':[
                                            {'id':1,'name':'alex','email':'alex3714@163.com'},
                                            {'id':2,'name':'alex2','email':'alex3714@1632.com'},
                                            {'id': 3, 'name': 'alex3', 'email': 'alex3714@1633.com'},
                                        ]})

urlpatterns = [
    # path('admin/', admin.site.urls),
    path('login/', login),
    path('index/',index),
]
index.html :标记语言与for循环的应用
<!DOCTYPE html>
<html lang="zh-CN">
<head>
    <meta charset="UTF-8">
    <title>Title</title>
    <meta name="viewport" content="width=device-width, initial-scale=1, maximum-scale=1, user-scalable=no">

</head>
<body>
    <h1>标记模板</h1>
    <p>{{ name }}</p>
    <P>{{ users }}</P>
    <p><h2>{{ users.0 }}</h2></p>
    <p><h2>{{ users.1 }}</h2></p>
    <p>{{ user_dict.k1 }}</p>
    <p>{{ user_dict.k2 }}</p>
    <h1>循环</h1>
    {% for item in users %}
        <p>{{ item }}</p>
    {% endfor %}
    {% for item in user_dict.values %}
        <p>{{ item}}</p>
    {% endfor %}
    <table border="1">
        <thead>
        <tr>
            <th>id</th>
            <th>name</th>
            <th>email</th>
            <th>操作</th>
        </tr>
        </thead>
    <tbody>
        {% for row in user_list_dict %}
            <tr>
                <td>{{ row.id}}</td>
                <td>{{ row.name }}</td>
                <td>{{ row.email }}</td>
                <td>
                    <a href="">编辑</a> | <a href="">删除</a>
                </td>
            </tr>
        {% endfor %}
    </tbody>

    </table>
</body>
</html>
login.html:Django框架的发送数据显示
<!DOCTYPE html>
<html lang="zh-CN">
<head>
    <meta charset="UTF-8">
    <title>login</title>
    <meta name="viewport" content="width=device-width, initial-scale=1, maximum-scale=1, user-scalable=no">
    <link rel="stylesheet" href="/static1/loginStyle.css">
</head>
<body>
<h3 class="c1">用户登陆</h3>
<form action="/login/" method="POST">
    <div>
        <label for="username">用户名</label>
        <input type="text" id="username" name="username">
    </div>
    <div>
        <label for="password">密码</label>
        <input type="password" id="password" name="password">
    </div>
    {{ error }}
    <div>
        <input type="submit" value="登陆">
    </div>
<!--提交数据的时候是以字典的形式提交-->
  <!--  username:输入的username
    password:输入的密码-->
</form>

</body>
</html>
loginStyle.css样式:
.c1 {
    color: green;
}

 浙公网安备 33010602011771号