Springcloud项目中添加熔断器hystrix并集成dashboard查看
一、新建module,与服务的提供者为同级
除Springcloud基本依赖添加下面依赖
 1      <!--仪表盘-->
 2         <dependency>
 3             <groupId>org.springframework.cloud</groupId>
 4             <artifactId>spring-cloud-starter-netflix-hystrix-dashboard</artifactId>
 5         </dependency>
二、编写配置文件application.yml
 server:
    port: 5666

#忘记仪表盘会出现Unable to connect to Command Metric Stream
  hystrix:
    dashboard:
      proxy-stream-allow-list: "*"
三、编写启动类并开启仪表盘
1 @SpringBootApplication
2 @EnableHystrixDashboard
3 public class DashBoardApp {
4     public static void main(String[] args) {
5         SpringApplication.run(DashBoardApp.class,args);
6     }
7 }
四、在服务的提供者下添加依赖
1         <!--hystrix 熔断器-->
2         <dependency>
3             <groupId>org.springframework.cloud</groupId>
4             <artifactId>spring-cloud-starter-netflix-hystrix</artifactId>
5         </dependency>
五、(选)在服务的提供者controller中的方法上面添加注解@HystrixCommand用于触发熔断机制后处理,并添加在触发熔断后进行处理的方法
 1     @RequestMapping("/aaaa")
 2     //@HystrixCommand(defaultFallback = "defaultFallBack")
 3     @HystrixCommand(fallbackMethod = "getUserByIdFallBack")
 4     public String getUserById(Integer id) throws Exception {
 5         ..........
 6     }
 7
 8     public String defaultFallBack(){
 9        //触发了默认的熔断机制后开始处理
10     }
11    //返回类型、参数要保持一致
12     public String getUserByIdFallBack(Integer id){
13        //触发了熔断机制,处理...
14     }
六、在服务的提供者启动类添加配置
 1 @SpringBootApplication
 2 @EnableEurekaClient
 3 @EnableCircuitBreaker// 开启熔断器的支持
 4 //@EnableHystrixDashboard// 开启熔断器仪表盘的支持
 5 public class HystrixApp {
 6     public static void main(String[] args) {
 7         SpringApplication.run(HystrixApp.class,args);
 8     }
 9
10     @Bean
11     public ServletRegistrationBean getServlet(){
12         HystrixMetricsStreamServlet streamServlet=new HystrixMetricsStreamServlet();
13         ServletRegistrationBean registrationBean = new ServletRegistrationBean(streamServlet);
14
15         registrationBean.setLoadOnStartup(1);
16         registrationBean.addUrlMappings("/hystrix.stream");
17         registrationBean.setName("HystrixMetricsStreamServlet");
18
19         return registrationBean;
20     }
21 }
七、启动项目,在浏览器输入http://localhost:5666/hystrix发现一直卡在那
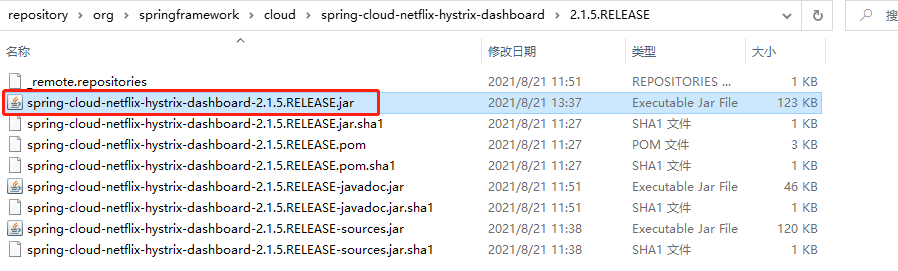
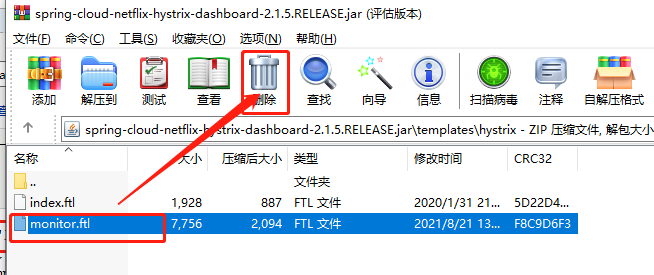
定位到依赖

在本地仓库的jar包的位置
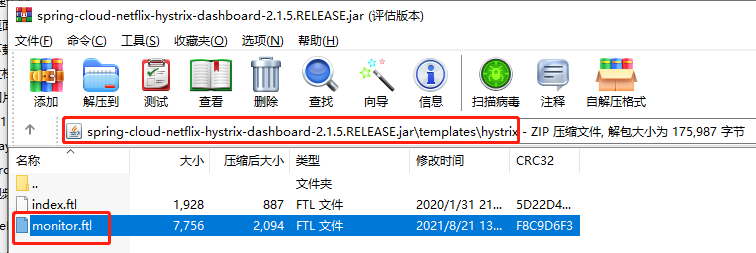
用压缩软件直接打开jar不要解压缩,找到文件monitor.ftl
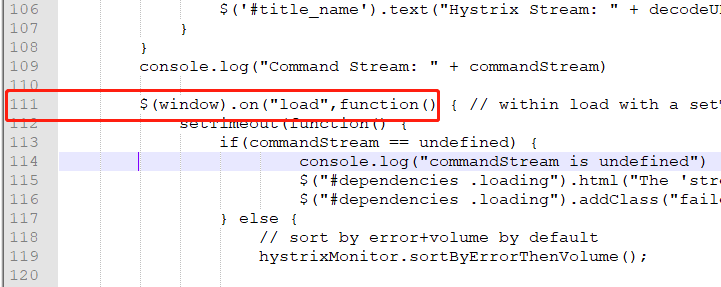
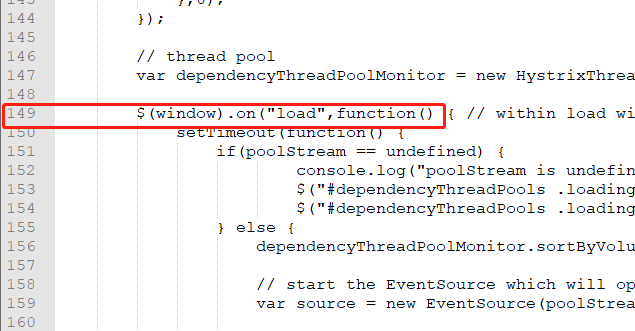
直接拖到桌面用记事本等编辑器打开进行编辑,修改111行和149行共计两处到如图所示(用于复制:$(window).on("load",function())
删除掉原来的后直接将修改后的拖进来
八、重新启动项目
1.先访问自己的服务,不访问肯定啥都监听不到一直在连接状态
2.浏览器输入http://localhost:5666/hystrix后看到界面
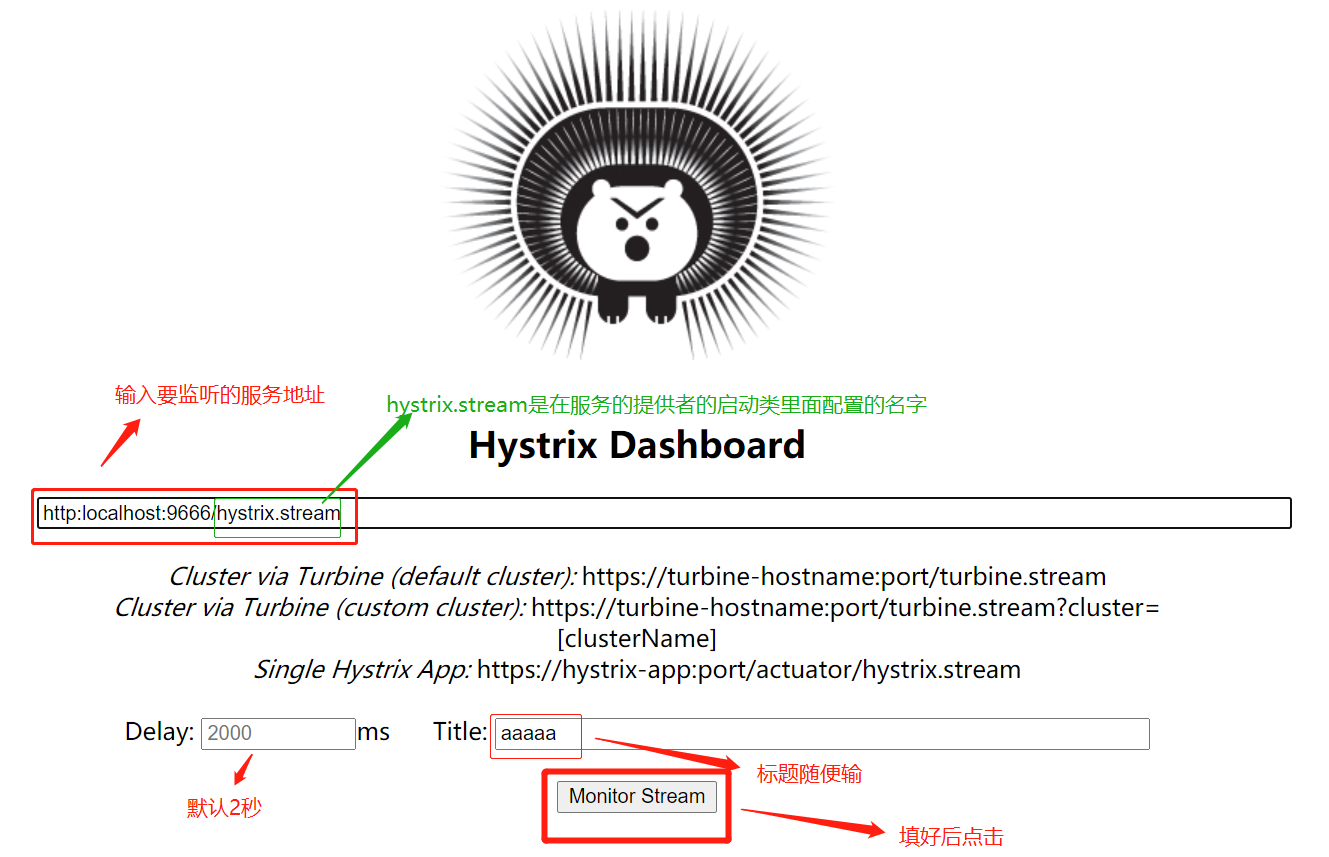
点击Monitor Stream后即可进入,(上面地址填写做图忘记修改,少加了斜杠,在此说明,正确地址:http://localhost:9666/hystrix.stream)
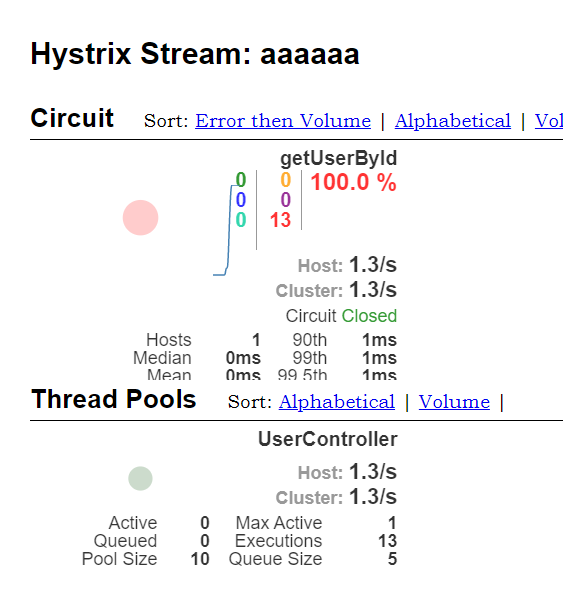
然后就可以为所欲为的访问你的服务进行查看它的熔断、恢复状态了。

 浙公网安备 33010602011771号