服务注册与发现
服务注册与发现
1. 概念
在服务注册与发现中,有一个注册中心。当服务启动时会把自己的服务信息注册到注册中心中;另外一方(消费方)会去注册中心上获取到实际的通信地址。实际的作用其实就是管理多个服务跟服务之间复杂的依赖关系,实现服务调用、负载均衡、容错等。

2. 实现服务注册与发现的几种方案
2.1 Eureka
Eureka2.0停更了,可以使用Zookeeper/Consul/alibaba
2.2 Zookeeper
zookeeper是一个分布式协调工具,可以实现注册中心功能,可以使用zookeeper服务器取代Eureka服务器,zk作为服务注册中心
2.3 Consul
Consul是一台开源的分布式服务发现和配置的管理系统,由Go语言开发它提供了微服务系统中的服务治理、配置中心、控制总线等功能。这些功能可以单独使用也可以一起使用,支持全平台
- 服务发现 - 提供HTTP和DNS两种发现方式
- 健康检测 - 支持多种协议,HTTP/TCP/Docker/Shell脚本定制化
- KV存储 - key, value 的存储方式
- 多数据中心 - Consul支持多数据中心
- 可视化Web界面 -
3. 单机搭建步骤
3.1 Eureka
1. pom.xml引入依赖
<dependencies>
    <!-- 引入Eureka注册中心的服务端依赖-->
    <dependency>
        <groupId>org.springframework.cloud</groupId>
        <artifactId>spring-cloud-starter-netflix-eureka-server</artifactId>
    </dependency>
    <dependency>
        <groupId>org.springframework.boot</groupId>
        <artifactId>spring-boot-starter-web</artifactId>
    </dependency>
    <!--监控-->
    <dependency>
        <groupId>org.springframework.boot</groupId>
        <artifactId>spring-boot-starter-actuator</artifactId>
    </dependency>
    <dependency>
        <groupId>org.projectlombok</groupId>
        <artifactId>lombok</artifactId>
        <optional>true</optional>
    </dependency>
    <dependency>
        <groupId>org.springframework.boot</groupId>
        <artifactId>spring-boot-starter-test</artifactId>
        <scope>test</scope>
    </dependency>
    <!--<dependency>
            <groupId>org.springframework.boot</groupId>
            <artifactId>spring-boot-devtools</artifactId>
            <scope>runtime</scope>
            <optional>true</optional>
        </dependency>-->

    <dependency>
        <groupId>com.leancloud.springcloud</groupId>
        <artifactId>cloud-api-common</artifactId>
    </dependency>
</dependencies>
2. yml配置文件
server:
  port: 7001 # 7002, 7003
  client:
    register-with-eureka: false # false 代表不注册自己
    fetch-registry: false # false 表示自身就是注册中心,并不需要去检索服务
    service-url:
      # 注册中心的地址
      defaultZone: http://localhost:7001/eureka
3. 编写启动类
@SpringBootApplication
@EnableEurekaServer // 表明本项目是eureka注册种的的服务端
public class EurekaApplication {

    public static void main(String[] args) {
        SpringApplication.run(EurekaApplication.class,args);
    }
}
4. 消费端添加依赖
 <!--eureka client -->
<dependency>
    <groupId>org.springframework.cloud</groupId>
    <artifactId>spring-cloud-starter-netflix-eureka-client</artifactId>
</dependency>
5. 修改配置文件
eureka:
  client:
    fetch-registry: true
    register-with-eureka: true
    service-url:
      defaultZone: http://localhost:7001/eureka
  instance:
    instance-id: payment8001 # 设置eureka上显示的名称
    prefer-ip-address: true # 访问路径可以显示IP地址
6. 启动类添加开启注解
@EnableEurekaClient // 表明为Eureka的客户端
3.2 Zookeeper实现注册中心
3.2.1 部署Zookeeper服务
3.2.2 搭建服务提供者
-
引入zookeeper的pom
<dependency> <groupId>org.springframework.cloud</groupId> <artifactId>spring-cloud-starter-zookeeper-discovery</artifactId> <exclusions> <exclusion> <groupId>org.apache.zookeeper</groupId> <artifactId>zookeeper</artifactId> </exclusion> </exclusions> </dependency> <!-- 只有当服务器和使用的jar包的版本不匹配值时,替换掉指定的自带的jar包,指定合适的版本 Caused by: org.apache.zookeeper.KeeperException$UnimplementedException: KeeperErrorCode = Unimplemented for /services/cloud-provider-payment/ee1f4936-0ac2-4468-b0a4-9fbc3eea7d95 --> <dependency> <groupId>org.apache.zookeeper</groupId> <artifactId>zookeeper</artifactId> <version>3.4.9</version> </dependency>-
添加yaml文件
server: port: 8004 spring: application: name: cloud-provider-payment cloud: zookeeper: connect-string: 47.93.237.204:2181 -
编写启动类
@SpringBootApplication @EnableDiscoveryClient public class PaymentApplication8004 { public static void main(String[] args) { SpringApplication.run(PaymentApplication8004.class, args); } } -
启动项目查看是否注册成功
./zkClient.sh

[zk: localhost:2181(CONNECTED) 14] ls /services/cloud-provider-payment
[c44643d2-65d1-4537-9273-0a2d609b0b28]
# 至此服务已经成功注册到zookeeper
3.2.3 搭建消费者
-
引入依赖
和搭建服务一样的依赖
-
编写配置文件
和搭建服务端一样
-
编写配置类
@Configuration public class ApplicationContext { @Bean @LoadBalanced public RestTemplate restTemplate() { return new RestTemplate(); } } -
编写controller
@RestController public class OrderController { @Autowired private RestTemplate restTemplate; private static final String INVOKER_URL = "http://cloud-provider-payment"; @RequestMapping("/consumer/zk") public String getUUID() { return restTemplate.getForObject(INVOKER_URL+"/payment/zk",String.class); } } -
启动服务
-
-
3.3 Consul
docker安装consul
docker pull consul # 拉取consul
docker run -d --name=myconsul -p 8500:8500 consul # 启动consul
3.3.1 搭建服务端
-
引入pom依赖
<dependency> <groupId>org.springframework.cloud</groupId> <artifactId>spring-cloud-starter-consul-discovery</artifactId> </dependency> -
编写yml文件
spring: application: name: consul-provider-payment cloud: consul: host: 47.93.237.204 port: 8500 discovery: service-name: ${spring.application.name} -
业务逻辑代码和上面一样
3.3.2 搭建客户端
-
引入pom依赖
<dependency> <groupId>org.springframework.cloud</groupId> <artifactId>spring-cloud-starter-consul-discovery</artifactId> </dependency> -
编写yml文件
spring: application: name: consul-consumer-order cloud: consul: host: 47.93.237.204 port: 8500 discovery: service-name: ${spring.application.name} -
业务逻辑代码和上面一样
4. 集群搭建步骤
4.1 Eureka
4.1.1 引入依赖
参考上面
4.1.2 将原来项目复制一份
两个项目一个为 7001 一个为 7002
4.1.3 配置文件
修改主机hosts文件 添加域名映射
127.0.0.1	eureka7001.com
127.0.0.1	eureka7002.com
修改7001yml配置文件
server:
  port: 7001 # 7002
eureka:
  instance:
    hostname: eureka7001.com # eureka服务端的实例名称 在hosts配置文件添加映射 127.0.0.1 eureka7001.com
  client:
    register-with-eureka: false # false 代表不注册自己
    fetch-registry: false # false 表示自身就是注册中心,并不需要去检索服务
    service-url:
      # 注册中心的地址
      defaultZone: http://eureka7002.com:7002/eureka
修改7002yml配置文件
server:
  port: 7002 # 7002, 7003
eureka:
  instance:
    hostname: eureka7002.com # eureka服务端的实例名称 在hosts配置文件添加映射 127.0.0.1 eureka7001.com
  client:
    register-with-eureka: false # false 代表不注册自己
    fetch-registry: false # false 表示自身就是注册中心,并不需要去检索服务
    service-url:
      # 注册中心的地址
      defaultZone: http://eureka7001.com:7001/eureka
4.1.4 启动两个注册中心
4.1.5 修改消费者
service-url:
  defaultZone:  http://eureka7001.com:7001/eureka ,http://eureka7002.com:7002/eureka  #集群版
4.1.6 实现负载均衡
-
@Bean @LoadBalanced // 添加@LoadBalanced 注解表示生效负载均衡机制 public RestTemplate restTemplate() { return new RestTemplate(); } -
/**
 * http://CLOUD-PAYMENT-SERVICE : 微服务的名称
 */
private static final String PAYMENT_URL = "http://CLOUD-PAYMENT-SERVICE";

@Autowired
private RestTemplate restTemplate;

@PostMapping("/payment")
public CommonResult create(@RequestBody Payment payment) {
    return restTemplate.postForObject(PAYMENT_URL+"/payment",payment,CommonResult.class);

}
4.1.7 服务发现Discovery
对于注册进eureka里面的微服务,可以通过服务发现来获得该服务的信息
-
修改服务提供方启动类添加
@EnableDiscoveryClient // 1. 开启服务发现 -
修改服务提供端controller
@Autowired
private DiscoveryClient discoveryClient;
@GetMapping(value = "/payment/discovery")
public Object discovery() {
    List<String> services = discoveryClient.getServices();
    for (String service : services) {
        System.out.println("****element : " + service);
    }
    // 一个微服务下的所有实现
    List<ServiceInstance> instances = discoveryClient.getInstances("CLOUD-PAYMENT-SERVICE");
    for (ServiceInstance instance : instances) {
        System.out.println(instance.getServiceId() + "\t" + instance.getHost() + "\t" + instance.getPort());
    }
    return this.discoveryClient;
}
4.1.8 Eureka自我保护
-
概述
保护模式主要用于一组
client和servver之间存在网络分区场景下的保护.一旦进入保护模式,Eureka Server将会尝试保护其服务注册表中的信息,不在删除服务注册表中的信息 -
为什么会产生Eureka自我保护机制
为了防止EurekaClient可以正常运行,但是与EurekaServer网络不通的情况下,EurekaServer不会立即将EurekaClient删除
-
修改Eureka配置文件
server: enable-self-preservation: false # 关闭自我保护 eviction-interval-timer-in-ms: 2000 # -
修改EurekaClient端配置文件
 instance:
    instance-id: payment8001 # 设置eureka上显示的名称
    prefer-ip-address: true # 访问路径可以显示IP地址
    # Eureka客户端向服务端发送心跳的时间间隔,单位是秒(默认30秒)
    lease-renewal-interval-in-seconds: 1
    # Eureka服务端在收到最后一个心跳等待时间上限,单位为秒(默认90秒)
    lease-expiration-duration-in-seconds: 2
5. 三个注册中心异同点
CAP
- C: Consistency(强一致性)
- A: Availability (高可用)
- P: partition tolerance(分区容错)
- CAP理论关注粒度是数据,而不是整体系统设计
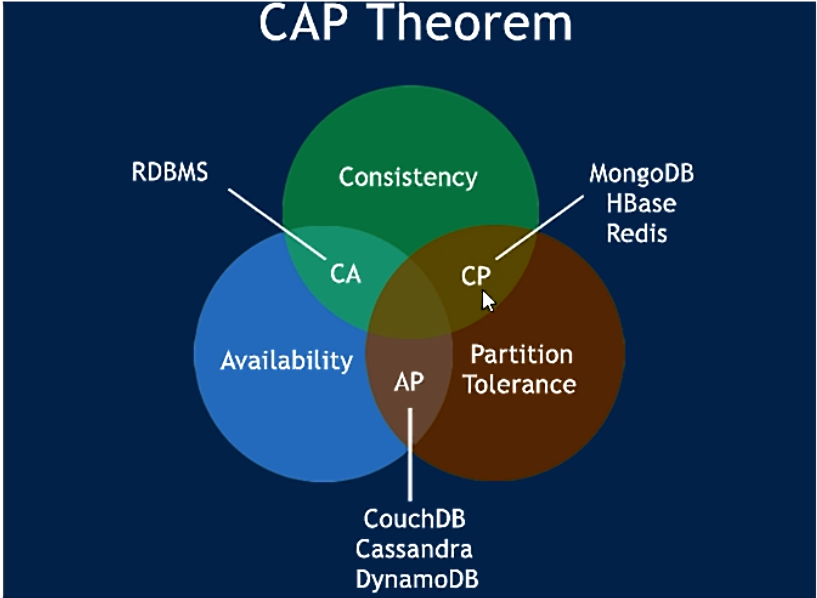
Eureka 是AP
Consul和Zookeeper是CP

 浙公网安备 33010602011771号