Tekton 设计简介 及 实践
本文是我对Tekton的实现原理和背后技术逻辑的理解,以及在实践过程中的一些总结。
简介
Tekton 是一个基于 Kubernetes 的云原生 CI/CD 开源框架,基于 CRD(Custom Resource Definitions)方式实现,目前阿里、google、IBM 都在使用这个框架。
Tekton 定义了 Task、TaskRun、Pipeline、PipelineRun、PipelineResource 五类核心对象,通过对task、pipeline资源的编排可以实现CI/CD。
除此之外Tekton还提供了:
- Tekton CLI 命令行工具可以更加快捷和针对性的现实tekton的运行状态;
- Tekton Dashboard 可以图形化界面的形式查看运行状态和结果;
- Tekton Trigger 提供了web api可以进行基本的触发。
实现原理
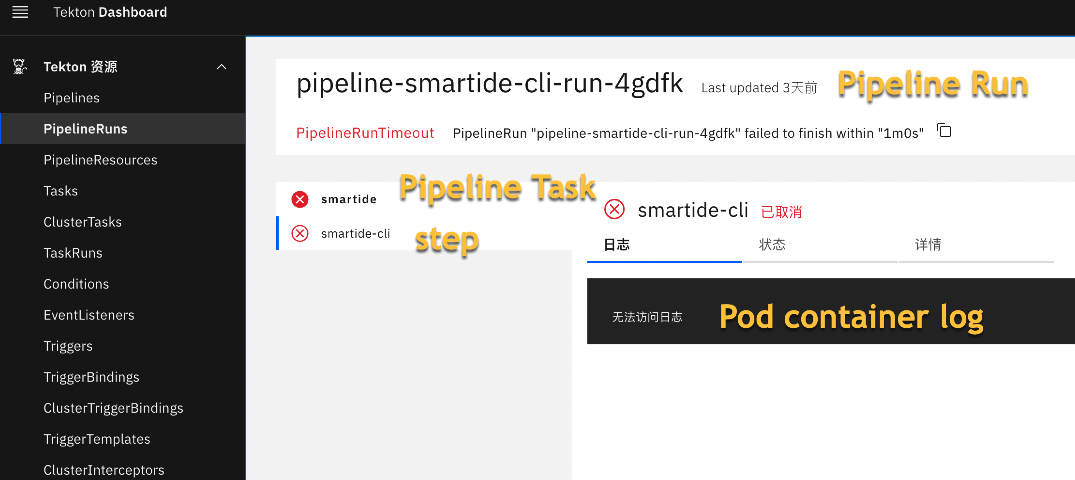
Tekton 是基于CRD(Custom Resource Definitions)实现的,是标准的k8s扩展机制。Tekton 有四个基本的对象 Task、TaskRun、Pipeline、PipelineRun ,下图是Tekton Dashboard 的界面,可以直观的感受一下 这几个对象。
如下图所示, Pipeline 实例化为 Pipeline Run,Pipeline Run 创建并管理 Pod,一个 Pod 对应 Task 的实例 Task Run,Task Run / Task 中的 step 对应 Pod 中的 container,除此Pod通常会共享一个 PersistentVolume 支持的临时文件系统。
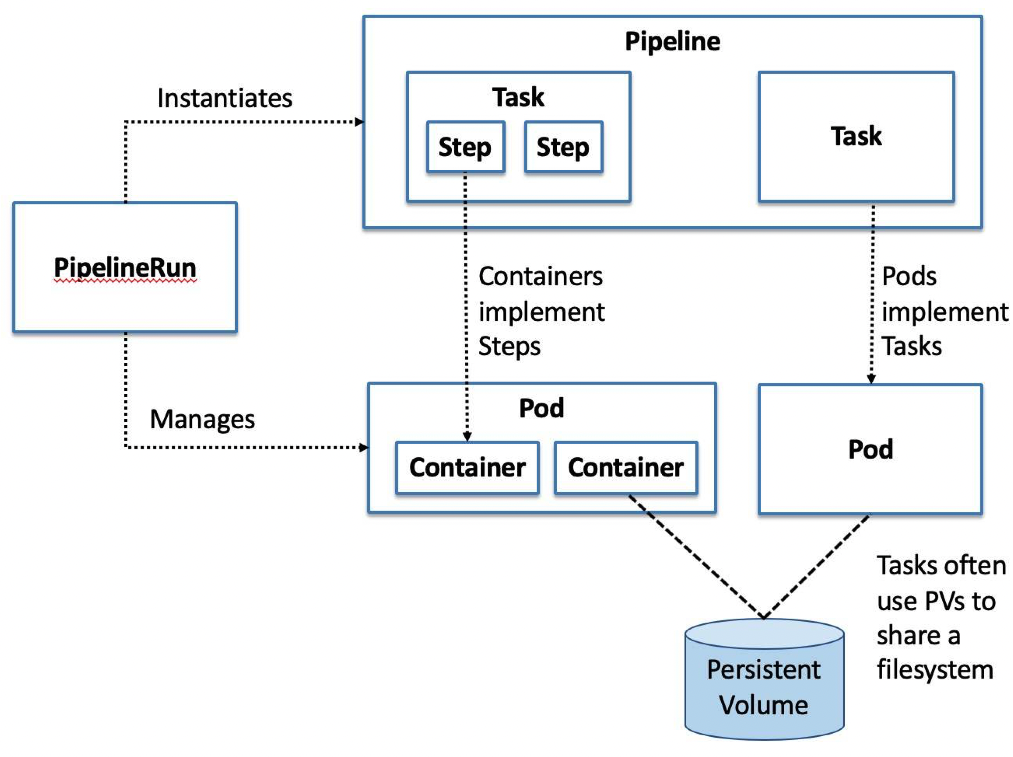
- Task 构建任务,是 Tekton 中不可分割的最小单位,正如同 Pod 在 Kubernetes 中的概念一样。在 Task 中,可以有多个 Step,每个 Step 由一个 Container 来执行。
- Pipeline 由一个或多个 Task 组成。在 Pipeline 中,用户可以定义这些 Task 的执行顺序以及依赖关系来组成 DAG(有向无环图)。
- Pipeline Run 是 Pipeline 的实际执行产物,当用户定义好 Pipeline 后,可以通过创建 PipelineRun 的方式来执行流水线,并生成一条流水线记录。
- Task Run PipelineRun 被创建出来后,会对应 Pipeline 里面的 Task 创建各自的 TaskRun。一个 TaskRun 控制一个 Pod,Task 中的 Step 对应 Pod 中的 Container。当然,TaskRun 也可以单独被创建。
CLI
Tekton Trigger
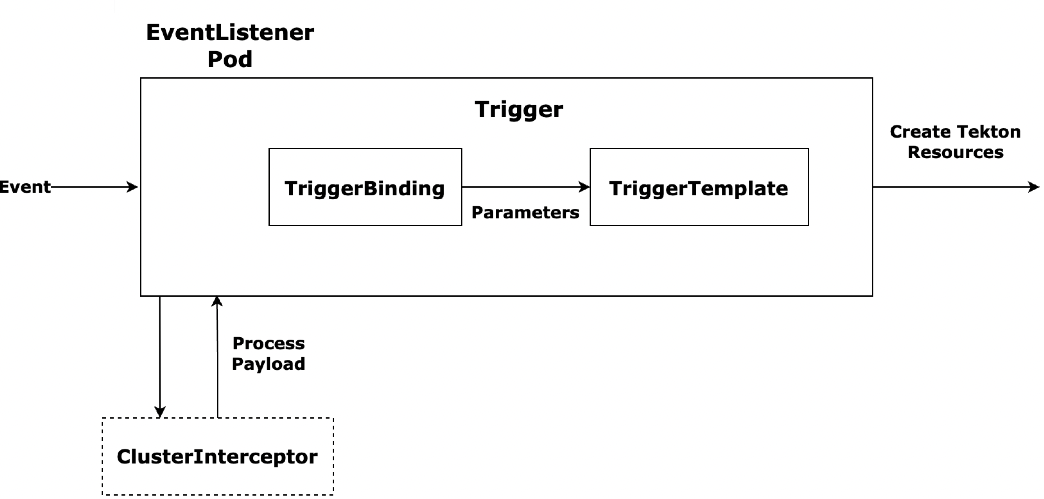
可以通过http接口的形式触发Tekton流水线,包括三个主要组件,设置有点繁琐,如果是所有人都需要配置会疯掉。
- EventListner 监听http请求的发起
- TriggerTemplate 配置Pipeline Run
- TriggerBinding 从http的request body中获取数据传递给Pipeline Run
Tekton Dashboard
后端的接口会转发到k8s的api
参考:https://tekton.dev/docs/dashboard/install/
源码:https://github.com/tektoncd/dashboard
实践
以下yaml文件均存储于 https://github.com/smallidea/tekton-test
部署
以 linux / mac 为例
# docker & docker-compose install
curl -o- https://smartidedl.blob.core.chinacloudapi.cn/docker/linux/docker-install.sh | bash

# Kubectl install
curl -LO https://smartidedl.blob.core.chinacloudapi.cn/kubectl/v1.23.0/bin/linux/amd64/kubectl
sudo install -o root -g root -m 0755 kubectl /usr/local/bin/kubectl

# minikube install,参考 https://minikube.sigs.k8s.io/docs/start/
curl -LO https://smartidedl.blob.core.chinacloudapi.cn/minikube/v1.24.0/minikube-linux-amd64
sudo install minikube-linux-amd64 /usr/local/bin/minikub
minikube delete
minikube start --image-mirror-country=cn --driver=docker --cpus=2 --memory=2048mb

# Tekton Pipeline & Dashboard install
kubectl apply -f https://gitee.com/chileeb/SmartIDE/raw/main/server/deployment/online/pipeline/v0.32.0/smartide-tekton-release.yaml
kubectl apply -f https://gitee.com/chileeb/SmartIDE/raw/main/server/deployment/online/dashboard/v0.32.0/smartide-tekton-dashboard-release.yaml

# Tekton Trigger install (选装)
kubectl apply -f https://gitee.com/chileeb/SmartIDE/raw/main/server/deployment/online/trigger/v0.18.0/smartide-release.yaml
kubectl apply -f https://gitee.com/chileeb/SmartIDE/raw/main/server/deployment/online/trigger/v0.18.0/smartide-interceptor.yaml

# Tekton CLI, https://tekton.dev/docs/cli/
brew install tektoncd-cli
参考:SmartIDE ( https://smartide.cn/zh/ )的私有化部署脚本
国内网络一键安装
curl -o- https://gitee.com/chileeb/SmartIDE/raw/main/server/deployment/online/deployment_cn.sh | bash
国际网络一键安装
curl -o- https://gitee.com/chileeb/SmartIDE/raw/main/server/deployment/online/deployment.sh | bash
示例
1. yaml
task.yaml
apiVersion: tekton.dev/v1beta1
kind: Task
metadata:
  name: tekton-task-test
spec:
  description: >-
    This Task is test task to test Tekton.

  params:
    - name: USERNAME
      description: your name
      type: string
      default:

  steps:
    - name: step-01
      image: ubuntu
      script: |
        #!/bin/bash
        echo "Hello World!"

    - name: step-02
      image: ubuntu
      script: |
        #!/bin/bash
        echo "I'm $(params.USERNAME)"
pipeline.yaml
apiVersion: tekton.dev/v1beta1
kind: Pipeline

metadata:
  name: tekton-pipeline-test

spec:
  params:
    - name: FIRST_NAME
      description: Your first name
      type: string
      default: "jason"
    - name: LAST_NAME
      description: Your last name
      type: string
      default: "chen"

  tasks:
    - name: task-001
      taskRef:
        name: tekton-task-test
      params:
        - name: USERNAME
          value: $(params.FIRST_NAME)

    - name: task-002
      runAfter:
        - task-001
      taskRef:
        name: tekton-task-test
      params:
        - name: USERNAME
          value: $(params.LAST_NAME)
pipeline_run.yaml
apiVersion: tekton.dev/v1beta1
kind: PipelineRun

metadata:
  name: tekton-pipeline-test-run-003

spec:
  pipelineRef:
    name: tekton-pipeline-test
  params:
    - name: FIRST_NAME
      value: "Jason"
    - name: LAST_NAME
      value: "Chen"
2. Pipeline Run
# apply
kubectl apply -f task.yaml
kubectl apply -f pipeline.yaml
kubectl apply -f pipeline-run.yaml
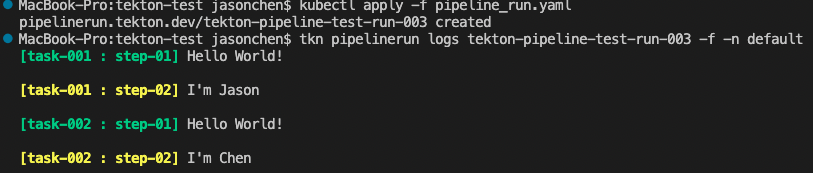
# 通过 Tekton CLI 查看运行结果
tkn pipelinerun logs tekton-pipeline-test-run-003 -f -n default
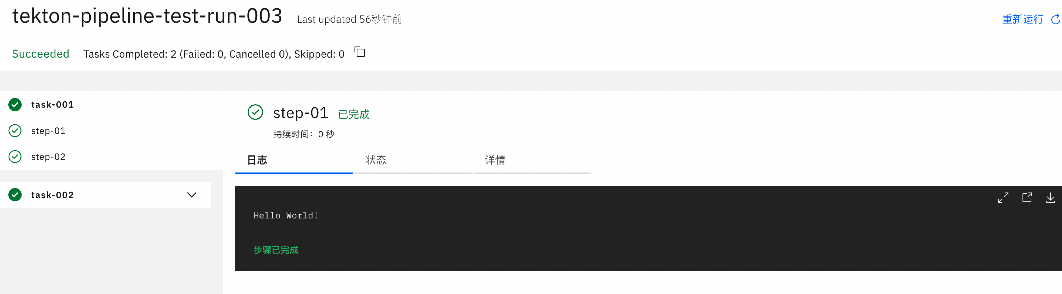
通过 Dashboard 查看运行结果
3. Tekton Trigger
trigger.yaml
apiVersion: triggers.tekton.dev/v1beta1
kind: TriggerBinding
metadata:
  name: pipeline-binding-test
spec:
  params:
  - name: FIRST_NAME
    value: $(body.FIRST_NAME)
  - name: LAST_NAME
    value: $(body.LAST_NAME)

---

apiVersion: triggers.tekton.dev/v1beta1
kind: EventListener
metadata:
  name: trigger-listener-test
spec:
  serviceAccountName: tekton-triggers-test-sa
  triggers:
    - name: trigger-test
      bindings:
        - ref: pipeline-binding-test
      template:
        ref: tekton-pipeline-test

---

apiVersion: triggers.tekton.dev/v1beta1
kind: TriggerTemplate
metadata:
  name: pipeline-template-test
spec:
  params:
  - name: FIRST_NAME
    default:
  - name: LAST_NAME
    default:

  resourcetemplates:
  - apiVersion: tekton.dev/v1beta1
    kind: PipelineRun
    metadata:
      generateName: tekton-pipeline-test-run-
    spec:
      pipelineRef:
        name: tekton-pipeline-test
      params:
      - name: FIRST_NAME
        value: $(tt.params.FIRST_NAME)
      - name: LAST_NAME
        value: $(tt.params.LAST_NAME)

---

apiVersion: v1
kind: ServiceAccount
metadata:
  name: tekton-triggers-test-sa

---

apiVersion: rbac.authorization.k8s.io/v1
kind: RoleBinding
metadata:
  name: tekton-triggers-test-eventlistener-binding
subjects:
- kind: ServiceAccount
  name: tekton-triggers-test-sa
roleRef:
  apiGroup: rbac.authorization.k8s.io
  kind: ClusterRole
  name: tekton-triggers-eventlistener-roles

---

apiVersion: rbac.authorization.k8s.io/v1
kind: ClusterRoleBinding
metadata:
  name: tekton-triggers-test-eventlistener-clusterbinding
subjects:
- kind: ServiceAccount
  name: tekton-triggers-test-sa
  namespace: default
roleRef:
  apiGroup: rbac.authorization.k8s.io
  kind: ClusterRole
  name: tekton-triggers-eventlistener-clusterroles
# apply
kubectl apply -f trigger.yaml
# 端口尽量不要使用常用的,避免冲突;如果是多个pipeline的trigger,记得端口保持唯一。
# Tekton Listener 对应service的名称,一般是 el-<tekton listener name>
kubectl port-forward service/el-trigger-listener-test 9091:8080 --address 0.0.0.0 &

# 使用curl命令触发
curl -v \
   -H 'content-Type: application/json' \
   -d '{"FIRST_NAME": "Tekton", "LAST_NAME": "CD"}' \
   http://localhost:9091
欢迎在评论区留下你宝贵的意见,不论好坏都是我前进的动力(cnblogs 排名提升)!
如果喜欢,记得点赞、推荐、关注、收藏、转发 ... ;)

 浙公网安备 33010602011771号