es高级用法之冷热分离
背景
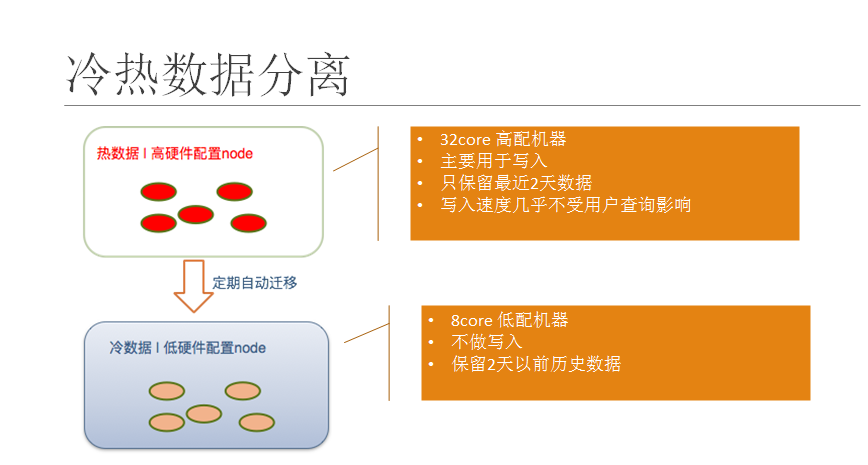
用户需求:近期数据查询速度快,较远历史数据运行查询速度慢?
- 对于开发人员而言即数据的冷热分离,实现此功能有2个前提条件:
- 硬件:处理速度不同的硬件,最起码有读写速度不同的硬盘,如SSD、机械硬盘HDD。
- 软件配置:可以配置 不同的数据存储在不同的硬盘,如近期数据存储在SSD,较远历史数据存储在HDD。对于linux系统而言,存储于不同的硬盘就是存储在不同的路径。
elasticsearch的冷热分离配置主要依赖于分片分布规则设置。
es配置之分片分布规则设置
自定义分片分布规则
- cluster.routing.allocation.awareness.attributes
根据某个属性作为分片分布规则。
#设置节点属性rack_id及属性值rack_one
node.rack_id: rack_one
#设置rack_id属性作为分片分布规则
cluster.routing.allocation.awareness.attributes: rack_id
- 可以为分片分布规则设置多个属性,例如:
cluster.routing.allocation.awareness.attributes: rack_id,zone
注意:当设置了分片分布属性时,如果集群中的节点没有设置其中任何一个属性,那么分片就不会分布到这个节点中。
强制分布规则
副本被分布到相同分布规则属性值的一群节点上,那么,我们可以强制分片规则为一个指定的值。
cluster.routing.allocation.awareness.force.zone.values: zone1,zone2
cluster.routing.allocation.awareness.attributes: zone
启动两个node.zone设置成zone1的节点,然后创建一个5个分片,一个副本的索引。索引建立完成后只有5个分片(没有副本),只有当我们启动node.zone设置成zone2的节点时,副本才会分配到那节点上。
上面配置的意思就是设置属性zone作为分布规则,并且属性zone的值为zone1/zone2,由于副本与主分片不分配在一类节点中,则副本分片到zone2节点中。
分片分布过滤
通过include/exclude过滤器来控制分片的分布。这些过滤器可以设置在索引级别上或集群级别上。
node.tag: hot
node.tag: cold
node.tag: value3

"index.routing.allocation.include.tag": "hot"
"index.routing.allocation.exclude.tag" : "value3"
include或exclude过滤器的值都会使用通配符来匹配,如value*。一个特别的属性名是_ip,它可以用来匹配节点的ip地址。
显然,一个节点可能拥有多个属性值,所有属性的名字和值都在配置文件中配置。如,下面是多个节点的配置:
node.group1: group1_value1
node.group2: group2_value4
同样的方法,include和exclude也可以设置多个值,如:
curl -XPUT localhost:9200/test/_settings -d '{
    "index.routing.allocation.include.group1" : "xxx"
    "index.routing.allocation.include.group2" : "yyy",
    "index.routing.allocation.exclude.group3" : "zzz",
}'
上面的设置可以通过索引更新的api实时更新到索引上,允许实时移动索引分片。
集群范围的过滤器也可以定义,可以通过集群更新api实时更新到集群上。这些设置可以用来做让一些节点退出集群的操作。下面是通过ip地址去掉一个节点的操作:
curl -XPUT localhost:9200/_cluster/settings -d '{
    "transient" : {
        "cluster.routing.allocation.exclude._ip" : "10.0.0.1"
    }
}'
冷热分离实践
- step1:划分冷热节点
node.tag: hot
node.tag: cold
node.max_local_storage_nodes: 2   #允许每个机器启动两个es进程(可选)
- step2:按时间规律等建索引。比如按天、按周建索引
索引模板logstash:所有 logstash* 的索引匹配的模板。
PUT /_template/logstash
{
        "order": 0,
        "template": "logstash*",
        "settings": {
            "index.routing.allocation.include.tag": "hot",
            "index.refresh_interval": "30s",
            "index.number_of_replicas": "1",
            "index.number_of_shards": "1",
            "index.translog.flush_threshold_ops": "30000"
        }
}
“index.routing.allocation.include.tag”: “hot”,表示新建索引将分配到 node.tag = hot 的节点下
- step3: 定时任务将历史索引分配到 cold 节点下。
最新索引保存在hot节点,历史索引定时保存到cold节点。有2种方式:
- 自己写脚本,将历史索引标记为stale
PUT /index_name/_settings
{
   "index.routing.allocation.include.tag" : "cold"
}
这样旧索引数据会自动迁移到cold集群上
- 安装 elasticsearch的命令行管理工具curator, 编写curator脚本,每天4点将历史索引分配到 cold 节点下
pip install elasticsearch-curator==5.x

# 将3天以前的 logstash* 索引分配到 cold 节点下
 1:
    action: allocation
    description: "Apply shard allocation filtering rules to the specified indices"
    options:
      key: box_type
      value: cold
      allocation_type: require
      wait_for_completion: true
      timeout_override:
      continue_if_exception: false
      disable_action: false
    filters:
    - filtertype: pattern
      kind: prefix
      value: logstash-
    - filtertype: age
      source: name
      direction: older
      timestring: '%Y.%m.%d'
      unit: days
      unit_count: 3
强制索引合并,每个分片1个分段。
2:
    action: forcemerge
    description: "Perform a forceMerge on selected indices to 'max_num_segments' per shard"
    options:
      max_num_segments: 1
      delay:
      timeout_override: 21600
      continue_if_exception: false
      disable_action: false
    filters:
    - filtertype: pattern
      kind: prefix
      value: logstash-
    - filtertype: age
      source: name
      direction: older
      timestring: '%Y.%m.%d'
      unit: days
      unit_count: 3
读写分离探讨
- 类似于mysql的读写分离,将副本数据存储于特点节点上。这个没办法通过自动配置完成,可以通过reroute api来手动进行索引分片的分配.
不过要想完全手动,必须先把cluster.routing.allocation.disable_allocation参数设置为true,禁止es进行自动索引分片分配,否则你从一节点把分片移到另外一个节点,那么另外一个节点的一个分片又会移到那个节点。
一共有三种操作,分别为:移动(move),取消(cancel)和分配(allocate)。下面分别介绍这三种情况:
- 移动(move)
把分片从一节点移动到另一个节点。可以指定索引名和分片号。 - 取消(cancel)
取消分配一个分片。可以指定索引名和分片号。node参数可以指定在那个节点取消正在分配的分片。allow_primary参数支持取消分配主分片。 - 分配(allocate)
分配一个未分配的分片到指定节点。可以指定索引名和分片号。node参数指定分配到那个节点。allow_primary参数可以强制分配主分片,不过这样可能导致数据丢失。
curl -XPOST 'localhost:9200/_cluster/reroute' -d '{
    "commands" : [ {
        "move" :
            {
              "index" : "test", "shard" : 0,
              "from_node" : "node1", "to_node" : "node2"
            }
        },
       "cancel" :
            {
              "index" : "test", "shard" : 0, "node" : "node1"
            }
        },
        {
          "allocate" : {
              "index" : "test", "shard" : 1, "node" : "node3"
          }
        }
    ]
}'
- 注意事项:
因为es的replica也是一个实际需要cpu和io的indexing过程,而且indexing本身也有要求要写够一定副本数来才算写入完成。所以,你即使只请求replica,也是有可能影响到写入的。

所以,你只能开启一个副本——因为写入副本数要求是从二个副本开始才有。
冷热数据查询
GET /_search?preference=xyzabc123
{
    "query": {
        "match": {
            "title": "elasticsearch"
        }
    }
}

 浙公网安备 33010602011771号