Vue 根组件
<!DOCTYPE html>
<html>
<head>
    <meta charset="utf-8">
    <title>根组件</title>

</head>
<body>
<div id="app">
    <h1>{{ title }}</h1>
    <p>{{ title }}</p>sdfsdaf
    sdfasdafsda
    sdafsda
    sdafsad
    sdafsdaf
    fsdaf
</div>

<div id="main"></div>
</body>
<script src="js/vue.js"></script>
<script>

    // template就是一个组件的html实体代码块
    new Vue({
        el: '#app',
        data: {
            title: '根组件'
        },
        // template模板,书写html代码块
        // 根组件也可以添加template模板,但是建议直接使用挂载点
        // 每个组件的template模板中只能解析一个(第一个)根标签
        template: `
        <!--<div></div>-->
        <div id="home">
            <h1>{{ title }}</h1>
            <p>{{ title }}</p>
            <i>{{ title }}</i>
        </div>
        <div>
            {{ title }}
        </div>
        `
    });

    // 只要是被new出来的vue实例都是根组件,所以一个vue单页面项目中只需要出现一次new创建的vue实例
    new Vue({
        el: '#main'
    })

</script>
</html>
Vue 局部组件
<!DOCTYPE html>
<html>
<head>
    <meta charset="utf-8">
    <title>根组件</title>

</head>
<body>

<div id="app">
<!--<localTag></localTag>-->
    <!--资源出现在哪个模板,该资源就由该模板的拥有者提供-->
    <!--++++组件不能绑定系统事件,但可以绑定自定义事件++++-->
    <abc @mouseenter="abcEnter">{{ info }}</abc>
    <abc></abc>
</div>

<div id="main">
    <local-tag></local-tag>
</div>

<!--<div class="localTag">-->
    <!--<h2>我是局部组件</h2>-->
    <!--<p style="color: red;">我是局部组件的文本解释</p>-->
    <!--<p @click="btnClick">我被点击了 {{ num }} 下</p>-->
    <!--<hr>-->
<!--</div>-->

</body>
<script src="js/vue.js"></script>
<script>
    // 局部组件
    // 子组件的资源有自身提供
    var localTag = {
        // 挂载点是根组件的独有特性
        // el: '.localTag',

        // 子组件必须拥有自身template
        template: `
        <div id="localTag">
            <h2>我是局部组件</h2>
            <p style="color: red;">我是局部组件的文本解释</p>
            <p @click="btnClick">我被点击了 {{ num }} 下</p>
            <hr>
        </div>
        `,

        // 子组件的data为方法的返回值字典
        data: function () {
            return {
                num: 0
            }
        },

        methods: {
            btnClick: function () {
                this.num++
            }
        }
    };

    // 如果想在页面中看见子组件,需要在根组件中使用该子组件
    // 如果根组件要使用局部子组件,需要提前注册
    new Vue({
        el: '#app',
        data: {
            info: "message"
        },
        components: {
            abc: localTag,
        },
        methods: {
            abcEnter: function () {
                console.log('abc被悬浮了')
            }
        }
    });


    new Vue({
        el: '#main',
        components: {
            // 在页面中才有 <local-tag></local-tag>
            // localTag: localTag
            // 'localTag': localTag
            // 'local-tag': localTag
            localTag
        }
    })

</script>
</html>
vue 全局组件
<!DOCTYPE html>
<html>
<head>
    <meta charset="utf-8">
    <title>全局组件</title>
</head>
<body>
    <div id="app">
        <global-tag></global-tag>
    </div>
</body>
<script src="js/vue.js"></script>
<script>
    // 全局组件与局部组件的不同点:全局组件不用注册

    // 全局组件用Vue.component()来声明定义,两个参数
    // 第一个为组件名,第二个为组件内容
    Vue.component('globalTag', {
         template: `
        <div>
            <h2>我是全局组件</h2>
            <p style="color: red;">我是全局组件的文本解释</p>
            <p @click="btnClick">我被点击了 {{ num }} 下</p>
            <hr>
        </div>
        `,

        data: function() {
             return {
                 num: 1
             }
        },

        // computed: {
        //      num: function() {
        //          return 1
        //      }
        // },

        methods: {
            btnClick: function () {
                this.num++
            }
        }
    });


    new Vue({
        el: '#app',
        data: {

        }
    })

</script>
</html>
Vue 组件通信
<!DOCTYPE html>
<html>
<head>
    <meta charset="utf-8">
    <title>组件间的通信</title>
</head>
<body>
<div id="app">

    <tag :super_msg="msg" @own_method="receiveInfo"></tag>

    <p>{{ temp_info }}</p>
</div>
</body>
<script src="js/vue.js"></script>
<script>

    // 父组件数据传递给子组件,通过自定义属性绑定的方式
    // 子组件数据传递给父组件,通过自定义事件的发送
    Vue.component('tag', {
        props: ['super_msg'],

        template: `
        <div>
            <h2 @click="sendInfo">{{ super_msg }}</h2>
        </div>
        `,

        data: function () {
            return {
                info: '子级的信息'
            }
        },

        methods: {
            sendInfo: function () {
                this.$emit('own_method', this.info)
            }
        }
    });

    new Vue({
        el: '#app',
        data: {
            msg: '父级的数据',
            temp_info: ''
        },
        methods: {
            receiveInfo: function (info) {
                this.temp_info = info
            }
        }
    })
</script>
</html>
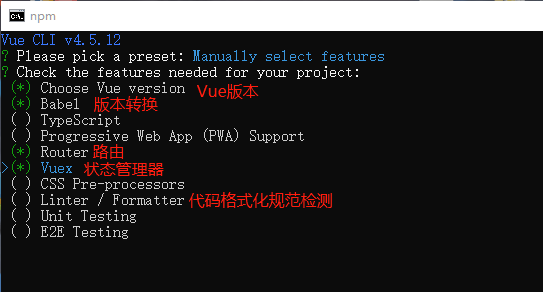
Vue-cli创建项目
项目部署操作
1 安装node环境 16.14.0环境
  - 跟python比较
  - node    python
  - npm     pip3
  - 安装cnpm,淘宝做的npm,以后使用npm的地方,都是用cnpm

2 安装cnpm
  npm install -g cnpm --registry=https://registry.npm.taobao.org

3 安装cli脚手架
  cnpm install -g @vue/cli

4 清空缓存(安装失败操作)
  npm cache clean --force

5 创建项目
  vue create 项目名

6 安装vue-cookie(进入项目目录下安装)
  cnpm install vue-cookie --save

7 安装vue-axios
  cnpm install vue-axios --save

8 启动vue
  nmp run serve

9 复制新项目(node_modules目录不需要拷贝)
  npm install

10 pycharm启动vue项目及高亮显示
   https://www.cnblogs.com/zhangmingyan/p/11573165.html
vue 创建项目图形化操作

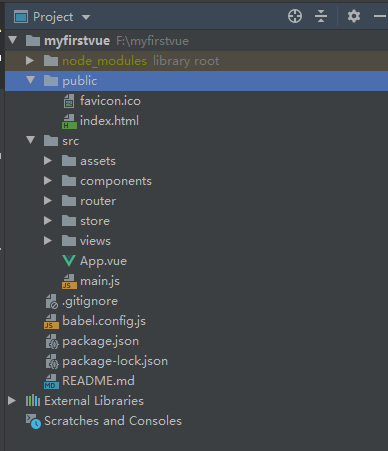
├─ node_moduls:项目依赖,当前项目的所有第三方包,(上传项目的时候不需要用:把项目给别人,这个文件夹删掉)
       npm install  就会又把依赖重新装上
       pi3 install -r request.txt
├─ public文件夹:(你不用动)
    ├─ favicon.ico  网站图标
    └─ index.html  项目入口页面,单页面开发(整个vue项目就这一个页面,一般不会动它)
├─ src文件夹:代码文件夹(经常动,书写你的所有代码)
    ├─ assets文件夹 :存储项目中自己的一些静态资源,图片,js,css
    ├─ components文件夹:存储项目中的自定义组件(组件,小组件,公共组件)
    ├─ router文件夹:存储VueRouter路由相关文件(装了Router才有,否则没有,页面跳转)
    ├─ store文件夹:存储Vuex相关文件(vuex才有的,状态管理器)
    ├─ views文件夹:存储项目中的自定义组件(大组件,页面级组件,路由级别组件)
    ├─ App.vue:根组件
    └─ main.js:整个项目的入口js
├─ .gitignore  # git的忽略文件,讲到git才知道
├─ babel.config.js # 不用动
├─ package.json     #依赖的模块
├─ package-lock.json #依赖的模块
└─ README.md      # 介绍
项目组件介绍(重点)
1  每一个vue组件都有三部分
      -template  :放html代码
      -script  :放js相关的东西
      -style  :放css相关


2  vue中创建路由
      -创建一个组件
      -配置路由:
        -在router.js中加入
	    {
	      path: '/freecourse',
	      name: 'freecourse',
	      component: FreeCourse
	     },
	-路由跳转
	    <router-link to="/freecourse">跳转</router-link>


3  vue在组件中显示数据
      在template:
	{{变量}}
      在script:
	data: function () {
	    return {
		course_list: ['python', 'linux', 'go','java']
            }

4 vue中的axios
     -安装:
        npm install axios  在package.json中就能看到依赖
        -在main.js中配置
        //导入axios
        import axios from 'axios'
        //把axios对象付给$http
        Vue.prototype.$http=axios
     -在组件的js代码中写:
        <template>
          <div class="about">
            <h1>免费页面</h1>
            <button @click="init">点击</button>
            <div v-for="course in app_list">{{ course }}</div>
          </div>
        </template>
        <script>
        export default {
          name: 'Home',
          data:function () {
             return {
                app_list:[]
              }
        },
        methods:{
          'init':function () {
            var _this=this
            this.$http({
            url:'http://127.0.0.1:8001/course/',
            method:'get',
            }).then(function (response){
            // console.log(response.data)
            _this.app_list=response.data
        })
    },

5 页面挂载完成,执行数据加载
     mounted:function () {
         this.init()
    }

6 vue中使用element-ui
    饿了么开源的样式
    安装  npm i element-ui -S
    在main.js中配置
	import ElementUI from 'element-ui';
	import 'element-ui/lib/theme-chalk/index.css';
	Vue.use(ElementUI);
	去官方文档看样式赋值,粘贴
把vue项目编译成纯html,css,js
webpack:模块化
打包:npm run build
在项目路径下有个dist文件夹:html,css,js

 浙公网安备 33010602011771号