Confd+Consul 动态生成配置文件
一、Consul安装和配置
1、consul是什么?
consul是HashiCorp公司推出的一款工具,主要用于实现分布式系统的服务发现与配置,它提供了以下几个关键特性:
- 服务发现:Consul客户端可以提供如 api或mysql之类的服务,其他客户端使用Consul去发现一个指定服务的提供者.通过DNS或者HTTP应用程序可用很容易的找到他所依赖的服务.
- 健康检查:consul客户端可以提供任意数量的健康检查,,可以结合具体的服务(“Web服务器返回200 OK”)或本地节点(“内存利用率低于90%”)。操作者可以通过检测信息来监视群集运行状况,服务发现组件会将流量从不健康的主机路由到健康主机。
- K/V存储:应用程序可以根据需要使用consul的层级K/V存储,如动态配置,功能标记,一致性协调,leader选举等。简单的HTTP API使其易于使用。
- 多数据中心:consul支持开箱即用的多数据中心。用户不用担心需要建立额外的抽象层让业务扩展到多个区域.。
Consul面向DevOps和应用开发者友好.非常适合现代的弹性的基础设施.
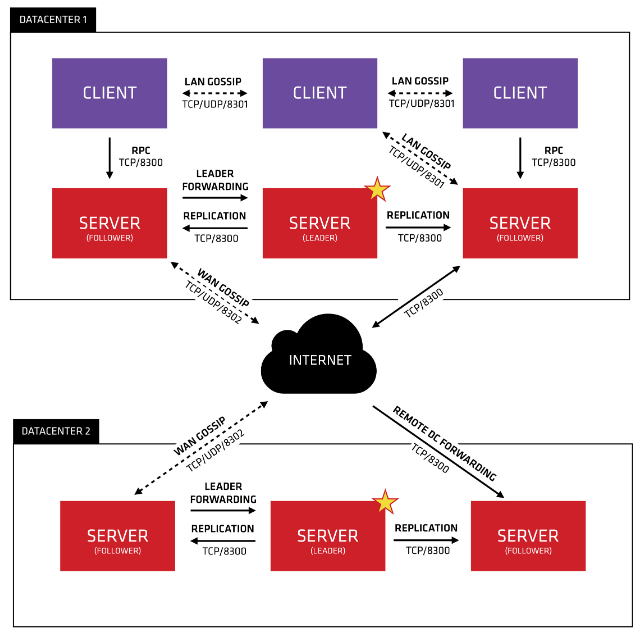
2、Consul基础架构
1、consul是一个分布式,高可用性的系统。这里只是简单介绍一下基础知识,故意省略了一些不必要的细节,以便能够快速了解consul的工作原理.
2、每个提供Consul服务的节点都会运行一个consul agent。发现服务或者获取、设置key/value数据的节点不需要运行agent。agent负责对节点上运行的服务以及节点本身进行健康检查。
3、agent连接一个或者多个Consul server,Consul server存储,复制数据,选取leaader。虽然Consul server可以只运行一个,但是通常建议每个数据中心运行由3到5个consul server组成的集群,以防单点故障造成数据丢失。
4、需要发现其他服务或节点的组件可以查询任何consul server或consul agent。consul agent会自动将请求转发给consul server。
5、每个数据中心都运行一组Consul server集群。当进行跨数据中心服务发现或配置请求时,本地consul server会将请求转发到远程数据中心并返回结果。
3、Consul架构图
4、Consul安装
和其他软件一样,都支持二进制安装、源码安装等。我这里采用最简单的安装方式:二进制安装。
wget https://releases.hashicorp.com/consul/1.5.3/consul_1.5.3_linux_amd64.zip
unzip consul_1.5.3_linux_amd64.zip
mv consul /usr/bin/
安装完成。
5、Consul启动
consul agent -server -bootstrap -ui -data-dir=/var/lib/consul-data -bind=172.31.0.21 -client=0.0.0.0 -node=server01
agent:agent模式
server:server模式
ui:启用UI界面
datadir:数据目录
bind:绑定侦听地址
client:指定client
node:节点名称
6、Consul启动日志
[root@vm172-31-0-21 ~]# consul agent -server -bootstrap -ui -data-dir=/var/lib/consul-data -bind=172.31.0.21 -client=0.0.0.0 -node=server01
bootstrap = true: do not enable unless necessary
==> Starting Consul agent...
           Version: 'v1.5.3'
           Node ID: '381f702d-7495-1b19-d75e-9cd79b1bbf8e'
         Node name: 'server01'
        Datacenter: 'dc1' (Segment: '<all>')
            Server: true (Bootstrap: true)
       Client Addr: [0.0.0.0] (HTTP: 8500, HTTPS: -1, gRPC: -1, DNS: 8600)
      Cluster Addr: 172.31.0.21 (LAN: 8301, WAN: 8302)
           Encrypt: Gossip: false, TLS-Outgoing: false, TLS-Incoming: false, Auto-Encrypt-TLS: false

==> Log data will now stream in as it occurs:

    2019/08/02 10:00:12 [INFO]  raft: Initial configuration (index=1): [{Suffrage:Voter ID:381f702d-7495-1b19-d75e-9cd79b1bbf8e Address:172.31.0.21:8300}]
    2019/08/02 10:00:12 [INFO]  raft: Node at 172.31.0.21:8300 [Follower] entering Follower state (Leader: "")
    2019/08/02 10:00:12 [INFO] serf: EventMemberJoin: server01.dc1 172.31.0.21
    2019/08/02 10:00:12 [INFO] serf: EventMemberJoin: server01 172.31.0.21
    2019/08/02 10:00:12 [INFO] consul: Adding LAN server server01 (Addr: tcp/172.31.0.21:8300) (DC: dc1)
    2019/08/02 10:00:12 [INFO] consul: Handled member-join event for server "server01.dc1" in area "wan"
    2019/08/02 10:00:12 [WARN] agent/proxy: running as root, will not start managed proxies
    2019/08/02 10:00:12 [INFO] agent: Started DNS server 0.0.0.0:8600 (udp)
    2019/08/02 10:00:12 [INFO] agent: Started DNS server 0.0.0.0:8600 (tcp)
    2019/08/02 10:00:12 [INFO] agent: Started HTTP server on [::]:8500 (tcp)
    2019/08/02 10:00:12 [INFO] agent: started state syncer
==> Consul agent running!
    2019/08/02 10:00:19 [ERR] agent: failed to sync remote state: No cluster leader
    2019/08/02 10:00:20 [WARN]  raft: Heartbeat timeout from "" reached, starting election
    2019/08/02 10:00:20 [INFO]  raft: Node at 172.31.0.21:8300 [Candidate] entering Candidate state in term 2
    2019/08/02 10:00:20 [INFO]  raft: Election won. Tally: 1
    2019/08/02 10:00:20 [INFO]  raft: Node at 172.31.0.21:8300 [Leader] entering Leader state
    2019/08/02 10:00:20 [INFO] consul: cluster leadership acquired
    2019/08/02 10:00:20 [INFO] consul: New leader elected: server01
    2019/08/02 10:00:20 [INFO] consul: member 'server01' joined, marking health alive
    2019/08/02 10:00:22 [INFO] agent: Synced node info
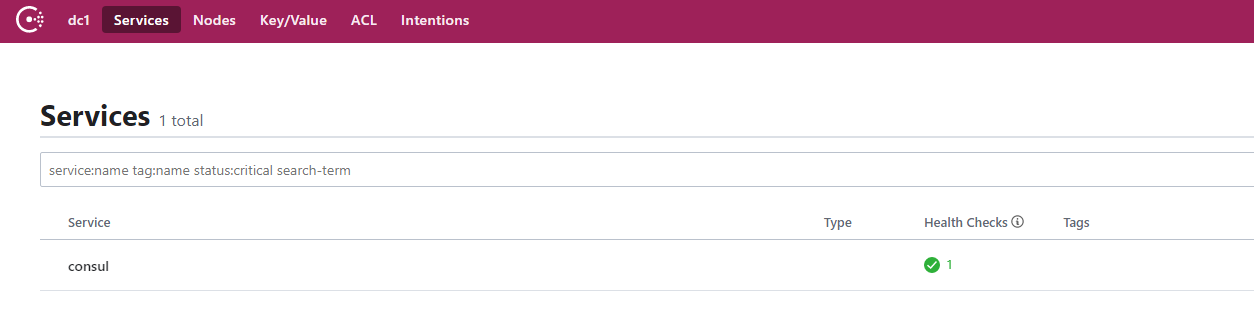
7、dashboard
二、confd安装和配置
1、confd简介
当系统变的复杂,配置项越来越多,一方面配置管理变得繁琐,另一方面配置修改后需要重新上线同样十分痛苦。这时候,需要有一套集中化配置管理系统,一方面提供统一的配置管理,另一方面提供配置变更的自动下发,及时生效。
统一配置管理系统,大家应该比较熟悉,常见的:zookeeper、etcd、consul、git等
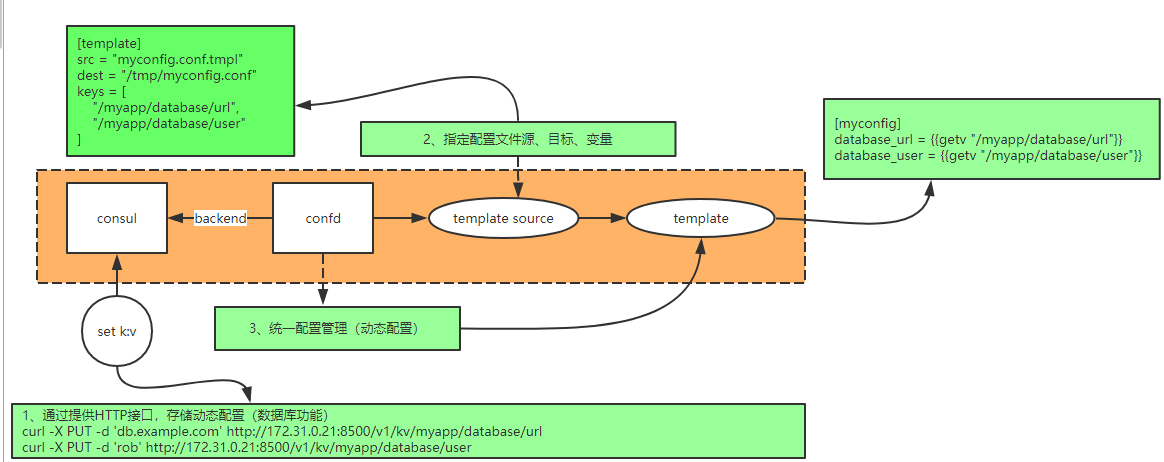
confd流程图
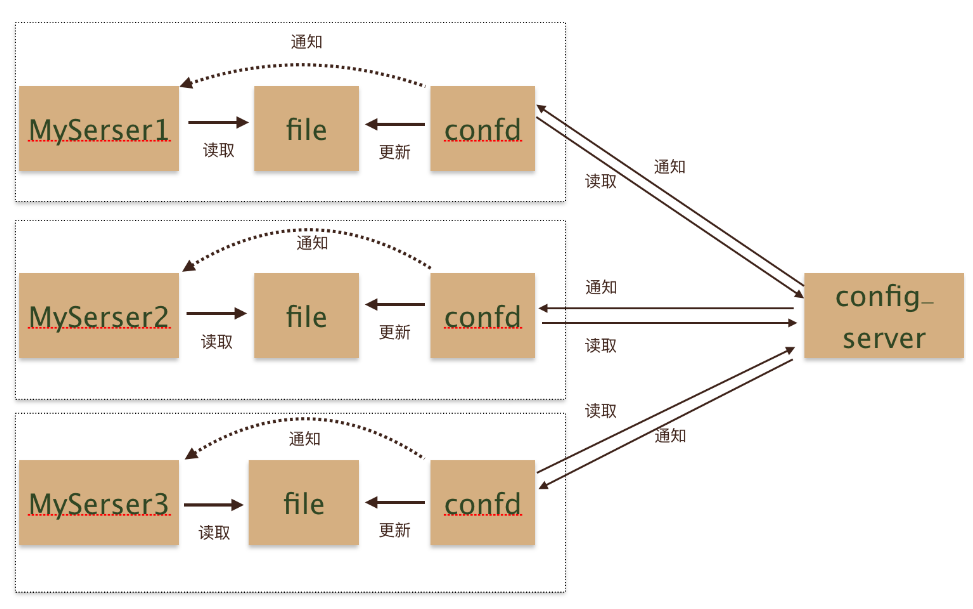
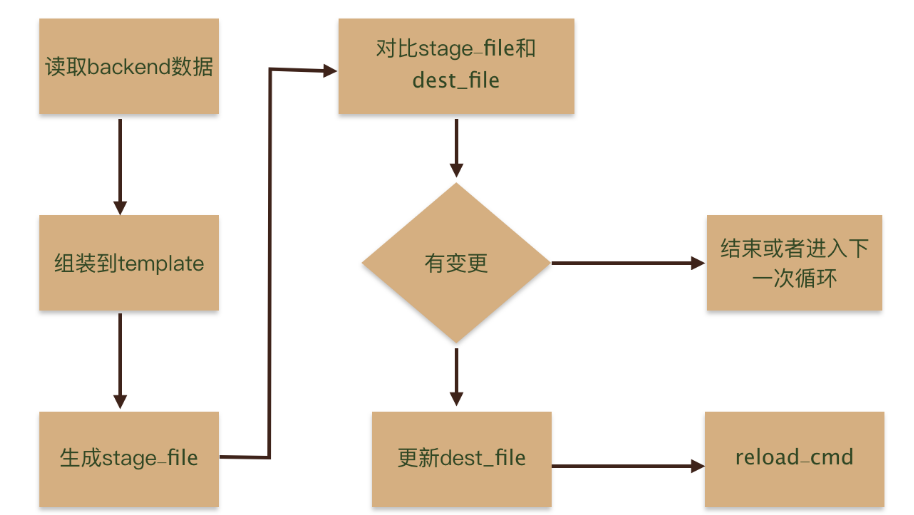
2、confd是如何工作的?
3、confd的安装
下载confd的二进制文件,下载地址为:https://github.com/kelseyhightower/confd/releases。
# Download the binary
wget https://github.com/kelseyhightower/confd/releases/download/v0.16.0/confd-0.16.0-linux-amd64

# 重命名二进制文件,并移动到PATH的目录下
mv confd-0.16.0-linux-amd64 /usr/local/bin/confd
chmod +x /usr/local/bin/confd

# 验证是否安装成功
confd --help
4、confd的配置
1. 创建confdir
mkdir -p /etc/confd/{conf.d,templates}
confdir底下包含两个目录:
-
conf.d:confd的配置文件,主要包含配置的生成逻辑,例如模板源,后端存储对应的keys,命令执行等。 -
templates:配置模板Template,即基于不同组件的配置,修改为符合 Golang text templates的模板文件。
2、Template Resources
模板源配置文件是TOML格式的文件,主要包含配置的生成逻辑,例如模板源,后端存储对应的keys,命令执行等。默认目录在/etc/confd/conf.d。
cat /etc/confd/conf.d/myconfig.toml
[template]
src = "myconfig.conf.tmpl"
dest = "/tmp/myconfig.conf"
keys = [
    "/myapp/database/url",
    "/myapp/database/user",
]
src:指定tmpl源文件
dest:指定生成目标文件
keys:tmpl会用到的变量
3、Template
emplate定义了单一应用配置的模板,默认存储在/etc/confd/templates目录下,模板文件符合Go的text/template格式。
模板文件常用函数有base,get,gets,lsdir,json等。具体可参考https://github.com/kelseyhightower/confd/blob/master/docs/templates.md。
cat /etc/confd/templates/myconfig.conf.tmpl
[myconfig]
database_url = {{getv "/myapp/database/url"}}
database_user = {{getv "/myapp/database/user"}}
4、启动confd
confd -confdir="/etc/confd/" -config-file="/etc/confd/conf.d/myconfig.toml" -onetime=false -interval=3 -backend consul -node 172.31.0.21:8500 -log-level="debug"
confdir:配置文件目录
config-file:配置文件
interval:检测文件变化间隔
backend:指定后端数据库
node:后端数据库地址
log-level:日志级别
5、启动日志
[root@vm172-31-0-21 confd]# confd -confdir="/etc/confd/" -config-file="/etc/confd/conf.d/myconfig.toml" -onetime=false -interval=3 -backend consul -node 172.31.0.21:8500 -log-level="debug"
2019-08-02T10:37:11+08:00 vm172-31-0-21.ksc.com confd[1801]: INFO Backend set to consul
2019-08-02T10:37:11+08:00 vm172-31-0-21.ksc.com confd[1801]: INFO Starting confd
2019-08-02T10:37:11+08:00 vm172-31-0-21.ksc.com confd[1801]: INFO Backend source(s) set to 172.31.0.21:8500
2019-08-02T10:37:11+08:00 vm172-31-0-21.ksc.com confd[1801]: DEBUG Loading template resources from confdir /etc/confd/
2019-08-02T10:37:11+08:00 vm172-31-0-21.ksc.com confd[1801]: DEBUG Found template: /etc/confd/conf.d/myconfig.toml
2019-08-02T10:37:11+08:00 vm172-31-0-21.ksc.com confd[1801]: DEBUG Loading template resource from /etc/confd/conf.d/myconfig.toml
2019-08-02T10:37:11+08:00 vm172-31-0-21.ksc.com confd[1801]: DEBUG Retrieving keys from store
2019-08-02T10:37:11+08:00 vm172-31-0-21.ksc.com confd[1801]: DEBUG Key prefix set to /
2019-08-02T10:37:11+08:00 vm172-31-0-21.ksc.com confd[1801]: DEBUG Got the following map from store: map[/myapp/database/url:db.example.com /myapp/database/user:rob]
2019-08-02T10:37:11+08:00 vm172-31-0-21.ksc.com confd[1801]: DEBUG Using source template /etc/confd/templates/myconfig.conf.tmpl
2019-08-02T10:37:11+08:00 vm172-31-0-21.ksc.com confd[1801]: DEBUG Compiling source template /etc/confd/templates/myconfig.conf.tmpl
2019-08-02T10:37:11+08:00 vm172-31-0-21.ksc.com confd[1801]: DEBUG Comparing candidate config to /tmp/myconfig.conf
2019-08-02T10:37:11+08:00 vm172-31-0-21.ksc.com confd[1801]: DEBUG Target config /tmp/myconfig.conf in sync
2019-08-02T10:37:14+08:00 vm172-31-0-21.ksc.com confd[1801]: DEBUG Loading template resources from confdir /etc/confd/
2019-08-02T10:37:14+08:00 vm172-31-0-21.ksc.com confd[1801]: DEBUG Found template: /etc/confd/conf.d/myconfig.toml
2019-08-02T10:37:14+08:00 vm172-31-0-21.ksc.com confd[1801]: DEBUG Loading template resource from /etc/confd/conf.d/myconfig.toml
2019-08-02T10:37:14+08:00 vm172-31-0-21.ksc.com confd[1801]: DEBUG Retrieving keys from store
2019-08-02T10:37:14+08:00 vm172-31-0-21.ksc.com confd[1801]: DEBUG Key prefix set to /
2019-08-02T10:37:14+08:00 vm172-31-0-21.ksc.com confd[1801]: DEBUG Got the following map from store: map[/myapp/database/user:rob /myapp/database/url:db.example.com]
6、查看新生成的配置文件
cat /tmp/myconfig.conf
[myconfig]
database_url = db.example.com
database_user = rob
三、整体流程图

 浙公网安备 33010602011771号