在我们开发各种工具软件的时候,我们不可避免的会遇到打印的问题。而使用.NET开发打印功能,水晶报表或许会是一个十分不象错的选择!
一般步骤:
- 准备好想要打印的数据源;
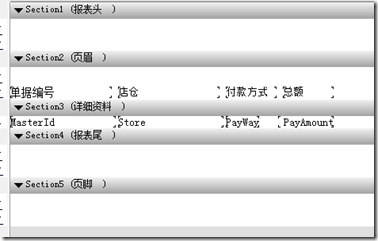
- 制作用于规定打印结果样式的模板文件(.rpt);
- 创建用于打印的执行窗口Form1,并在其中放置一个CrystalReportViewer (第三方控件,来自SAP)
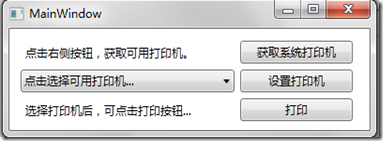
- 创建打印按键所在的Form2;
- 获取系统所能使用的打印机;
- 设置使用的打印机,及打印相关参数;
- 使用Form2调用Form1完成打印。
水晶报表的一般概念
水晶报表的两种模式:
- 拉 PULL:设置好数据连接之后,使用水晶报表文件中所使用的获得数据的方式,由水晶报表自己解决数据获取操作。
- 推 PUSH:使用DataSet装载数据,然后填充到水晶报表中,再按照水晶报表的格式来展示。
相关控件:
- CrystalReportViewer 「数据展示者」「ASP.NET & WinForm」
- CrystalReportSource 「数据提供者」「ASP.NET」
- CrystalReport 「数据提供者」「WinForm」
命名空间:
- CrystalDecisions.Shared
- CrystalDecisions.CrystalReports.Engine
相关成员:
| 类名 | 成员名 | 描述 |
| CrystalReport | Load | 加载水晶报表(.rpt)文件 |
| | SetDatabaseLogon | 设置数据库连接,PULL中会用到 |
| | SetParameterValue | 设置报表值 |
| | | |
| CrystalReportViewer | ReportSource | 设置报表数据源 |
| | DataBind | 绑定数据源 |
| | | |
| CrystalReportSource | ReportDocument.Load | 加载水晶报表(.rpt)文件,Server.MapPath("*********.rpt") |
| | ReportDocument.SetDatabaseLogon | 设置数据库连接,PULL中会用到 |
| | ReportDocument.SetParameterValue | 设置报表值 |
| | | |
具体实现
打印模板文件样式

Form2样式


 Form2using System.Windows;
// 引入可以访问 app.config 中的项
using System.Drawing.Printing; // 打印必须
namespace csdemo.reportdemo
{
/// <summary>
/// MainWindow.xaml 的交互逻辑
/// </summary>
public partial class MainWindow : Window
{
public MainWindow()
{
InitializeComponent();
}
/// <summary>
/// 获取可用打印机
/// </summary>
/// <param name="sender"></param>
/// <param name="e"></param>
private void button1_Click(object sender, RoutedEventArgs e)
{
comboBox1.Items.Clear();
foreach (var item in PrinterSettings.InstalledPrinters)
{
comboBox1.Items.Add(item.ToString());
}
comboBox1.SelectedIndex = 0;
}
/// <summary>
/// 打印机名称
/// </summary>
private string _printerName=string.Empty;
/// <summary>
/// 设置打印机
/// </summary>
/// <param name="sender"></param>
/// <param name="e"></param>
private void button2_Click(object sender, RoutedEventArgs e)
{
_printerName = comboBox1.SelectedValue.ToString();
}
/// <summary>
/// 调用打印
/// </summary>
/// <param name="sender"></param>
/// <param name="e"></param>
private void button3_Click(object sender, RoutedEventArgs e)
{
PrintWindow pw = new PrintWindow();
pw.printerName = _printerName;
pw.Show();
pw.Close();
}
}
}

 Form1using System.Windows;
using System.Data.SqlClient;
using CrystalDecisions.CrystalReports.Engine;
namespace csdemo.reportdemo
{
/// <summary>
/// PrintWindow.xaml 的交互逻辑
/// </summary>
public partial class PrintWindow : Window
{
public PrintWindow()
{
InitializeComponent();
Data_Binding();
}
public string printerName = string.Empty;
private void Data_Binding()
{
System.Data.DataSet ds = new System.Data.DataSet();
SqlConnection conn = new SqlConnection();
conn.ConnectionString = @"Data Source=192.168.0.196;Initial Catalog=NewEMaxTest;Persist Security Info=True;User ID=sa;Password=qwerta";
conn.Open();
string cmd = "select * from TBusRetail";
SqlDataAdapter da = new SqlDataAdapter(cmd, conn);
da.Fill(ds, "TBusRetail");
conn.Close();
string pathRpt = @"D:\Projects\csdemo\branches\csdemo2010\csdemo.reportdemo\ReportFile\DemoCrystalReport.rpt";
// ****************************************************
ReportDocument repostDoc = new ReportDocument();
repostDoc.Load(pathRpt); // 加载打印模板文件
repostDoc.SetDataSource(ds); // 设置数据源
repostDoc.PrintOptions.PrinterName = printerName; // 设置打印机名称
repostDoc.PrintOptions.PaperSize = CrystalDecisions.Shared.PaperSize.PaperA4; // 设置打印纸张样式
repostDoc.PrintOptions.PaperOrientation = CrystalDecisions.Shared.PaperOrientation.DefaultPaperOrientation;
repostDoc.PrintToPrinter(1, false, 1, 1); // 只打印一页,不核对,从第 0 页打印到第0页
// ****************************************************
// 如果要显示数据的话,就可以使用这个来在Viwer中绑定数据源了。
// crv.ViewerCore.ReportSource = repostDoc;
}
}
}
注意:
- 在使用VS2010配合水晶报表时,需要更改工程的目标框架为「.NET Framework 4」不然会出现错误。
- 我在使用的时候,不知道是不是我个人机器的原因,一真会提示有一个文件在「dotnet1」下找不到,之后我到它的上级目录拷贝了相关的文件过去就好了~
参考网摘:
- C#水晶报表教程
- C#实现打印功能
Form2
Form1


 浙公网安备 33010602011771号