Django之MTV实战(2)
Hello, 各位,我回来了,大家别以为我消失了,我还是在的...
最近忙于家里重要事情,不能定期及时更新,请包含...
忙里挑一,我还是在后台默默的码了几篇文章,前提要保证下质量,才能发出来,哈哈!不然...嘿嘿
大家搬好小板凳了,前方的真的高能,文章篇幅有点多,一步一步来...
跟着我走,简单学起来...
1. 回顾知识
上一篇文章已经教会了大家怎么安装Django和简单的配置,相信大家应该早就学会了,那么我们在回忆一下吧,懂的同学可跳过这章节。
1.1 新增工程
django-admin startproject <自定义工程名称>
(py369) [python@localhost Python]$ django-admin startproject devops
1.2 创建新的APP
python manage.py startapp <自定义APP名称>
(py369) [python@localhost devops]$ python manage.py startapp hello
1.3 注册APP
在devops->settings.y里面t添加:
INSTALLED_APPS = [
    'django.contrib.admin',
    'django.contrib.auth',
    'django.contrib.contenttypes',
    'django.contrib.sessions',
    'django.contrib.messages',
    'django.contrib.staticfiles',
    # 第一种方式
    'hello.apps.HelloConfig',
    # 第二种方式,直接写hello也行
    'hello',
]
1.4 编写URL和VIEW
在devops下的主路由urls.py:
from django.contrib import admin
from django.urls import path,include
from views import index

urlpatterns = [
    path('admin/', admin.site.urls),
    path('', index.index),
    # 引导到hello下的路由URL(也叫子路由)
    path('hello/', include('hello.urls'))
]
在hello下的子路由urls.py:
from django.urls import path
from hello import view

app_name = 'hello'
urlpatterns = [
    # 普通url参数
    path('', view.index, name='index'),
hello下的view.py代码:
from django.http import HttpResponse

def index(request):
    return HttpResponse('hello django')
1.5 验证结果如下:

2. 基本概念
2.1 专业术语
MTV简写:
-
M:model,这个是对应数据库的,简单理解就是对应数据库的表。
-
T:template,这个对应的是HTML模板,前端渲染用的。
-
V:view,这个对应的是后台python执行脚本了。
通俗的一句话:用户发送http请求,匹配url后执行view脚本返回模板template,用户看到了网页的展示效果(渲染)。
2.2 MTV之视图
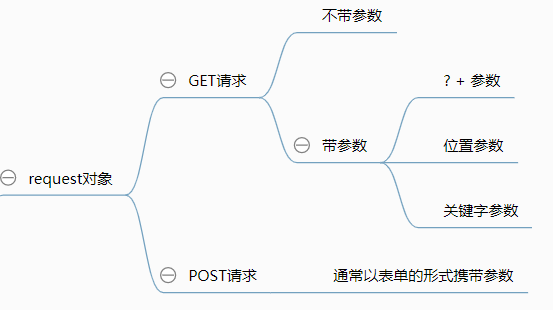
2.2.1 request对象
2.2.2 Respone对象
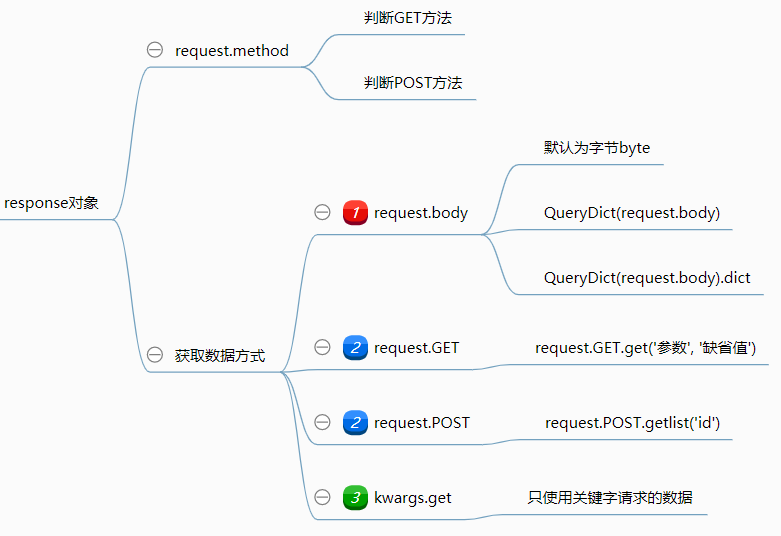
下面详细介绍下...
2.2.3 GET请求
-
GET请求,不带参数
网页输入这样的格式,是
不带参数:https://192.168.8.130:8888/hello备注:如上面演示的就是不带参数。
-
GET请求,?+参数
比较常用的方式
?+参数在浏览器输入如下地址:
http://192.168.8.130:8888/hello/?year=2020&month=09&day=02说明: 参数:
yearmonthday网址匹配到路由
hello/url.py的配置规则from django.urls import path from hello import view app_name = 'hello' urlpatterns = [ # 普通参数 path('', view.index, name='index'), ]后台视图
hello/view.py代码配置如下:from django.http import HttpResponse def index(request): print(request.GET) return HttpResponse("year is {}, month is {}, day is {}.".format(year, month, day))后台打印输出的结果如下:
备注: 是一个QueryDict对象。<QueryDict: {'year': ['2020'], 'month': ['09'], 'day': ['02']}>从上面已经接收到用户的信息了,就可以获取相应的参数了,hello/view后台脚本更新如下:
  from django.http import HttpResponse

  def index(request):
      #第一个参数是获取QueryDict的year
      #第二参数是默认值,表示拿不到数据,用缺省值
      year = request.GET.get('year', '2030')
      month = request.GET.get('month', 'Sep')
      day = request.GET.get('day', '8')
      return HttpResponse("year is {}, month is {}, day is {}.".format(year, month, day))
网页请求带参数返回的结果如下:
![]()
网页请求不带参数返回的结果如下:
![]()
-
GET请求,位置参数
不推荐使用,位置要一一对应入座网址匹配到路由
hello/url.py配置规则from django.urls import re_path from hello import view app_name = 'hello' urlpatterns = [ # 位置参数 # [0-9]表示数字0-9,{4}表示取4位数字 re_path('([0-9]{4})/([0-9]{2})/([0-9]{2})/', view.index, name='index'), ]后台视图
hello/view.py脚本配置如下:def index(request, year, month, day): return HttpResponse("year is {}, month is {}, day is {}.".format(year, month, day))网页输入如下地址,请求返回的结果如下:
![]()
-
GET请求,关键字参数
说明:
强烈推荐,优雅的方式.在浏览器输入如下地址:
http://192.168.8.130:8888/2020/09/02路由视图
hello/url.py配置规则from django.urls import re_path from hello import view app_name = 'hello' urlpatterns = [ # 关键字参数,(?<参数名>参数类型) re_path('(?P<year>[0-9]{4})/(?P<month>[0-9]{2})/(?P<day>[0-9]{2})', view.index, name='index'), ]后台视图
hello/view.py脚本配置如下:from django.http import HttpResponse def index(request, **kwargs): # 输出结果:{'year': '2020', 'month': '09', 'day': '02'} print(kwargs) year = kwargs.get('year') month = kwargs.get('month') day = kwargs.get('day') return HttpResponse("year is {}, month is {}, day is {}.".format(year, month, day))还可以换成另外一种写法,更加灵活,但是用的也不是很多:
from django.http import HttpResponse

# 不用考虑到函数参数的位置
def index(request, day, month, year):
    return HttpResponse("year is {}, month is {}, day is {}.".format(year, month, day))
2.2.4 POST请求
在devops/setting.py里把csrf关闭,不然会运行报错:
MIDDLEWARE = [
    'django.middleware.security.SecurityMiddleware',
    'django.contrib.sessions.middleware.SessionMiddleware',
    'django.middleware.common.CommonMiddleware',
    # 默认开启防止中间人CSRF攻击,前期先注释掉
    # 'django.middleware.csrf.CsrfViewMiddleware',
    'django.contrib.auth.middleware.AuthenticationMiddleware',
    'django.contrib.messages.middleware.MessageMiddleware',
    'django.middleware.clickjacking.XFrameOptionsMiddleware',
]
网址匹配到路由hello/urls.py配置规则
from django.urls import path
from hello import view

app_name = 'hello'
urlpatterns = [
    path('', view.index, name='index'),
]
后台视图hello/view.py脚本配置如下:
from django.http import HttpResponse, QueryDict

def index(request):
    if request.method == "POST":
        # POST方法
        print(request.method)
        # body是字节编码,b'year=2020&month=09&day=13'
        print(request.body)
        # 转换为字典{'year': '2020', 'month': '09', 'day': '13'}
        print(QueryDict(request.body).dict())
        # <QueryDict: {'year': ['2020'], 'month': ['09'], 'day': ['13']}>
        print(request.POST)
        data = request.POST
        year = data.get('year', '2030')
        month = data.get('month', '9')
        day = data.get('day', '8')

        return HttpResponse("year is {}, month is {}, day is {}.".format(year, month, day))
模拟触发POST流量:
[root@localhost ~]# curl -X POST http://192.168.8.130:8888/hello/ -d 'year=2020&month=09&day=13'
year is 2030, month is 9, day is 13.
看看我们后台接收哪些信息:
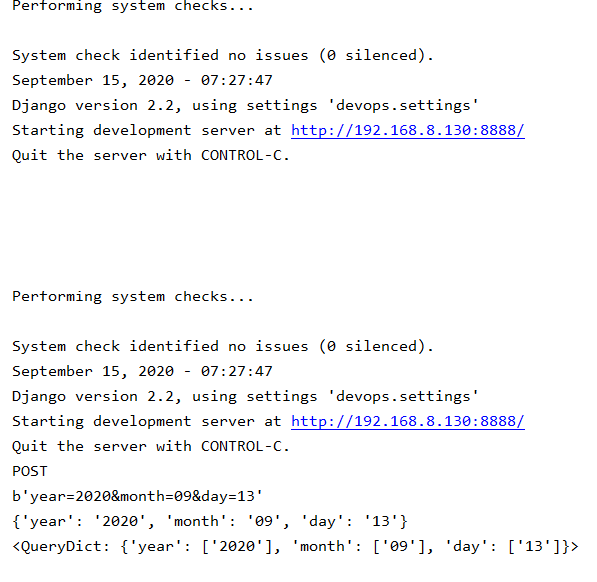
2.2.5 QueryDict介绍
在httprequest对象中,GET和POST属性是django.http.QueryDict的实例,它是一个自定义的类似字典的类,用来处理同一个键带多个值。无论使用GET,POST方式,他们最终都是通过QueryDict方法对传入的参数进行处理。
3. MTV之模板
3.1 模板继承
3.1.1 常规手段
-
创建模板
templates目录及子目录hello:mkdir -p devops/templates/hello备注:每一个APP对应一个目录。
-
路由视图
hello/urls.py配置规则from django.urls import path from hello import view app_name = 'hello' urlpatterns = [ path('list/', view.list, name='list'), ] -
后台视图
hello/view.py配置from django.shortcuts import render def list(request): users = [ {'username':'test01', 'age':18, 'hobby':'python'}, {'username':'test02', 'age':18, 'hobby':'java'}, {'username':'test01', 'age':18, 'hobby':'C'}, ] return render(request, 'hello/list.html', {'users':users})说明:本次练习,还没涉及到数据库,所以先本地创建数据。
-
新建模板
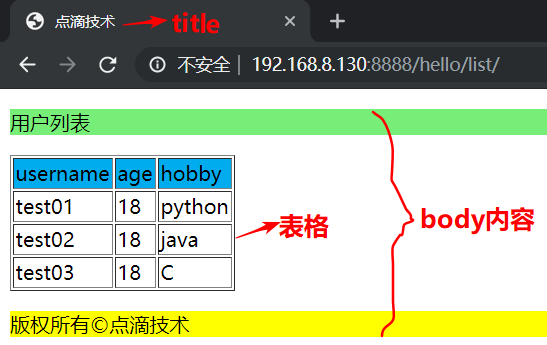
templates/hello/list.html配置<!DOCTYPE html> <html lang="en"> <head> <meta charset="UTF-8"> <title>点滴技术</title> </head> <body> <p style="background-color: #77ee77">用户列表</p> <table border="1"> <thead style="background-color: #00aced"> <tr> <td>username</td> <td>age</td> <td>hobby</td> </tr> </thead> <tbody> {% for user in users %} <tr> <td> {{ user.username }} </td> <td> {{ user.age }} </td> <td> {{ user.hobby }} </td> </tr> {% endfor %} </tbody> </table> <p style="background-color: yellow"> 版权所有©点滴技术 </p> </body> </html> -
网页输入地址后,效果图:
![]()
3.1.2 模板继承
-
定义母板
在devops/templates目录下新增一个base.html母板。<!doctype html> <html lang="en"> <head> <!-- 每个html的标签变量,都可以自定义--> <title> {% block title %}NetDevOps{% endblock title %} </title> </head> <body> <!-- body变量,每个页面都可以自定义内容--> {% block body %}这是body的内容{% endblock body %} <!-- 底部,每个html页面固定样式 --> <p style="background-color: yellow"> 版权所有©点滴技术 </p> </body> </html> -
子页面继承
  <!--继承母版-->
  {% extends "base.html" %}
  <!--重写title的内容-->
  {% block title %} 用户的列表 {% endblock %}

  <!--重写body的内容-->
  {% block body %}
  <table border="1">
  	<thead style="background-color: #00aced" >
  		<tr>
  			<td>username</td>
  			<td>age</td>
  			<td>hobby</td>
  		</tr>
  	</thead>
  	<tbody>
  		{% for user in users %}
  		<tr>
  			<td> {{ user.username }} </td>
  			<td> {{ user.age }} </td>
  			<td> {{ user.hobby }} </td>
  	  </tr>
  		{% endfor %}
  	</tbody>
  </table>
  {% endblock%}
备注:公共部分代码就不用写出来了,减少了代码冗余。
-
视图
hello/view.py配置from django.shortcuts import render def userlist(request): users = [ {'username':'test01', 'age':18, 'hobby':'python'}, {'username':'test02', 'age':18, 'hobby':'java'}, {'username':'test03', 'age':18, 'hobby':'C'}, ] return render(request, 'hello/userlist.html', {'users':users}) -
效果图:
![]()
4. Template模板过滤器
4.1 Django自带常用过滤器
-
传入参数的长度
{% if messages|length >= 3 %} The Messages is too long. {% else %} The messages is too short. {% endif %} -
default:缺省值
{{ messages|default:"nothing" }}备注:如果传入的值为false,则使用缺省值。
-
first/last
{{ messages|first }}
{{ messages|last }}
备注:显示列表第一个或最后一个元素。
-
join
说明:将列表转为字符串。{{ value|join:"-" }} -
length
说明:判断长度,返回布尔值{{ messages|length}} {{ messages|length_is:"4"}} -
static
说明:加载本地图片、css、js样式等资源,通常使用CDN方式。# 方法1: {% load static %} <img src="{% static "images/favicon.png" %}" alt="Hi!" /> # 方法2: {% load static %} {% static "images/favicon.png" as myphoto %} <img src="{{ myphoto }}"></img> -
date
说明:时间格式化,返回年-月-日 时-分-秒{{ messages|date:"Y/m/d" }}{{ messages|date:"H:i:s" }} -
safe
说明:缺省情况下,django会对HTML等标签进行自动转义,如果要关闭自动转义,可通过过滤器"|safe"的方式申明不用转义。value = "<a href="https://www.python.org"> 百度链接 </a>" {{ value|safe }} -
csrf_token
说明:用于跨站请求伪造保护<form action="" method='post'> {% csrf_token %} # 有了这个POST请求才能正常运行 <p> <input type="text" name="user"></p> <input type="submit"> </form> -
slice
说明:切片{{ messages|slice:":2"}}
4.2 自定义模板标签和过滤器
-
定义标签
创建目录及文件:hello/templatetags/mytag.pyfrom django import template register = template.Library() @register.filter def test(x, y): return int(x)*2 + int(y)qq -
模板视图
  <!--继承母版-->
  {% extends "base.html" %}
  {% block title %}模板标签{% endblock %}

  <!--重写body的内容-->
  {% block body %}

  <!--自定义模板标签-->
  {% load mytag %}
  <p> {{ "2"|test:"1" }}</p>

  {% endblock%}
5. 模型Model基础
5.1 模型概念
简单理解:模型对应数据库中的表,模型中的一个类对应数据库一张表;
5.1.1 常用字段类型
-
字符串:
CharFieLdfrom django.db import models class User(): username = models.CharField(max_length=20) -
整数:
IntegerFieldint_field = models.IntegerField() -
浮点数:
FloatFieldfloat_field = models.FloatField() -
自增字段:
AutoFieldid_field = models.AutoField(primary_key=True) -
文本框:
TextFieldtext_field = models.TextField() -
邮箱:
EmailField
说明:用于检查邮箱的合法性。mail_field = models.EmailField() -
日期:
DateField说明:
auto_now是被保存时,将时间设置为当前时间,通常表示last-modified,auto_now_add是首次被创建时,设置为当前时间,通常表示创建时间。date = models.DateField() -
文件上传:
Filefield
说明:upload_to必选参数,指文件的上传存放路径。upload_file = models.FileField(upload_to='/usr/tmp/test')
5.1.2 常用字段参数
- null
如果null=True将再数据库存放一个空值NULL,缺省为Flase。
该字段是可以在数据中存放null值。 - blank
如果blank=True,则允许该字段为空白,缺省是False,不允许为空。
该字段是表单验证是否允许为空或不为空的。 - unique
如果unique=True,表示该字段在整个表单中是唯一的,不重复的。 - primary_key
如果primary_key=True, 表示该字段在数据库中是主键。 - default = ''
用于定义缺省值。 - verbose_name
ForeignKey、ManyToManyField、和OneToOneField的备注信息需要用到这个。
6. 建模及同步
6.1 设计一个简单的模型
hello\models.py:
#!/usr/bin/env python3
#-*- coding:UTF-8 -*-

from django.db import models

class Devices(models.Model):
    device_name = models.CharField(max_length=32, help_text='设备名称')
    ip = models.CharField(max_length=15, help_text='管理IP地址')
    vendor = models.CharField(max_length=16, help_text='厂商')
    device_type = models.CharField(max_length=6, help_text='设备类型')
    model = models.CharField(max_length=32, help_text='设备型号')
    sn = models.CharField(max_length=32, help_text='序列号')
    os = models.CharField(max_length=16, help_text='操作系统')
    version = models.CharField(max_length=32, help_text='版本')

    def __str__(self):
        return self.device_name
6.2 将模型同步到数据库
-
生成迁移脚本
(py369) [root@localhost devops]# python manage.py makemigrations hello Migrations for 'hello': hello/migrations/0004_devices.py - Create model Devices -
展示迁移的sql语句
(py369) [root@localhost devops]# python manage.py sqlmigrate hello 0004 BEGIN; -- -- Create model Devices -- 此处省略... -
执行数据库命令
(py369) [root@localhost devops]# python manage.py migrate hello Operations to perform: Apply all migrations: hello Running migrations: Applying hello.0004_devices... OK -
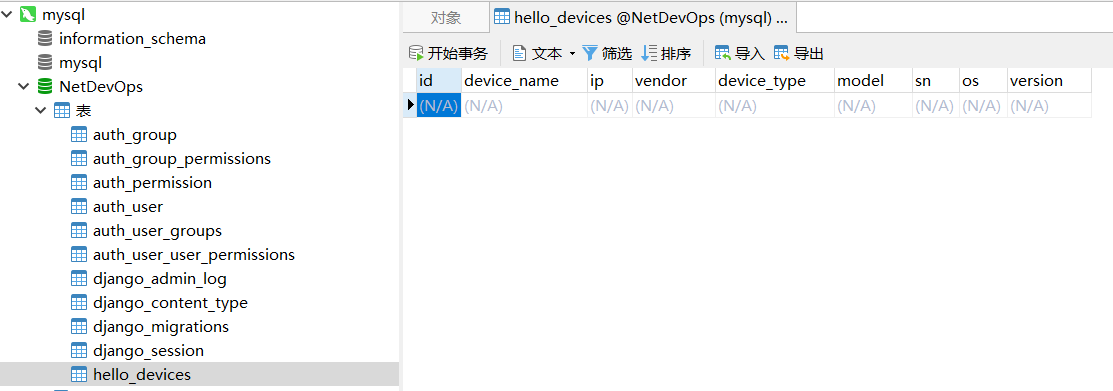
查看数据库表
![]()
-
常用命令解释
# 生产迁移脚本
python manage.py makemigrations <app_name>
# 转换后的sql语句
python manage.py sqlmigrate <app_name> <number>
# 执行数据库命令
python manage.py migrate
# 所有APP及对应生效的migration
python manage.py showmigrations
# 将某个APP的migration重置
python manage.py migrate --fake hello
# 强制执行某个版本的迁移脚本
python manage.py migrate --fake hello
python manage.py migrate --fake hello 0004
7. ORM实现简单的增删改查
7.1 ORM概念
- ORM是对数据抽象建模并提供访问接口的编程方式
- 模型中的一个类(class)表示一个表(table)
- 每一个属性对应数据表中的一个字段
- 调用数据表,就是实例化类的对象
7.2 增 | 删 | 改 | 查
7.2.1 增加数据
(py369) [root@localhost devops]# python manage.py shell

In [1]: from hello.models import Devices
# 实例化对象
In [4]: D = Devices.objects.all()
In [5]: D
# 暂时还没有数据,为空
Out[5]: <QuerySet []>
In [7]: data = {'device_name':'test-sw-01', 'ip':'192.168.1.1', 'vendor':'cisco','device_type':'switch','model':'c3850','sn':'001','os':'ios','version':'15.0'}
# 第一种创建方式(最常用)
In [8]: D.create(**data)
Out[8]: <Devices: test-sw-01>

# 第二种创建方式(防止重复,速度相对较慢):
# 返回一个元组(对象,True或False)
In [10]: data2 = {'device_name':'test-sw-02', 'ip':'192.168.1.2', 'vendor':'cisco','device_type':'switch','model':'c3850','sn':'001','os':'ios','version':'15.0'}
In [14]: D.get_or_create(**data2)
Out[14]: (<Devices: test-sw-02>, True)
In [16]: D
Out[16]: <QuerySet [<Devices: test-sw-01>, <Devices: test-sw-02>]>
7.2.2 删除删除
数据库表中的数据(偷偷增加了一台设备):

In [1]: from hello.models import Devices
# 删除一条记录
 # 第一种方法:get
In [4]: D = Devices.objects.get(device_name = 'test-sw-02')
In [5]: D.delete()
Out[5]: (1, {'hello.Devices': 1})
 # 第二种方法:filter
In [2]: Devices.objects.filter(device_name='test-sw-03').delete()
Out[2]: (1, {'hello.Devices': 1})

# 先还原数据,再删除所有的记录
In [5]: Devices.objects.all().delete()
Out[5]: (3, {'hello.Devices': 3})
7.2.3 修改数据
# 第一种方法:
In [2]: D = Devices.objects.get(device_name='test-sw-03')
In [3]: D.device_name = 'test-sw-13'
In [4]: D.save()
In [5]: Devices.objects.all()
Out[5]: <QuerySet [<Devices: test-sw-01>, <Devices: test-sw-02>, <Devices: test-sw-13>]>

# 第二种方法:
# 指定字段更新,偷偷去看下后台的ID是多少
In [6]: Devices.objects.filter(id=11)
Out[6]: <QuerySet [<Devices: test-sw-13>]>
In [7]: Devices.objects.filter(id=11).update(device_name='test-sw-03')
Out[7]: 1
In [8]: Devices.objects.get(device_name='test-sw-03')
Out[8]: <Devices: test-sw-03>

# 多个字段更新
In [26]: data = {'vendor':'huawei','device_type':'switch','model':'S9303','sn':'001','os':'VRP'}
In [27]: Devices.objects.filter(id=11).update(**data)
Out[27]: 1
最终效果如下(通过数据库查询):

7.2.4 查看数据
-
查询多条数据
列表嵌套一个字典(QuerySet对象)
# 查询所有 In [30]: D = Devices.objects.all() In [31]: D Out[31]: <QuerySet [<Devices: test-sw-01>, <Devices: test-sw-02>, <Devices: test-sw-03>]> # 每个对象及对象的属性 In [32]: D[0] Out[32]: <Devices: test-sw-01> In [33]: D[0].device_name Out[33]: 'test-sw-01' # 切片,不支持负索引 In [34]: D[:2] Out[34]: <QuerySet [<Devices: test-sw-01>, <Devices: test-sw-02>]> # 遍历 In [36]: for d in D: ...: print(d.device_name) ...: test-sw-01 test-sw-02 test-sw-03 # 返回指定的字段(values_list 和 values) In [37]: D.values_list('device_name','ip') Out[37]: <QuerySet [('test-sw-01', '192.168.1.1'), ('test-sw-02', '192.168.1.2'), ('test-sw-03', '192.168.1.3')]> In [39]: D.values('device_name','vendor') Out[39]: <QuerySet [{'device_name': 'test-sw-01', 'vendor': 'cisco'}, {'device_name': 'test-sw-02', 'vendor': 'cisco'}, {'device_name': 'test-sw-03', 'vendor': 'huawei'}]> -
查询一条数据
# 第一种方法: In [2]: D = Devices.objects.get(device_name='test-sw-01') In [3]: D # 返回的是一个对象 Out[3]: <Devices: test-sw-01> # 取对象的属性值 In [4]: D.device_name Out[4]: 'test-sw-01' In [5]: D.vendor Out[5]: 'cisco # 第二种方法: In [6]: data = {'device_name':'test-sw-01'} In [7]: D = Devices.objects.get(**data) In [8]: D.device_name Out[8]: 'test-sw-01'- 过滤查询
In [9]: Devices.objects.filter(device_name='test-sw-01') Out[9]: <QuerySet [<Devices: test-sw-01>]> In [11]: Devices.objects.filter(**data) Out[11]: <QuerySet [<Devices: test-sw-01>]>- 过滤常用方法:
# 不区分大小写:<属性值>__iexact In [16]: Devices.objects.filter(device_name__iexact='test-sw-01') Out[16]: <QuerySet [<Devices: test-sw-01>]> # 包含匹配:<属性值>__contains In [17]: Devices.objects.filter(device_name__contains='sw') Out[17]: <QuerySet [<Devices: test-sw-01>, <Devices: test-sw-02>, <Devices: test-sw-03>]> # 模糊匹配,不分区大小写:<属性值>__icontains In [18]: Devices.objects.filter(device_name__icontains='sw') Out[18]: <QuerySet [<Devices: test-sw-01>, <Devices: test-sw-02>, <Devices: test-sw-03>]> # 正则模糊匹配:<属性值>__regex In [20]: Devices.objects.filter(device_name__regex='-03$') Out[20]: <QuerySet [<Devices: test-sw-03>]> # 正则模糊匹配,不区分大小写:<属性值>__regex In [21]: Devices.objects.filter(device_name__iregex='^test') Out[21]: <QuerySet [<Devices: test-sw-01>, <Devices: test-sw-02>, <Devices: test-sw-03>]> # 排除过滤:<属性值>__contains In [22]: Devices.objects.exclude(device_name__contains='test-sw-01') Out[22]: <QuerySet [<Devices: test-sw-02>, <Devices: test-sw-03>]> # 包含带有sw的device_name,但排除了vendor是cisco厂商的 In [23]: Devices.objects.filter(device_name__contains='sw').exclude(vendor='cisco') Out[23]: <QuerySet [<Devices: test-sw-03>]> # filter其他常用过滤查询方法 __exact:精确匹配 __iexact:精确匹配,忽略大小写 __gt:大于 __gte:大于等于 __lt:小于 __lte:小于等于 __in:在一个list列表范围内 __startswith:以...开头 __startswith:以...开头,忽略大小写 __endswith:以...结尾 __range:在...范围内 __year:日期的年份 __month:日期的月份 __day:日期的日数 __isnull=True/False:字段是否为空get和filter的区别:# 都可以获取到指定的对象; # get是获取唯一数据的场景,数据不存在会报错; # filter适用于任何场景,返回是一个QuerySet对象,数据不存在则返回是空的对象。-
排序查询
# 正序
In [32]: Devices.objects.all().order_by('device_name')
Out[32]: <QuerySet [<Devices: test-sw-01>, <Devices: test-sw-02>, <Devices: test-sw-03>]>
# 倒序,前面加
In [33]: Devices.objects.all().order_by('-device_name')
Out[33]: <QuerySet [<Devices: test-sw-03>, <Devices: test-sw-02>, <Devices: test-sw-01>]>
8. 打通MTV
8.1 创建模型
参见以上的hello/models.py的配置。
8.2 创建视图view
from django.shortcuts import render
from hello.models import Devices

def devicelist(request):
    # 对象实例化
    devices = Devices.objects.all()
    # {'devices':devices}表示传参
    return render(request, 'hello/device.html', {'devices':devices})
8.3 创建模板
<!--继承母版-->
{% extends "base.html" %}

<!--重写title的内容-->
{% block title %}设备列表{% endblock %}

<!--重写body的内容-->
{% block body %}
<p style="background-color: #77ee77">设备列表</p>
<!--表格-->
<table border="1">
<!--    表头-->
    <thead style="background-color: #00aced" >
        <tr>
            <td>设备名称</td>
            <td>IP地址</td>
            <td>厂商</td>
            <td>设备类型</td>
            <td>型号</td>
            <td>序列号</td>
            <td>操作系统</td>
            <td>版本号</td>
        </tr>
    </thead>
<!--表的正文-->
    <tbody>
        {% for device in devices %}
        <tr>
            <td> {{ device.device_name }} </td>
            <td> {{ device.ip }} </td>
            <td> {{ device.vendor }} </td>
            <td> {{ device.device_type }} </td>
            <td> {{ device.model }} </td>
            <td> {{ device.sn }} </td>
            <td> {{ device.os }} </td>
            <td> {{ device.version }} </td>
        </tr>
        {% endfor %}
    </tbody>
</table>

{% endblock%}
8.4 创建路由视图URL
from django.urls import path
from hello import view

app_name = 'hello'
urlpatterns = [
    path('devicelist', view.devicelist, name='devicelist'),
]
8.5 效果图如下:
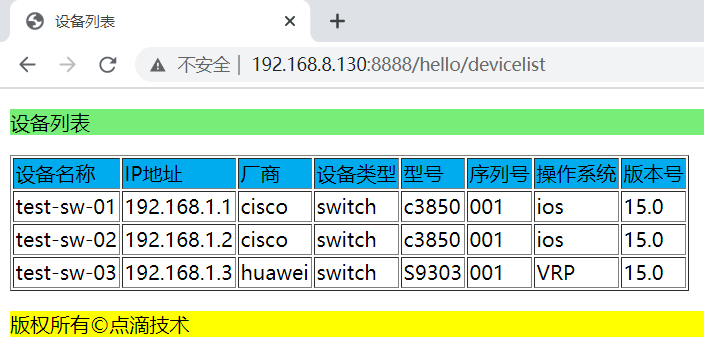
大家先不要在意前端效果,后面的项目,再把UI这块优化好,先到这里了,大家学会了吗?
好不容易码完这篇了,大家点个赞吧!
如果喜欢的我的文章,欢迎关注我的公众号:点滴技术,扫码关注,不定期分享




 浙公网安备 33010602011771号