
目标检测网络yolo3详解(二)
yolo v3目标检测网络
yolo3的运行速度快,检测效果也不差,算是使用最广泛的目标检测网络了。对于yolo3的理解,也主要在于三点,一是网络结构和模型流程的理解;二是对于正负样本分配的理解(anchor和gt_box之间的匹配);三是对于loss函数的理解
1.1 yolo v3 网络结构
yolo3的网络包括Darknet53, Yolo3_blocks(FPN)两部分。yolo3的整体结构如下图所示,输入尺寸为416*416的图片,经过Daeknet53提取特征,选择最后三个卷积层的特征feature1, feature2, feature3,feature3送入Yolo3_block1产生预测值,feature2和Yolo3_block1中间的输出特征图结合后送入Yolo3_block2产生预测值,feature1和Yolo3_block2中间输出特征图结合后送入Yolo3_block3产生预测值,最后将三个Yolo3_blocks的预测值合并作为最后的输出结果。


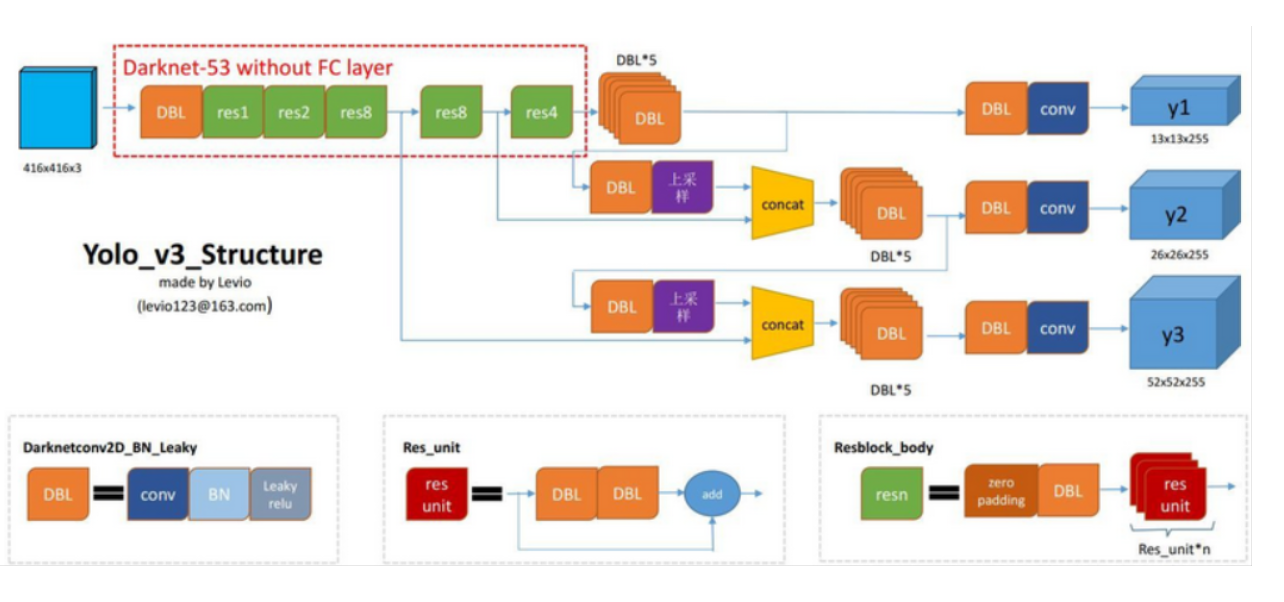
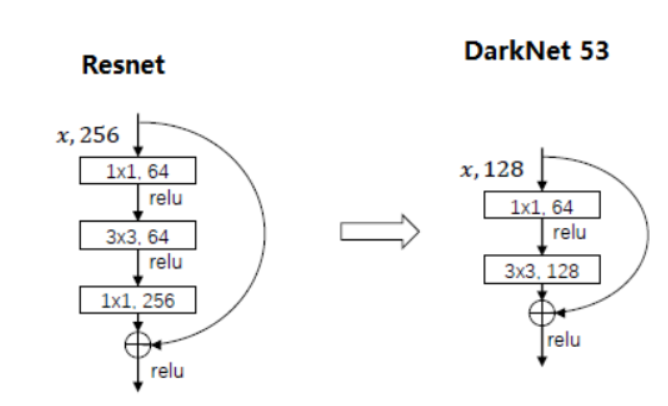
yolo3网络中有三个值得注意的地方,一是大量使用的DBL结构,即conv+BatchNorm+Leaky Relu;二是借鉴FPN的思想,将不同尺度特征融合时采用了一个1*1的卷积和上采样,其中卷积改变特征图通道数,上采样改变特征图分辨率;三是Darknet53中的res unit,借鉴了resnet的残差思想,其区别如下图所示;
模型计算流程:
(以1x3x416x416图片为示例,yolo3要求图片尺寸为32的倍数)
-
Darknet53部分得到三个特征图Feature1, Feature2和Feature3,其尺寸分别为(1, 256, 52, 52),(1, 512, 26, 26),(1, 1024, 13, 13)
-
-
上一步block1_feature(1,512, 13, 13)上采样后和Feature2(1, 512,26,26)结合后送入yolo3 block2中block2,得到中间特征block2_feature(1, 256, 26, 26)和预测结果output2(1, 26, 26, 255)
-
上一步block2_feature(1, 256, 26, 26)上采样后和Feature1(1, 256, 52, 52)结合后送入yolo3 blocks的block3,得到预测结果output3(1, 52, 52, 255)
-
将output1,output2,output3结合得到最后的预测结果
训练阶段:
-
返回背景置信度all_objectness(1, 10647, 1), box中心位置偏移值all_box_centers(1, 10647, 2), box尺度all_box_scales(1, 10647, 2), 类别置信度all_class_pred(1, 10647, 80), 再结合gt_box, gt_ids, anchor计算loss
测试阶段:
-
根据先验框anchors和预测box偏移值,尺度信息,计算真实box坐标值和类别置信度,经过NMS,最后输出类别信息ids(n, 1), 置信度scores(n, 1), 坐标bboxes(n, 4)
1.2 正负样本分配(anchor和gt_boxes匹配策略)
anchor设置
若输入图片尺寸416*416,下图是coco数据集的典型anchor配置(size),可以看到不同尺寸的feature上每个像素点都设置了3个anchor,三张feature总共设置了10647个anchor:
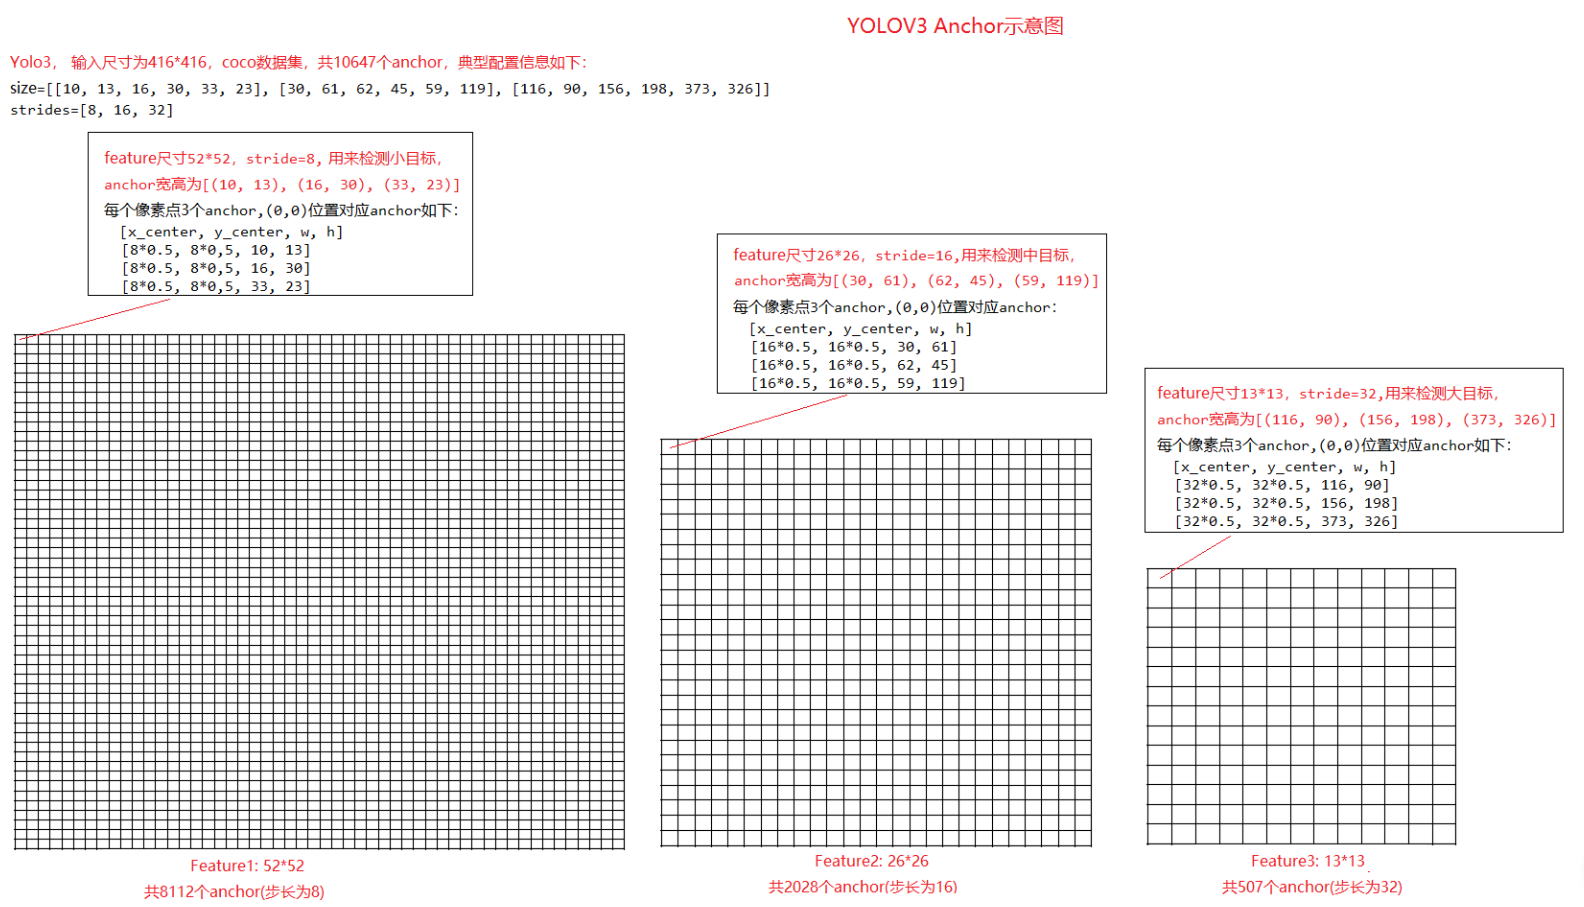
对于52*52的feature map, 设置的三个anchor的宽高为(10, 13), (16, 30), (33, 23), 尺寸比较小,主要用来预测小目标。在feature map中每个像素点都对应三个anchor,如(0, 0)区域框中,其中心点为(0.5, 0.5),而stride步长为8,对应416x416的原图片中中心点为(8x0.5, 8x0.5),因此此像素点处的三个anchor的中心点在(4, 4), 宽高依次为(10, 13), (16, 30), (33, 23)
anchor匹配规则
虽然设置了大量anchor,但一张训练图片上可能只有几个gt_box,因此需要确定选择那些anchor来负责预测这几个gt_box
yolo3中,anchor和gt_box进行匹配,正负样本是按照以下规则决定的:
-
第一步,如果一个anchor与所有的gt_box的最大 IoU<ignore_thresh 时,那这个anchor就是负样本。(一般ignore_thresh=0.7)
-
第二步,如果gt_box的中心点落在一个区域中,该区域就负责检测该物体。将与该物体有最大IoU的anchor作为正样本(注意这里没有用到ignore_thresh, 即使该最大IoU<ignore_thresh也不会影响该anchor为正样本, 对于其他anchor,若IoU>ignore_thresh, 但不是最佳匹配,设置为忽略样本
根据上面匹配规则,yolo3中anchor有三种样本:正样本,负样本,忽略样本
-
正样本:和gt_box有最大的IoU,无论是否满足IoU>ignore_thresh,用1标记
-
负样本:不是和gt_box有最大IoU的anchor,且IoU <= ignore_thresh, 用0标记
-
忽略样本:不是和gt_box有最大IoU的anchor,且IoU > ignore_thresh, 用-1标记
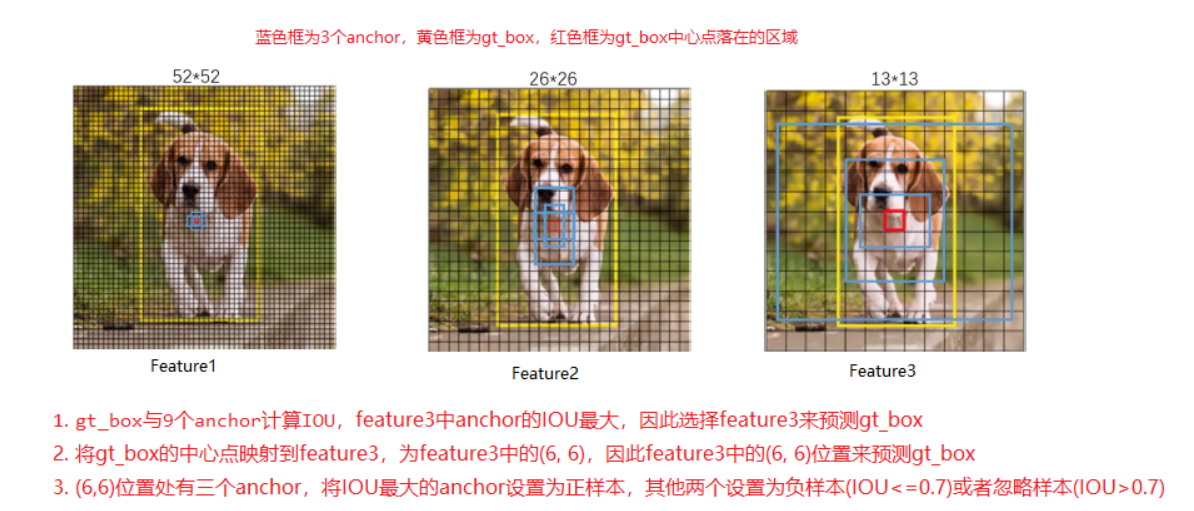
anchor匹配过程
一般先判断用那个尺度的feature来预测gt_box, 再判断用feature中那个区域来预测gt_box。下面是一段示例代码帮助理解:


#coding:utf-8
import numpy as np

def box_to_center(box):
    new_box = np.zeros_like(box)
    center = box[:, :2]   #(x_center, y_center)
    size = box[:, 2:]/2   #[w, h]
    new_box[:, :2] = center - size
    new_box[:, 2:] = center + size
    return new_box

def box_iou(ar1, ar2):
    x1 = max(ar1[0], ar2[0])
    y1 = max(ar1[1], ar2[1])
    x2 = min(ar1[2], ar2[2])
    y2 = min(ar1[3], ar2[3])
    if x1 >= x2 or y1 >= y2:
        return 0
    else:
        area1 = (ar1[2] - ar1[0]) * (ar1[3] - ar1[1])
        area2 = (ar2[2] - ar2[0]) * (ar2[3] - ar2[1])
        area_iou = (x2 - x1) * (y2 - y1)
        iou = area_iou / (area1 + area2 - area_iou)
        return iou


def match(gt_box, anchors, features):
    num_anchors = np.cumsum([len(a) // 2 for a in anchors])  #[3 6 9]

    #1.移动gt_box
    gt_w= gt_box[2]-gt_box[0]
    gt_h = gt_box[3]-gt_box[1]
    shift_gt_box = np.array([-0.5*gt_w, -0.5*gt_h, 0.5*gt_w, 0.5*gt_h]) #将gt_box的中心移动到(0, 0)
    # print(shift_gt_box)

    #2.移动anchor_box
    anchors = np.array(anchors).reshape(-1, 2)
    anchors_bbox = np.concatenate([0*anchors, anchors], axis=1)
    shift_anchor_boxes = box_to_center(anchors_bbox)  #将anchor_box的中心移动(0, 0)
    # print(shift_anchor_boxes)

    #3.计算ious,选择最佳匹配的anchor,确定采用那个尺度的feature
    num_anchor = anchors_bbox.shape[0]
    ious = np.zeros(shape=(1, num_anchor))
    for i in range(num_anchor):
        ious[:,i] = box_iou(shift_gt_box, shift_anchor_boxes[i])
    print(ious)   #[[0.00179019, 0.00716076, 0.01050245, 0.02685285, 0.04069698, 0.10210049,0.15574651, 0.46079484, 0.51360041]]
    match_index = ious.argmax(axis=1) # 8, 表示第9个anchor为最佳匹配
    feture_index = np.nonzero(num_anchors>match_index)[0][0] # 2,表示第9个anchor属于第三张feature
    print(feture_index)

    #4.确定feature上的那个区域负责预测
    gt_center_x = (gt_box[0]+gt_box[2])/2
    gt_center_y = (gt_box[1]+gt_box[3])/2
    height, width = features[feture_index]
    loc_x = int(gt_center_x*width/416)
    loc_y = int(gt_center_y*height/416)
    print(loc_x, loc_y)   # 6, 6;  13*13的feature中(6, 6)位置处负责预测

    #结合3,4两部,最终可以确定,采用13*13的feature中(6, 6)位置处,尺寸为(373, 326)的anchor预测这个gt_box

if __name__ == "__main__":
    # yolo3, 输入图片为416*416
    gt_box = [108, 42, 304, 384]  # 标注框[xmin, ymin, xmax, ymax]
    anchors = [[10, 13, 16, 30, 33, 23], [30, 61, 62, 45, 59, 119],
               [116, 90, 156, 198, 373, 326]]  # 三个尺度feature中,anchor的宽高,w,h
    features = [(52, 52), (26, 26), (13, 13)]  # feature1, feature2, feature3
    match(gt_box, anchors, features)
代码简要逻辑如下:
-
gt_box与9个anchor计算IoU,feature3中anchor的IoU最大,因此选择feature3来预测gt_box
-
将gt_box的中心点映射到feature3,为feature3中的(6, 6),因此feature3中的(6, 6)位置来预测gt_box
-
(6,6)位置处有三个anchor,将IOU最大的anchor设置为正样本,其他两个设置为负样本(IOU<=0.7)或者忽略样本(IOU>0.7)
下面这张图总结了上述匹配过程:
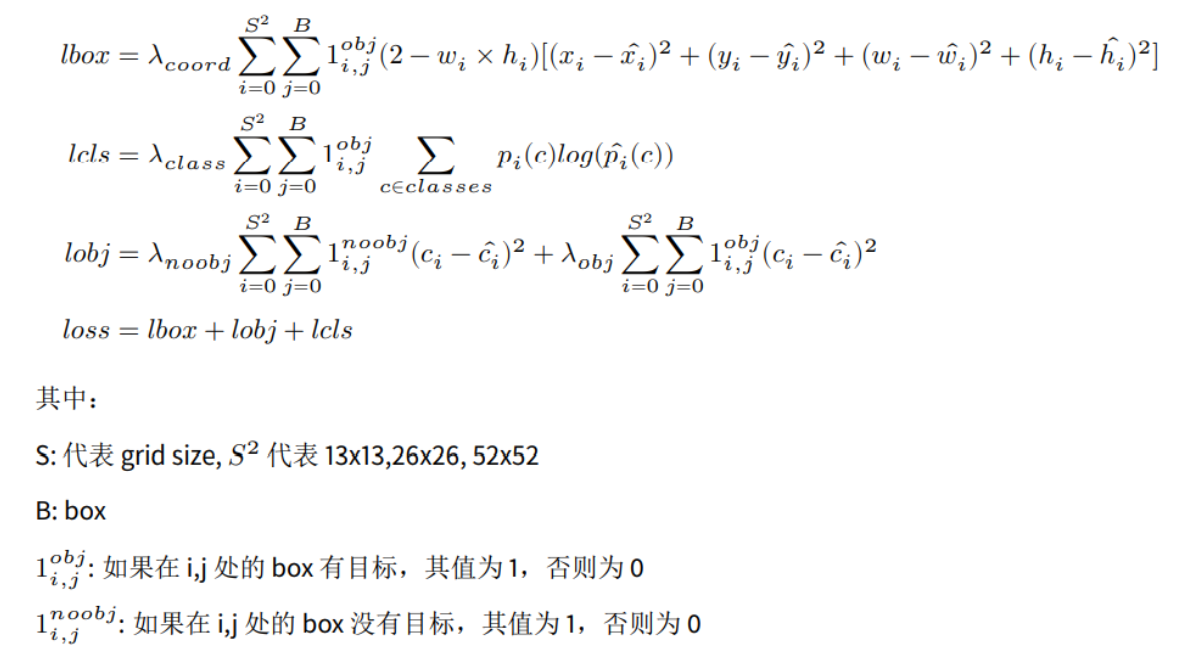
1.3 yolo3 loss函数
yolo3 loss函数包括四部分: 背景置信度obj_loss, bbox中心点偏移值center_loss, bbox尺度scale_loss, 类别置信度cls_loss。计算公式大致如下:
计算loss时,会将gt_box (cx, cy, w, h)处理成相对于anchor的偏移(offset_x, offset_y, log_ratio_w, log_ratio_h), 其中offset_x, offset_y是相对于gt所在feature网格点左上角偏移值,范围在0-1之间,log_ratio_w,log_ratio_h是gt的w,h相对于anchor宽高比例的log值,代码如下:
# compute the location of the gt centers
loc_x = int(gtx / orig_width * width)
loc_y = int(gty / orig_height * height)
# write back to targets
index = _offsets[nlayer] + loc_y * width + loc_x
center_targets[b, index, match, 0] = gtx / orig_width * width - loc_x  # tx,  相对于左上角偏移值,0-1之间
center_targets[b, index, match, 1] = gty / orig_height * height - loc_y  # ty
scale_targets[b, index, match, 0] = np.log(max(gtw, 1) / np_anchors[match, 0])  # gt的w和anchor w的比率,在进行log计算
scale_targets[b, index, match, 1] = np.log(max(gth, 1) / np_anchors[match, 1])
weights[b, index, match, :] = 2.0 - gtw * gth / orig_width / orig_height
objectness[b, index, match, 0] = (
                        np_gt_mixratios[b, m, 0] if np_gt_mixratios is not None else 1)
class_targets[b, index, match, :] = 0
class_targets[b, index, match, int(np_gt_ids[b, m, 0])] = 1
上面公式是大致理解,在具体计算和代码实现细节上,不同版本的代码里面会有些细微变化,下面为示例代码:
from mxnet.gluon.loss import Loss, SigmoidBinaryCrossEntropyLoss, L1Loss


class YOLOV3Loss(Loss):
    """Losses of YOLO v3.

    Parameters
    ----------
    batch_axis : int, default 0
        The axis that represents mini-batch.
    weight : float or None
        Global scalar weight for loss.

    """
    def __init__(self, batch_axis=0, weight=None, **kwargs):
        super(YOLOV3Loss, self).__init__(weight, batch_axis, **kwargs)
        self._sigmoid_ce = SigmoidBinaryCrossEntropyLoss(from_sigmoid=False)
        self._l1_loss = L1Loss()

    def hybrid_forward(self, F, objness, box_centers, box_scales, cls_preds,
                       objness_t, center_t, scale_t, weight_t, class_t, class_mask):
        """Compute YOLOv3 losses.

        Parameters
        ----------
        objness : mxnet.nd.NDArray
            Predicted objectness (B, N), range (0, 1).
        box_centers : mxnet.nd.NDArray
            Predicted box centers (x, y) (B, N, 2), range (0, 1).
        box_scales : mxnet.nd.NDArray
            Predicted box scales (width, height) (B, N, 2).
        cls_preds : mxnet.nd.NDArray
            Predicted class predictions (B, N, num_class), range (0, 1).
        objness_t : mxnet.nd.NDArray
            Objectness target, (B, N), 0 for negative 1 for positive, -1 for ignore.
        center_t : mxnet.nd.NDArray
            Center (x, y) targets (B, N, 2).
        scale_t : mxnet.nd.NDArray
            Scale (width, height) targets (B, N, 2).
        weight_t : mxnet.nd.NDArray
            Loss Multipliers for center and scale targets (B, N, 2).
        class_t : mxnet.nd.NDArray
            Class targets (B, N, num_class).
            It's relaxed one-hot vector, i.e., (1, 0, 1, 0, 0).
            It can contain more than one positive class.
        class_mask : mxnet.nd.NDArray
            0 or 1 mask array to mask out ignored samples (B, N, num_class).

        Returns
        -------
        tuple of NDArrays
            obj_loss: sum of objectness logistic loss
            center_loss: sum of box center logistic regression loss
            scale_loss: sum of box scale l1 loss
            cls_loss: sum of per class logistic loss

        """
        # compute some normalization count, except batch-size
        denorm = F.cast(
            F.shape_array(objness_t).slice_axis(axis=0, begin=1, end=None).prod(), 'float32')
        weight_t = F.broadcast_mul(weight_t, objness_t)
        hard_objness_t = F.where(objness_t > 0, F.ones_like(objness_t), objness_t)
        new_objness_mask = F.where(objness_t > 0, objness_t, objness_t >= 0)
        obj_loss = F.broadcast_mul(
            self._sigmoid_ce(objness, hard_objness_t, new_objness_mask), denorm)
        center_loss = F.broadcast_mul(self._sigmoid_ce(box_centers, center_t, weight_t), denorm * 2)
        scale_loss = F.broadcast_mul(self._l1_loss(box_scales, scale_t, weight_t), denorm * 2)
        denorm_class = F.cast(
            F.shape_array(class_t).slice_axis(axis=0, begin=1, end=None).prod(), 'float32')
        class_mask = F.broadcast_mul(class_mask, objness_t)
        cls_loss = F.broadcast_mul(self._sigmoid_ce(cls_preds, class_t, class_mask), denorm_class)
        return obj_loss, center_loss, scale_loss, cls_loss
上面代码中obj_loss, cls_loss, center_loss 都采用了BCE Loss, 只有scale_loss采用smoothL1 Loss。需要注意的是两个地方,一是 center_loss 采用了BCE Loss,而不是上述公式中的MSE Loss;二是计算center_loss 和scale_loss时有一个权重系数 (2.0 - (gtw * gth) / (416*416)), 是为了抑制gt_box尺度大小(gtw, gth为gt_box的宽高)对loss的影响,当物体尺度大时,权重系数小,而物体尺寸小时,权重系数大。
最后,通过上述loss计算,可以发先,网络预测的box中,x,y是相对于feature网格点左上角偏移值,w,h是比率的log值,需要后处理成真实的box值,处理代码如下:
box_centers = F.broadcast_add(F.sigmoid(raw_box_centers), offsets) * self._stride
box_scales = F.broadcast_mul(F.exp(raw_box_scales), anchors)
confidence = F.sigmoid(objness)
class_score = F.broadcast_mul(F.sigmoid(class_pred), confidence)
可以发现yolov3 loss计算时,loss和exp是没有关系的,如果将其loss改成iou_loss则需要引入exp函数,exp函数的梯度会比较大,所以yolov5之类采用ciou_loss时会改变了yolo v3的预测模式。

 浙公网安备 33010602011771号