(五)OpenCV-Python学习—边缘检测1
在进行图像识别时,常需要检测图像的边缘信息。图像的边缘指的是灰度值急剧变化的地方,一般是背景和前景物体的交界处。由于边缘处的灰度值急剧变化特性,可以利用离散数列的差分(相当于连续函数的导数)来识别边缘。目前常用的边缘检测算法大多数是通过梯度方向导数求卷积的方法,常用的卷积算子有Roberts算子,Prewitt,Sobel算子,Scharr算子等。
1. Roberts算子和Prewitt算子
1.1 Roberts算子
Roberts边缘检测算法是图像,分别与下面两个卷积核(锚点为1所在位置)进行卷积运算。第一个为135度方向像素值差分,第二个为45度方向像素值差分,可以发现卷积后,图像内部由于相近像素值会变为0,成为黑色背景,而边缘处由于像素值相差大,相减的差分值作为新的像素值。因此能够将图像边缘处的像素值识别出来,得到图像的轮廓
通过上述两个卷积会得到145度和45度的卷积结果,将两者合并得到最后的输出结果。有如下四种合并方式:
a. 取两个矩阵对应位置绝对值的和
b. 取两个矩阵对应位置平方和的开方
c. 取两个矩阵对应位置绝对值的最大值
d. 插值法
取平方和的开方效果最好,但同时也是最耗时的操作。
下面通过convolve2d()函数实现robert边缘检测算法的代码和效果如下:(可以发现45度和135度得到的是该角度上的边缘信息,而两者综合后的边缘更加清晰和完整)


#coding:utf-8


import cv2 as cv
from scipy import signal
import numpy as np


def robert(img,boundary="symm",fillvalue=0):
    H1,W1 = img.shape[:2]
    r1 = np.array([[1,0],[0,-1]],np.float32)
    r2 = np.array([[0,1],[-1,0]],np.float32)
    H2,W2= 2,2
    #锚点位置
    kr1,kc1=0,0
    con_r1 = signal.convolve2d(img,r1,mode="full",boundary=boundary,fillvalue=fillvalue)
    #截取出same卷积
    con_r1 = con_r1[H2-kr1-1:H1+H2-kr1-1,W2-kc1-1:W1+W2-kc1-1]

    kr2,kc2=0,1
    con_r2 = signal.convolve2d(img,r2,mode="full",boundary=boundary,fillvalue=fillvalue)
    con_r2 = con_r2[H2-kr2-1:H1+H2-kr2-1,W2-kc2-1:W1+W2-kc2-1]
    return (con_r1,con_r2)

if __name__=="__main__":
    img = cv.imread(r"C:\Users\Administrator\Desktop\Messi.jpg",0)
    con_r1,con_r2 = robert(img)
    con_r1 =np.abs(con_r1)
    edge_135 = con_r1.astype(np.uint8)
    con_r2 =np.abs(con_r2)
    edge_45 = con_r2.astype(np.uint8)
    edge = np.sqrt(np.power(con_r1,2.0)+np.power(con_r2,2.0))
    edge = np.round(edge)
    edge[edge>255]=255
    edge = edge.astype(np.uint8)
    cv.imshow("img",img)
    cv.imshow("edge_135",edge_135)
    cv.imshow("edge_45 ",edge_45 )
    cv.imshow("edge",edge)
    cv.waitKey(0)
    cv.destroyAllWindows()
(上述代码中,由于锚点不是中心点,所以没有直接计算same卷积,而是先进行full卷积,再从中截取same卷积结果)

1.2 Prewitt算子
prewitt边缘检测算子如下图所示,分别为水平方向和垂直方向的卷积核(锚点为中心点),再进行边缘检测时,也是先分别进行水平和垂直方向的差分计算,最后再进行合并。

prewitt算子的来个卷积核是可分离的,如下图所示。对于水平方向的卷积核,可以拆分为一个垂直方向上的均值平滑卷积核和水平方向的差分卷积核,因此prewitt水平算子,相当于先进行了垂直方向的均值平滑,然后再进行水平方向的差分卷积运算。同样prewitt垂直算子,相当于先进行水平方向的均值平滑,再进行垂直方向的差分卷积。 所以相比于Robert算子,Prewitt算子多了一个平滑操作,所以其受噪声干扰小。
 通过convolve2d()函数实现prewitt边缘检测算法的代码和效果如下:
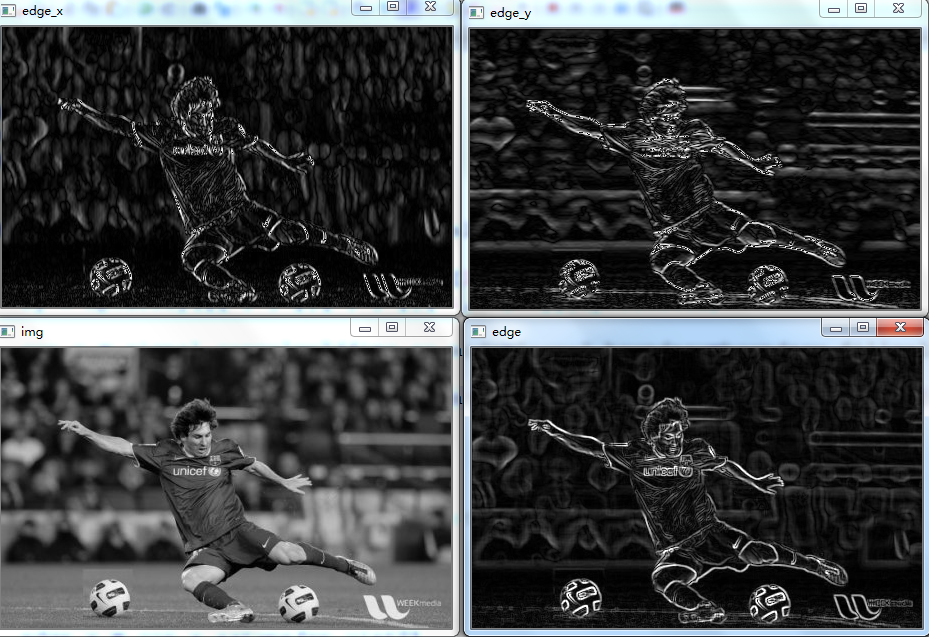
#coding:utf-8


import cv2 as cv
from scipy import signal
import numpy as np


def prewitt(img,boundary="symm",fillvalue=0):
    H1,W1 = img.shape[:2]
    rx = np.array([[1,0,-1],[1,0,-1],[1,0,-1]],np.float32)
    ry = np.array([[1,1,1],[0,0,0],[-1,-1,-1]],np.float32)
    #也可以分别进行垂直均值平滑卷积,然后水平差分卷积,来加速运算
    con_x = signal.convolve2d(img,rx,mode="same",boundary=boundary,fillvalue=fillvalue)

    con_y = signal.convolve2d(img,ry,mode="same",boundary=boundary,fillvalue=fillvalue)

    return (con_x,con_y)

if __name__=="__main__":
    img = cv.imread(r"C:\Users\Administrator\Desktop\Messi.jpg",0)
    con_x,con_y = prewitt(img)
    con_x =np.abs(con_x)
    edge_x = con_x.copy()
    edge_x[edge_x>255]=255
    edge_x = con_x.astype(np.uint8)
    con_y =np.abs(con_y)
    edge_y = con_y.copy()
    edge_y[edge_y>255]=255
    edge_y = con_y.astype(np.uint8)
    #采用插值法方式,将x和y卷积结果合并
    edge = 0.5*con_x+0.5*con_y
    edge[edge>255]=255
    edge = edge.astype(np.uint8)
    cv.imshow("img",img)
    cv.imshow("edge_x",edge_x)
    cv.imshow("edge_y ",edge_y )
    cv.imshow("edge",edge)
    cv.waitKey(0)
    cv.destroyAllWindows()
2. sobel算子
sobel算子的两个卷积核如下,也分为水平方向和垂直方向的卷积核(锚点为中心点),其卷积核也是可以差分,相比于prewitt算子,只是其平滑卷积核由均值平滑变成了高斯平滑,差分卷积核还是一样的。

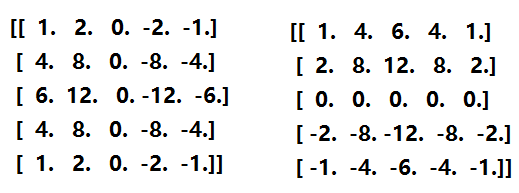
sobel卷积核除了三阶,还可以是高阶的,通过其两个分离卷积核,进行矩阵乘法可以得到,下面是两个5*5的sobel卷积核:
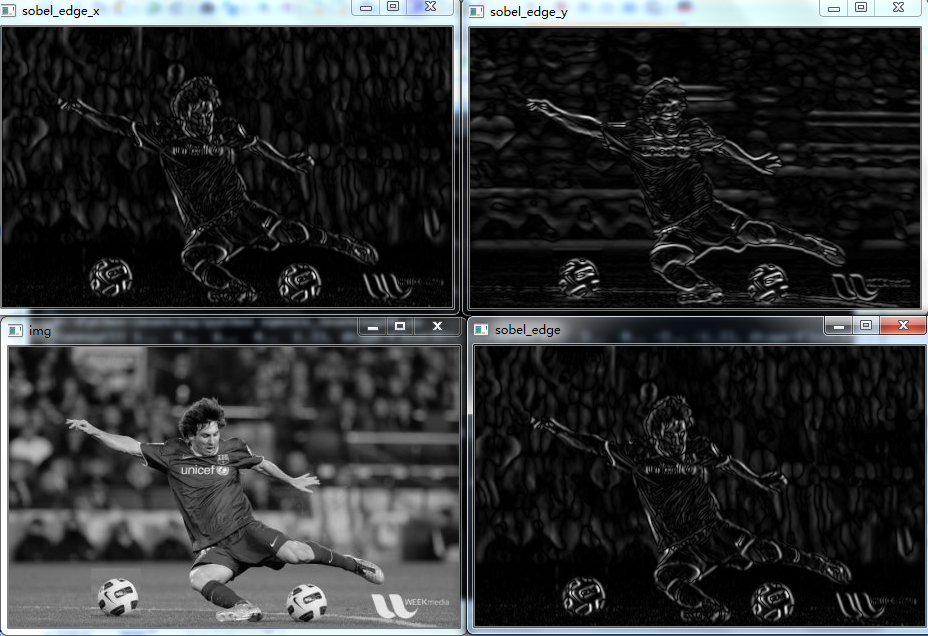
下面代码为利用convolve2d()函数实现的sobel边缘检测算法,其效果见图片所示:(单通道)
#coding:utf-8


import cv2 as cv
from scipy import signal
import numpy as np
import math

#n阶的二项展开式系数,构建一维高斯平滑矩阵
def getsmooth(n):
    smooth = np.zeros([1,n],np.float32)
    for i in range(n):
        smooth[0][i] = math.factorial(n-1)/(math.factorial(i)*math.factorial(n-i-1))
    return smooth

def getdiff(n):
    diff = np.zeros([1,n],np.float32)
    smooth = getsmooth(n-1)
    for i in range(n):
        if i==0:
            diff[0][i]=smooth[0][i]  #恒等于1
        elif i==n-1:
            diff[0][i] = -smooth[0][i-1]  #恒等于-1
        else:
            diff[0][i] = smooth[0][i] - smooth[0][i-1]
    return diff

def sobel(img,size,boundary="symm",fillvalue=0):
    smooth = getsmooth(size)
    diff = getdiff(size)
    print(smooth,diff)
    print(np.dot(smooth.transpose(),diff))
    print(np.dot(diff.transpose(),smooth))
    rows,cols = img.shape[:2]
    #水平方向的sobel算子:先进行垂直方向的高斯平滑,再进行水平方向的差分
    gaussian_y = signal.convolve2d(img,smooth.transpose(),mode="same",boundary=boundary,fillvalue=fillvalue)
    sobel_x = signal.convolve2d(gaussian_y,diff,mode="same",boundary=boundary,fillvalue=fillvalue)

    #垂直方向的sobel算子:先进行水平方向的高斯平滑,再进行垂直方向的差分
    gaussian_x = signal.convolve2d(img,smooth,mode="same",boundary=boundary,fillvalue=fillvalue)
    sobel_y = signal.convolve2d(gaussian_x,diff.transpose(),mode="same",boundary=boundary,fillvalue=fillvalue)

    return(sobel_x,sobel_y)

if __name__=="__main__":
    img = cv.imread(r"C:\Users\Administrator\Desktop\Messi.jpg",0)
    sobel_x, sobel_y= sobel(img,size=5)
    sobel_x = np.abs(sobel_x)
    sobel_edge_x = sobel_x.copy()
    sobel_edge_x = sobel_edge_x/np.max(sobel_edge_x)
    sobel_edge_x = sobel_edge_x*255  #进行归一化处理
    sobel_edge_x = sobel_edge_x.astype(np.uint8)

    sobel_y = np.abs(sobel_y)
    sobel_edge_y = sobel_y.copy()
    sobel_edge_y = sobel_edge_y/np.max(sobel_edge_y)
    sobel_edge_y = sobel_edge_y*255
    sobel_edge_y = sobel_edge_y.astype(np.uint8)

    sobel_edge =np.sqrt(np.power(sobel_x,2.0),np.power(sobel_y,2.0))
    sobel_edge = sobel_edge/np.max(sobel_edge)
    sobel_edge = sobel_edge*255
    sobel_edge = sobel_edge.astype(np.uint8)
    cv.imshow("img",img)
    cv.imshow("sobel_edge_x",sobel_edge_x)
    cv.imshow("sobel_edge_y ",sobel_edge_y )
    cv.imshow("sobel_edge",sobel_edge)
    cv.waitKey(0)
    cv.destroyAllWindows()
Opencvt提供Sobel()函数进行sobel边缘检测 ,其对应参数如下:
dst = cv2.Sobel(src,ddepth,dx,dy,ksize,scale,delta,borderType)
        src: 输入图像对象矩阵,单通道或多通道
        ddepth:输出图片的数据深度,注意此处最好设置为cv.CV_32F或cv.CV_64F
        dx:dx不为0时,img与差分方向为水平方向的Sobel卷积核卷积
        dy: dx=0,dy!=0时,img与差分方向为垂直方向的Sobel卷积核卷积
        dx=1,dy=0: 与差分方向为水平方向的Sobel卷积核卷积
             dx=0,dy=1: 与差分方向为垂直方向的Sobel卷积核卷积
             dx=1,dy=1: 分别与垂直和水分方向Sobel卷积核卷积
        ksize: sobel核的尺寸,值为1,3,5,7;ksize为1时表示没有平滑算子,只有差分算子
        scale: 放大比例系数
        delta: 平移系数
        borderType:边界填充类型
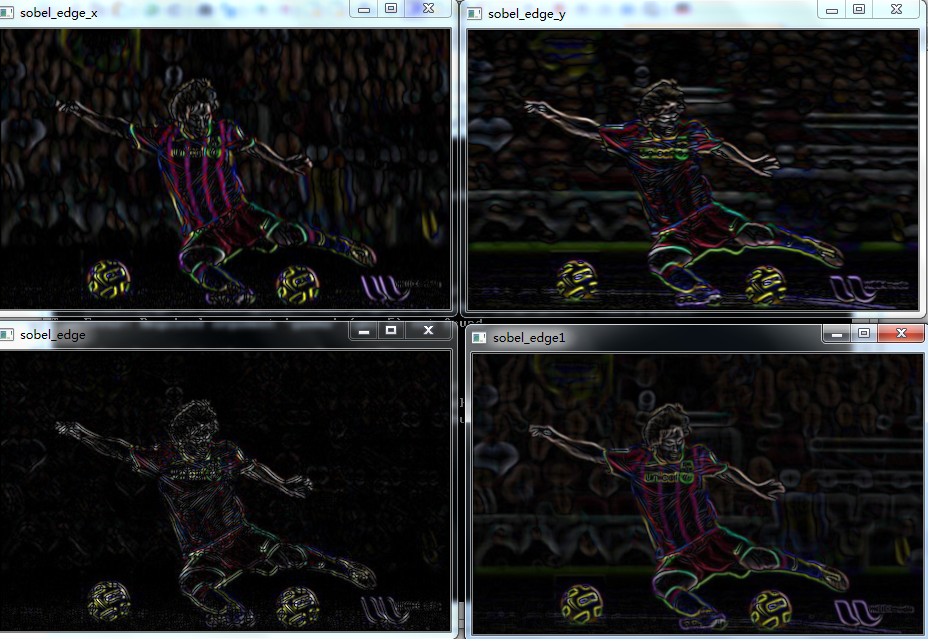
下面为使用代码及其对应效果:
(注意:x方向的差分算子对应的边缘为垂直方向; y方向的差分算子对应的边缘为水平方向)
#coding:utf-8

import cv2 as cv
import numpy as np

img = cv.imread(r"C:\Users\silence_cho\Desktop\Messi.jpg")

#注意此处的ddepth不要设为-1,要设为cv.CV_32F或cv.CV_64F,否则会丢失太多信息
sobel_edge_x = cv.Sobel(img,ddepth=cv.CV_32F,dx=1,dy=0,ksize=5)
sobel_edge_x = np.abs(sobel_edge_x)
sobel_edge_x = sobel_edge_x/np.max(sobel_edge_x)
sobel_edge_x = sobel_edge_x*255  #进行归一化处理
sobel_edge_x = sobel_edge_x.astype(np.uint8)

sobel_edge_y = cv.Sobel(img,ddepth=cv.CV_32F,dx=0,dy=1,ksize=5)
sobel_edge_y = np.abs(sobel_edge_y)
sobel_edge_y = sobel_edge_y/np.max(sobel_edge_y)
sobel_edge_y = sobel_edge_y*255
sobel_edge_y = sobel_edge_y.astype(np.uint8)

sobel_edge1 = cv.addWeighted(sobel_edge_x,0.5,sobel_edge_y,0.5,0)

sobel_edge = cv.Sobel(img,ddepth=cv.CV_32F,dx=1,dy=1,ksize=5)
sobel_edge = np.abs(sobel_edge)
sobel_edge = sobel_edge/np.max(sobel_edge)
sobel_edge = sobel_edge*255
sobel_edge = sobel_edge.astype(np.uint8)


cv.imshow("img",img)
cv.imshow("sobel_edge_x",sobel_edge_x)
cv.imshow("sobel_edge_y ",sobel_edge_y )
cv.imshow("sobel_edge",sobel_edge)
cv.imshow("sobel_edge1",sobel_edge1)
cv.waitKey(0)
cv.destroyAllWindows()
3. Scharr算子
scharr算子和3阶的Sobel边缘检测算子类似,其对应两个卷积核如下:
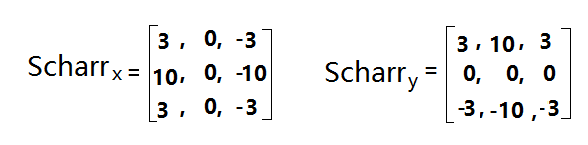
opencv提供了cv2.Scharr()函数进行Scharrr边缘检测,其对应参数如下:(注意没有szie参数)
  dst= cv2.Scharr(src,ddepth,dx,dy,scale,delta,borderType)
        src: 输入图像对象矩阵,单通道或多通道
        ddepth:输出图片的数据深度,注意此处最好设置为cv.CV_32F或cv.CV_64F
        dx:dx不为0时,img与差分方向为水平方向的Sobel卷积核卷积
        dy: dx=0,dy!=0时,img与差分方向为垂直方向的Sobel卷积核卷积

            dx=1,dy=0: 与差分方向为水平方向的Sobel卷积核卷积
            dx=0,dy=1: 与差分方向为垂直方向的Sobel卷积核卷积
       (注意必须满足: dx >= 0 && dy >= 0 && dx+dy == 1)

        scale: 放大比例系数
        delta: 平移系数
        borderType:边界填充类型
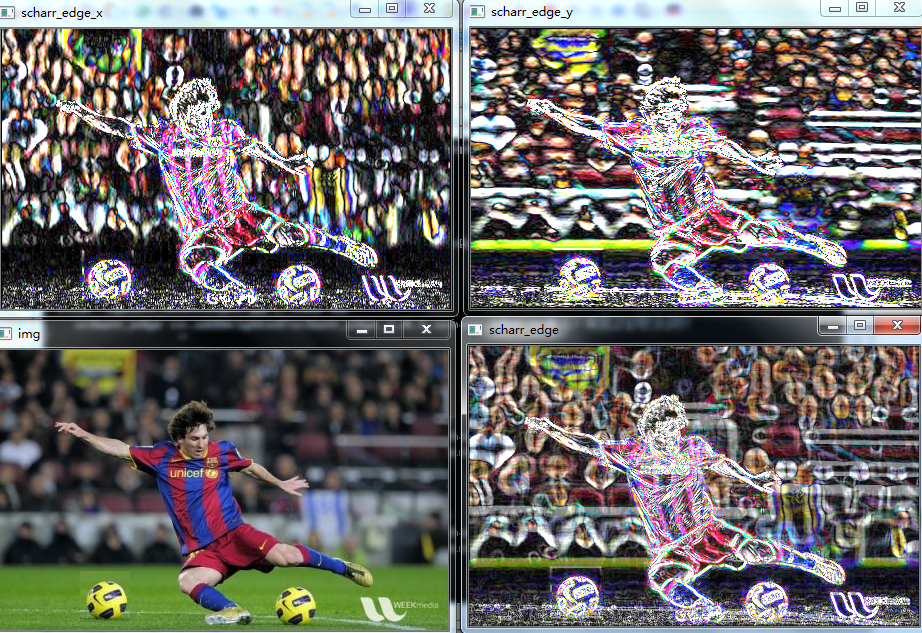
下面为使用代码及其对应效果:
#coding:utf-8


import cv2 as cv
import numpy as np

img = cv.imread(r"C:\Users\Administrator\Desktop\Messi.jpg")
#注意此处的ddepth不要设为-1,要设为cv.CV_32F或cv.CV_64F,否则会丢失太多信息
scharr_edge_x = cv.Scharr(img,ddepth=cv.CV_32F,dx=1,dy=0)
scharr_edge_x = cv.convertScaleAbs(scharr_edge_x)
#convertScaleAbs等同于下面几句:
# scharr_edge_x = np.abs(scharr_edge_x)
# scharr_edge_x = scharr_edge_x/np.max(scharr_edge_x)
# scharr_edge_x = scharr_edge_x*255  #进行归一化处理
# scharr_edge_x = scharr_edge_x.astype(np.uint8)

scharr_edge_y = cv.Scharr(img,ddepth=cv.CV_32F,dx=0,dy=1)
scharr_edge_y = cv.convertScaleAbs(scharr_edge_y)

scharr_edge=cv.addWeighted(scharr_edge_x,0.5,scharr_edge_y,0.5,0) #两者等权叠加

cv.imshow("img",img)
cv.imshow("scharr_edge_x",scharr_edge_x)
cv.imshow("scharr_edge_y ",scharr_edge_y )
cv.imshow("scharr_edge",scharr_edge)
cv.waitKey(0)
cv.destroyAllWindows()
4. canny边缘检测算法
Sobel,Scharr算子等边缘检测算法,只是对检测到的边缘进行了超阈值处理(超过255的像素点截断等), Canny边缘算法,是在sobel算法的基础上,对边缘像素进行更细致的后处理,过滤掉部分非边缘点,从而使得到便边缘更加细致准确。
Canny边缘检测可以细分为三步:
-
采用Sobel卷积核进行卷积运算
-
基于边缘梯度方向的非极大值抑制
-
(1) Sobel卷积核进行卷积运算
分别采用水平方向和垂直方向的sobel算子,卷积计算出水平方向梯度 和竖直方向梯度
,然后我们可以计算图像中每个像素的梯度大小为
,梯度方向为
,梯度方向通常垂直于边缘方向。
(2) 基于边缘梯度方向的非极大值抑制
在得到每个像素的梯度大小和方向后,我们遍历每个像素,判断该像素的梯度大小在该像素梯度方向上是否是其邻域中的局部最大值。如下图所示:

在上图中,假设一张5*5的image,左边为sobel算子计算的梯度大小,右边为计算的梯度方向,位于(1, 1)像素位置处的梯度大小为912, 梯度方向为120。上图左边画出了坐标轴和梯度方向,可以发现,沿着梯度方向的梯度值为(0,2)处的292和(2,0)处的276,由于912大于这两个梯度值,所以912为极大值。 按照这样的规则遍历每一个像素点,对于非极大值的像素点,需要将其梯度大小置为0
(3) 双阈值的滞后阈值处理
这一步我们设置两个阈值 和
-
梯度大小大于
的像素点被归为“确定边缘”像素,被保留;
-
梯度大小小于
的像素点被认为一定不属于边缘,被丢弃。
-
梯度大小介于
和
之间的像素点,如果它们连接到“确定边缘”像素,则它们被视为边缘的一部分。否则,它们也会被丢弃。
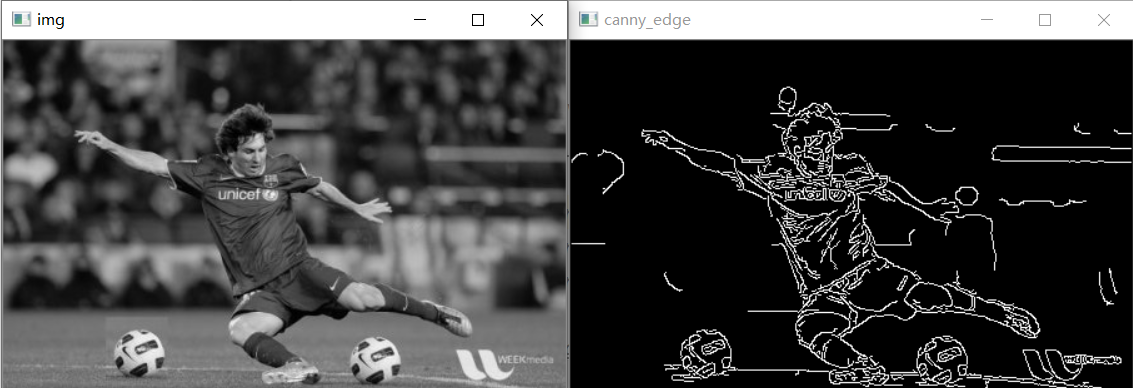
采用python, 自己实现Canny算法代码如下:
#coding:utf-8

import cv2
import numpy as np
import math

def no_maximum_suppression_default(dx, dy):
    edge = np.sqrt(np.power(dx, 2) + np.power(dy, 2))  # 梯度大小
    rows, cols = dx.shape
    gradientDirection = np.zeros(dx.shape)
    edge_nonMaxSup = np.zeros(dx.shape)
    # 最外层一圈为填充0,不进行处理
    for r in range(1, rows-1):
        for c in range(1, cols-1):
            angle = math.atan2(dy[r][c], dx[r][c])*180/math.pi  # 梯度方向
            gradientDirection[r][c] = angle
            # 左右方向
            if abs(angle) < 22.5 or abs(angle) > 157.5:
                if edge[r][c] > edge[r][c-1] and edge[r][c] > edge[r][c+1]:
                    edge_nonMaxSup[r][c] = edge[r][c]
            # 左上角,右下角方向
            if 22.5 <= angle < 67.5 or -157.5 <= angle < -112.5:
                if edge[r][c] > edge[r-1][c-1] and edge[r][c] > edge[r+1][c+1]:
                    edge_nonMaxSup[r][c] = edge[r][c]
            # 上下方向
            if 67.5 <= abs(angle) <= 112.5:
                if edge[r][c] > edge[r-1][c] and edge[r][c] > edge[r+1][c]:
                    edge_nonMaxSup[r][c] = edge[r][c]
            # 左下角,右上角方向
            if 112.5 < angle <= 157.5 or -67.5 < angle <= -22.5:
                if edge[r][c] > edge[r-1][c+1] and edge[r][c] > edge[r+1][c-1]:
                    edge_nonMaxSup[r][c] = edge[r][c]
    return edge_nonMaxSup


def checkInRange(r, c, rows, cols):
    if 0 <= r < rows and 0 <= c < cols:
        return True
    else:
        return False


def trace(edge_nonMaxSup, edge, lowerThresh, r, c, rows, cols):
    if edge[r][c] == 0:
        edge[r][c] = 255
        for i in range(-1, 2):
            for j in range(-1, 2):
                if checkInRange(r+i, c+j, rows, cols) and edge_nonMaxSup[r+i][c+j] >= lowerThresh:
                    trace(edge_nonMaxSup, edge, lowerThresh, r+i, c+j, rows, cols)

def hysteresisThreshold(edge_nonMaxSup, lowerThresh, upperThresh):
    rows, cols = edge_nonMaxSup.shape
    edge = np.zeros(edge_nonMaxSup.shape, np.uint8)
    for r in range(1, rows-1):
        for c in range(1, cols-1):
            # 大于高阈值的点确定为边缘点,并以该点为起点进行深度优先搜索
            if edge_nonMaxSup[r][c] >= upperThresh:
                trace(edge_nonMaxSup, edge, lowerThresh, r, c, rows, cols)
            # 小于低阈值的点剔除掉
            if edge_nonMaxSup[r][c] < lowerThresh:
                edge[r][c] = 0
    return edge

if __name__ == "__main__":
    img_path = r"C:\Users\silence_cho\Desktop\Messi.jpg"
    img = cv2.imread(img_path, 0)

    sobel_edge_x = cv2.Sobel(img, ddepth=cv2.CV_32F, dx=1, dy=0, ksize=3)
    sobel_edge_y = cv2.Sobel(img, ddepth=cv2.CV_32F, dx=0, dy=1, ksize=3)

    # 梯度方向非极大值抑制
    edge_nonMaxSup = no_maximum_suppression_default(sobel_edge_x, sobel_edge_y)
    edge_nonMaxSup[edge_nonMaxSup>255] = 255

    # 双阈值后阈值处理
    edge_nonMaxSup = edge_nonMaxSup.astype(np.uint8)
    canny_edge = hysteresisThreshold(edge_nonMaxSup, 60, 180)

    cv2.imshow("img", img)
    cv2.imshow("canny_edge", canny_edge)
    cv2.waitKey(0)
    cv2.destroyAllWindows()


    # sobel算子边缘提取
    # img_path = r"C:\Users\silence_cho\Desktop\Messi.jpg"
    # img = cv2.imread(img_path, 0)
    # sobel_edge_x = cv2.Sobel(img, ddepth=cv2.CV_32F, dx=1, dy=0, ksize=3)
    # sobel_edge_y = cv2.Sobel(img, ddepth=cv2.CV_32F, dx=0, dy=1, ksize=3)
    # sobel_edge = np.sqrt(np.power(sobel_edge_x, 2) + np.power(sobel_edge_y, 2))
    # sobel_edge[sobel_edge > 255] = 255
    # sobel_edge = sobel_edge.astype(np.uint8)
    # cv2.imshow("sobel_edge", sobel_edge)
    # cv2.waitKey(0)
    # cv2.destroyAllWindows()
对应效果如下:
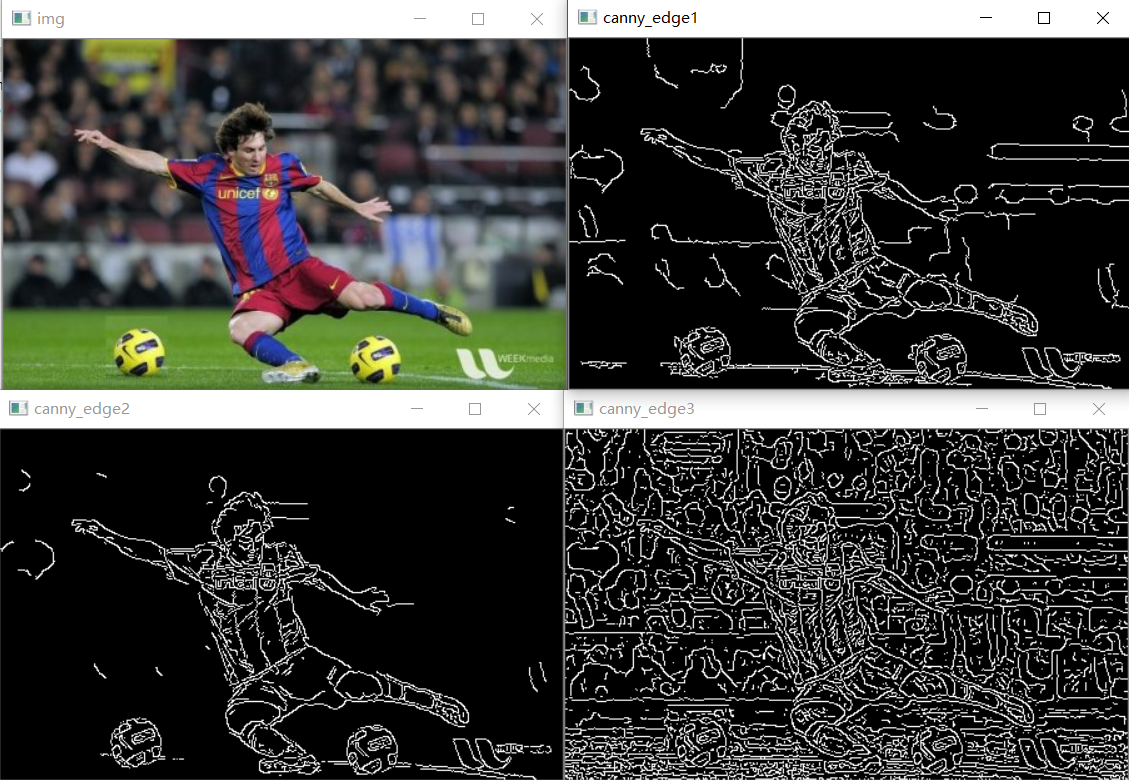
opencv中提供Canny()函数进行Canny边缘检测 ,其对应参数如下:
edges=cv.Canny(image, threshold1, threshold2, apertureSize=3, L2gradient=False)
    image:输入图像对象矩阵,单通道或多通道
    threshold1: 代表双阈值中的低阈值
    threshold2: 代表双阈值中的高阈值
    apertureSize: spbel核的窗口大小,默认为3*3
    L2gradient: 代表计算边缘梯度大小时使用的方式,True代表使用平方和开方的方式,False代表采用绝对值和的方式,默认为False

下面为使用代码及其对应效果:
#coding:utf-8

import cv2

img_path= r"C:\Users\silence_cho\Desktop\Messi.jpg"
img = cv2.imread(img_path)

canny_edge1 = cv2.Canny(img, threshold1=60, threshold2=180)
canny_edge2 = cv2.Canny(img, threshold1=180, threshold2=230)
canny_edge3 = cv2.Canny(img, threshold1=180, threshold2=230, apertureSize=5, L2gradient=True)

cv2.imshow("img", img)
cv2.imshow("canny_edge1", canny_edge1)
cv2.imshow("canny_edge2", canny_edge2)
cv2.imshow("canny_edge3", canny_edge3)
cv2.waitKey(0)
cv2.destroyAllWindows()

 浙公网安备 33010602011771号