


原文:http://www.codeproject.com/useritems/LineCounterAddin.asp
注意:1.本文中的提到的“外接程序”等同与“插件程序”
2.本文提供的源码是在原作的基础上有过修改。
源码:https://files.cnblogs.com/sifang2004/LineCounterAddin.rar
代码行数统计插件
--Visual Studio 2005插件开发
前段日子也写篇关于开发Visual Studio 2005插件的文章,《用Visual Studio 2005 开发VB.NET-C#语言转换插件》,对这个也产生了点兴趣,后又在codeproject上看到了这篇文章,开发一个可以统计整个项目代码行数的插件,觉得还是挺不错的,准备介绍给E文不是很好的朋友,当然没有必要对文章进行整体翻译,只要达到我们学习的目的就行了,而且代码也是经过我做了些修改(我现在还有点纳闷,为什么他的源码编译后可以正常运行,我是修改了几个小时才能让它正确运行的,特别是在中文环境中,需要修改的地方更多),如果你觉得本文让你受益,那就向原著致以谢意吧!
背景
其实这种统计工程中各个文件及其整体的代码行数的插件在WndTabs.com已经出现很久了,只是直到现在它还没有出现支持VS2005的插件,那插件的运行效果显示如下:

这插件的用处不用我说了,也许你说你用不上,但有的却是喜欢至极了。
下面就是本文要完成的插件,运行后的效果图:
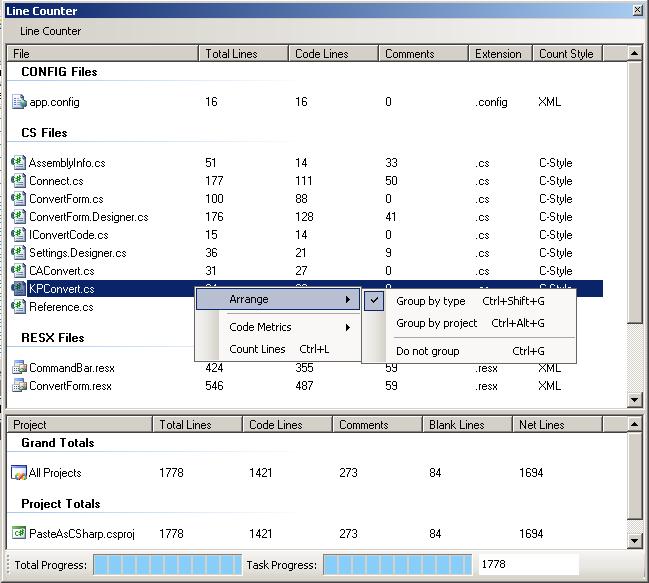
是不是觉得更加漂亮点呢,至于功能,基本上差不多,如果你还需要更多的功能,完全可以自己去扩展,没有看本文之前,也许还一头雾水,但看完本文,你就有点蠢蠢欲动了。
Visual Studio自动化和扩展
Visual Studio最大的特性之一就是其扩展性,对此我们中很多人应该都有所了解。Visual Studio 提供了三种不同级别的扩展:宏、外接程序和向导(就是我们本文中到的插件程序)以及 Visual Studio行业合作伙伴 (VSIP) 计划。
若要创建自动化应用程序(如外接程序),则必须执行一些步骤获取对自动化成员的访问权。首先必须引用必需的自动化程序集,然后必须获取对顶级对象 DTE2 的引用。
在 Visual Studio .NET 2002 和 Visual Studio .NET 2003 中,所有的核心自动化项均位于名为 EnvDTE 的程序集中,并且其最高分层对象为 DTE 对象。该对象是所有核心自动化对象、集合及其成员的父对象。DTE2 是从 DTE 派生的。
对于 Visual Studio 2005,只对这些核心自动化对象、集合及成员的一部分进行添加和更新。所有新的更新功能都位于名为 EnvDTE80 的程序集中(EnvDTE 8.0 版),而不会更新现有的程序集和危及现有外接程序和自动化项目的向后兼容性。EnvDTE80 中大多数更新的函数保留与早期版本相同的名称,但是在函数名后加上数字 2。例如,在新版本中,TaskItems 集合名为 TaskItems2,Solution 对象名为 Solution2。由于新成员比早期版本的功能更强健,并且包含最新功能,因此推荐在编写新的自动化应用程序时使用新对象和新集合。
虽然新项位于 EnvDTE80 中,但是大多数核心自动化功能仍然位于 EnvDTE 中。因此,在编写新的自动化应用程序(如外接程序)时,一定要引用 EnvDTE 和 EnvDTE80 两者。另外,如果使用 EnvDTE 程序集中的成员,也必须设置对 DTE 对象和 DTE2 对象的引用。这使您可以访问所有的项。
外接程序是一些可以为您节省时间和精力的应用程序,可附加到 Visual Studio 集成开发环境 (IDE) 中使用。外接程序是 COM 对象,它们实现 IDTExtensibility2 接口,并通过 EnvDTE 和 EnvDTE80 程序集中包含的核心自动化对象模型与 IDE 通信。工具栏模型包含在 Microsoft.VisualStudio.CommandBars 中。
使用到的主要对象就是DTE对象,利用它我们能编程控制在Visual Studio中的任何东西,从工具栏,装卸工具窗口,甚至编辑文件和初始化编译。
创建一个插件工程
Visual Studio 2005插件能使用任何编程语言写,当你在运行Add-In向导(也就是插件工程向导)时,你可以选择使用何种语言编写,向导还会向你显示其它的选项,具体每个选项的含义与作用,请参考MSDN,我只列举如下(外接程序就是本文所说的插件):
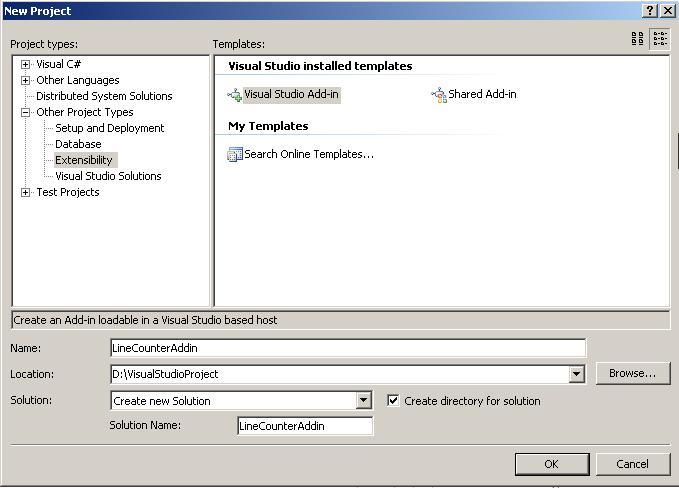
1. 创建一个新的 Visual Studio 外接程序项目。这会启动“外接程序向导”。
该项目类型位于“其他项目类型”下的“扩展性”文件夹中。
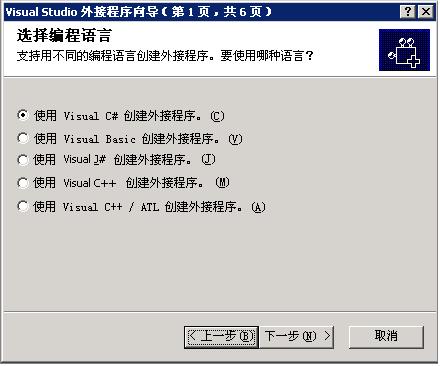
2. 在“选择编程语言”页选择一种语言。
这使您可以选择将用来编写外接程序的编程语言。
3. 在“选择应用程序宿主”页选择一个或多个应用程序,如 Visual Studio。
这使您可以选择需要的应用程序以便创建外接程序后可在其中运行该外接程序,如 Visual Studio 或 Visual Studio“宏 IDE”。
4. 在“输入名称和说明”页中输入外接程序的名称和说明。
创建外接程序后,此名称和说明显示在“外接程序管理器”对话框的“可用外接程序”列表中,它告诉用户外接程序的用途和工作方式等。
5. 在“选择外接程序选项”页可以指定:
² 是否希望外接程序显示在“工具”菜单中。
² 希望启动外接程序的时间。
² 外接程序是否不使用模型用户界面 (UI),以便可以和命令行生成一起安全地使用。
此页使您可以指定外接程序的某些行为选项。
6. 在“选择‘帮助’中的‘关于’信息”页指定是否要将外接程序的信息显示在 Visual Studio“帮助”中的“关于”窗口中,如果是这样,就会显示所需信息。
可以添加到 Visual Studio“帮助”中的“关于”窗口的信息包括版本号、支持详细信息和授权数据等。
完成步骤 1 - 6 后,选定的选项会显示在“摘要”页中。
7. 选择“完成”创建外接程序。
现在,您已经拥有了一个功能齐全的基本外接程序。若要使外接程序能够执行一些有用的操作,则必须添加相应代码。
根据“Add-In Wizard”创建一个外接程序,它具有全面的功能,但是只有基本框架,创建完该程序后可立即运行它。向导会自动生成一个Connect.cs文件,这个文件就是任何Visual Studio插件的起动点,它实现了一些关键接口,例如IDTExtensibility2, IDTCommandTarget,在几个关键方法中提供一些启动代码,最重要的一个方法就是OnConnection(object application, ext_ConnectMode connectMode, object addInInst, ref Array custom)。当启动一个插件时,第一个调用的方法就是它,你可以在其中增加一些初始化代码,以及一些技术性的处理代码,只要这些是工作在Visual Studio自动模型所公开的范围之内。通常,该方法被插件向导生成的代码填充,它实现你当时所做出的选择(例如,增加一个工具菜单项)。
在Onconnection方法中许多代码都有很好注释说明,我们就不详细解释了,首先我们要注意的这三行代码:
_applicationObject = (DTE2)application;
_addInInstance = (AddIn)addInInst;
if (connectMode == ext_ConnectMode.ext_cm_AfterStartup || connectMode == ext_ConnectMode.ext_cm_Startup)
第一行就是缓存一个DTE对象,这是在Visual Studio启动插件时由它提供的,第二行就是缓存插件自己的一个实例,在你的编写的插件代码中你将会经常调用它,第三行是一个if语句,当插件启动后,涉及到的条件的处理,Visual Studio通常会两次启动插件,一次就是设置自己的UI,如菜单项,菜单栏按钮等等;另外,当插件真正运行后,插件被再次启动,这可以发生在两种不同情况下(第一是当VS启动后自动运行,或者是在VS启动后通过其它进程来运行)。If语句中两个条件含义你可以参照下表:
|
成员名称 |
说明 |
|
ext_cm_AfterStartup |
外接程序是在 Visual Studio 启动后加载的。 |
|
ext_cm_CommandLine |
外接程序是从命令行加载的。 |
|
ext_cm_External |
外接程序是由外部客户端加载的。(Visual Studio 不再使用此设置。) |
|
ext_cm_Solution |
外接程序是在解决方案中加载的。 |
|
ext_cm_Startup |
外接程序是在 Visual Studio 启动时加载的。 |
|
ext_cm_UISetup |
外接程序是为用户界面设置而加载的。 |
枚举ext_ConnectMode的成员
OnConnection方法中的其它代码都有注释,根据你当初在向导中做出的选择,代码会有所不同,对于该Line Counter插件来说,我们去掉了所有的自动生成的代码,完全用自己写的代码代替了,如果你希望跟着本文听我解释如果创建一个工具栏插件,那么按如下设置创建一个新的工程:
工程名称:LineCounterAddin
语言:c#
插件名称:Line Counter
插件描述:Line Counter 2005 - Source Code Line Counter
其它选项:默认
工程创建后,添加如下引用:
System.Drawing
System.Windows.Forms
最后,添加一个用户控件LineCounterBrowser,该用户控件是本插件的主要的交换接口,它就像普通的Widows Form那样工作,当然这不是本文讨论的重点,你可以下载源码,从源码中查看该用户控件的详细细节,现在,我们向新的用户控件中加入下面的代码:
private DTE
public DTE2 DTE
{
set
{
m_dte = value;
}
}
暂时在用户控件代码中我们不需要任何其它东西,这个属性以及相应的变量为我们提供了一种从Connect类向我们的UI类传递DTE对象引用的方法。我们在Connect类的OnConnection方法中设定该属性,OnConnection方法中的全部代码就如下面的,已经注释的非常清楚,在这我就不做深入解释了。
public void OnConnection(object application, ext_ConnectMode connectMode, object addInInst, ref Array custom)
{
// Cache the DTE and add-in instance objects
_applicationObject = (DTE2)application;
_addInInstance = (AddIn)addInInst;
// Only execute the startup code if the connection mode is a startup mode
if (connectMode == ext_ConnectMode.ext_cm_AfterStartup || connectMode == ext_ConnectMode.ext_cm_Startup)
{
try
{
// Declare variables
string ctrlProgID, guidStr;
EnvDTE80.Windows2 toolWins;
object objTemp = null;
// The Control ProgID for the user control
ctrlProgID = "LineCounterAddin.LineCounterBrowser";
// This guid must be unique for each different tool window,
// but you may use the same guid for the same tool window.
// This guid can be used for indexing the windows collection,
// for example: applicationObject.Windows.Item(guidstr)
guidStr = "{
// Get the executing assembly...
System.Reflection.Assembly asm = System.Reflection.Assembly.GetExecutingAssembly();
// Get Visual Studio's global collection of tool windows...
toolWins = (Windows2)_applicationObject.Windows;
// Create a new tool window, embedding the LineCounterBrowser control inside it...
m_toolWin = toolWins.CreateToolWindow2(_addInInstance, asm.Location, ctrlProgID, "Line Counter", guidStr, ref objTemp);
// Pass the DTE object to the user control...
LineCounterBrowser browser = (LineCounterBrowser)objTemp;
browser.DTE = _applicationObject;
// and set the tool windows default size...
m_toolWin.Visible = true; // MUST make tool window visible before using any methods or properties,
// otherwise exceptions will occurr.
//toolWin.Height = 400;
//toolWin.Width = 600;
}
catch (Exception ex)
{
Debug.WriteLine(ex.Message);
Debug.WriteLine(ex.StackTrace);
}
}
// Create the menu item and toolbar for starting the line counter
if (connectMode == ext_ConnectMode.ext_cm_UISetup)
{
try
{
// Get the command bars collection, and find the MenuBar command bar
CommandBars cmdBars = ((Microsoft.VisualStudio.CommandBars.CommandBars)_applicationObject.CommandBars);
CommandBar menuBar = cmdBars["MenuBar"];
// Add command to 'Tools' menu
CommandBarPopup toolsPopup = (CommandBarPopup)menuBar.Controls["Tools"];
AddPopupCommand(toolsPopup, "LineCounterAddin", "Line Counter 2005", "Display the Line Counter 2005 window.", 1);
// Add new command bar with button
CommandBar buttonBar = AddCommandBar("LineCounterAddinToolbar", MsoBarPosition.msoBarFloating);
AddToolbarCommand(buttonBar, "LineCounterAddinButton", "Line Counter 2005", "Display the Line Counter 2005 window.", 1);
}
catch (Exception ex)
{
string error = ex.Message;
}
}
}
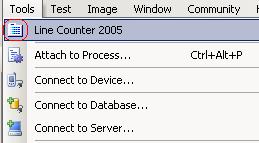
在Visual Studio的执行期间的不同点,OnConnection方法会运行几次,我们关注的是方法被调用的可能原因中的两个,其一是UI Setpup,另外就是Startup,当因为UI Setpup OnConnection方法被调用时,为了这个插件,我们想用一个菜单项以及菜单栏按钮更新Visual Studio的用户接口,我们是在OnConnection方法中的第二个if语句中完成的。当OnConnection方法因为Startup(有两种不同的方法-当VS启动时,VS启动后)调用时我们显示我们的插件。
当执行UI Setup时,我们已经创建了几个private辅助方法来简化处理,下面,你能发现不少方法能帮助你在Visual Studio中建立新的CommandBar,还可以向这些CommandBar中添加命令。这些方法还包含向菜单中添加菜单项,这些方法也都注释得非常清楚了。关于这些方法,要注意的一件事情就是他们认为你的插件项目中有一个包含你所有你希望为你命令使用的图片(包括菜单项以及你工具条上的按钮。等下我就解释如何添加自定义的图标。
/// <summary>
/// Add a command bar to the VS2005 interface.
/// </summary>
/// <param name="name">The name of the command bar</param>
/// <param name="position">Initial command bar positioning</param>
/// <returns></returns>
private CommandBar AddCommandBar(string name, MsoBarPosition position)
{
// Get the command bars collection
CommandBars cmdBars = ((Microsoft.VisualStudio.CommandBars.CommandBars)_applicationObject.CommandBars);
CommandBar bar = null;
try
{
try
{
// Create the new CommandBar
bar = cmdBars.Add(name, position, false, false);
}
catch (ArgumentException)
{
// Try to find an existing CommandBar
bar = cmdBars[name];
}
}
catch
{
}
return bar;
}
/// <summary>
/// Add a menu to the VS2005 interface.
/// </summary>
/// <param name="name">The name of the menu</param>
/// <returns></returns>
private CommandBar AddCommandMenu(string name)
{
// Get the command bars collection
CommandBars cmdBars = ((Microsoft.VisualStudio.CommandBars.CommandBars)_applicationObject.CommandBars);
CommandBar menu = null;
try
{
try
{
// Create the new CommandBar
menu = cmdBars.Add(name, MsoBarPosition.msoBarPopup, false, false);
}
catch (ArgumentException)
{
// Try to find an existing CommandBar
menu = cmdBars[name];
}
}
catch
{
}
return menu;
}
/// <summary>
/// Add a command to a popup menu in VS2005.
/// </summary>
/// <param name="popup">The popup menu to add the command to.</param>
/// <param name="name">The name of the new command.</param>
/// <param name="label">The text label of the command.</param>
/// <param name="ttip">The tooltip for the command.</param>
/// <param name="iconIdx">The icon index, which should match the resource ID in the add-ins resource assembly.</param>
private void AddPopupCommand(CommandBarPopup popup, string name, string label, string ttip, int iconIdx)
{
// Do not try to add commands to a null menu
if (popup == null)
return;
// Get commands collection
Commands2 commands = (Commands2)_applicationObject.Commands;
object[] contextGUIDS = new object[] { };
try
{
// Add command
Command command = commands.AddNamedCommand2(_addInInstance, name, label, ttip, false, iconIdx, ref contextGUIDS, (int)vsCommandStatus.vsCommandStatusSupported + (int)vsCommandStatus.vsCommandStatusEnabled, (int)vsCommandStyle.vsCommandStylePictAndText, vsCommandControlType.vsCommandControlTypeButton);
if ((command != null) && (popup != null))
{
command.AddControl(popup.CommandBar, 1);
}
}
catch (ArgumentException)
{
// Command already exists, so ignore
}
}
/// <summary>
/// Add a command to a toolbar in VS2005.
/// </summary>
/// <param name="bar">The bar to add the command to.</param>
/// <param name="name">The name of the new command.</param>
/// <param name="label">The text label of the command.</param>
/// <param name="ttip">The tooltip for the command.</param>
/// <param name="iconIdx">The icon index, which should match the resource ID in the add-ins resource assembly.</param>
private void AddToolbarCommand(CommandBar bar, string name, string label, string ttip, int iconIdx)
{
// Do not try to add commands to a null bar
if (bar == null)
return;
// Get commands collection
Commands2 commands = (Commands2)_applicationObject.Commands;
object[] contextGUIDS = new object[] { };
try
{
// Add command
Command command = commands.AddNamedCommand2(_addInInstance, name, label, ttip, false, iconIdx, ref contextGUIDS, (int)vsCommandStatus.vsCommandStatusSupported + (int)vsCommandStatus.vsCommandStatusEnabled, (int)vsCommandStyle.vsCommandStylePict, vsCommandControlType.vsCommandControlTypeButton);
if (command != null && bar != null)
{
command.AddControl(bar, 1);
}
}
catch (ArgumentException)
{
// Command already exists, so ignore
}
}
现在我们有了必要的代码,让插件正确地集成到Visual Studio用户接口中去的代码,并当得到请求时显示插件,我们需要增加命令处理,在插件中处理命令是一件相当简单的事情,这个 IDTCommandTarget接口,我们的Connect 类实现了它,提供了一些必要的方法从Visual Studio中正确地处理命令。你将需要根据下面的代码更新QueryStatus和Exec 方法,下面的代码的含义是,当它的菜单项或者工具条按钮被点击后显示出Line Counter插件。
public void QueryStatus(string commandName, vsCommandStatusTextWanted neededText, ref vsCommandStatus status, ref object commandText)
{
if(neededText == vsCommandStatusTextWanted.vsCommandStatusTextWantedNone)
{
// Respond only if the command name is for our menu item or toolbar button
if (commandName == "LineCounterAddin.Connect.LineCounterAddin" || commandName == "LineCounterAddin.Connect.LineCounterAddinButton")
{
// Disable the button if the Line Counter window is already visible
if (m_toolWin.Visible)
{
// Set status to supported, but not enabled
status = (vsCommandStatus)vsCommandStatus.vsCommandStatusSupported;
}
else
{
// Set status to supported and eneabled
status = (vsCommandStatus)vsCommandStatus.vsCommandStatusSupported | vsCommandStatus.vsCommandStatusEnabled;
}
return;
}
}
}
public void Exec(string commandName, vsCommandExecOption executeOption, ref object varIn, ref object varOut, ref bool handled)
{
handled = false;
if(executeOption == vsCommandExecOption.vsCommandExecOptionDoDefault)
{
// Respond only if the command name is for our menu item or toolbar button
if (commandName == "LineCounterAddin.Connect.LineCounterAddin" || commandName == "LineCounterAddin.Connect.LineCounterAddinButton")
{
// Only display the add-in if it is not already visible
if (m_toolWin != null && m_toolWin.Visible == false)
{
m_toolWin.Visible = true;
}
handled = true;
return;
}
}
}
随着OnConnection方法的完成,你就已经建立了一个漂浮工具窗口的插件,完整的用户控件能让你计算你的解决方案中总共的代码行数,各个工程的代码行数,以及各个文件的代码行数。
为你的命令使用自定义图标
当你创建了一个提供菜单项和工具栏按钮的Visual Studio插件时,Visual Studio将用默认的Microsoft Office图标来设置命令,特殊的,就使用一个黄色的笑脸图标(该图标的索引是59),该图标就如下图所示:

通常,可用的图标是作为MSO库的一部分,你是不能随便能查找到的。为你的命令使用自定义的图标也不是特别难,但是关于任何做这些的文档都非常隐秘,不是那么容易找到。
第一步就是在插件工程中加入一个资源文件,并把它的“Build Action”属性改为“None”,我们将在post-build事件中对该文件进行我们自己的处理。


现在有了一个新的资源文件,我们需要把一个图片添加进去,这你可以根据下图来完成:

当弹出对图片命名的框时,我们简单命名为“1”,所有Visual Studio引用的图片资源都是通过它们的索引号,资源的ID应该和它的索引是相同的。本插件仅需要一个图片。一旦图片加入了,打开它,把它的尺寸该为16*16px,且它的颜色深度是16色,Visual Studio仅显示那些颜色深度4-24的。具体如何设计该图片你可以自由发挥了,当然如果你不想这么做,你可以从我的源码中下载来覆盖就行了。
当你正确地创建一个资源文件并添加了图片后,我们将要设置正确地不编译它,这种特殊的资源文件应该编译成一个卫星程序集(对于各种资源文件的解释,你可以看的令一篇文章《资源与本地化》),我们可以随着Post-build事件来完成,打开LineCounterAddin工程的属性窗口,按照下图找到Build Events标签。

d:
cd $(ProjectDir)
mkdir $(ProjectDir)$(OutDir)en-US
"$(DevEnvDir)..\..\SDK\v2.0\Bin\Resgen" $(ProjectDir)ResourceUI.resx
"$(SystemRoot)\Microsoft.NET\Framework\v2.0.50727\Al" /embed:$(ProjectDir)ResourceUI.resources/culture:en-US /out:$(ProjectDir)$(OutDir)en-US\LineCounterAddin.resources.dll
注意:你一定得更改第一行“d:”,它表示你工程所在的驱动器,这一点很重要,否则Resgen命令ResourceUI.resx文件引用的文件,同时也要注意,我们必须安装了.NET 2.0 SDK,否则Resgen命令就是不可用的,该脚本通常是以别的方式工作的,因为它是基于宏指令(macros)而不是指定的路径,当你把这段脚本放到Post-build那地方后,每次当你编译工程或者解决方案时会为你的插件编译生成一个卫星程序集,它将放在你的编译输出文件夹的一个子目录en-US下,当运行本工程时,Visual Studio将会引用卫星程序集以便找到任何命令行图片。下面就是使用使用了自定义的图标的效果:
计算行数
现在我们已经明白了如何创建一个显示新的工具窗口的插件。现在是时候去看看一些精髓代码了,插件的这一块就向编写老式的windows窗口应用,有着用户接口,事件处理以及辅助函数。对于该程序的需求是十分简单的,几个基本的设计模式将帮助我们达到这些要求。
² 主要目标:显示解决方案中每一个工程行数的计算信息。
² 显示解决方案的重要的统计计算以及每个工程的统计计算。
² 显示工程中每个单独的可计算的文件的行数计算信息。
² 正确地为不同类型的源文件计算行数,例如C++,C#,VB,XML等等。
² 允许按名称,行数,文件扩展名排序文件列表。
² 允许按文件类型,工程分组文件列表,也可用不分组。
² 在重新计算时显示处理进程。
让我们从给自己一个简洁,结构良好的用户控件的源文件开始吧。你的用户控件的源文件也应该有如下结构:
using System.Collections.Generic;
using System.ComponentModel;
using System.Drawing;
using System.Data;
using System.Text;
using System.Windows.Forms;
using System.IO;
using Microsoft.VisualStudio.CommandBars;
using Extensibility;
using EnvDTE;
using EnvDTE80;
namespace LineCounterAddin
{
public partial class LineCounterBrowser : UserControl
{
#region Nested Classes
// IComparer classes for sorting the file list
#endregion
#region Constructor
#endregion
#region Variables
private DTE
#endregion
#region Properties
/// <summary>
/// Recieves the VS DTE object
/// </summary>
public DTE2 DTE
{
set
{
m_dte = value;
}
}
#endregion
#region Handlers
// UI Event Handlers
#endregion
#region Helpers
#region Line Counting Methods
// Line counting methods for delegates
#endregion
#region Scanning and Summing Methods
// Solution scanning and general line count summing
#endregion
#endregion
}
#region Support Structures
// Delegate for pluggable line counting methods
delegate void CountLines(LineCountInfo info);
/// <summary>
/// Encapsulates line count sum details.
/// </summary>
class LineCountDetails
{
// See downloadable source for full detail
}
/// <summary>
/// Wraps a project and the line count total detail
/// for that project. Enumerates all of the files
/// within that project.
/// </summary>
class LineCountSummary
{
// See downloadable source for full detail
}
/// <summary>
/// Wraps a project source code file and the line
/// count info for that file. Also provides details
/// about the file type and what icon should be shown
/// for the file in the UI.
/// </summary>
class LineCountInfo
{
// See downloadable source for full detail
}
#endregion
}
从上面这些基本的代码中,你就应该能推断出一些窍门,我们是怎么正确计算各种不同类型的源文件的行数的,以及如何以不同的方法排序的。
现在,我们就要处理如何无缝地处理允许多种计算规则的,而不是用丑陋的if / else或者switch语句,现代语句最大的一个特点就是函数指针,在.NET中是以委托的形式提供的。很多时候,我认为在.NET中委托的价值被极度忽略了,所以,我提供一个简单但却非常优雅的例子,聪明的程序员如何让他们的生活更加简单,这个概念是简单的:建立一个扩展名和委托的行数计算函数直接的映射列表,使用.NET2.0和泛型,我们能非常有效地做到这点。在下面的地方这样更新你的源码:
#region Constructor
/// <summary>
/// Construct the line counter user interface and
/// the countable file type mappings (to icons and
/// counting algorithms).
/// </summary>
public LineCounterBrowser()
{
InitializeComponent();
m_cfgMgr = ConfigManager.Instance;
}
#endregion
这行代码是非常重要的,就是我们刚才提到的建立映射列表:
m_cfgMgr = ConfigManager.Instance;
我们可以根据这行代码顺藤摸瓜,就可以发现真正重要的是下面的方法已经其调用的几个方法,就是这些方法建立映射表:
private void Initialize()
{
if (m_init)
return;
try
{
// Extract the config file path from the default .config file
string configPath = ConfigurationManager.AppSettings["configPath"];
// If the default .config file is missing...
if (configPath == null)
{
// Get the assembly...
Assembly asm = Assembly.GetExecutingAssembly();
string exeRoot = asm.Location;
try
{
// And try explicitly loading it...
Configuration config = ConfigurationManager.OpenExeConfiguration(exeRoot);
configPath = config.AppSettings.Settings["configPath"].Value;
config = null;
// And if it is still not found...
if (configPath == null)
{
// Directly try to load the file from the same path as the .exe
string configRoot = Path.GetDirectoryName(exeRoot);
configPath = configRoot + "LineCounterAdding.config";
}
}
catch (ConfigurationErrorsException)
{
// Directly try to load the file from the same path as the .exe in all other cases
string configRoot = Path.GetDirectoryName(exeRoot);
configPath = configRoot + "LineCounterAddin.config";
}
asm = null;
}
// Replace the $(PersonalFolder) macro with the users MyDocuments path
configPath = configPath.Replace("$(PersonalFolder)", Environment.GetFolderPath(Environment.SpecialFolder.MyDocuments));
// Load the config file
if (File.Exists(configPath))
{
m_doc = new XmlDocument();
m_doc.Load(configPath);
configPath = null;
nsmgr = new XmlNamespaceManager(m_doc.NameTable);
nsmgr.AddNamespace(prefix, "http://synapticeffect.com/Config.xsd");
}
if (m_doc != null)
{
// Process the projecttypes section
XmlElement elProjectTypes = FindConfigElement("//" + prefix + ":projecttypes");
ProcessProjectTypes(elProjectTypes);
elProjectTypes = null;
// Process the filetypes section
XmlElement elFileTypes = FindConfigElement("//" + prefix + ":filetypes");
ProcessFileTypes(elFileTypes);
elFileTypes = null;
// Process the countparsers section
XmlElement elCountParsers = FindConfigElement("//" + prefix + ":countparsers");
ProcessCountParsers(elCountParsers);
elCountParsers = null;
// TODO: Process the metricsparsers section
}
m_init = true;
}
catch
{
}
finally
{
}
}
明眼人很快就明白,代码中读取了一个叫LineCounterAddin.config的配置文件,为了更容易扩展和配置,我们把与计算行数相关的映射信息都包含在这个文件中,下面就是该文件的一部分,没有包含全部内容但框架是完整的,在根元素linecounter下包含了四个子元素,projecttypes,filetypes,countparsers,metricparsers。根据内容大家都基本明白该文件的意义所在了,我仅解释下filetype元素,extension属性表明是何种类型的文件,<icon>子元素指示针对于该种文件类型图标,<for>子元素中<allow>元素指示当计算行数时我们应该使用到的方法,通过解析该文件我们就很容易建立起一种映射。
<?xml version="1.0" encoding="utf-8" ?>
<linecounter xmlns="http://synapticeffect.com/Config.xsd">
<projecttypes>
<projecttype key="{B5E9BD34-6D3E-4B5D-925E
<icon iconIndex="1" />
</projecttype>
<projecttype key="{B5E9BD33-6D3E-4B5D-925E
<icon iconIndex="2" />
</projecttype>
</projecttype>
</projecttypes>
<filetypes>
<filetype extension=".cs" desc="C# File">
<icon iconIndex="1" />
<for what="count">
<allow method="countLinesCStyle" />
</for>
<for what="metrics">
<allow method="metricsTMV" />
</for>
</filetype>
<filetype extension=".vb" desc="VB.NET File">
<icon iconIndex="2" />
<for what="count">
<allow method="countLinesVBStyle" />
</for>
<for what="metrics">
<allow method="metricsTMV" />
</for>
</filetype>
</filetypes>
<countparsers>
<countparser assembly="." classname="." methodname="CountLinesGeneric" countparserID="countLinesGeneric" />
<countparser assembly="." classname="." methodname="CountLinesCStyle" countparserID="countLinesCStyle" />
<countparser assembly="." classname="." methodname="CountLinesVBStyle" countparserID="countLinesVBStyle" />
<countparser assembly="." classname="." methodname="CountLinesXMLStyle" countparserID="countLinesXMLStyle" />
</countparsers>
<metricsparsers>
<metricsparser assembly="." classname="." methodname="GatherMetricsTMV" metricsparserID="metricsTMV"/>
</metricsparsers>
</linecounter>
读取了上述文件后,并通过解析相关子元素来建立映射列表,我们在这只看下如何建立文件类型以及相关处理方法之间的映射列表。
XmlElement elFileTypes = FindConfigElement("//" + prefix + ":filetypes");
通过该语句调用FindConifElement方法得到元素<filetypes>。
private XmlElement FindConfigElement(string path)
{
if (m_doc == null)
return null;
if (path == null)
return null;
try
{
XmlElement root = m_doc.DocumentElement;
XmlElement elem = (XmlElement)root.SelectSingleNode(path,nsmgr);
return elem;
}
catch
{
}
return null;
}
这段代码我做了修改,在原著提供的源码中是使用了SelectSingleNode的另一重载方法:
XmlElement elem = (XmlElement)root.SelectSingleNode(path);
也就是,没有名称空间的那个,这点我是比较纳闷的,因为我们要读取的LineCounterAddin.config文件中明显有名称空间啊:
<linecounter xmlns="http://synapticeffect.com/Config.xsd">
在这种情况下如果用SelectSingleNode(path)方法应该是不行的,MSDN上似乎也是这么说的,事实上我运行原著的代码在这行也是根本就没有找到相关元素的。我添加了相关代码
nsmgr = new XmlNamespaceManager(m_doc.NameTable);
nsmgr.AddNamespace(prefix, "http://synapticeffect.com/Config.xsd");
在用SelectSingleNode(path,nsmgr)方法就可以得到想要的元素了。
赶紧回到主题上吧,用如下方法,把文件扩展名和其相关处理联系起来,我这里为什么说“相关处理”而不是“计算行数的函数”呢,是因为,对应于某扩展名,我们需要的不仅仅是通过它关联其“计算行数的函数”,我们还要得到其关联的图标,以及对该种文件类型的描述。所以我们这里灵活处理,我用类一个类FileType来储存各种相关信息。
private void ProcessFileTypes(XmlElement elFileTypes)
{
if (elFileTypes != null)
{
m_fileTypes = new Dictionary<string, FileType>();
XmlNodeList nlFileTypes = elFileTypes.GetElementsByTagName("filetype");
for (int i = 0; i < nlFileTypes.Count; i++)
{
XmlElement elFileType = (XmlElement)nlFileTypes[i];
try
{
FileType ftype = new FileType(elFileType);
m_fileTypes.Add(ftype.Extension, ftype);
}
catch
{
}
}
}
}
FileType类的是一个嵌套在ConfigManager.cs文件中的公共类,相关代码请参考源码,比较简单,我不做解释了。现在我们已经建好了相关的映射了,该是编写实际的计算方法的时候了,这些方法都很简单,仅需要匹配先前声明的委托delegate void CountLines(LineCountInfo info).提供的签名就行了。下面就是我们建立的四个方法。
private void CountLinesGeneric(LineCountInfo info)
private void CountLinesCStyle(LineCountInfo info)
private void CountLinesVBStyle(LineCountInfo info)
private void CountLinesXMLStyle(LineCountInfo info)
所有这四个方法都匹配委托CountLines的签名。在默认的构造函数中我们添加了一些代码,使得这些方法被映射到恰当的扩展名。我现在以计算某一.cs文件为例,解释代码是如何根据被计算的文件类型调用相应的计算方法的。先还是重新看一下LineCounterAddin.config该配置文件的<countparsers>元素,为了插件更加灵活,我们把那四个方法也放进了该配置文件。
<countparsers>
<countparser assembly="." classname="." methodname="CountLinesGeneric" countparserID="countLinesGeneric" />
<countparser assembly="." classname="." methodname="CountLinesCStyle" countparserID="countLinesCStyle" />
<countparser assembly="." classname="." methodname="CountLinesVBStyle" countparserID="countLinesVBStyle" />
<countparser assembly="." classname="." methodname="CountLinesXMLStyle" countparserID="countLinesXMLStyle" />
</countparsers>
我们应该还记得在ConfigManagers.cs文件中,类ConfigManager在构造函数中就调用了的重要的初始化方法:
private void Initialize()
在该方法中,有这么一个语句:
ProcessCountParsers(elCountParsers);
调用的ProcessCountParser方法就是根据<countparsers>元素的内容生成CountParserDelegate委托实例并以<countparser>元素的属性countparserID的值为键值,存储在m_countParsers中:
private Dictionary<string, CountParserDelegate> m_countParsers;
下面就是方法ProcessCountParsers()的代码:
private void ProcessCountParsers(XmlElement elCountParsers)
{
m_countParsers = new Dictionary<string, CountParserDelegate>();
m_countParsers.Add("countLinesGeneric", new CountParserDelegate(CountLinesGeneric));
if (elCountParsers != null)
{
XmlNodeList nlCountParsers = elCountParsers.GetElementsByTagName("countparser");
for (int i = 0; i < nlCountParsers.Count; i++)
{
XmlElement elCountParser = (XmlElement)nlCountParsers[i];
try
{
string assembly = elCountParser.Attributes["assembly"].Value;
string className = elCountParser.Attributes["classname"].Value;
string methodName = elCountParser.Attributes["methodname"].Value;
string parserID = elCountParser.Attributes["countparserID"].Value;
CountParserDelegate countParser = null;
if (assembly == "." && className == ".")
{
countParser = (CountParserDelegate)Delegate.CreateDelegate(typeof(CountParserDelegate), this, methodName);
}
else
{
// TODO: Load third-party assembly and map delegate
}
if (countParser != null && !m_countParsers.ContainsKey(parserID))
{
m_countParsers.Add(parserID, countParser);
}
}
catch
{
}
}
}
}
其实这似乎都是先准备工作,在代码中调用排序方法就是下面两行代码:
CountParserDelegate counter = MapCountAlgorithm(info.FileType);
counter(info);
MapCountAlgorithm方法中的参数中的info就是在先前提到的类LineCountInfo的一个实例,传入的参数是info.FileType,因为我例举的是计算.cs文件,所以这info.FileType就等价于传入了字符串”.cs”。
private CountParserDelegate MapCountAlgorithm(string extension)
{
CountParserDelegate countParser = m_cfgMgr.MapCountParser("countLinesGeneric");
string method = m_cfgMgr.AllowedMethod(extension, "count", 0);
if (method != null)
{
CountParserDelegate tempParser = m_cfgMgr.MapCountParser(method);
if (tempParser != null)
countParser = tempParser;
}
return countParser;
}
在MapCountParser方法中又是主要调用了类ConfigManager中的MapCountParser方法来获取一个CountParserDelegate的实例,在此之前,我们通过调用ConfigManager中的AllowedMethod方法来得到计算“.cs”文件的行数的计算方法的名称。MapCountParser方法其实很简单,它检查在m_countParsers的键中是否包含有传人的参数,如果有,则把相应的委托实例返回。
public CountParserDelegate MapCountParser(string method)
{
if (m_countParsers.ContainsKey(method))
{
return m_countParsers[method];
}
return null;
}
就是这样,我们就可用灵活而不是用丑陋的难于管理的if / else或者switch case语句来得到我们想要的计算方法,这样便于我以后扩展新的计算方法。还有那些统计整个工程或者整个解决方案的相关代码就请大家自己去体会吧。
排序
本文中我希望提及的最后一个概念就是对文件列表排序,我经常看到.NET开发人员问如何对ListView控件中的项进行排序,答案总是比较少而且各不相同。我相信这个Line Counter插件对许多人来说是个很有用的实用工具,我也希望这儿对ListView进行排序的解释会广泛曝光。最后,这个概念的确非常简单。使用模板方法模式使得用不同方法排序不同数据的多列非常简单,首先让我们在控件中嵌套类区域中增加一个抽象类:
abstract class ListViewItemComparer : System.Collections.IComparer
{
public abstract int Compare(ListViewItem item1, ListViewItem item2);
public ListView SortingList;
public int Column;
#region IComparer Members
int System.Collections.IComparer.Compare(object x, object y)
{
if (x is ListViewItem && y is ListViewItem)
{
int diff = Compare((ListViewItem)x, (ListViewItem)y);
if (SortingList.Sorting == SortOrder.Descending)
diff *= -1;
return diff;
}
else
{
throw new ArgumentException("One or both of the arguments are not ListViewItem objects.");
}
}
}
该类作为我们的“抽象方法”的抽象之家,模板方法模式在抽象类简单地提供一个普通的,骨架方法,全部或者部分实际的算法推迟到子类中去实现,我们使用单一的类型和单一的方法,但是针对ListView中的不同列使用不同算法,这将简化了我们的排序。为了达到该目标,我们必须为要排序的列的每种类型实现更多的嵌套类(这些你可以查看源代码)。一旦我们明确的定义好的算法,我们需要实现一个针对ListView. ColumnClick事件的简单事件处理器:
private int lastSortColumn = -1; // Track the last clicked column
private void lvFileList_ColumnClick(object sender, ColumnClickEventArgs e)
{
ListViewItemComparer comparer = null;
// Create an instance of the specific comparer in the 'comparer'
// variable. Since each of the explicit comparer classes is
// derived from the abstract case class, polymorphism applies.
switch (e.Column)
{
// Line count columns
case 1:
case 2:
case 3:
comparer = new FileLinesComparer();
break;
// The file extension column
case 4:
comparer = new FileExtensionComparer();
break;
// All other columns sort by file name
default:
comparer = new FileNameComparer();
break;
}
// Set the sorting order
if (lastSortColumn == e.Column)
{
if (lvFileList.Sorting == SortOrder.Ascending)
{
lvFileList.Sorting = SortOrder.Descending;
}
else
{
lvFileList.Sorting = SortOrder.Ascending;
}
}
else
{
lvFileList.Sorting = SortOrder.Ascending;
}
lastSortColumn = e.Column;
// Send the comparer the list view and column being sorted
comparer.SortingList = lvFileList;
comparer.Column = e.Column;
// Attach the comparer to the list view and sort
lvFileList.ListViewItemSorter = comparer;
lvFileList.Sort();
}
虽然你也许被这段代码搞得不是那么明白了,当比较ListView的元素时ListViewItemComparer抽象基类的“模板方法”被List.Sort()方法调用,既然我们每个显示的比较类都是派生自ListViewItemComparer抽象类,且每个都overiides抽象的Compare(ListViewItem item1, ListViewItem item2)方法,所以比较方法的显示的实现类被使用,只要合适的显示类被创建并赋值给变量compare,那么对不同数据的多行进行排序就成为了可能。不仅仅是那,还有可能执行更加复杂的排序,例如,先对行数排序,如果有两行的行数是相同的,再可以根据名称来排序,确保有一个被正确地排序的文件列表(这也就是Line Counter插件所要做的)。
安装插件
建好插件后,测试它是简单而直接的事情,因为向导帮助我们建立了一个“For Testing”
版本的.Addin文件。这使得在出现Visual Studio的副本中摆弄插件和运行工程一样简单。任何使用你插件的用户都不会这么幸运,因为他们都也许没有源代码让他们玩弄。给你的插件创建一个安装工程就像给其它工程创建安装工程一样,但是有一些窍门保证事情简单。
我们给LineCounterAddin创建一个名为LineCounterSetup的安装工程,建好工程后,打开File System Editor件系统,除了Application Folder外,把其它文件夹都删掉,选择Application Folder,改变DefaultLocation属性为'[PersonalFolder]\Visual Studio 2005\Addins'。这将致使插件默认安装在用户的AddIns文件夹中,由于Visual Studio自动为寻找.Addin文件扫描该文件夹,这使得安装简单便利。返回到File System Editor,右键Application Folder,建立新文件夹,命名为LineCouterAddin,这就是我们为我们的插件(连同任何附加文件,例如包含我们的图片资源的卫星程序集)安装实际的.dll的地方。在LineCounterAddin下建立一个新的“en-US”文件夹。
现在我们来配置安装文件夹,我们需要添加我们想要安装的原料,在solution explorer中右键安装工程选择“Add”菜单下的“Project Output…”选项,为LineCounterAddin工程选择Primary Output。现在从LineCounterAddin工程中增加几个文件(从Add菜单中选择’File…’)。包括:
- For Installation\AddRemove.ico
- For Installation\LineCounterAddin.AddIn
- bin\en-US\LineCounterAddin.resources.dll
当你添加所有包含的文件后,你还需要从Detected Dependencies文件夹中排除几个依赖项,我们仅需要保留Microsoft .NET Framework,所有其它的在任何安装了Visual Studio 2005的系统中都是可用的,为了排除一个依赖项,选择它后,把它的Exclude改为true,(注意:你可用一次选择多项同时改变它们)
配置安装工程的最后一步是把所有文件放进正确的文件夹中,把文件放置在如下的位置:
- LineCounterAddin.AddIn -> Application Folder\
- Primary output from LineCounterAddin -> Application Folder\LineCounterAddin\
- AddRemove.ico -> Application Folder\LineCounterAddin\
- LineCounterAddin.resources.dll -> Application Folder\LineCounterAddin\en-US\
当你把所有文件都放到正确的位置后,你就能编译你的安装工程生成便于分发的LineCounterSetup.msi文件和一个Setup.exe文件,如果你想在Add/Remove程序控制面板中配置一个自定义图标,在solution explorer中右键LineCounterSetup工程,更改AddRemoveProgramsIcon属性,让它使用AddRemove.ico文件,你应该在添加任何其它文件前就做这件事情,因为当你这么做后,AddRemove.ico文件被添加进LineCounterSetup工程中。在更改解决方案中的其它工程后,我们应该手动重新编译安装工程,因为普通编译不会包含对安装工程的编译。
编译者的结论
首先,我认为这是一个很有用的插件,如果继续得到改进和增强,我想该插件会被更多开发者使用。
对于该插件源码的学习,对于我们掌握怎样正确创建插件工程是很有帮助的,而且也可从中学到不少编程技巧,例如委托和模板方法。
我在学习该插件源码的时候,发现有些菜单还是不起作用的,因为暂时时间比较紧,没有太多时间研究这个,还有我觉得安装工程有点问题,但是由于我对安装工程的经验极少,也弄不出个子丑寅卯来。希望大家一起研究下,既然是开源的,那就应该不涉及到版权问题吧!

 浙公网安备 33010602011771号